翻译: Streamlit从入门到精通 构建一个机器学习应用程序 三
Streamlit从入门到精通 系列:
- 翻译: Streamlit从入门到精通 基础控件 一
- 翻译: Streamlit从入门到精通 显示图表Graphs 地图Map 主题Themes 二

1. 构建一个机器学习应用程序
在这一部分,我将带你了解我做的一个关于贷款预测的项目。
贷款的主要利润直接来自于贷款的利息。贷款公司在进行了一系列严格的审核和验证过程后,才会授予贷款。然而,他们仍然不能保证申请人是否能够毫无困难地偿还贷款。在这个教程中,我们将构建一个预测模型(随机森林分类器)来预测申请人的贷款状态。我们的任务是准备一个网络应用,使其能够在生产环境中使用。
首先,我们从导入应用程序所需的必要库开始:
import streamlit as st
import pandas as pd
import numpy as np
import pickle
#to load a saved modelimport base64  #to open .gif files in streamlit app
在这个应用程序中,我们将使用多个小部件作为滑块:在侧边栏菜单中选择框和单选按钮,为此我们将准备一些Python函数。这个例子将是一个简单的演示,它有两个页面。在主页上,它将显示我们选择的数据,而“探索”页面将允许您在图表中可视化变量,“预测”页面将包含带有“预测”按钮的变量,该按钮将允许您估计贷款状态。下面的代码为您在侧边栏提供了一个选择框,使您能够选择一个页面。数据进行了缓存,因此无需不断重新加载。
@st.cache是一种缓存机制,即使在从网络加载数据、处理大型数据集或执行昂贵的计算时,也能让您的应用保持高效。
@st.cache(suppress_st_warning=True)
def get_fvalue(val):
	feature_dict = {"No":1,"Yes":2}
	for key,value in feature_dict.items():
		if val == key:
			return valuedef get_value(val,my_dict):
	for key,value in my_dict.items():
		if val == key:
			return valueapp_mode = st.sidebar.selectbox('Select Page',['Home','Prediction']) #two pages

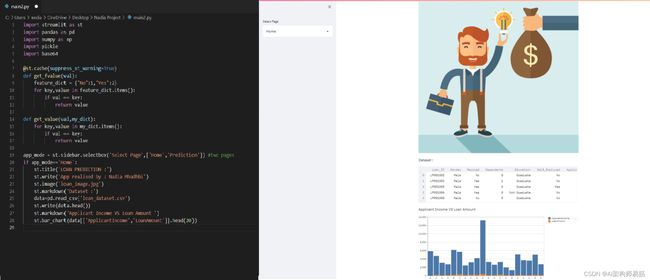
在主页上,我们将展示:演示图片 / 数据集 / 申请人收入和贷款金额的直方图。
注:我们将使用if/elif/else来在不同页面间切换。
我们将把loan_dataset.csv文件加载到名为data的变量中,这将使我们能够在主页上展示其中的几行数据。
if app_mode=='Home':
	st.title('LOAN PREDICTION :')
	st.image('loan_image.jpg')
	st.markdown('Dataset :')
	data=pd.read_csv('loan_dataset.csv')
	st.write(data.head())
	st.markdown('Applicant Income VS Loan Amount ')
	st.bar_chart(data[['ApplicantIncome','LoanAmount']].head(20))
elif app_mode == 'Prediction':
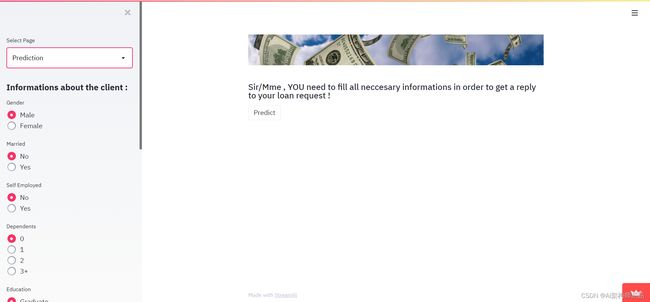
	st.image('slider-short-3.jpg')
	st.subheader('Sir/Mme , YOU need to fill all necessary informations in order    to get a reply to your loan request !')
	st.sidebar.header("Informations about the client :")
	gender_dict = {"Male":1,"Female":2}
	feature_dict = {"No":1,"Yes":2}
	edu={'Graduate':1,'Not Graduate':2}
	prop={'Rural':1,'Urban':2,'Semiurban':3}
	ApplicantIncome=st.sidebar.slider('ApplicantIncome',0,10000,0,)
	CoapplicantIncome=st.sidebar.slider('CoapplicantIncome',0,10000,0,)
	LoanAmount=st.sidebar.slider('LoanAmount in K$',9.0,700.0,200.0)
	Loan_Amount_Term=st.sidebar.selectbox('Loan_Amount_Term',(12.0,36.0,60.0,84.0,120.0,180.0,240.0,300.0,360.0))
	Credit_History=st.sidebar.radio('Credit_History',(0.0,1.0))
	Gender=st.sidebar.radio('Gender',tuple(gender_dict.keys()))
	Married=st.sidebar.radio('Married',tuple(feature_dict.keys()))
	Self_Employed=st.sidebar.radio('Self Employed',tuple(feature_dict.keys()))
	Dependents=st.sidebar.radio('Dependents',options=['0','1' , '2' , '3+'])
	Education=st.sidebar.radio('Education',tuple(edu.keys()))
	Property_Area=st.sidebar.radio('Property_Area',tuple(prop.keys()))
	class_0 , class_3 , class_1, class_2 = 0,0,0,0
	if Dependents == '0':
		class_0 = 1
	elif Dependents == '1':
		class_1 = 1
	elif Dependents == '2':
		class_2 = 1
	else:
		class_3= 1

	Rural,Urban,Semiurban=0,0,0
	if Property_Area == 'Urban' :
		Urban = 1
	elif Property_Area == 'Semiurban' :
		Semiurban = 1
	else :
		Rural=1
我们编写了两个函数get_value(val, my_dict)和get_fvalue(val),以及字典feature_dict,用于操作st.sidebar.radio()来处理非数字变量。这是可选的,你可以轻松地做类似这样的事情:
![]()
让我们看看为什么我们这样做。
注意:机器学习算法不能处理分类变量。在数据集中,我做了一些特征工程。例如,列Married有两个变量’Yes’和’No’,我进行了标签编码(看一下以便更好地理解),所以"NO"等于1,"Yes"等于2。函数get_fvalue(val)可以轻松返回值(1/2),取决于客户选择的是什么。函数get_value(val,my_dict)也是如此。这两个函数的区别在于,第一个处理yes/no特征,第二个则适用于当我们有多个变量的一般情况(例如:性别)。
正如我们所看到的,变量Dependents有四个类别’0’、‘1’、‘2’和’3+’,我们不能将这样的东西转换为数值变量,而且我们有’+3’,意味着Dependents可以取3、4、5… 我们进行了独热编码(看一下以便更好地理解),因此,我们创建了一个包含四个元素的侧边栏单选框,每个元素都有一个二进制变量,如果客户选择了’0’,class_0将等于1,其他的将等于0。

我们对“Property_Area”进行了独热编码,因此我们创建了3个变量(农村、城市、半城市)。当“农村”取1时,其他变量将等于0。

那么我们已经看到了这两点——当我们标记或对我们的特征进行独热编码时,以及如何处理这些编码以成功创建一个运行中的Streamlit应用程序。
 data1={
 	'Gender':Gender,
 	'Married':Married,
 	'Dependents':[class_0,class_1,class_2,class_3],
 	'Education':Education,
 	'ApplicantIncome':ApplicantIncome,
 	'CoapplicantIncome':CoapplicantIncome,
 	'Self Employed':Self_Employed,
 	'LoanAmount':LoanAmount,
 	'Loan_Amount_Term':Loan_Amount_Term,
 	'Credit_History':Credit_History,
 	'Property_Area':[Rural,Urban,Semiurban],
 }

feature_list=[ApplicantIncome,CoapplicantIncome,LoanAmount,Loan_Amount_Term,Credit_History,get_value(Gender,gender_dict),get_fvalue(Married),data1['Dependents'][0],data1['Dependents'][1],data1['Dependents'][2],data1['Dependents'][3],get_value(Education,edu),get_fvalue(Self_Employed),data1['Property_Area'][0],data1['Property_Area'][1],data1['Property_Area'][2]]

single_sample = np.array(feature_list).reshape(1,-1)
现在我们会把我们的变量存储在一个字典中,因为我们写了get_value(val,my_dict)和get_fvalue(val)来处理字典。之后,客户在我们的Streamlit应用中将选择的输入将被整理在一个名为feature_list的列表中,然后转换为一个名为single_sample的numpy变量。
注意:特征的输入必须按照数据集列的相同顺序排列(例如,已婚不能取性别的输入)。
if st.button("Predict"):
file_ = open("6m-rain.gif", "rb")
contents = file_.read()
data_url = base64.b64encode(contents).decode("utf-8")
file_.close()
file = open("green-cola-no.gif", "rb")
contents = file.read()
data_url_no = base64.b64encode(contents).decode("utf-8")
file.close()
loaded_model = pickle.load(open('Random_Forest.sav', 'rb'))
prediction = loaded_model.predict(single_sample)
if prediction[0] == 0 :
st.error( 'According to our Calculations, you will not get the loan from Bank' )
st.markdown( f' {data_url_no}" alt="cat gif">', unsafe_allow_html=True,)
elif prediction[0] == 1 :
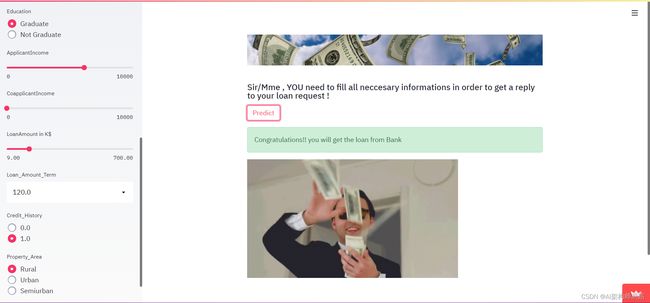
st.success( 'Congratulations!! you will get the loan from Bank' )
st.markdown( f'
 {data_url}" alt="cat gif">', unsafe_allow_html=True, )
最后,我们将把保存的RandomForestClassifier模型加载到loaded_model中,并将其预测结果,即0或1(分类问题),保存在prediction中。.gif文件将被存储在file和file_中。根据prediction的值,我们将有两种情况:“成功”或“失败”,来决定是否能从银行获得贷款。
这是我们的预测页面:

故障情况下,输出将如下所示:

在成功的情况下,输出将如下所示:

代码
- https://github.com/Nadiaa1/Streamlit_app
