【从零开始】PythonOCC
目录
-
- 1. 三维展示
- 2. 基本的几何操作
-
- 2.1 建立坐标轴
- 2.2 获取三维物体的包围盒
- 3. 拓扑操作
-
- 3.1 拓扑形状之间的布尔操作
- 3.2 拓扑形状的数据获取
- 4. 经典案例——画瓶子
参考资料:
(1) PythonOCC API
(2) PythonOCC入门进阶到实战
(3)pythonocc实例
(4)Github:pythonOCC portal
1. 三维展示
如果需要进行三维展示,要求Python安装了可视化界面的相关的包,例如PyQt5, PyQt4, PySide2, PySide, or wxPython。在三维展示的时候,我的电脑会有这样的错误:Error! OpenGL context reports version 4.6 but does not export required functions for 4.5 (glGetnTexImage)。这个错误我找了很久也没有什么解决办法,不过好像有些展示没有影响。
三维展示用到的包是OCC.Display,一个简单的案例如下:
from OCC.Display.SimpleGui import init_display
from OCC.Core.BRepPrimAPI import BRepPrimAPI_MakeBox

display, start_display, add_menu, add_function_to_menu = init_display()
my_box = BRepPrimAPI_MakeBox(10., 20., 30.).Shape()

display.DisplayShape(my_box, update=True)
start_display()
首先是创建了一个长方体,然后展示出来,如下图所示:

如果要保存视图,则可以通过display.View.Dump()函数实现:
def export_to_BMP(event=None):
    display.View.Dump('./capture_bmp.bmp')


def export_to_PNG(event=None):
    display.View.Dump('./capture_png.png')


def export_to_JPEG(event=None):
    display.View.Dump('./capture_jpeg.jpeg')


def export_to_TIFF(event=None):
    display.View.Dump('./capture_tiff.tiff')
同时,可以指定导出的视角,例如正视图,可以通过display.View_Front()实现:
display.DisplayShape(my_box, update=True)
display.View_Front()
display.View.Dump('capture_jpeg.jpeg')
同理,View_Bottom()表示仰视图,View_Front()表示正视图,View_Left()表示左视图,View_Right()表示右视图,View_Top()表示俯视图。这些对于display的相关操作都在OCC.Display.OCCViewer模块中。
可以通过display.set_bg_gradient_color([R1, G1, B1], [R2, G2, B2])来设置背景色,具体可以参照OCC.V3d这个包。如果 R 1 = R 2 R1=R2 R1=R2、 G 1 = G 2 G1=G2 G1=G2、 B 1 = B 2 B1=B2 B1=B2,则背景色为一个颜色,否则为渐变色。
2. 基本的几何操作
2.1 建立坐标轴
from OCC.Core.gp import gp_Pnt, gp_Dir, gp_Ax3

p1 = gp_Pnt(2., 3., 4.) # 建立原点
d = gp_Dir(4., 5., 6.) # 建立一个方向
a = gp_Ax3(p1, d) # 根据原点和方向,建立三维坐标轴
a_IsDirect = a.Direct() # 判断该坐标系是否遵循右手法则,是则返回True,否则返回False
print("a is direct:", a_IsDirect)
建立坐标轴主要由包OCC.Core.gp完成。首先需要建立坐标轴的原点,然后确定坐标轴的方向,最后通过gp_Ax3()建立三维坐标轴。
2.2 获取三维物体的包围盒
参考资料
PYTHONOCC进阶学习:包围盒BOUNDINGBOX
获取三维形状的包围盒主要通过包OCC.Bnd和OCC.BRepBndLib来完成。
# 获取包围盒
bbox = Bnd_Box() # 首先创建一个空的包围盒
tol= 1e-4
bbox.SetGap(tol)
brepbndlib_Add(crossSections, bbox, True) # 将形状添加到包围盒中
XMin, YMin, ZMin, XMax, YMax, ZMax = bbox.Get() # 获取包围盒的信息
案例:
from OCC.Core.BRepBndLib import brepbndlib_Add
from OCC.Core.BRepMesh import BRepMesh_IncrementalMesh
from OCC.Core.BRepPrimAPI import BRepPrimAPI_MakeBox, BRepPrimAPI_MakeCylinder
from OCC.Core.Bnd import Bnd_Box
from OCC.Core.gp import gp_Pnt
from OCC.Display.OCCViewer import rgb_color

shape = BRepPrimAPI_MakeCylinder(60, 60, 50).Shape()

# 获取包围盒
bbox = Bnd_Box() # 首先创建一个空的包围盒
tol= 1e-4
bbox.SetGap(tol)
brepbndlib_Add(shape, bbox, True) # 将形状添加到包围盒中
XMin, YMin, ZMin, XMax, YMax, ZMax = bbox.Get() # 获取包围盒的信息

# 绘制包围盒
xmin = XMin
xmax = XMax
xlen = XMax - XMin
ymin = YMin
ymax = YMax
ylen = YMax - YMin
zmin = ZMin
zmax = ZMax
zlen = ZMax - ZMin

center = gp_Pnt((XMax + XMin) / 2,
                     (YMax + YMin) / 2,
                     (ZMax + ZMin) / 2)
box = BRepPrimAPI_MakeBox(gp_Pnt(xmin,ymin,zmin),gp_Pnt(xmax,ymax,zmax)).Shape()


from OCC.Display.SimpleGui import init_display
display, start_display, add_menu, add_function_to_menu = init_display()
display.DisplayShape(shape)
display.DisplayShape(box,update=True,color=rgb_color(0,0,0.1),transparency=1)
start_display()
可以得到结果如下图所示:

上述代码获取的是轴对齐包围盒(AABB),如果要获取有向包围盒(OBB),则需要调用Bnd_OBB()和brepbndlib_AddOBB()。例如:
import random

from OCC.Core.BRepPrimAPI import BRepPrimAPI_MakeBox
from OCC.Core.gp import gp_Pnt, gp_Ax2, gp_Dir, gp_XYZ
from OCC.Core.BRepBndLib import brepbndlib_AddOBB, brepbndlib_Add
from OCC.Core.Bnd import Bnd_OBB, Bnd_Box
from OCC.Core.BRepBuilderAPI import BRepBuilderAPI_MakeVertex
from OCC.Core.BRepPrimAPI import BRepPrimAPI_MakeBox

from OCC.Display.SimpleGui import init_display

display, start_display, add_menu, add_function_to_menu = init_display()

def ConvertBndToShape(theBox):
  aBaryCenter = theBox.Center()
  aXDir = theBox.XDirection()
  aYDir = theBox.YDirection()
  aZDir = theBox.ZDirection()
  aHalfX = theBox.XHSize()
  aHalfY = theBox.YHSize()
  aHalfZ = theBox.ZHSize()

  ax = gp_XYZ(aXDir.X(), aXDir.Y(), aXDir.Z())
  ay = gp_XYZ(aYDir.X(), aYDir.Y(), aYDir.Z())
  az = gp_XYZ(aZDir.X(), aZDir.Y(), aZDir.Z())
  p = gp_Pnt(aBaryCenter.X(), aBaryCenter.Y(), aBaryCenter.Z())
  anAxes = gp_Ax2(p, gp_Dir(aZDir), gp_Dir(aXDir))
  anAxes.SetLocation(gp_Pnt(p.XYZ() - ax*aHalfX - ay*aHalfY - az*aHalfZ))
  aBox = BRepPrimAPI_MakeBox(anAxes, 2.0*aHalfX, 2.0*aHalfY, 2.0*aHalfZ).Shape()
  return aBox

# 创建OBB
obb = Bnd_OBB()

# 创建AABB
bbox = Bnd_Box() # 首先创建一个空的包围盒
tol= 1e-4
bbox.SetGap(tol)

n = 10
for _ in range(n):
    x = random.uniform(100, 500)
    y = random.uniform(100, 500)
    z = random.uniform(100, 500)
    p = BRepBuilderAPI_MakeVertex(gp_Pnt(x, y, z)).Shape()
    display.DisplayShape(p)
    brepbndlib_AddOBB(p, obb)
    brepbndlib_Add(p, bbox, True) # 将形状添加到包围盒中

obb_shape = ConvertBndToShape(obb)
display.DisplayShape(obb_shape, transparency=0.5)

XMin, YMin, ZMin, XMax, YMax, ZMax = bbox.Get() # 获取包围盒的信息

# 绘制包围盒
xmin = XMin
xmax = XMax
xlen = XMax - XMin
ymin = YMin
ymax = YMax
ylen = YMax - YMin
zmin = ZMin
zmax = ZMax
zlen = ZMax - ZMin

center = gp_Pnt((XMax + XMin) / 2,
                     (YMax + YMin) / 2,
                     (ZMax + ZMin) / 2)
box = BRepPrimAPI_MakeBox(gp_Pnt(xmin,ymin,zmin),gp_Pnt(xmax,ymax,zmax)).Shape()

display.DisplayShape(box, transparency=0.5)
start_display()
随机产生空间中的点,可以得到如下图所示的两种包围盒,一种是AABB,一种是OBB。

3. 拓扑操作
参考资料
OpenCasCade一些常用的API
OpenCasCade拓扑几何的布尔运算
3.1 拓扑形状之间的布尔操作
拓扑结构之间的布尔运算(相交、相减、联合)通过包OCC.BRepAlgoAPI实现。
| 布尔运算函数 | 功能 |
|---|---|
BRepAlgoAPI_Common |
相交,求两个图形的相交形状 |
BRepAlgoAPI_Section |
相交,得到的是两个图形相交的轮廓线 |
BRepAlgoAPI_Cut |
相减,从一个形状中减去另一个形状 |
BRepAlgoAPI_Fuse |
相加,将两个形状合并 |
3.2 拓扑形状的数据获取
拓扑结构的一些数据捕获通过包OCC.TopExp来实现。TopExp_Explorer(S, ToFind, ToAviod)用于对形状S中查找除了ToAviod对象以外的ToFind对象。例如aFaceExplorer = TopExp_Explorer(crossSections, TopAbs_EDGE) 表示获取crossSections中的边。
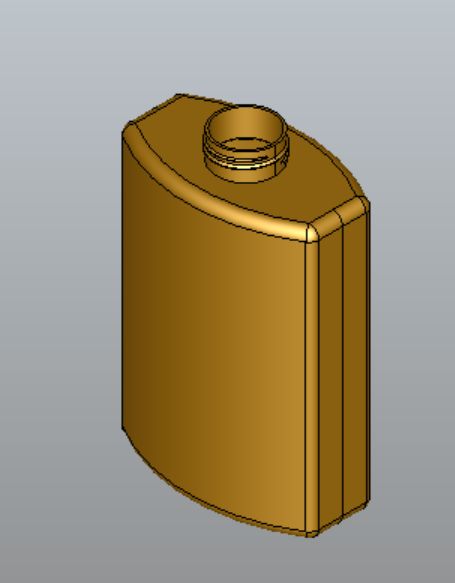
4. 经典案例——画瓶子
参考教程:
pythonOCC例子搬运:4.经典瓶子造型
导入需要的包:
import math

from OCC.Core.gp import gp_Pnt, gp_OX, gp_Vec, gp_Trsf, gp_DZ, gp_Ax2, gp_Ax3, gp_Pnt2d, gp_Dir2d, gp_Ax2d
from OCC.Core.GC import GC_MakeArcOfCircle, GC_MakeSegment
from OCC.Core.GCE2d import GCE2d_MakeSegment
from OCC.Core.Geom import Geom_Plane, Geom_CylindricalSurface
from OCC.Core.Geom2d import Geom2d_Ellipse, Geom2d_TrimmedCurve
from OCC.Core.BRepBuilderAPI import (BRepBuilderAPI_MakeEdge, BRepBuilderAPI_MakeWire,
	                                 BRepBuilderAPI_MakeFace, BRepBuilderAPI_Transform)
from OCC.Core.BRepPrimAPI import BRepPrimAPI_MakePrism, BRepPrimAPI_MakeCylinder
from OCC.Core.BRepFilletAPI import BRepFilletAPI_MakeFillet
from OCC.Core.BRepAlgoAPI import BRepAlgoAPI_Fuse
from OCC.Core.BRepOffsetAPI import BRepOffsetAPI_MakeThickSolid, BRepOffsetAPI_ThruSections
from OCC.Core.BRepLib import breplib
from OCC.Core.BRep import BRep_Tool_Surface, BRep_Builder
from OCC.Core.TopoDS import topods, TopoDS_Compound
from OCC.Core.TopExp import TopExp_Explorer
from OCC.Core.TopAbs import TopAbs_EDGE, TopAbs_FACE
from OCC.Core.TopTools import TopTools_ListOfShape
from OCC.Display.SimpleGui import init_display
首先,先设置瓶子的一些参数:
height = 70
width = 50
thickness = 30
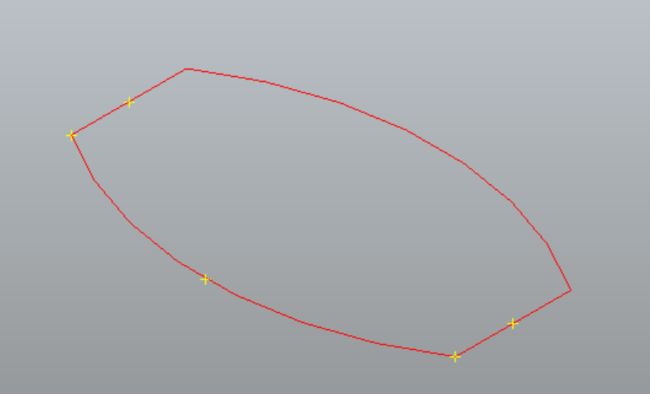
然后,创建一瓶子上的控制点:
aPnt1 = gp_Pnt(-width / 2.0, 0, 0)
aPnt2 = gp_Pnt(-width / 2.0, -thickness / 4.0, 0)
aPnt3 = gp_Pnt(0, -thickness / 2.0, 0)
aPnt4 = gp_Pnt(width / 2.0, -thickness / 4.0, 0)
aPnt5 = gp_Pnt(width / 2.0, 0, 0)

根据控制点创造边/线:
aArcOfCircle = GC_MakeArcOfCircle(aPnt2, aPnt3, aPnt4) # 创造弧线
aSegment1 = GC_MakeSegment(aPnt1, aPnt2)
aSegment2 = GC_MakeSegment(aPnt4, aPnt5)

aEdge1 = BRepBuilderAPI_MakeEdge(aSegment1.Value())
aEdge2 = BRepBuilderAPI_MakeEdge(aArcOfCircle.Value())
aEdge3 = BRepBuilderAPI_MakeEdge(aSegment2.Value())

aWire = BRepBuilderAPI_MakeWire(aEdge1.Edge(), aEdge2.Edge(), aEdge3.Edge())

通过镜像操作,得到瓶子的轮廓:
# 创建轴网
xAxis = gp_OX()
aTrsf = gp_Trsf()
aTrsf.SetMirror(xAxis) # 设置对称轴

aBRespTrsf = BRepBuilderAPI_Transform(aWire.Wire(), aTrsf) # 通过镜像得到变换后的形状
aMirroredShape = aBRespTrsf.Shape()
aMirroredWire = topods.Wire(aMirroredShape)
# 合并两个线条)对称前和对称后的
mkWire = BRepBuilderAPI_MakeWire()
mkWire.Add(aWire.Wire())
mkWire.Add(aMirroredWire)
myWireProfile = mkWire.Wire()
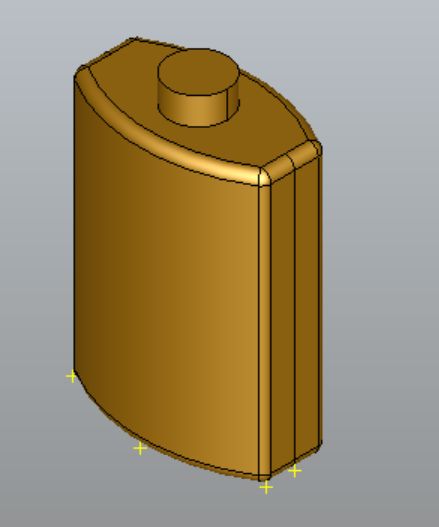
创建瓶子的主体
# 创建截面
myFaceProfile = BRepBuilderAPI_MakeFace(myWireProfile) # 得到拉伸截面
aPrismVec = gp_Vec(0, 0, height) # 创建拉伸方向
myBody = BRepPrimAPI_MakePrism(myFaceProfile.Face(), aPrismVec) # 通过拉伸得到瓶子的主体

给瓶子的边创建一些Fillet:
mkFillet = BRepFilletAPI_MakeFillet(myBody.Shape())
anEdgeExplorer = TopExp_Explorer(myBody.Shape(), TopAbs_EDGE)

while anEdgeExplorer.More():
    anEdge = topods.Edge(anEdgeExplorer.Current())
    mkFillet.Add(thickness / 12.0, anEdge)

    anEdgeExplorer.Next()

myBody = mkFillet

创建瓶子的颈部
neckLocation = gp_Pnt(0, 0, height) # 创建瓶颈的原点
neckAxis = gp_DZ()
neckAx2 = gp_Ax2(neckLocation, neckAxis) # 创建瓶颈的拉伸方向

myNeckRadius = thickness / 4.0
myNeckHeight = height / 10.0
# 根据拉伸方向、半径、高度,创建圆柱体(瓶颈)
mkCylinder = BRepPrimAPI_MakeCylinder(neckAx2, myNeckRadius, myNeckHeight)

myBody = BRepAlgoAPI_Fuse(myBody.Shape(), mkCylinder.Shape()) # 合并瓶子的主体和瓶颈
移除不符合要求的截面:
def face_is_plane(face):
    """
    Returns True if the TopoDS_Shape is a plane, False otherwise
    """
    hs = BRep_Tool_Surface(face)
    downcast_result = Geom_Plane.DownCast(hs)
    # The handle is null if downcast failed or is not possible, that is to say the face is not a plane
    if downcast_result is None:
        return False
    else:
        return True


def geom_plane_from_face(aFace):
    """
    Returns the geometric plane entity from a planar surface
    """
    return Geom_Plane.DownCast(BRep_Tool_Surface(aFace))

# 对生成的截面进行处理
# Our goal is to find the highest Z face and remove it
faceToRemove = None
zMax = -1

# We have to work our way through all the faces to find the highest Z face so we can remove it for the shell
aFaceExplorer = TopExp_Explorer(myBody.Shape(), TopAbs_FACE)
while aFaceExplorer.More():
    aFace = topods.Face(aFaceExplorer.Current())

    if face_is_plane(aFace):
        aPlane = geom_plane_from_face(aFace)

        # We want the highest Z face, so compare this to the previous faces
        aPnt = aPlane.Location()
        aZ = aPnt.Z()
        if aZ > zMax:
            zMax = aZ
            faceToRemove = aFace

    aFaceExplorer.Next()

facesToRemove = TopTools_ListOfShape()
facesToRemove.Append(faceToRemove)

myBody = BRepOffsetAPI_MakeThickSolid(myBody.Shape(), facesToRemove, -thickness / 50.0, 0.001)

生成瓶子颈部的螺纹:
#
# Set up our surfaces for the threading on the neck
neckAx2_Ax3 = gp_Ax3(neckLocation, gp_DZ())
aCyl1 = Geom_CylindricalSurface(neckAx2_Ax3, myNeckRadius * 0.99)
aCyl2 = Geom_CylindricalSurface(neckAx2_Ax3, myNeckRadius * 1.05)

# Set up the curves for the threads on the bottle's neck
aPnt = gp_Pnt2d(2.0 * math.pi, myNeckHeight / 2.0)
aDir = gp_Dir2d(2.0 * math.pi, myNeckHeight / 4.0)
anAx2d = gp_Ax2d(aPnt, aDir)

aMajor = 2.0 * math.pi
aMinor = myNeckHeight / 10.0

anEllipse1 = Geom2d_Ellipse(anAx2d, aMajor, aMinor)
anEllipse2 = Geom2d_Ellipse(anAx2d, aMajor, aMinor / 4.0)

anArc1 = Geom2d_TrimmedCurve(anEllipse1, 0, math.pi)
anArc2 = Geom2d_TrimmedCurve(anEllipse2, 0, math.pi)

anEllipsePnt1 = anEllipse1.Value(0)
anEllipsePnt2 = anEllipse1.Value(math.pi)

aSegment = GCE2d_MakeSegment(anEllipsePnt1, anEllipsePnt2)

# Build edges and wires for threading
anEdge1OnSurf1 = BRepBuilderAPI_MakeEdge(anArc1, aCyl1)
anEdge2OnSurf1 = BRepBuilderAPI_MakeEdge(aSegment.Value(), aCyl1)
anEdge1OnSurf2 = BRepBuilderAPI_MakeEdge(anArc2, aCyl2)
anEdge2OnSurf2 = BRepBuilderAPI_MakeEdge(aSegment.Value(), aCyl2)

threadingWire1 = BRepBuilderAPI_MakeWire(anEdge1OnSurf1.Edge(), anEdge2OnSurf1.Edge())
threadingWire2 = BRepBuilderAPI_MakeWire(anEdge1OnSurf2.Edge(), anEdge2OnSurf2.Edge())

# Compute the 3D representations of the edges/wires
breplib.BuildCurves3d(threadingWire1.Shape())
breplib.BuildCurves3d(threadingWire2.Shape())

# Create the surfaces of the threading
aTool = BRepOffsetAPI_ThruSections(True)
aTool.AddWire(threadingWire1.Wire())
aTool.AddWire(threadingWire2.Wire())
aTool.CheckCompatibility(False)
myThreading = aTool.Shape()
合并瓶身、瓶颈部和螺纹:
bottle = TopoDS_Compound()
aBuilder = BRep_Builder()
aBuilder.MakeCompound(bottle)
aBuilder.Add(bottle, myBody.Shape())
aBuilder.Add(bottle, myThreading)