经典目标检测YOLO系列(二)YOLOV2的复现(2)正样本的匹配、损失函数的实现及模型训练
经典目标检测YOLO系列(二)YOLOV2的复现(2)正样本的匹配、损失函数的实现及模型训练
我们在之前实现YOLOv1的基础上,加入了先验框机制,快速的实现了YOLOv2的网络架构,并且实现了前向推理过程。
经典目标检测YOLO系列(二)YOLOV2的复现(1)总体网络架构及前向推理过程
如前所述,我们使用基于先验框的正样本匹配策略。
1 正样本匹配策略
1.1 基于先验框的正样本匹配策略
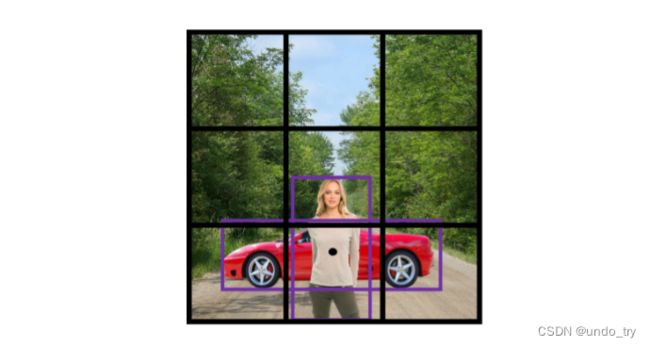
- 由于每个网格只输出一个边界框,因此在YOLOv1中的正样本匹配策略很简单,目标框的中心点落在哪个网格,这个网格(左上角点)就是正样本。
- 但是,我们现在引入了先验框机制,每个网格会输出5个预测框。那么目标框的中心点所在的每一个网格,我们都需要确定这5个预测框中,哪些是正样本,哪些是负样本。
- 既然我们已经有了具有边界框尺寸信息的先验框,那么我们可以基于先验框来筛选正样本。
假设一个含有目标框中心的网格上的5个先验框分别为A、B、C、D、E,那么需要计算这5个先验框与目标框O的IoU值,分别为:IoU_A、IoU_B、IoU_C、IoU_D、IoU_E,然后设定一个阈值iou_thresh:
- 第1种情况:如果IoU_A、IoU_B、IoU_C、IoU_D、IoU_E都小于iou_thresh,为了不丢失这个训练样本,我们选择选择IoU值最大的先验框P_A。将P_A对应的预测框B_A,标记为正样本,即
先验框决定哪些预测框会参与到何种损失的计算中去。 - 第2种情况:仅有一个IoU值大于iou_thresh,那么这个先验框所对应的预测框会被标记为正样本,会参与到置信度、类别及位置损失的计算。
- 第3种情况:有多个IoU值大于iou_thresh,那么这些先验框所对应的预测框都会被标记为正样本,即
一个目标会被匹配上多个正样本。
这种正样本匹配策略,似乎保证了每个目标都会至少匹配上一个正样本,但其实存在漏洞。假如,有2个目标的中心点都落到了同一个目标框,可能会导致原本属于目标A的先验框后来又分配给目标B。
- 在YOLOv1中,2个目标的中心点都落到了同一个目标框,网络就只能学习一个。
- 在YOLOv2中,虽然每个网格会输出多个预测框,但是在制作正样本时候,也会存在刚才说的
语义歧义现象,会使得某些目标匹配不到正样本,其信息也就不会被网络学习到,不过我们现在不做处理。
1.2 代码实现
1.2.1 正样本匹配
pytorch读取VOC数据集:
-
一批图像数据的维度是 [B, 3, H, W] ,分别是batch size,色彩通道数,图像的高和图像的宽。
-
标签数据是一个包含 B 个图像的标注数据的python的list变量(如下所示),其中,每个图像的标注数据的list变量又包含了 M 个目标的信息(类别和边界框)。
-
获得了这一批数据后,图片是可以直接喂到网络里去训练的,但是标签不可以,需要再进行处理一下。
[
    {
        'boxes':     tensor([[ 29., 230., 148., 321.]]),  # bbox的坐标(xmin, ymin, xmax, ymax)
        'labels':    tensor([18.]),                       # 标签
        'orig_size': [281, 500]                           # 图片的原始大小
    },
    {
        'boxes':      tensor([[  0.,  79., 416., 362.]]),
        'labels':     tensor([1.]),
        'orig_size': [375, 500]
    }
]
标签处理主要包括3个部分,
- 一是将真实框中心所在网格对应
正样本位置(anchor_idx)的置信度置为1,其他默认为0 - 二是将真实框中心所在网格对应
正样本位置(anchor_idx)的标签类别为1(one-hot格式),其他类别设置为0 - 三是将真实框中心所在网格对应
正样本位置(anchor_idx)的bbox信息设置为真实框的bbox信息。
# 处理好的shape如下:
# gt_objectness
torch.Size([2, 845, 1])  # 845=13×13×5
# gt_classes
torch.Size([2, 845, 20])
# gt_bboxes
torch.Size([2, 845, 4])
1.2.2 具体代码实现
# RT-ODLab/models/detectors/yolov2/matcher.py

import torch
import numpy as np


class Yolov2Matcher(object):
    def __init__(self, iou_thresh, num_classes, anchor_size):
        self.num_classes = num_classes
        self.iou_thresh = iou_thresh
        # anchor box
        self.num_anchors = len(anchor_size)
        self.anchor_size = anchor_size
        self.anchor_boxes = np.array(
            [ [0., 0., anchor[0], anchor[1]] for anchor in anchor_size]
            )  # [KA, 4]


    def compute_iou(self, anchor_boxes, gt_box):
        """
            函数功能: 计算目标框和5个先验框的IoU值
            anchor_boxes : ndarray -> [KA, 4] (cx, cy, bw, bh).
            gt_box : ndarray -> [1, 4] (cx, cy, bw, bh).

            返回值: iou变量,类型为ndarray类型,shape为[5,], iou[i]就表示该目标框和第i个先验框的IoU值

        """
        # 1、计算5个anchor_box的面积
        # anchors: [KA, 4]
        anchors = np.zeros_like(anchor_boxes)
        anchors[..., :2] = anchor_boxes[..., :2] - anchor_boxes[..., 2:] * 0.5  # x1y1
        anchors[..., 2:] = anchor_boxes[..., :2] + anchor_boxes[..., 2:] * 0.5  # x2y2
        anchors_area = anchor_boxes[..., 2] * anchor_boxes[..., 3]
        # 2、gt_box复制5份,计算5个相同gt_box的面积
        # gt_box: [1, 4] -> [KA, 4]
        gt_box = np.array(gt_box).reshape(-1, 4)
        gt_box = np.repeat(gt_box, anchors.shape[0], axis=0)
        gt_box_ = np.zeros_like(gt_box)
        gt_box_[..., :2] = gt_box[..., :2] - gt_box[..., 2:] * 0.5  # x1y1
        gt_box_[..., 2:] = gt_box[..., :2] + gt_box[..., 2:] * 0.5  # x2y2
        gt_box_area = np.prod(gt_box[..., 2:] - gt_box[..., :2], axis=1)
        # 3、计算计算目标框和5个先验框的IoU值
        # intersection  交集
        inter_w = np.minimum(anchors[:, 2], gt_box_[:, 2]) - \
                  np.maximum(anchors[:, 0], gt_box_[:, 0])
        inter_h = np.minimum(anchors[:, 3], gt_box_[:, 3]) - \
                  np.maximum(anchors[:, 1], gt_box_[:, 1])
        inter_area = inter_w * inter_h

        # union
        union_area = anchors_area + gt_box_area - inter_area

        # iou
        iou = inter_area / union_area
        iou = np.clip(iou, a_min=1e-10, a_max=1.0)

        return iou


    @torch.no_grad()
    def __call__(self, fmp_size, stride, targets):
        """
            img_size: (Int) input image size
            stride: (Int) -> stride of YOLOv1 output.
            targets: (Dict) dict{'boxes': [...],
                                 'labels': [...],
                                 'orig_size': ...}
        """
        # prepare
        bs = len(targets)
        fmp_h, fmp_w = fmp_size
        gt_objectness = np.zeros([bs, fmp_h, fmp_w, self.num_anchors, 1])
        gt_classes = np.zeros([bs, fmp_h, fmp_w, self.num_anchors, self.num_classes])
        gt_bboxes = np.zeros([bs, fmp_h, fmp_w, self.num_anchors, 4])

        # 第一层for循环遍历每一张图像的标签
        for batch_index in range(bs):
            # targets_per_image是python的Dict类型
            targets_per_image = targets[batch_index]
            # [N,] N表示一个图像中有N个目标对象
            tgt_cls = targets_per_image["labels"].numpy()
            # [N, 4]
            tgt_box = targets_per_image['boxes'].numpy()
            # 第二层for循环遍历这张图像标签的每一个目标数据
            for gt_box, gt_label in zip(tgt_box, tgt_cls):
                x1, y1, x2, y2 = gt_box
                # xyxy -> cxcywh
                xc, yc = (x2 + x1) * 0.5, (y2 + y1) * 0.5
                bw, bh = x2 - x1, y2 - y1
                gt_box = [0, 0, bw, bh]

                # check
                if bw < 1. or bh < 1.:
                    continue

                # 1、计算该目标框和5个先验框的IoU值
                iou = self.compute_iou(self.anchor_boxes, gt_box)
                iou_mask = (iou > self.iou_thresh)

                # 2、基于先验框的标签分配策略
                label_assignment_results = []
                # 第一种情况:所有的IoU值均低于阈值,选择IoU最大的先验框
                if iou_mask.sum() == 0:
                    # We assign the anchor box with highest IoU score.
                    iou_ind = np.argmax(iou)
                    anchor_idx = iou_ind
                    # compute the grid cell
                    xc_s = xc / stride
                    yc_s = yc / stride
                    grid_x = int(xc_s)
                    grid_y = int(yc_s)

                    label_assignment_results.append([grid_x, grid_y, anchor_idx])
                else:
                    # 第二种和第三种情况:至少有一个IoU值大于阈值
                    for iou_ind, iou_m in enumerate(iou_mask):
                        if iou_m:
                            anchor_idx = iou_ind
                            # compute the gride cell
                            xc_s = xc / stride
                            yc_s = yc / stride
                            grid_x = int(xc_s)
                            grid_y = int(yc_s)

                            label_assignment_results.append([grid_x, grid_y, anchor_idx])

                # label assignment
                # 获取到被标记为正样本的先验框,我们就可以为这次先验框对应的预测框制作学习标签
                for result in label_assignment_results:
                    grid_x, grid_y, anchor_idx = result
                    if grid_x < fmp_w and grid_y < fmp_h:
                        # objectness标签,采用0,1离散值
                        gt_objectness[batch_index, grid_y, grid_x, anchor_idx] = 1.0
                        # classification标签,采用one-hot格式
                        cls_ont_hot = np.zeros(self.num_classes)
                        cls_ont_hot[int(gt_label)] = 1.0
                        gt_classes[batch_index, grid_y, grid_x, anchor_idx] = cls_ont_hot
                        # box标签,采用目标框的坐标值
                        gt_bboxes[batch_index, grid_y, grid_x, anchor_idx] = np.array([x1, y1, x2, y2])

        # [B, H, W, A, C] -> [B, HWA, C]
        gt_objectness = gt_objectness.reshape(bs, -1, 1)
        gt_classes = gt_classes.reshape(bs, -1, self.num_classes)
        gt_bboxes = gt_bboxes.reshape(bs, -1, 4)

        # to tensor
        gt_objectness = torch.from_numpy(gt_objectness).float()
        gt_classes = torch.from_numpy(gt_classes).float()
        gt_bboxes = torch.from_numpy(gt_bboxes).float()

        return gt_objectness, gt_classes, gt_bboxes


if __name__ == '__main__':
    anchor_size  = [[17, 25], [55, 75], [92, 206], [202, 21], [289, 311]]
    matcher = Yolov2Matcher(iou_thresh=0.5, num_classes=20, anchor_size=anchor_size)
    targets = [
    {
        'boxes':     torch.tensor([[ 29., 230., 148., 321.]]),  # bbox的坐标(xmin, ymin, xmax, ymax)
        'labels':    torch.tensor([18.]),                       # 标签
        'orig_size': [281, 500]                                 # 图片的原始大小
    },
    {
        'boxes':      torch.tensor([[  0.,  79., 416., 362.]]),
        'labels':     torch.tensor([1.]),
        'orig_size': [375, 500]
    }
]
    gt_objectness, gt_classes, gt_bboxes = matcher(fmp_size=(13, 13),stride=32, targets=targets )
    print(gt_objectness.shape)
    print(gt_classes.shape)
    print(gt_bboxes.shape)
- 最终这段代码返回了gt_objectness, gt_classes, gt_bboxes三个Tensor类型的变量:
- gt_objectness包含一系列的0和1,标记了哪些预测框是正样本,哪些预测框是负样本
- gt_classes包含一系列的one-hot格式的类别标签
- gt_bboxes包含的是正样本要学习的边界框的位置参数
- 在上述代码实现中,在计算IoU时候,我们将目标框的中心点坐标和先验框的中心点坐标都设置为0,这是因为
一个目标框在做匹配时候,仅仅考虑到目标框中心点所在的网格中的5个先验框,周围的网格都不进行考虑。 - 在SSD以及Faster R-CNN中,每一个目标框都是和全局的先验框去计算IoU,这些算法都会考虑目标框的中心点坐标和先验框的中心点坐标。
因此,其每一个目标框匹配上的先验框不仅来自中心点所在的网格,也会来自周围的网格。这是YOLO和其他工作一个重要差别所在,YOLO这种只考虑中心点的做法,处理起来更加简便、更易学习。
2 损失函数的计算、YOLOv2的训练
2.1 损失函数的计算
- YOLOv2损失函数计算(RT-ODLab/models/detectors/yolov2/loss.py)和之前实现的YOLOv1基本一致,不再赘述
- 我们实现的YOLOv2和之前实现的YOLOv1相比,仅仅多了先验框以及由此带来的正样本匹配上的一些细节上的差别。
2.2 YOLOv2的训练
-
完成了YOLOv2的网络搭建,标签匹配以及损失函数的计算,就可以进行训练了
-
数据读取、数据预处理及数据增强操作,和之前实现的YOLOv1一致,不再赘述
-
YOLOv1和YOLOv2都在同一个项目代码中,数据代码、训练代码及测试代码均一致,我们只需要修改训练脚本即可
nohup python -u train.py --cuda \
         -d voc                 \
         -m yolov2              \
         -bs 16                 \
         -size 640              \
         --wp_epoch 3           \
         --max_epoch 150        \
         --eval_epoch 10        \
         --no_aug_epoch 10      \
         --ema                  \
         --fp16                 \
         --multi_scale          \
         --num_workers 8 1>./logs/yolo_v2_train_log.txt 2>./logs/yolo_v2_warning_log.txt &
相关参数讲解可以参考YOLOv1:
经典目标检测YOLO系列(一)复现YOLOV1(5)模型的训练及验证
2.3 可视化检测结果、计算mAP指标
-
训练结束后,模型默认保存在weights/voc/yolov2/文件夹下,名为yolov2_voc_best.pth,保存了训练阶段在测试集上mAP指标最高的模型。
-
运行项目中所提供的eval.py文件可以验证模型的性能,具体命令如下行所示
-
可以给定不同的图像尺寸来测试实现的YOLOv1在不同输入尺寸下的性能
python eval.py \ --cuda -d voc \ --root path/to/voc -m yolov2 \ --weight path/to/yolov2_voc_best.pth \ -size 416 -
也可以可视化训练好的模型
python test.py \
--cuda -d voc \
--root path/to/voc -m yolov2
--weight path/to/yolov2_voc_best.pth \
-size 416 -vt 0.3 \
--show

# -size表示输入图像的最大边尺寸
# -vt是可视化的置信度阈值,只有高于此值的才会被可视化出来
# --show表示展示检测结果的可视化图片
2.4 训练结果
《YOLO目标检测》作者训练好的模型,在VOC2007测试集测试指标如下:
从表格中可以看到,实现的YOLOv2达到了官方YOLOv2的性能。
| 模型 | 输入尺寸 | mAP(%) |
|---|---|---|
| YOLOv2*(官方) | 416 | 76.8 |
| YOLOv2*(官方) | 480 | 77.8 |
| YOLOv2*(官方) | 544 | 78.6 |
| YOLOv2 | 416 | 76.8 |
| YOLOv2 | 480 | 78.4 |
| YOLOv2 | 544 | 79.6 |
| YOLOv2 | 640 | 79.8 |
