关于python环境变量相关的配置汇总(venv虚拟环境/conda环境/pip相关)
关于python环境变量相关的配置汇总(venv虚拟环境/conda环境/pip相关)

本文作者: slience_me
文章目录
- 关于python环境变量相关的配置汇总(venv虚拟环境/conda环境/pip相关)
-
- 1. python环境配置相关
-
- 1.1 系统环境
- 1.2 Anaconda环境相关
-
- 1.2.1 安装
- 1.2.2 查看python环境
- 1.3 venv虚拟环境配置
- 2. pip相关操作
1. python环境配置相关
1.1 系统环境
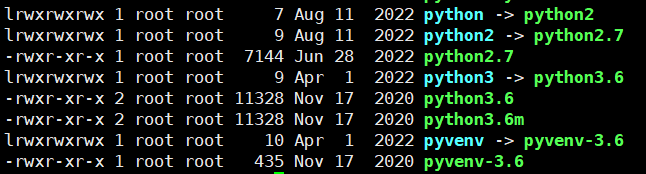
输入以下指令,查看python的软链接指向,默认bin -> usr/bin:
cd /bin
ls -l
可以看到如下图所示:
python默认指向python2的环境,python2默认指向python2.7环境,python3默认指向python3.6的环境:
输入指令python指令,进入默认python环境,如下图所示:

输入指令python3指令,进入python3环境,如下图所示:

如果想要修改默认的python指向python3环境:有两种方式,选择一种,推荐后一种
ln -sf /usr/bin/python3 /usr/bin/python  # 右侧指向左侧 -f 选项用于在存在同名文件时强制覆盖
或
cd /bin
ln -sf python3 python
执行完成后,如下图所示,python默认指向了python3:

再输入python后,即可进入python3环境:

1.2 Anaconda环境相关
1.2.1 安装
在选择anaconda版本的时候,需要查看 Linux 系统的架构,可以使用 uname 命令。以下是查看系统架构的方法:
uname -m
运行上述命令后,系统将返回一个字符串,表示系统的架构。常见的架构包括:
x86_64:表示64位的 x86 架构,通常用于现代的台式机和服务器。i686或i386:表示32位的 x86 架构,用于一些较旧的系统。arm:表示ARM架构,通常用于嵌入式系统和一些移动设备。aarch64:表示64位的ARM架构。
例如,如果返回的是 x86_64,则表示你的系统是64位的 x86 架构。
例如,我的是下图所示:

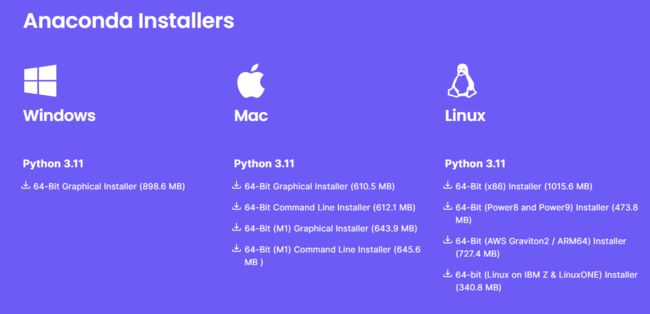
在anaconda的 点击 下载链接, 选择对应的版本
ubuntu操作步骤
- 运行指令
bash Anaconda3-2021.11-Linux-x86_64.sh - 进入注册信息页面,持续点击空格即可跳过注册信息, 输入yes;
- 阅读注册信息,然后输入yes;查看文件即将安装的位置,按enter,即可安装,
- 安装完成后,收到加入环境变量的提示信息,输入yes
- 重启终端,会看到命令行前面出现(base)环境,即可默认使用Anaconda3;
- 可以使用
conda -V验证是否安装完毕,若安装完成,则会出现版本号。
执行下面指令后,回车即可:
[slience_me@VM-24-2-centos ~]$ bash Anaconda3-2023.09-0-Linux-x86_64.sh
Welcome to Anaconda3 2023.09-0
In order to continue the installation process, please review the license
agreement.
Please, press ENTER to continue
>>>
输入yes即可,同意该使用协议
==================================================
End User License Agreement - Anaconda Distribution
==================================================
Copyright 2015-2023, Anaconda, Inc.
All rights reserved under the 3-clause BSD License:
This End User License Agreement (the "Agreement") is a legal agreement between you and Anaconda, Inc. ("Anaconda") and governs your use of Anaconda Distribution (which was formerly known as Anaconda Individual Edition).
......
Do you accept the license terms? [yes|no]
[no] >>> yes
选择安装的路径,直接回车就使用默认路径/home/slience_me/anaconda3
Anaconda3 will now be installed into this location:
/home/slience_me/anaconda3

  - Press ENTER to confirm the location
  - Press CTRL-C to abort the installation
  - Or specify a different location below

[/home/slience_me/anaconda3] >>>
PREFIX=/home/slience_me/anaconda3
Unpacking payload ...
Installing base environment...
Downloading and Extracting Packages
Downloading and Extracting Packages
Preparing transaction: done
Executing transaction: \
    Installed package of scikit-learn can be accelerated using scikit-learn-intelex.
    More details are available here: https://intel.github.io/scikit-learn-intelex
    For example:
        $ conda install scikit-learn-intelex
        $ python -m sklearnex my_application.py                                                                               done
installation finished.
Do you wish to update your shell profile to automatically initialize conda?
This will activate conda on startup and change the command prompt when activated.
If you'd prefer that conda's base environment not be activated on startup,
   run the following command when conda is activated:
conda config --set auto_activate_base false
是否初始化环境变量,选择yes即可
You can undo this by running `conda init --reverse $SHELL`? [yes|no]
[no] >>> yes
no change     /home/slience_me/anaconda3/condabin/conda
no change     /home/slience_me/anaconda3/bin/conda
no change     /home/slience_me/anaconda3/bin/conda-env
no change     /home/slience_me/anaconda3/bin/activate
no change     /home/slience_me/anaconda3/bin/deactivate
no change     /home/slience_me/anaconda3/etc/profile.d/conda.sh
no change     /home/slience_me/anaconda3/etc/fish/conf.d/conda.fish
no change     /home/slience_me/anaconda3/shell/condabin/Conda.psm1
no change     /home/slience_me/anaconda3/shell/condabin/conda-hook.ps1
no change     /home/slience_me/anaconda3/lib/python3.11/site-packages/xontrib/conda.xsh
no change     /home/slience_me/anaconda3/etc/profile.d/conda.csh
modified      /home/slience_me/.bashrc
==> For changes to take effect, close and re-open your current shell. <==
Thank you for installing Anaconda3!
可以查看一下环境变量,执行以下指令
vim ~/.bashrc
发现有以下内容,即是anaconda的环境变量配置
# >>> conda initialize >>>
# !! Contents within this block are managed by 'conda init' !!
__conda_setup="$('/home/slience_me/anaconda3/bin/conda' 'shell.bash' 'hook' 2> /dev/null)"
if [ $? -eq 0 ]; then
    eval "$__conda_setup"
else
    if [ -f "/home/slience_me/anaconda3/etc/profile.d/conda.sh" ]; then
        . "/home/slience_me/anaconda3/etc/profile.d/conda.sh"
    else
        export PATH="/home/slience_me/anaconda3/bin:$PATH"
    fi
fi
unset __conda_setup
# <<< conda initialize <<<
1.2.2 查看python环境
激活conda环境,执行以下环境
source ~/.bashrc
如下图所示,看到左边有(base),即激活了base环境,进行一系列操作
![]()
如果想要修改系统的python指向anaconda的python环境,执行以下指令
ln -sf /home/anaconda3/bin/python /usr/bin/python # python -> /home/anaconda3/bin/python
可以查看相关的虚拟环境
conda env list

下面是一些相关的指令: 我的指令本
# 激活环境
conda activate torch

# 退出环境
conda deactivate

# 对虚拟环境中安装额外的包
conda install -n your_env_name [package]

# 检查更新当前conda
conda update conda

# 创建python版本为x.x,名字为your_env_name的虚拟环境
conda create -n your_env_name python=x.x

# 删除虚拟环境
conda remove -n your_env_name --all

# 删除环境钟的某个包
conda remove --name $your_env_name  $package_name
1.3 venv虚拟环境配置
创建一个虚拟环境
# 创建虚拟环境venv
python3 -m venv 包名
然后可以执行以下指令,激活环境
cd venv
cd bin
source activate
然后执行相关的操作
2. pip相关操作
查看需要安装的模块的所有版本
pip index versions [your python module name]
导出/入包环境为文件
pip freeze > requirements.txt
pip install -r requirements.txt
pip list --format=freeze > requirements.txt
conda install --yes --file requirements.txt
conda install --use-local 包名称    # 安装根目录的pkgs文件下的本地包
pip换源操作
# 临时换源 豆瓣源
pip3 install 模块 -i http://pypi.douban.com/simple/ --trusted-host pypi.douban.com
pip3 install 模块 -i http://pypi.tuna.tsinghua.edu.cn/simple/ --trusted-host tuna.tsinghua.edu.cn
pip3 install 模块 -i http://mirrors.aliyun.com/pypi/simple/ --trusted-host aliyun.com

防止权限不足 加 --user

# pip相关
pip -V  # 查询
pip list

# 可选择的源
清华:https://pypi.tuna.tsinghua.edu.cn/simple/

阿里云:http://mirrors.aliyun.com/pypi/simple/

中国科技大学 https://pypi.mirrors.ustc.edu.cn/simple/

华中科技大学:http://pypi.hustunique.com/

山东理工大学:http://pypi.sdutlinux.org/

豆瓣:http://pypi.douban.com/simple/

中科大:https://pypi.mirrors.ustc.edu.cn
通过下面的操作进行pip全局换源
要永久更改
pip的软件包源,你可以编辑或创建pip的配置文件,并在其中设置新的源。以下是具体的步骤:
打开或创建
pip的配置文件。配置文件通常位于用户主目录下的.pip目录中。你可以使用文本编辑器打开或创建这个文件。如果不存在.pip目录,你可以创建它。mkdir -p ~/.pip在
.pip目录中创建一个文件,命名为pip.conf(如果使用的是 Python 3,可能需要创建pip.ini文件)。touch ~/.pip/pip.conf打开
pip.conf文件,并添加以下内容:[global] index-url = https://pypi.org/simple/上述示例将
index-url设置为 Python Package Index(PyPI)的默认源。你可以将https://pypi.org/simple/替换为其他源的地址,如清华大学的镜像源等。[global] index-url = https://pypi.tuna.tsinghua.edu.cn/simple保存并关闭文件。
现在,
pip将使用你指定的源来安装软件包。这样设置后,你不再需要每次使用pip install命令时都手动指定源。