Latex 相关命令及官方文档
推荐官方文档,里面例子很多!
algorithm2e官方文档
Introduction to LaTeX on Linux: https://linuxconfig.org/introduction-to-latex-on-linux
Mac 下vs code无法找到latex命令
文章目录
- 相关内容
- LaTeX/命令词汇表
- LaTeX中设置字体颜色的三种方式
- 长公式换行及对齐
- 伪代码
-
- 加注释
- 伪代码例子
- Code using algorithm packagePermalink
- Code using algorithm2e package
- Write Function within Algorithm
- eps转pdf
- pdf去白边
- Letax转Word
- 设置参考文献
- 引用跳转
- 表格
- 合并单元格
- Latex figure 引用显示错误
- 插图片:垂直排版
- IEEE论文检测的字体未嵌入问题Times New Roman
- 注意事项
相关内容
- Gnuplot绘图
LaTeX/命令词汇表
里面记录了大量命令的解释:https://en.wikibooks.org/wiki/LaTeX/Command_Glossary
LaTeX中设置字体颜色的三种方式
https://blog.csdn.net/meiqi0538/article/details/105978246
\usepackage{color}
1.使用系统自定义的颜色
使用语法:
\textcolor{red/blue/green/black/white/cyan/magenta/yellow}{text}
其中:
{red/blue/green/black/white/cyan/magenta/yellow}为系统自定义的颜色。
{text}为需要着色的文字内容。
例如:
\textcolor{red}{AIAS编程有道}、\textcolor{blue}{AIAS编程有道}、\textcolor{yellow}{AIAS编程有道}、\textcolor{green}{AIAS编程有道}

2.使用RGB组合值设置颜色
使用语法:
\textcolor[rgb]{r,g,b}{text}
\textcolor[RGB]{R,G,B}{text}
其中:
[rgb]设置\textcolor选用rgb配色方案;
{r,g,b}代表red、green和blue三种颜色的组合,取值范围为[0-1]
{text}为需要着色的文字内容。
{R,G,B}代表red、green和blue三种颜色的组合,取值范围为[0-255]
例如:
\textcolor[rgb]{0.5,0.6,0.7}{AIAS编程有道}、\textcolor[rgb]{0.5,0.8,0.7}{AIAS编程有道}、\textcolor[rgb]{0.1,0.8,0.9}{AIAS编程有道}

3.自定义一种颜色,直接调用
自定义方式1:
\definecolor{ColorName}{rgb}{r,g,b}
这时r/g/b的定义域就在[0-1],可参考方法2。

\definecolor{ColorName}{RGB}{R,G,B}
这时R/G/B的定义域就在[0-255],可参考方法2。

这里为颜色定义了名称ColorName,下面可以直接调用这个颜色方案即可。
调用方式:\textcolor{ColorName}{text}。操作方式可参考方法2。
长公式换行及对齐
方法1
\begin{equation}
\begin{aligned}
\theta ^{*},\theta ^{'*}&= \argmin\limits_{\theta,\theta^{'}}\frac{1}{n}\sum_{n}^{i=1}L\left (\textbf{x}^{(i)},\textbf{x}^{'(i)}  \right )\\
&=\argmin\limits_{\theta,\theta^{'}}\frac{1}{n}\sum_{n}^{i=1}L\left (\textbf{x}^{(i)},g_{\theta ^{'}}\left ( f_{\theta }\left ( \textbf{x}^{i}\right )\right )\right )
\end{aligned}
\label{f2}
\end{equation}
方法2
https://blog.csdn.net/yangguangdblu/article/details/78790723
长公式换行用\,对齐用&,宏包\usepackage{amsmath}
\begin{equation*}%加*表示不对公式编号
\begin{split}
PMV =&[0.303*exp(-0.036M)+0.0275]*\{M-W-3.05*[5.733-\\
&0.007(M-W)-P_a]-0.42*(M-W-58.2)-0.0173M*\\
&(5.867-P_a)-0.0014M*(34-t_a)-3.96*10^-8*f_cl*[(t_cl+\\
&273)^4-(t_r+273)^4]-f_cl*h_c*(t_cl-t_a)\}
\end{split}
\end{equation*}
伪代码
加注释
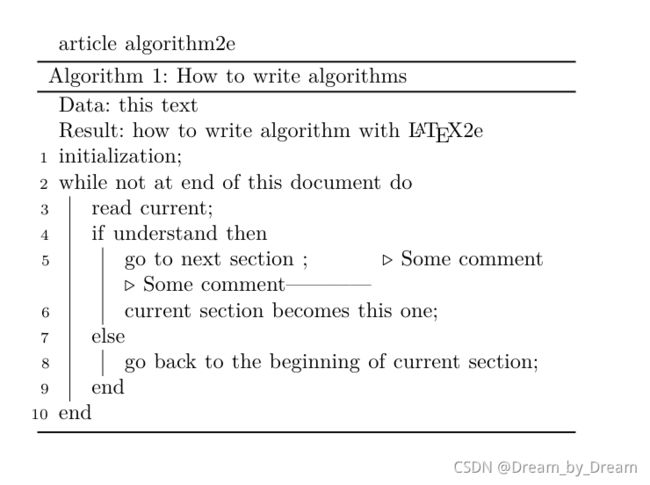
\documentclass{article}
\usepackage{algorithm2e}
\SetKwComment{Comment}{$\triangleright$\ }{}
\begin{document}

\begin{algorithm}[H]
  \SetAlgoLined
  \KwData{this text}
  \KwResult{how to write algorithm with \LaTeX2e }
  initialization\;
  \While{not at end of this document}{
    read current\;
    \eIf{understand}{
      go to next section \Comment*[r]{Some comment}
      \Comment{Some comment------------}
      current section becomes this one\;
    }{
      go back to the beginning of current section\;
    }
  }
  \caption{How to write algorithms}
\end{algorithm}
\end{document}
伪代码例子
Latex写算法伪代码
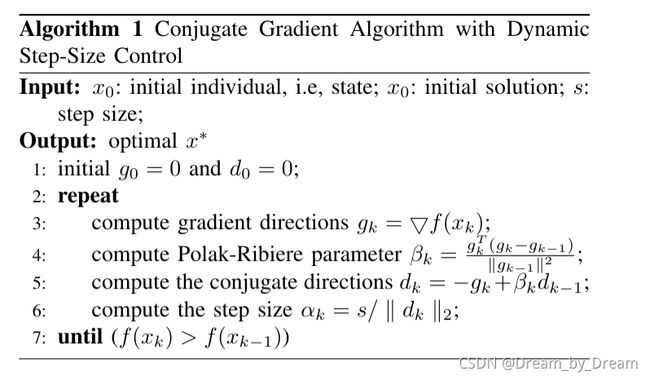
1.模板一
\documentclass[conference]{IEEEtran}
\usepackage{algorithm}
\usepackage{algpseudocode}
\usepackage{amsmath}
\begin{document}
%% 写算法伪代码或者流程的前期准备
\renewcommand{\algorithmicrequire}{\textbf{Input:}}  % Use Input in the format of Algorithm
\renewcommand{\algorithmicensure}{\textbf{Output:}} % Use Output in the format of Algorithm

\begin{algorithm}[h]
  \caption{Conjugate Gradient Algorithm with Dynamic Step-Size Control} % 名称
  \label{alg::conjugateGradient}
  \begin{algorithmic}[1]
    \Require
      $x_0$: initial individual, i.e, state;
      $x_0$: initial solution;
      $s$: step size;
    \Ensure
      optimal $x^{*}$
    \State initial $g_0=0$ and $d_0=0$;
    \Repeat
      \State compute gradient directions $g_k=\bigtriangledown f(x_k)$;
      \State compute Polak-Ribiere parameter $\beta_k=\frac{g_k^{T}(g_k-g_{k-1})}{\parallel g_{k-1} \parallel^{2}}$;
      \State compute the conjugate directions $d_k=-g_k+\beta_k d_{k-1}$;
      \State compute the step size $\alpha_k=s/\parallel d_k \parallel_{2}$;
    \Until{($f(x_k)>f(x_{k-1})$)}
  \end{algorithmic}
\end{algorithm}
\end{document}
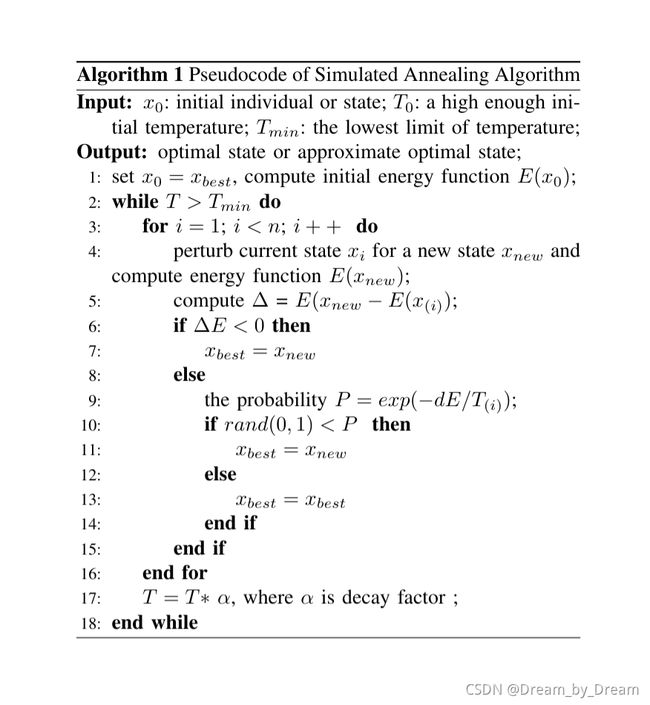
\documentclass[conference]{IEEEtran}
\usepackage{algorithm}
\usepackage{algorithm}
\usepackage{algorithmicx}
\usepackage{algpseudocode}
\usepackage{amsmath}
\usepackage[top=2cm, bottom=2cm, left=2cm, right=2cm]{geometry}
\begin{document}

%% 写算法伪代码或者流程的前期准备
\renewcommand{\algorithmicrequire}{\textbf{Input:}}  % Use Input in the format of Algorithm
\renewcommand{\algorithmicensure}{\textbf{Output:}} % Use Output in the format of Algorithm

\begin{algorithm}[h]
  \caption{Pseudocode of Simulated Annealing Algorithm} % 名称
  \begin{algorithmic}[1]
    \Require
      $x_0$: initial individual or state;
      $T_0$: a high enough initial temperature;
      $T_{min}$: the lowest limit of temperature;
    \Ensure
       optimal state or approximate optimal state;
       \State set $x_0 = x_{best}$, compute initial energy function $E(x_0)$;
       \While {$T > T_{min}$}
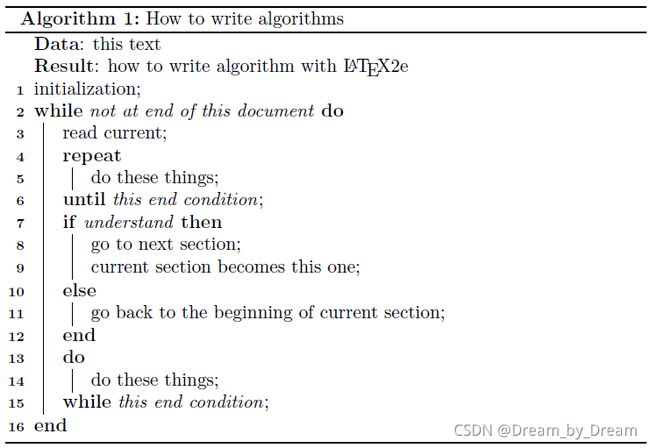
\For{$i = 1$; $i\documentclass{article}
\usepackage[linesnumbered, ruled]{algorithm2e}
\SetKwRepeat{Do}{do}{while}%
\begin{document}
\begin{algorithm}[H]
\KwData{this text}
\KwResult{how to write algorithm with \LaTeX2e }
initialization\;
\While{not at end of this document}{
read current\;
\Repeat{this end condition}{
do these things\;
}
\eIf{understand}{
go to next section\;
current section becomes this one\;
}{
go back to the beginning of current section\;
}
\Do{this end condition}{
do these things\;
}
}
\caption{How to write algorithms}
\end{algorithm}
\end{document}
Code using algorithm packagePermalink
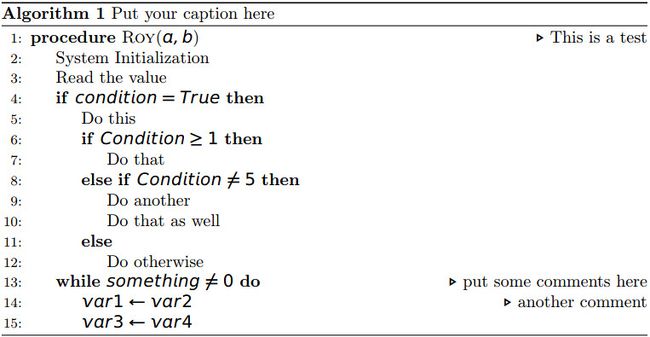
https://shantoroy.com/latex/how-to-write-algorithm-in-latex/
\documentclass[a4paper]{article}

\usepackage[margin=1.5in]{geometry}    % For margin alignment
\usepackage[english]{babel}
\usepackage[utf8]{inputenc}
\usepackage{algorithm}
\usepackage{arevmath}     % For math symbols
\usepackage[noend]{algpseudocode}

\title{Algorithm template}
\author{Roy}

\date{\today}    % Today's date

\begin{document}
\maketitle
\section{Demo code}

\begin{algorithm}
\caption{Put your caption here}
\begin{algorithmic}[1]

\Procedure{Roy}{$a,b$}       \Comment{This is a test}
    \State System Initialization
    \State Read the value
    \If{$condition = True$}
        \State Do this
        \If{$Condition \geq 1$}
        \State Do that
        \ElsIf{$Condition \neq 5$}
        \State Do another
        \State Do that as well
        \Else
        \State Do otherwise
        \EndIf
    \EndIf

    \While{$something \not= 0$}  \Comment{put some comments here}
        \State $var1 \leftarrow var2$  \Comment{another comment}
        \State $var3 \leftarrow var4$
    \EndWhile  \label{roy's loop}
\EndProcedure

\end{algorithmic}
\end{algorithm}

\end{document}
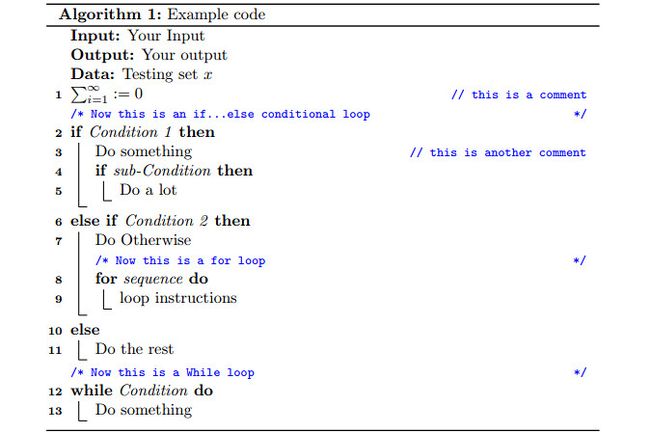
Code using algorithm2e package
\documentclass{article}
\usepackage{xcolor}
\usepackage[linesnumbered,ruled,vlined]{algorithm2e}

\title{Another algorithm template}
\author{Roy}

%%% Coloring the comment as blue
\newcommand\mycommfont[1]{\footnotesize\ttfamily\textcolor{blue}{#1}}
\SetCommentSty{mycommfont}

\SetKwInput{KwInput}{Input}                % Set the Input
\SetKwInput{KwOutput}{Output}              % set the Output


\begin{document}
\maketitle

\begin{algorithm}[!ht]
\DontPrintSemicolon

  \KwInput{Your Input}
  \KwOutput{Your output}
  \KwData{Testing set $x$}
  $\sum_{i=1}^{\infty} := 0$ \tcp*{this is a comment}
  \tcc{Now this is an if...else conditional loop}
  \If{Condition 1}
    {
        Do something    \tcp*{this is another comment}
        \If{sub-Condition}
        {Do a lot}
    }
    \ElseIf{Condition 2}
    {
    	Do Otherwise \;
        \tcc{Now this is a for loop}
        \For{sequence}
        {
        	loop instructions
        }
    }
    \Else
    {
    	Do the rest
    }

    \tcc{Now this is a While loop}
   \While{Condition}
   {
   		Do something\;
   }

\caption{Example code}
\end{algorithm}

\end{document}
Write Function within Algorithm
第一种风格:
\begin{algorithm}[H]
\SetKwInput{KwInput}{Input}                % Set the Input
\SetKwInput{KwOutput}{Output}              % set the Output
\DontPrintSemicolon

  \KwInput{Your Input}
  \KwOutput{Your output}
  \KwData{Testing set $x$}

% Set Function Names
  \SetKwFunction{FMain}{Main}
  \SetKwFunction{FSum}{Sum}
  \SetKwFunction{FSub}{Sub}

% Write Function with word ``Function''
  \SetKwProg{Fn}{Function}{:}{}
  \Fn{\FSum{$first$, $second$}}{
        a = first\;
        b = second\;
        sum = first + second\;
        \KwRet sum\;
  }
  \;

% Write Function with word ``Def''
  \SetKwProg{Fn}{Def}{:}{}
  \Fn{\FSub{$first$, $second$}}{
        a = first\;
        b = second\;
        sum = first - second\;
        \KwRet sum\;
  }
  \;

  \SetKwProg{Fn}{Function}{:}{\KwRet}
  \Fn{\FMain}{
        a = 5\;
        b = 10\;
        Sum(5, 10)\;
        Sub(5, 10)\;
        print Sum, Sub\;
        \KwRet 0\;
  }
\end{algorithm}
\documentclass{article}
\usepackage{algorithm2e}

\SetKwComment{Comment}{$\triangleright$\ }{}
\begin{document}

\begin{algorithm}[H]
\SetAlgoLined    %设置线型,\SetAlgoLined becomes the default, see section 9.6 for explanations about the \SetAlgoLined
macros
\DontPrintSemicolon
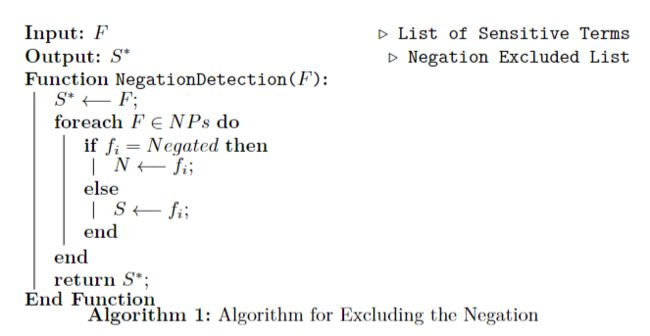
\KwIn{$ F $\Comment*[r]{List of Sensitive Terms}}
\KwOut{$ S^{*} $ \Comment*[r]{Negation Excluded List}}

    \SetKwFunction{FMain}{NegationDetection}
    \SetKwProg{Fn}{Function}{:}{}
    \Fn{\FMain{$F$}}{
        $ S^{*}  \longleftarrow F $;

        \ForEach{$ F \in NPs $}
        {\eIf{$ f_i = Negated $}
            {$ N \longleftarrow f_i;$}
            {$ S \longleftarrow f_i;$}

        }
        \textbf{return} $ S^{*}; $
    }
    \textbf{End Function}


\caption{Algorithm for Excluding the Negation}
\label{NagetionAlgo}
\end{algorithm}

\end{document}
eps转pdf
	epstopdf ${figname}.eps  ${figname}.pdf
	echo "finish ${figname}.eps -> ${figname}.pdf"
	pdfcrop ${figname}.pdf  # 去白边
	mv ${figname}-crop.pdf ${figname}.pdf
pdf去白边
1.ubuntu上安装软件
sudo apt install texlive-extra-utils
pdfcrop ${figname}.pdf  # 去白边
2.在线工具
https://pdfresizer.com/crop/6b5c7b2d7784.pdf
Letax转Word
pandoc
sudo apt-get install pandoc
# pandoc
# eq-1
pandoc input.md -o output.docx -w docx  --pdf-engine xelatex
# eq-2
pandoc input.tex -o output.docx -w docx --reference-doc ref.docx --pdf-engine xelatex
其中 <files> 为输入的内容,其输入即可以来自文件,也可以来自标准输入甚至网页链接。而 <options> 为参数选项。
主要的参数选项有:
-f <format>、-r <format>:指定输入文件格式,默认为 Markdown;
-t <format>、-w <format>:指定输出文件格式,默认为 HTML;
-o <file>:指定输出文件,该项缺省时,将输出到标准输出;
--highlight-style <style>:设置代码高亮主题,默认为 pygments;
-s:生成有头尾的独立文件(HTML,LaTeX,TEI 或 RTF);
-S:聪明模式,根据文件判断其格式;
--self-contained:生成自包含的文件,仅在输出 HTML 文档时有效;
--verbose:开启 Verbose 模式,用于 Debug;
--list-input-formats:列出支持的输入格式;
--list-output-formats:列出支持的输出格式;
--list-extensions:列出支持的 Markdown 扩展方案;
--list-highlight-languages:列出支持代码高亮的编程语言;
--list-highlight-styles:列出支持的代码高亮主题;
-v、--version:显示程序的版本号;
-h、--help:显示程序的帮助信息。
虽然 Pandoc 提供了用于指定输入输出格式的参数,但是很多时候该参数不必使用。Pandoc 已经足够聪明到可以根据文件名判断输入输出格式,所以除非文件名可能造成歧义,否则这两个参数都可以省略。
设置参考文献
摘抄自: LaTeX格式模板四-参考文献的引用
第一种引用方式如下图,缺点就是当参考论文较多时管理麻烦。
\begin{thebibliography}{99}
\bibitem{索引名1} Fowler M. Refactoring: improving the design of existing code[M]. Pearson Education India, 1999.\\
\bibitem{索引名2} Guo Y, Seaman C, Zazworka N, et al. Domain-specific tailoring of code smells: an empirical study[C]//Proceedings of the 32nd ACM/IEEE International Conference on Software Engineering-Volume 2. ACM, 2010: 167-170.
\end{thebibliography}
第二种引用方式如下图,只有简短的两句话。那些参考文献则在liu.bib这个文件中,这个文件的格式是BitTex格式,JabRef对这些文献可以按BitTex的格式进行整理。 bibliographystyle花括号中的unsrt的意思是让引用的论文在参考文献部分按引用的先后顺序排序。
对于JabRef的使用和bibliographystyle花括号中的参数{在生成的论文PDF中这些引用到的论文如何排序的方式,是按字母排序还是引用先后},网上的介绍更详细,这里只是做个简单的介绍。
\bibliographystyle{unsrt}
\bibliography{liu}
反正最后的显示效果都是这样
附注小点:前引号
打引号的时候,前引号会变得跟后引号一样吗,这时候要用 ``(Tab键上面的那个键),敲两遍那个键就可以了。
附注:论文中标点符号
要符合默认规定,要空格,大家可以看一下别人的论文,每个标点符号后都要空一格。
参考:
IEEE Trans LaTex模板参考文献格式
\bibliographystyle格式对比
引用跳转
有的latex模板中的引用点击之后不能直接跳转,故需要自己导入要给包:
 \usepackage[backref]{hyperref}  % 引用会边框
 \usepackage[hidelinks]{hyperref} % 去掉边框
表格
\begin{table}[!t]
    \caption{Table Head}
    %\vspace{-0.1in}
    \label{tab:data}
    \centering
    \footnotesize
    {\renewcommand{\arraystretch}{1.2}
    % \setlength{\tabcolsep}{3pt} %colums
    \begin{tabular}{l| c |c| c }
        % \toprule
        \hline

        \hline % 与上面的线重合加粗,注意需要与上面的\hline之间加一个空行
        {\textbf{RR}} &
        {\textbf{NN}} &
        {\textbf{BB}} &
        {\textbf{FF}} \\
         \hline
         bbb~\cite{b} & 50,636,154 & 1,949,412,601 & 33GB \\
         \hline
         aaa~\cite{a} & 3 & 2 & 1 \\
        % \bottomrule
        \hline

        \hline
    \end{tabular}
    }
    \vspace{-0.1in}
\end{table}
合并单元格
注意: 如果出现合并后线重合或者出现多出线条,考虑是否是\multicolumn{2}{|c|}{\multirow{2}*{合并两行两列}}里面的|c|中|的影响。
- https://blog.csdn.net/wzxlovesy/article/details/69063271
\documentclass[a4paper,12pt]{report}
\usepackage[UTF8,nopunct]{ctex}
\usepackage{multirow}

\begin{document}

\begin{table}
   \centering
   \begin{tabular}{|c|c|c|c|}
   	\hline
   	\multicolumn{2}{|c|}{\multirow{2}*{合并两行两列}}  & 三 & 四 \\
   	\cline{3-4}
   	\multicolumn{2}{|c|}{~} & 3 & 4 \\
   	\hline
   \end{tabular}
\end{table}

\end{document}
————————————————
版权声明:本文为CSDN博主「TheNetAdmin」的原创文章,遵循CC 4.0 BY-SA版权协议,转载请附上原文出处链接及本声明。
原文链接:https://blog.csdn.net/wzxlovesy/article/details/69063271
\documentclass[a4paper,12pt]{report}
\usepackage[UTF8,nopunct]{ctex}

\begin{document}

\begin{table}
	\centering
	\begin{tabular}{|c|c|c|c|}
		\hline
		\multicolumn{2}{|c|}{合并一行两列} & 三 & 四 \\
		\hline
		1 & 2 & 3 & 4 \\
		\hline
	\end{tabular}
\end{table}

\end{document}

2. 更复杂的:
参考:https://blog.csdn.net/weixin_41519463/article/details/103737464

\begin{table*}[t]
\centering
\caption{MAP scores of teacher model, different student models with 4 widths and three baseline models with different length of binary codes on CIFAR-10 and SUN datasets.}
\label{table1}
\begin{tabular}{|c|c|c|c|c|c|c|c|c|c|c|c|}
\hline
\multicolumn{2}{|c|}{\multirow{2}{*}{Model}} &\multirow{2}{*}{FLOPs}&\multirow{2}{*}{Params} & \multicolumn{4}{c|}{CIFAR-10}&\multicolumn{4}{c|}{SUN}\\
\cline{5-12}

\multicolumn{2}{|c|}{} & & & 12bits & 24bits & 32bits & 48bits & 12bits & 24bits & 32bits & 48bits \\
\hline

\multicolumn{2}{|c|}{Teacher} &4.12G	&25.56M	&0.87841	&0.89512	&0.9014	&0.90601	&0.83587	&0.85736	&0.86297	&0.87103\\
\hline

%0.25x-----------------
\multirow{4}{*}{$0.25\times$} & Stu-1 & 0.15G & 1.03M &
0.70746 & 0.73458 &	0.74909 &	0.75833 &	0.69618 &	0.76631 &	0.78075 &	0.78787 \\
\cline{2-12}

\multirow{4}{*}{} & Stu-2 &0.19G	&1.08M	&0.7629	&0.79111	&0.80039	&0.80519	&0.73539	&0.79714	&0.80753	&0.81195\\
\cline{2-12}

\multirow{4}{*}{} & Stu-3 &0.26G	&1.43M	&0.84684	&0.86443	&0.87384	&0.88268	&0.79284	&0.83442	&0.84350	&0.84353\\
\cline{2-12}

\multirow{4}{*}{} & Stu-4 & 0.29G	&1.99M	&0.85901	&0.87269	&0.8836	&0.88728	&0.81997	&0.84620	&0.85041	&0.85036\\
\hline
\end{tabular}
\label{table_MAP}
\end{table*}
Latex figure 引用显示错误
一般是因为 \caption 和\label 的相对位置不对。
记住:\label 一定要放在 \caption 后面,一般caption的根据图/表/算法的类型是相对固定的。
参考: https://blog.csdn.net/D_turtle/article/details/83005105
插图片:垂直排版
\begin{figure}
\vspace{-0.2in}
		\centering
		\subfloat[PageRank]{\label{fig:compress_ratio_pr}\hsp
		\includegraphics[scale=0.40]{fig/compress_rate_pr.eps}}
% 		\\
% 		\vspace{-0.2in}
		\subfloat[SSSP]{\label{fig:compress_ratio_sssp}\hsp
		\includegraphics[scale=0.40]{fig/compress_rate_sssp.eps}}
		\vspace{-0.2in}
		\caption{Compression ratio and algorithm running time as a function of compression factor.}
		\label{fig:compress_ratio}
		\vspace{-0.1in}
\end{figure}
IEEE论文检测的字体未嵌入问题Times New Roman
参考:
- IEEE论文检测的字体未嵌入问题Times New Roman,Bold, Times New Roman,Italic is not embedded解决方法
- EDAS字体嵌入问题解决方法
投 IEEE的会议论文时,有些会议要求一定要投pdf格式的文档,而且所有字体一定要embeded,所谓字体embeded就是把这种字体嵌入文档,那么 以后即使这个文档在其他任何系统下打开,无论该系统有没有这个字体,都不会出现乱码,可移植性比较强,当然嵌入后文档体积会有所增大。
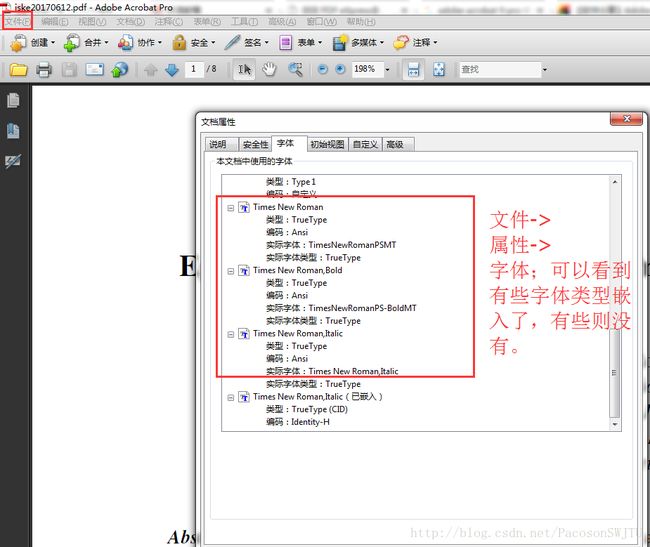
首先告诉大家如何看自己的pdf文档字体是否嵌 入:在pdf格式的文件中,点“文件”-> “文档属性”-> “字体”,显示的就是你文档中用的所有字体了,每一个字体后面,如果注明了“embeded(已嵌入)”或“embeded subset(已嵌入子集)”,就说明是嵌入了,否则就要想办法。
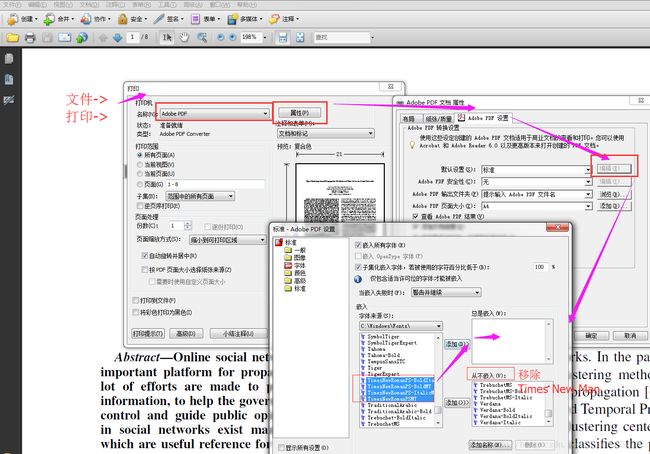
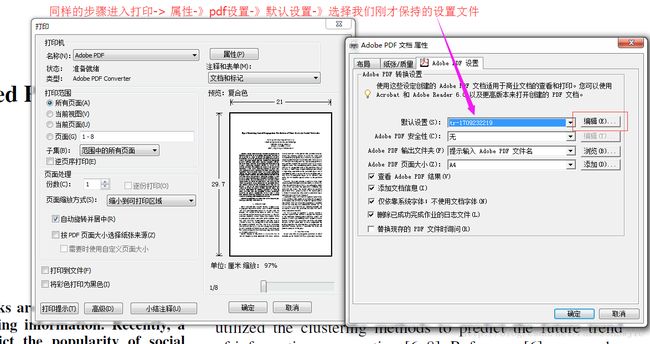
下面是一个更简单的方法:
1.用acrobat打开不满足要求的pdf文档
2.打印,选择Adobe PDF打印机,
3.点击属性,Adobe PDF 设置
4.点"编辑"按钮
5.在最左边点击"字体"——“添加名称”,然后输入Helvetica,选择总是嵌入列表,然后添加、完成。(出现问题一般都是Matlab,莫名其妙的默认字体Helvetica!)
6. 点击确认,保存到和文件同一个文件夹下即可。
7. 最后打印,选择Adobe PDF打印机,再打印就大功告成了!!
注意事项
- lable: 命名中不要带下划线.


