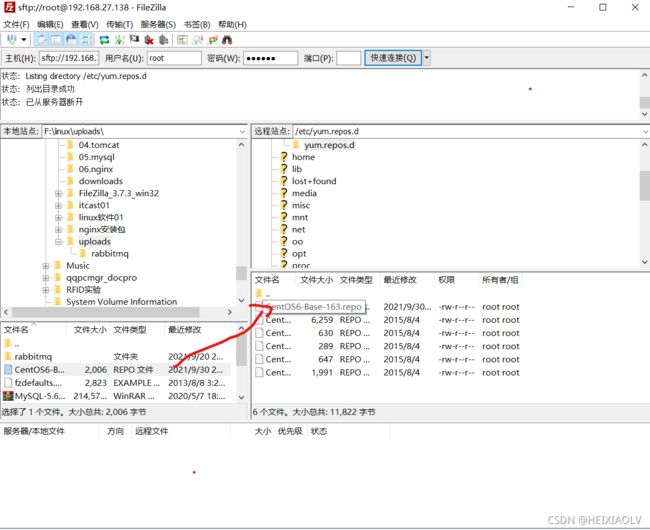
关于配置yum源(1,2,3步可以解决yum源不匹配问题,如果在clean和makecache之后仍不能解决,可以参考后面的步骤)
因为装的是centos6.7版本,而与之匹配的yum源在两年前也宣布不再维护,所以当时百度了有个更换yum源的教程,弄了之后就好了。
后来有一次因为用yum下载不了东西,以为要更换一个新的yum源,找了好几个(阿里的,163的等等),自己瞎搞,弄得yum源下载什么东西都不行了(一直报下面这个错)
Loading mirror speeds from cached hostfile Could not retrieve mirrorlist

http://mirrorlist.centos.org/?release=6&arch=i386&repo=os&infra=stock

error was 14: PYCURL ERROR 6 - "Couldn't resolve host 'mirrorlist.centos.org'"
错误:Cannot find a valid baseurl for repo: base
然后自己弄了好久没弄好,昨天加今天一个小时,终于给弄出来了
下面是具体教程
1.先下载你需要的yum源链接,如我的是centos6.7版本,我下载了这个:http://mirrors.163.com/.help/CentOS6-Base-163.repo
你们可以根据自己的需要下载对应的yum源 阿里源的地址:
https://developer.aliyun.com/mirror/centos?spm=a2c6h.13651102.0.0.3e221b11shelh6
2.把 刚刚下载的 yum源 上传到你们的linux服务器 ,放到 /etc/yum.repos.d 下,我用的是 filezilla(找到后直接拖拽就可以上传了) 你们也可以用其他的,比如 lrzsz(我yum源没坏的时候喜欢用这个,命令行窗口输入 rz 就可以上传、下载文件了)
3.上传好后,切换到 /etc/yum.repos.d ,命令行输入以下命令
cd /etc/yum.repos.d

ll            #查看目录下的文件

mv CentOS6-Base-163.repo CentOS-Base.repo  #改名

yum clean all        #清缓存
(4-8步可以参考:centos6 yum源失效的最新操作方式,解决:[Errno 14] PYCURL ERROR 22_新月爱文宇的博客-CSDN博客)
4.备份
mv /etc/yum.repos.d/CentOS-Base.repo /etc/yum.repos.d/CentOS-Base.repo.backup
5.下载新的 CentOS-Base.repo 到 /etc/yum.repos.d/
wget -O /etc/yum.repos.d/CentOS-Base.repo https://mirrors.aliyun.com/repo/Centos-6.repo6.运行 yum makecache 生成缓存
[root@bogon ~]#yum makecache
已加载插件:fastestmirror, refresh-packagekit, security
Repository base is listed more than once in the configuration
Repository updates is listed more than once in the configuration
Repository extras is listed more than once in the configuration
Repository centosplus is listed more than once in the configuration
Repository contrib is listed more than once in the configuration
Determining fastest mirrors
 * base: mirrors.aliyun.com
 * extras: mirrors.aliyun.com
 * updates: mirrors.aliyun.com
http://mirrors.aliyun.com/centos/6/os/x86_64/repodata/repomd.xml: [Errno 14] PYCURL ERROR 22 - "The requested URL returned error: 404 Not Found"
尝试其他镜像。
To address this issue please refer to the below knowledge base article

https://access.redhat.com/articles/1320623

If above article doesn't help to resolve this issue please open a ticket with Red Hat Support.

http://mirrors.aliyuncs.com/centos/6/os/x86_64/repodata/repomd.xml: [Errno 12] Timeout on http://mirrors.aliyuncs.com/centos/6/os/x86_64/repodata/repomd.xml: (28, 'connect() timed out!')
尝试其他镜像。
http://mirrors.cloud.aliyuncs.com/centos/6/os/x86_64/repodata/repomd.xml: [Errno 14] PYCURL ERROR 6 - "Couldn't resolve host 'mirrors.cloud.aliyuncs.com'"
尝试其他镜像。
错误:Cannot retrieve repository metadata (repomd.xml) for repository: base. Please verify its path and try again
[root@bogon ~]#
7.替换源文件配置, 使用https://mirrors.aliyun.com/centos-vault/
1.官方: 非阿里云ECS用户会出现 Couldn’t resolve host ‘mirrors.cloud.aliyuncs.com’ 信息,不影响使用。用户也可自行修改相关配置: eg:
sed -i -e '/mirrors.cloud.aliyuncs.com/d' -e '/mirrors.aliyuncs.com/d' /etc/yum.repos.d/CentOS-Base.repo
2.替换http成https
sed -i 's/http/https/g' /etc/yum.repos.d/CentOS-Base.repo
3.替换版本,$releasever替换6.7, 6.7是我用的版本
sed -i 's/$releasever/6.7/g' /etc/yum.repos.d/CentOS-Base.repo如何查看自己的$releasever
$releasever的值,当前系统的发行版本。

查看命令:rpm -qi centos-release
可以看到我的是6.7版本的(其实我感觉这个就是你的centos版本)
[root@bogon ~]# rpm -qi centos-release
Name        : centos-release               Relocations: (not relocatable)
Version     : 6                                 Vendor: CentOS
Release     : 7.el6.centos.12.3             Build Date: 2015年08月04日 星期二 00时12分46秒
Install Date: 2021年09月26日 星期日 06时36分20秒      Build Host: c6b9.bsys.dev.centos.org
Group       : System Environment/Base       Source RPM: centos-release-6-7.el6.centos.12.3.src.rpm
Size        : 35634                            License: GPLv2
Signature   : RSA/SHA1, 2015年08月04日 星期二 00时15分08秒, Key ID 0946fca2c105b9de
Packager    : CentOS BuildSystem
Summary     : CentOS release file
Description :
CentOS release files
[root@bogon ~]#
4.替换centos为centos-vault
sed -i 's/centos/centos-vault/g' /etc/yum.repos.d/CentOS-Base.repo8.yum clean all && yum makecache(你们到这一步应该就可以了), 而我makecache出不来,就只有接着百度(错误信息大概意思是缓存的镜像文件里的URL无效了,所以无法下载程序文件来安装。)
[root@bogon yum.repos.d]# yum clean all && yum makecache
已加载插件:fastestmirror, refresh-packagekit, security
Cleaning repos: base extras updates
清理一切
Cleaning up list of fastest mirrors
已加载插件:fastestmirror, refresh-packagekit, security
Determining fastest mirrors
错误: cannot find a valid baseurl for repo: base
[root@bogon yum.repos.d]#
9.我看了一篇文章受到了启发,意识到应该是DNS配置有问题,所以就去修改,先去了 /etc/resolvef.conf9(之前的nameserver只有第四行的192.168.27.2),第一次多加了第五行的 8.8.8.8,保存退出后重启网络,发现又还原了,只剩下之前的四行,便又寻找解决办法,
10.后来到网上查找,发现有人与我同样的问题。原来在CentOS6.7下面直接修改/etc/resolv.conf不行。必须要在/etc /sysconfig/network-scripts/ifcfg-eth0里面最后加上dns的设置。要不然,重启后,肯定使用eth0设置中没有设 dns的相关信息,使/etc/resolv.conf恢复到原来的状态这样设置后,/etc/resolv.conf里面根本就不需要设置。service network restart 后,可以发现/etc/resolv.conf里面就有dns的解析ip了。配置好以后重启网络,cat /etc/resolv.conf,可以看到如上参数。
你们可以参考这个修改/etc/resolv.conf又恢复到原来的状态? - mslog - 博客园
11.我因为之前设置了ifcfg-eth0的快捷方式,所以直接拿来用了,这一步是教大家如何给文件设置快捷方式的。大家可以参考此链接:Linux中ln命令用法 - Alpha Xhon - 博客园
ln是linux中又一个非常重要命令,它的功能是为某一个文件在另外一个位置
建立一个同不的链接(类似Windows的快捷方式),这个命令最常用的参数是-s,
具体用法是:ln –s 源文件 目标文件。
  当我们需要在不同的目录,用到相同的文件时,我们不需要在每一个需要的
目录下都放一个必须相同的文件,我们只要在某个固定的目录,放上该文件,
然后在 其它的目录下用ln命令链接(link)它就可以,不必重复的占用磁盘空间。
例如:ln –s /bin/less /usr/local/bin/less

  -s 是代号(symbolic)的意思。
  这里有两点要注意:
    第一,ln命令会保持每一处链接文件的同步性,也就是说,不论你改动了哪一处,
其它的文件都会发生相同的变化;
    第二,ln的链接又 软链接和硬链接两种,软链接就是ln –s ** **,它只会在你
选定的位置上生成一个文件的镜像,不会占用磁盘空间,硬链接ln ** **,没有参数-s,
它会在你选定的位置上生成一个和源文件大小相同的文件,无论是软链接还是硬链接,
文件都保持同步变化。
  如果你用ls察看一个目录时,发现有的文件后面有一个@的符号,
那就是一个用ln命令生成的文件,用ls –l命令去察看,就可以看到显示的link的路径了。12.设置好DNS以后,便重新执行命令:yum clean all && yum makecache ,终于出现了自己想要的结果,也就是下面这个。
[root@bogon yum.repos.d]# yum clean all && yum makecache
已加载插件:fastestmirror, refresh-packagekit, security
Cleaning repos: base extras updates
清理一切
Cleaning up list of fastest mirrors
已加载插件:fastestmirror, refresh-packagekit, security
Determining fastest mirrors
base                                                     | 3.7 kB     00:00
base/group_gz                                            | 226 kB     00:00
base/filelists_db                                        | 6.4 MB     00:01
base/primary_db                                          | 4.7 MB     00:00
base/other_db                                            | 2.8 MB     00:00
extras                                                   | 3.4 kB     00:00
extras/filelists_db                                      |  38 kB     00:00
extras/prestodelta                                       | 1.3 kB     00:00
extras/primary_db                                        |  37 kB     00:00
extras/other_db                                          |  51 kB     00:00
updates                                                  | 3.4 kB     00:00
updates/filelists_db                                     | 3.5 MB     00:00
updates/prestodelta                                      | 390 kB     00:00
updates/primary_db                                       | 5.4 MB     00:01
updates/other_db                                         |  74 MB     00:12
元数据缓存已建立
[root@bogon yum.repos.d]#
13.执行yun list命令,出现下图所示结果,就代表yum源配置成功了
总结一下:yum源配置了这么久,终于成功了,也希望大家不要放弃,一定可以学有所成!


