【富文本编辑器实战】04 菜单组件和编辑器的整合
组件整合
目录
- 组件整合
-
- 前言
- 整合菜单
-
- 模板编写(template)
- Js 代码编写
- 样式编写
- 整合编辑器
前言
在上一篇文章中,我们对整个编辑器项目的大体结构有了一定的了解,主要分为菜单栏和编辑区。菜单栏包括了编辑器的主要文本操作功能,且菜单项是可配置的。编辑器界面显示比较简单,是一个可编辑的 div 区域。接下来我们就来把编辑器的整体框架搭建起来,让其可以在界面上显示出来。
整合菜单
首先,在 components 目录下,新建两个目录,分别是 content 目录,存放编辑区相关组件;和 menu 目录,存放菜单相关组件。然后在 menu 目录下新建一个文件 menubar.vue ,这就是菜单栏组件,菜单项将要被整合到这个组件里。
下面我们就来完成 menubar.vue 这个文件的编写
模板编写(template)
先给出代码:
<template>
  <div class="syl-editor-menubar" id="syl-editor-menubar">
    <div v-for="menu in viewMenu" :key="menu" class="menubar-item">
      <a
        href="javascript:;"
        :class="[stated[menu].status, menus[menu].className]"
        @click.stop="handleEvent($event, menu)"
        :title="lang[menu].title"
      >
        <span>
          <i :class="menus[menu].icon" aria-hidden="true">i>
        span>
        <span v-if="menus[menu].dropList">
          <i
            :class="[
              'drop-list-icon',
              stated[menu].showDropList ? 'fa fa-angle-up' : 'fa fa-angle-down',
            ]"
            aria-hidden="true"
          >i>
        span>
      a>
    div>
  div>
template>
首先是模版外层的代码,这是通用写法,以 标签表示这是模版部分。
这里的数据对象有四个:menus,全部菜单项配置;viewMenus ,可见的菜单项;stated,store 中的数据源;lang,菜单的语言集。
因为之前配置了很多菜单项,包括 className,action,以及 icon 等。同时,我们在编辑器全局配置中,配置了 viewMenu 选项,即可见的菜单。所以使用 v-for 循环取出菜单项的时候,应该从 viewMenu 中读取。
另外,项目中使用的图标来自于 fontawesome,因为它的资源较多且大部分都是免费的。需要的伙伴们可以私信博主免费获取本项目用到的字体图标资源。
Js 代码编写
同样,这里也先给出代码:
<script>
import Config from "../../config/index";
import Menu from "../../config/menu";
import lang from "../../config/lang";

export default {
  name: "MenubarComponent",
  data() {
    let { viewMenu } = Config.getConfig();
    let menus = Menu.getMenu();
    return {
      viewMenu,
      menus,
      lang,
    };
  },
  computed: {
    stated: function () {
      return this.$store.state.menuBar;
    },
  },
  methods: {
    handleEvent($event, menu) {
      if (this.stated[menu].status == "disable") {
        return;
      }
      this.showDropList($event, menu);
      this.updateMenu(menu);
    },
    showDropList($event, menu) {
      if (this.menus[menu].dropList) {
        this.$store.dispatch("showDropList", {
          name: menu,
          display: !this.$store.state.menuBar[menu].showDropList,
        });
        this.$store.dispatch(
          "getNodePosition",
          $event.currentTarget.getBoundingClientRect()
        );
      }
    },
    updateMenu(menu) {
      let state = {};
      if (this.menus[menu].action) {
        this.$store.dispatch("execCommand", {
          name: this.menus[menu].action,
          value: null,
        });
        if (this.stated[menu].status) {
          state[menu] =
            this.stated[menu].status == "active" ? "default" : "active";
        }
      }
      this.$store.dispatch("updateMenuStatus", state);
    },
  },
};
script>
引入相关的配置文件,读取所需数据。在组件中, data 必须是一个函数。在 data 函数中,返回之前使用的 menu 、 viewMenu 、 lang 。
在 computed 中,返回 store 中 menuBar 的相关数据。前面的文章说过,在组件中获取 store 数据,最好的方式就是在 computed 属性中获取。这里的 stated 就表示 menuBar 菜单栏对象,保存着各个菜单项的状态。
在 methods 属性中,包含了三个方法。 handleEvent 用于处理菜单栏的点击事件。同时传入点击事件和当前菜单项。然后处理该菜单项的下拉框展示,以及更新菜单栏的状态和行为。
样式编写
在本项目中,我们的样式代码不使用 css,而是使用 css 的扩展语言:sass(scss)。如果有兴趣,可以去了解一下,其实 sass 和 css 代码比较类似,不过 sass 更加灵活,写起来更加方便。不过使用的时候,需要被编译为 css 代码,所以需要添加相关的 loader 来处理。所以需要先安装相应的 loader:
npm install sass-loader sass webpack --save-dev
安装完成之后,我们就可以开始编写样式代码了:
<style lang="scss" scoped>
.syl-editor-menubar {
  border: 1px solid #666;
  border-bottom: none;
}
.menubar-item {
  display: flex;
  height: 40px;
  width: 5%;
  padding: 0 1px;
  align-content: center;
  justify-content: center;
  > a {
    display: flex;
    align-items: center;
    justify-content: center;
    height: 40px;
    width: 100%;
    color: #666;
    &.active {
      background: #eee;
    }
    &.default {
      background: #fff;
    }
    &.disable {
      background: #eee;
      cursor: not-allowed;
      opacity: 0.5;
    }
    &:hover {
      background: #eee;
    }
  }
}
.drop-list-icon {
  font-size: 12px;
  margin-left: 5px;
}
style>
整合编辑器
在 content 目录下,新建一个文件 editarea.vue 。这是编辑区组件,后续大部分操作都将在这里面进行,不过暂时不需要做太多工作。代码如下:
<template>
  <div class="syl-editor-editarea">
    <div class="edit-area" id="syl-editor-body" contenteditable="true">
      hello shiyanlou!
    div>
  div>
template>

<script>
export default {
  name: "EditareaComponent",
  data() {
    return {};
  },
};
script>

<style lang="scss" scoped>
.syl-editor-editarea {
  height: 458px;
  min-height: 458px;
  border: 1px solid #666;
  text-align: left;
  padding: 10px 15px;
  overflow-y: auto;
  .edit-area {
    height: 95%;
    outline: none;
    &:active {
      outline: none;
    }
  }
}
style>
这就是编辑区的代码,暂时比较少,后续会逐步增加。注意,虽然这是我们的编辑区,但是却没有任何的文本输入框或者文本输入区域。而只是有一个 div 而已,但是这个 div 具有一个属性 contenteditable="true" ,就是原因所在。
contenteditable 是 HTML5 的一个新属性,它的作用是规定当前元素的内容是否可编辑,比如:
<p contenteditable="true">这是一段可编辑的段落。请试着编辑该文本。p>
添加了这个属性之后,这一个段落就是可编辑的段落,可随意修改。
接下来在 components 文件夹下创建 layout.vue 。作为主要布局组件。在布局中,需要将所有的组件都在这里组装起来,包含菜单组件,编辑区组件, 以及下拉框组件。
<template>
  <div class="hello syl-editor">
    <syl-menubar>syl-menubar>
    <syl-editarea>syl-editarea>
    <div class="drop-list">
      <div v-for="item in list" :key="item">
        <component :is="'syl-' + item">component>
      div>
    div>
  div>
template>
<script>
import Menubar from "./menu/menubar";
import Editarea from "./content/editarea";

export default {
  name: "LayoutComponent",
  data() {
    return {
      list: [], // 下拉框组件列表
    };
  },
  components: {
    // 存放组件
    "syl-menubar": Menubar,
    "syl-editarea": Editarea,
  },
};
script>

<style lang="scss">
h1,
h2 {
  font-weight: normal;
}

li {
  margin: 0;
}

a {
  color: #42b983;
  cursor: pointer;
}

table {
  width: 100%;
  margin: 5px 0 10px 0;
  tr {
    td {
      min-width: 50px;
      padding: 5px;
      border-left: 1px solid #ddd;
      border-top: 1px solid #ddd;
      &:last-child {
        border-right: 1px solid #ddd;
      }
    }
    &:last-child {
      td {
        border-bottom: 1px solid #ddd;
      }
    }
  }
}

img {
  max-width: 100%;
  max-height: auto;
}

.syl-editor {
  max-width: 1000px;
  margin: 0 auto;
}

.drop-list-item {
  max-width: 200px;
  position: absolute;
  border: 1px solid #eee;
  background: #fff;
  li {
    border-bottom: 1px solid #eee;
    a {
      display: inline-block;
      text-decoration: none;
      color: #666;
    }
    &:last-child {
      border: none;
    }
  }
  &:before {
    content: " ";
  }
}
style>
最后一步,修改 App.vue 的内容。这是根组件位置,布局组件需要存放到这个组件里:
代码很简单,只需要导入 Layout 布局组件即可。
在 style 部分,需要做一点工作。因为项目中所使用的图标或者某些样式是用的 font-awesome 。所以,我们需要将它在此处引入到根组件中。首先需要下载并解压到 /src/assets 文件夹下(需要该文件的伙伴可以私信博主免费获取):
最后,在 App.vue 添加 style 部分代码如下:
<style>
@import "../src/assets/font-awesome-4.7.0/css/font-awesome.min.css";

#app {
  font-family: "Avenir", Helvetica, Arial, sans-serif;
  -webkit-font-smoothing: antialiased;
  -moz-osx-font-smoothing: grayscale;
  text-align: center;
  color: #2c3e50;
  margin-top: 60px;
}
.syl-editor-menubar {
  min-height: 40px;
  display: flex;
  align-items: center;
  flex-wrap: wrap;
  justify-content: flex-start;
}
style>
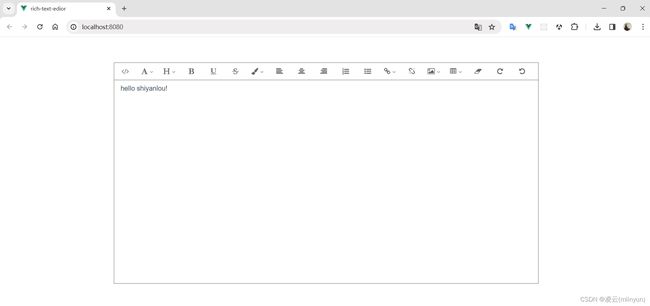
完成到这里,我们就可以启动项目了 npm run serve,启动成功后,我们打开浏览器查看效果如下:


