Elasticsearch8使用统一的CA为HTTP层更新证书
官方文档参考:
Update certificates with the same CA | Elasticsearch Guide [8.10] | Elastic
使用统一的CA为HTTP层更新证书,包括3部分:在ES集群内某个节点上生成证书;将生成的证书拷贝给集群内其他节点;更新kibana配置。
先在Elasticsearch集群内找一个节点(任意节点均可,此处假设为节点Node-1)为HTTP层生成CA证书。
1、在节点Node-1上:
(1) 生成证书:
使用elasticsearch-certutil工具生成CSR(证书签发请求)
./bin/elasticsearch-certutil http这个命令会生成一个zip文件,包含证书和密钥。
Generate a CSR? [y/N]n


Use an existing CA? [y/N]y

(这里我们使用了已有的CA证书)


CA Key: /usr/local/elasticsearch-8.10.2/ca/ca.key

(填写证书路径)


For how long should your certificate be valid? [5y] 100y

(设置证书有效期)


Generate a certificate per node? [y/N]n

(这里我们为所有节点使用统一的证书,可以根据实际需求设置)


Enter all the hostnames that you need, one per line.

When you are done, press  once more to move on to the next step.

(填写集群内所有节点以及要安装Fleet Server的服务器的hostname)


Enter all the IP addresses that you need, one per line.

When you are done, press  once more to move on to the next step.

(填写集群内所有节点以及要安装Fleet Server的服务器的IP地址)


Do you wish to change any of these options? [y/N]n


If you wish to use a blank password, simply press  at the prompt below.

Provide a password for the "http.p12" file:  [ for none](设置密码)

Repeat password to confirm: (重复密码以确认)


What filename should be used for the output zip file? [/usr/local/elasticsearch-8.10.2/elasticsearch-ssl-http.zip]
(设置输出文件路径及名称,默认即可,按【Enter】键继续)


Zip file written to /usr/local/elasticsearch-8.10.2/elasticsearch-ssl-http.zip
证书文件已生成,在/usr/local/elasticsearch-8.10.2/目录下,文件名为elasticsearch-ssl-http.zip

(2)证书生成之后:
解压生成的elasticsearch-ssl-http.zip文件:
unzip elasticsearch-ssl-http.zip解压后会生成两个文件夹,分别是./elasticsearch和./kibana,将./elasticsearch目录下的http.p12文件拷贝到/usr/local/elasticsearch-8.10.2/config/certs/目录下:
cp ./elasticsearch/http.p12 ./config/certs/2、在集群内其他节点上
(1) 从节点Node-1上拷贝http_ca.crt和http.p12文件,可以使用scp命令
(2) 更新密码:
在/usr/local/elasticsearch-8.10.2/bin/目录下执行:
./elasticsearch-keystore add xpack.security.http.ssl.keystore.secure_password

Setting xpack.security.http.ssl.keystore.secure_password already exists. Overwrite? [y/N]y

Enter value for xpack.security.http.ssl.keystore.secure_password: 输入前面在节点Node-1创建证书时生成的密码
3、在kibana上
(1) 拷贝节点Node-1上的elasticsearch-ca.pem
将节点Node-1上/usr/local/elasticsearch-8.10.2/kibana/目录下的elasticsearch-ca.pem拷贝到kibana/config目录下,可以使用scp命令
(2) 编辑kibana.yml文件
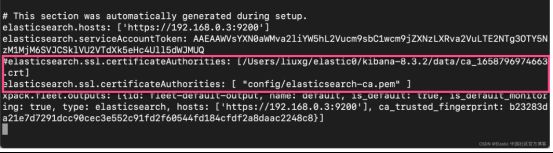
图片来源:https://elasticstack.blog.csdn.net/article/details/125993452
将elasticsearch.ssl.certificateAuthorities修改为config/elasticsearch-ca.pem
(3) 重新启动kibana