使用ssh client与bash scripts轻松管理多台主机
当我们需要控制一个局域网中的很多台服务器时,一个简单的全局操作可能会被放大地异常繁琐,这时我们就会需要新的工具来快速完成这种工作。
我们将使用ssh客户端提供的一些工具来快速完成这一开发工作,我们的开发平台是GNU/Linux。
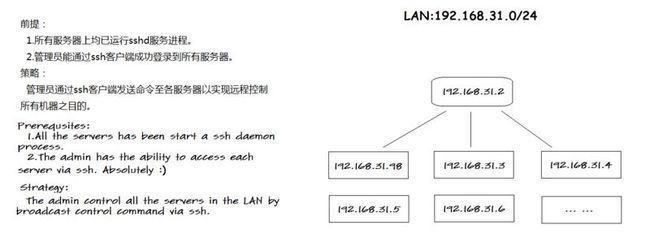
下面即是我们整个系统的鸟瞰图:
第一个工具:
要建立非交互式的ssh连接,采用客户端公钥认证登录的方式是一种很棒的方法。
第一个工具的功能是,将本地ssh客户端的公钥追加到各SlaveServers的/root/.ssh/authorized_keys文件中,以实现ssh公钥登录的认证。
具体实现如下:
SlaveServer.conf
1 #global var: glServerList
2 glServerList="192.168.31.98 \
3               192.168.31.3  \
4               192.168.31.4  \
5               192.168.31.5  \
6               192.168.31.6"
RSAPublicKeyBroadCast.sh
 1 #!/bin/bash
 2
 3 . SlaveServer.conf
 4
 5 function SSH_RSAPublicKeyBroadCast () {
 6   # $1 : sshd port like : 3198
 7   ssh-keygen
 8   declare RSApk_path=/root/.ssh/id_rsa.pub
 9   declare clientRSApk=`cat ${RSApk_path}`
10   declare i
11   for i in $glServerList
12   do
13     echo "communicating via ssh with $i ... ..."
14     ssh -o GSSAPIAuthentication=no -p "$1" root@${i} "mkdir ~/.ssh ; echo ${clientRSApk} >> ~/.ssh/authorized_keys"
15   done
16 }
17 SSH_RSAPublicKeyBroadCast "$1"
其使用、验证请看附录。
第二个工具:
当我们需要将一个本地文件传送到所有SlaveServer的一个相同路径时,我们便需要一个工具来完成这样的任务。
例如:当我们想统一调整所有SlaveServer的sshd服务的参数时,我们需要改变所有SlaveServer上的/etc/ssh/sshd_config文件,这时第二个工具将发挥它的威力。
具体实现如下:
FileBroadCast.sh
 1  #!/bin/bash
 2
 3 . SlaveServer.conf
 4
 5 function SSH_FileBroadCast () {
 6 # $1 : sshd port like : 3198
 7 # $2 : src :local file path like /etc/ssh/sshd_config
 8 # $3 : dest: remote server file path like /etc/ssh/sshd_config
 9 declare i
10 for i in $glServerList
11 do
12   echo "communicating via ssh with $i ... ..."
13   scp -o GSSAPIAuthentication=no -P "$1" "$2" root@${i}:${3}
14 done
15 }
16
17 SSH_FileBroadCast "$1" "$2" "$3"
其使用、验证请看附录。
第三个工具:
在完成第二个工具后,我们有了向所有SlaveServer传送文件的能力,但是,如何向其所有发送"service sshd reload"命令呢?
于是,我们的第三个工具,CommandBroadCast入场。
具体实现如下:
CommandBroadCast.sh
 1 #!/bin/bash
 2
 3 . SlaveServer.conf
 4
 5 function SSH_CommandBroadCast () {
 6 # $1 : sshd port like : 3198
 7 # $2 : command like ' service sshd reload '
 8 declare i
 9 for i in $glServerList
10 do
11   echo "communicating via ssh with $i ... ..."
12   ssh -o GSSAPIAuthentication=no -p "$1" root@${i} "${2}"
13 done
14 }
15
16 SSH_CommandBroadCast "$1" "$2"
其使用、验证请看附录。
第四个工具:
第三个工具可以让我们控制所有的SlaveServer执行我们指定的一段命令,但是,如果我们想让它们执行本地的一个bash脚本呢?
如此,第四个工具的功能是命令所有SlaveServer执行我们在本地定义的一个bash脚本文件。
具体实现如下:
AllSlaveExecLocalScripts.sh
#!/bin/bash

. SlaveServer.conf

function SSH_RemoteServerExecLocalScripts () {
# $1 remoteServerArgs like: root@192.168.31.2
# $2 remoteServer SSH Daemon's port like: 3198
# $3 local bash scripts you want the remoteServer to exec
declare tempFile=`mktemp` #local tmp
declare remoteTmpDir
if ssh -o GSSAPIAuthentication=no -p "$2" "$1" 'declare tempDir=`mktemp -d` ; chmod 700 $tempDir ;

chown root:root $tempDir ; cd $tempDir ; unset tempDir ; pwd ' 1> $tempFile
then
  remoteTmpDir=`tail -1 $tempFile`
  scp -o GSSAPIAuthentication=no -P "$2" "$3" ${1}:$remoteTmpDir 1>/dev/null
  ssh -o GSSAPIAuthentication=no -p "$2" "$1" " bash ${remoteTmpDir}/* ; rm -fr ${remoteTmpDir} "
  rm -f $tempFile
  return 0
else
  rm -f $tempFile
  echo "connect error:exit"
  return 1
fi
}

function SSH_BroadCastExecLocalScripts () {
# $1 : sshd port like : 3198
# $2 local bash scripts you want the remoteServer to exec
declare i
for i in $glServerList
do
  echo "communicating via ssh with $i ... ..."
  SSH_RemoteServerExecLocalScripts "$i" "$1" "$2"
done
}

SSH_BroadCastExecLocalScripts "$1" "$2"
至此,我们的四个工具已经开发完成,接下来请看附录中的实验展示。
附录:
关于实验环境的配置情况,请查看文章《构建一个完整的DNS系统》,这里不再赘述。
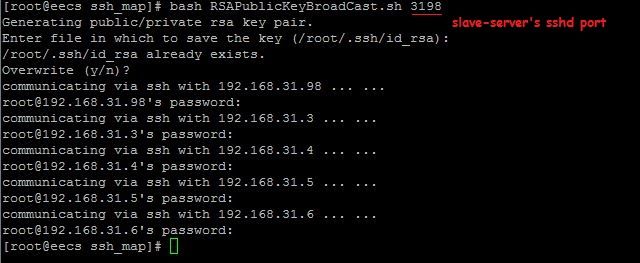
1.控制所有SlaveServer对192.168.31.2主机进行ssh公钥登录认证:
2.由于SlaveServer们的sshd参数设置问题,导致ssh登录连接的建立“异常”缓慢,所以我们需要重新调整所有SlaveServer的sshd配置文件:
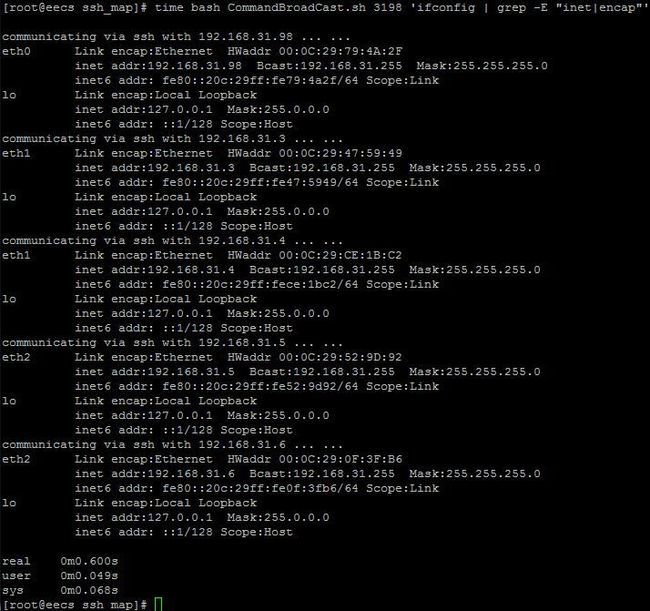
3.向所有SlaveServer发送'service sshd reload'命令:
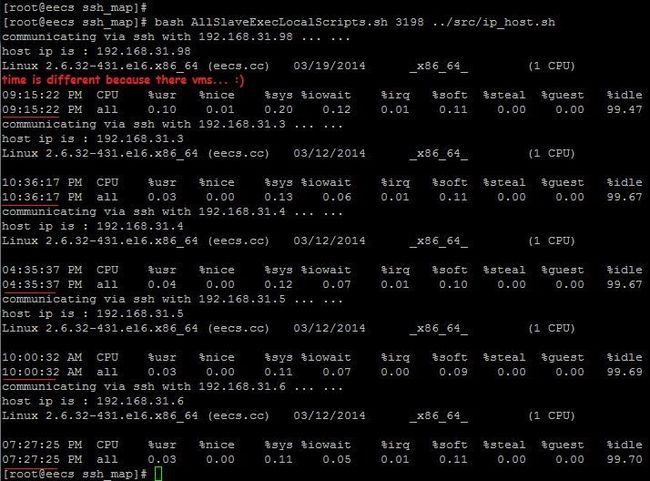
 4.命令所有SlaveServer执行本地主机192.168.31.2上的一个脚本:
ip_host.sh
1 #!/bin/bash
2
3 declare host_ip=`ifconfig | grep -Eo 'inet addr:\<(([0-9]|[1-9][0-9]|1[0-9]{2}|2[0-4][0-9]|25[0-5])\.([0-9]|[1-9][0-9]|1[0-9]{2}|2[0-4][0-9]|25[0-5])\.([0-9]|[1-9][0-9]|1[0-9]{2}|2[0-4][0-9]|25[0-5])\.([0-9]|[1-9][0-9]|1[0-9]{2}|2[0-4][0-9]|25[0-5]))\>' | grep -Eo '\<(([0-9]|[1-9][0-9]|1[0-9]{2}|2[0-4][0-9]|25[0-5])\.([0-9]|[1-9][0-9]|1[0-9]{2}|2[0-4][0-9]|25[0-5])\.([0-9]|[1-9][0-9]|1[0-9]{2}|2[0-4][0-9]|25[0-5])\.([0-9]|[1-9][0-9]|1[0-9]{2}|2[0-4][0-9]|25[0-5]))\>' | head -1`
4
5 echo "host ip is : $host_ip"
6
7 mpstat

至此,我们的工具实验展示结束。如有问题或建议,欢迎讨论 :)


