Webpack5 基本使用 - 2
常用 loader
loader是辅助打包工具。webpack默认只能打包js文件,打包其它模块就需要配置loader来告诉webpack该怎么去打包其它文件。loader可以将文件从不同的语言转换为JavaScript。- 一类文件如果需要多个
loader处理,loader的执行顺序是从后往前。
打包样式文件
打包 css
css 文件需要先用 css-loader 处理,再用 style-loader 插入 标签中。
安装 css-loader、style-loader:
yarn add css-loader style-loader --save
module.exports = {
	module: {
		rules: [
			{
				test: /\.css$/,
				use: [
					// 再用 style-loader 创建 style 标签插入  标签中
					'style-loader',
					// css 文件需要先用 css-loader 处理,将 css 编译成 commonjs 整合到 js 中
					'css-loader'
				]
			}
		]
	}
};
// 使用 localIdentName 自定义生成的样式名称格式,可选的参数有:
// [path] 表示样式表相对于项目根目录所在路径
// [name] 表示样式表文件名称
// [local] 表示样式的类名定义名称
// [hash:length] 表示32位的hash值

module.exports = {
	module: {
		rules: [
			{
				test: /\.css$/,
				use: [
					'style-loader',
					{
						loader: 'css-loader',
						options: {
							modules: {
								localIdentName: '[path][name]-[local]'
							}
						}
					}
				]
			}
		]
	}
};
// index.js
import add from '@utils/add';
import './css/style.css';

// import styles from './css/style.css';
// console.log(styles);

console.log(add(1, 4));
DOCTYPE html>
<html lang="en">
<head>
    <meta charset="UTF-8">
    <title>Titletitle>
head>
<body>
    <h1 class="title">hello webpack5h1>
body>
html>
样式兼容性处理
postcss-loader 自动添加浏览器前缀。
使用 autofixer 插件辅助
autoprefixer 可以指定需要兼容的浏览器。
安装 postcss-loader、autofixer
yarn add postcss-loader autoprefixer --save
// 通过配置加载指定的 css 兼容性样式
// postcss-loader 在 css-loader 之前调用
module.exports = {
	module: {
		rules: [
			{
				test: /\.scss$/,
				use: [
					'style-loader',
					'css-loader',
					{
						loader: 'postcss-loader',
						options: {
							postcssOptions: {
								plugins: [
									[
										'autoprefixer',
										{
											// options
											// 直接在这里指定浏览器版本
											overrideBrowsersList: ['last 5 versions']
										}
									]
								]
							}
						}
					},
					'sass-loader'
				]
			}
		]
	}
};
使用 postcss-preset-env 插件辅助
postcss-preset-env 插件可以指定需要添加的浏览器。
安装 postcss-loader、postcss-preset-env
yarn add postcss-loader postcss-prest-env --save
// 通过配置加载指定的css兼容性样式
module.exports = {
	module: {
		rules: [
			{
				test: /\.scss$/,
				use: [
					'style-loader',
					'css-loader',
					{
						loader: 'postcss-loader',
						options: {
						    postcssOptions: {
								plugins: [
									[
					                    "postcss-preset-env",
					                    {
					                      // Options
					                      "browserslist": {
												"development": [
													// 兼容最近的一个 chrome 的版本
													"last 1 chrome version",
													"last 1 firefox version",
													"last 1 safari version",
												],
												"production": [
													// 大于 99.8% 的浏览器
													">0.2%",
													// 不要已经死了的浏览器:比如 IE10,兼容没有意义
													"not dead",
													// op_mini 的浏览器全都死亡了
													"not op_mini all"
												]
											}
					                    },
				                  	]
								]
							}
						}
					},
					'sass-loader'
				]
			},
			{
				test: /\.scss$/,
				use: [
					'style-loader',
					'css-loader',
					{
						loader: 'postcss-loader',
						// 写法二
						options: {
							ident: 'postcss',
							plugins: [
								require('postcss-preset-env')()
							]
						}
					},
					'sass-loader'
				]
			}
		]
	}
};
打包 less
安装 less、less-loader、css-loader、style-loader
yarn add less less-loader css-loader style-loader --save
module.exports = {
	module: {
		rules: [
			// less-loader 是基于 less 的,所以使用 less-loader 需要同时安装 less
			{
				test: /\.less$/,
				use: [
					'style-loader',
					'css-loader',
					'less-loader'
				]
			}
		]
	}
};
打包 sass
安装 sass、sass-loader、css-loader、style-loader
yarn add sass sass-loader css-loader style-loader --save
module.exports = {
	module: {
		rules: [
			// sass-loader 是基于 sass 的,所以使用 sass-loader 需要同时安装 sass
			{
				test: /\.scss$/,
				use: [
					'style-loader',
					'css-loader',
					'postcss-loader',
					'sass-loader'
				]
			}
		]
	}
};
打包 styl
安装 stylus-loader、style-loader、css-loader'
yarn add stylus-loader css-loader style-loader
module.exports = {
	module: {
		rules: [
			{
				test: /\.scss$/,
				use: [
					'style-loader',
					'css-loader',
					'postcss-loader',
					'stylus-loader'
				]
			}
		]
	}
};
打包图片、字体等静态资源
打包图片
webpack4 需要使用url-loader和file-loader,webpack5 已内置,使用模块 asset。
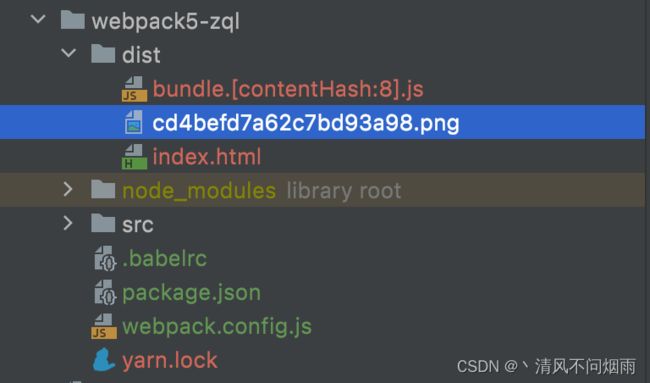
asset/resource
- 使用
asset/resource处理的资源会输出到目录中,采用哈希命名 file-loader在webpack5中已被asset/resource替代。
module.exports = {
	module: {
		rules: [
			{
				test: /\.(png|jpeg|gif|PNG)$/,
				type: 'asset/resource'
			}
		]
	}
};
const path = require('path');

module.exports = {
  output: {
    // ...
    // 指定所有 assetModule 文件的输出目录,同时重命名输出的文件名称
   	// assetModuleFilename: 'static/[hash][ext][query]'
  },
  module: {
    rules: [
      {
        test: /\.(png|jpg|jpeg|gif|PNG)$/,
        type: 'asset/resource',
        generator: {
        	// 与 assetModuleFilename 只取其一
			// 输出图片的名称
			filename: 'images/[hash:8][ext][query]'
		}
     }
    ]
  },
};
asset/inline
url-loader在webpack5中已被asset/inline替换。- 打包输出的数据
URI使用Base64算法编码的文件内容(可以减少http请求数量,但是体积会变大)
module.exports = {
	module: {
		rules: [
			{
				test: /\.(png|jpg|jpeg|gif|PNG)$/,
				type: 'asset/inline'
			}
		]
	}
};
asset
module.exports = {
	module: {
		output: {
			// ...
			// 指定 assetModule 文件的输出目录,同时重命名输出的文件名称
        	// assetModuleFilename: 'images/[hash:8][ext][query]'
		},
		rules: [
			{
				test: /\.(png|jpeg|gif|PNG)$/,
				type: 'asset',
				parser: {
					// 自定义转 base64 的界限
					dataUrlCondition: {
						// 小于 10kb 的图片转 base64
						maxSize: 10 * 1024 // 10kb
					}
				},
				generator: {
					// 跟 assetModuleFilename 之中选一个即可
					// 输出图片的名称
					filename: 'images/[hash:8][ext][query]'
				}
			}
		]
	}
};
打包字体图标资源
module.exports = {
	module: {
		output: {
			// ...
			// 指定图片文件的输出目录,同时重命名输出的文件名称
        	// assetModuleFilename: 'fonts/[hash:8][ext][query]'
		},
		rules: [
			{
				test: /\.(ttf|otf|woff2?)$/,
				type: 'asset',
				generator: {
					// 跟 assetModuleFilename 之中选一个即可
					// 输出文件的名称
					filename: 'fonts/[hash:8][ext][query]'
				}
			}
		]
	}
};
打包其他资源
module.exports = {
	module: {
		output: {
			// ...
			// 指定图片文件的输出目录,同时重命名输出的文件名称
        	// assetModuleFilename: 'media/[hash:8][ext][query]'
		},
		rules: [
			{
				test: /\.(mp3|mp4|avi|excel)$/,
				type: 'asset',
				generator: {
					// 跟 assetModuleFilename 之中选一个即可
					// 输出文件的名称
					filename: 'media/[hash:8][ext][query]'
				}
			}
		]
	}
};
js 兼容性处理
因为不是所有浏览器都能识别 es6 语法,所以需要通过 babel 进行转换,将 es6 语法转换成所有浏览器都可以识别的 es5 语法。
使用最新版本 babel
最新版本 babel 已支持转换 generator 函数,以及最新的 es6 语法。
安装 babel-loader、@babel/core、@babel/preset-env:
yarn add babel-loader @babel/core @babel/preset-env -D
module.exports = {
	module: {
		rules: [
			{
				test: /\.js$/,
				loader: 'babel-loader',
				exclude: /mode_modules/
			}
		]
	}
};
// 新建 .babelrc 文件
{
    "presets": ["@babel/preset-env"],
    "plugins": []
}
转换 jsx 语法
- 使用
@babel/preset-react - 或者使用
@babel/preset-env、 @babel/react
方法一:安装 @babel/preset-env 、 @babel/react
{
	presets: [
        '@babel/preset-env',
        '@babel/react'
    ],
    plugins: []
}
方法二:安装 @babel/preset-react
{
	presets: ['@babel/preset-react'],
    plugins: []
}
使用低版本 babel
转换基本语法
安装 babel-loader、@babel/core、@babel/preset-env
module.exports = {
	module: {
		rules: [
			{
				test: /\.js$/,
				loader: 'babel-loader',
				exclude: /mode_modules/,
				// 第一种配置,在这里通过 options 配置预设
				options: {
					// 预设:指示babel做什么样的兼容性处理
					presets: '@babel/preset-env'
				}
			}
		]
	}
};
// 第二种配置:新建 .babelrc 文件
{
    "presets": ["@babel/preset-env"],
    "plugins": []
}
@babel/preset-env不能转换所有的es6语法(比如async await、generator函数),只能转换基本语法;- 最新版本的已支持,如要测试请使用低版本
babel。
@babel/pollyfill
-
@babel/pollyfill相当于babel的补丁,使用@babel/pollyfill可以转换所有语法。 -
@babel/pollyfill是core-js和regenerator的集合(推荐单独安装core-js和regenerator,因为@babel/pollyfill会污染全局变量) -
@babel/pollyfill在babel 7.4.0以后已被弃用,如果想测试,需要安装低版本babel测试。 -
引入
@babel/pollyfill可以做js全部兼容性处理 -
会将所有的兼容性代码全部引入,体积太大,而且会污染全局变量
// 在需要处理的文件中通过 import 引入
import '@babel/pollyfill';
按需加载
- 使用
core-js可以解决@babel/pollyfill全部引入,导致体积太大的问题。 core-js和@babel/pollyfill不能同时使用,只安装一个即可,@babel/pollyfill内置有core-js。
安装 core-js
// .babelrc
{
    "presets": [
        [
            "@babel/preset-env",
            {
                // 按需加载
                "useBuiltIns": "usage",
                // 指定 core-js 版本
                "corejs": 3
            }
        ]
    ],
    "plugins": []
}
babel-runtime
babel-runtime可以解决@babel/pollyfill污染全局变量的问题。
安装 @babel/plugin-transform-runtime、@babel/runtime
yarn add @babel/plugin-transform-runtime -D
yarn add @babel/runtime --save
// .babelrc
{
    "presets": [
        [
            "@babel/preset-env",
            {
                // 按需加载
                "useBuiltIns": "usage",
                // 指定 core-js 版本
                "corejs": 3
            }
        ]
    ],
    "plugins": [
		[
			"@babel/plugin-transform-runtime",
			{
				"absoluteRuntime": false,
				"corejs": 3,
				"helpers": true,
				"regenerator": true,
				"useESModules": false
			}
		]
	]
}
eslint 语法检查
安装 eslint、eslint-webpack-plugin
yarn add eslint eslint-webpack-plugin -D
const EslintPlugin = require("eslint-webpack-plugin");

module.exports = {
	plugins: [
		new EslintPlugin({
            context: path.resolve(__dirname, 'src'), // 需要检测的根目录
            exclude: 'node_modules', // 需要排除的目录
            extensions: ['js'], // 需要检查的文件类型
            fix: true // 自动修复
        })
	]
};
eslint 规则配置 参考 https://eslint.cn/docs/rules/
// .eslintrc.js
module.exports = {
    root: true,
    env: {
        browser: true,
        node: true
    },
    extends: ['eslint:recommended'],
    rules: {
        'no-console': ['warn', { allow: ['warn', 'error'] }],
        'block-spacing': [2, 'always'],
        'brace-style': [2, '1tbs', { allowSingleLine: true }],
        'jsx-quotes': [2, 'prefer-single'],
        quotes: [
            2,
            'single',
            {
                avoidEscape: true,
                allowTemplateLiterals: true
            }
        ],
        'semi-spacing': [
            2,
            {
                before: false,
                after: true
            }
        ],
        'space-in-parens': [2, 'never'],
        'space-infix-ops': 'error',
        'space-unary-ops': 'error',
        indent: 0,
        semi: 'error',
        'comma-spacing': 0,
        'space-before-blocks': 0,
        'keyword-spacing': 0,
        'key-spacing': ['error', { afterColon: true }],
        'no-multiple-empty-lines': 0,
        'spaced-comment': [
            'error',
            'always',
            {
                line: {
                    markers: ['/'],
                    exceptions: ['-', '+']
                },
                block: {
                    markers: ['!'],
                    exceptions: ['*'],
                    balanced: true
                }
            }
        ],
        'space-before-function-paren': 0,
        'arrow-spacing': 'error',
        'object-curly-spacing': 0,
        'one-var-declaration-per-line': ['error', 'always'],
        'array-bracket-newline': ['error', 'consistent'],
        'no-lonely-if': 'error',
        'object-curly-newline': [
            'error',
            {
                ObjectPattern: { multiline: true },
                ImportDeclaration: { multiline: true },
                ExportDeclaration: { multiline: true }
            }
        ],
        'object-property-newline': ['error', { allowAllPropertiesOnSameLine: false }],
        'padding-line-between-statements': [
            'error',
            {
                blankLine: 'always',
                prev: ['const', 'let', 'var'],
                next: '*'
            },
            {
                blankLine: 'any',
                prev: ['const', 'let', 'var'],
                next: ['const', 'let', 'var']
            }
        ],
        'semi-style': ['error', 'last'],
        'switch-colon-spacing': 'error',
        'wrap-regex': 'error',
        'default-case': 'error',
        'guard-for-in': 'error',
        'no-else-return': 'error',
        'no-empty-function': 'error',
        'no-new-func': 'error',
        'no-useless-return': 'error',
        'symbol-description': 'error',
        'array-element-newline': ['error', 'consistent', { multiline: true }],
        'no-var': 'error',
        'one-var': ['error', 'consecutive'],
        'no-case-declarations': 0
    }
};
// .eslintignore
// 需要忽略 eslint 检查的文件

/.idea/*
/node_modules/*
/.eslintrc.js
static/fonts/*
/yarn.lock
/yarn-error.log
/.gitignore
airbnb 规则
使用 airbnb 规则:如果不想自己一个个配置 eslint rules, 推荐使用 airbnb 规则,需要用 eslint-config-airbnb-base 库。
yarn add eslint eslint-config-airbnb-base eslint-plugin-import -D
// 还需要在 package.json 中配置
{
	"eslintConfig": {
		"extends": "airbnb-base"
	}
}
@babel/eslint-parser
使用 @babel/eslint-parser 可以帮助你在使用 Babel 转换代码时,避免 ESLint 中的语法错误。同时,它也可以在您的代码中使用一些 Babel 特有的语法(如 jsx 和 decorators)时,帮助 ESLint 正确解析和检查代码。
安装 eslint、@babel/core、@babe:/eslint-parser
yarn add eslint @babel/eslint-parser -D
yarn add @babel/core --save
module.exports = {
    root: true,
    env: {
        browser: true,
        node: true
    },
    extends: ['eslint:recommended'],
    parserOptions: {
        parser: '@babel/eslint-parser',
        sourceType: 'module',
        ecmaVersion: 6,
        ecmaFeatures: {
            jsx: true,
            experimentalObjectRestSpread: true
        }
    },
    rules: {
    	// ...
    },
};
常用插件
生成 html 文件
安装 html-webpack-plugin
yarn add html-webpack-plugin
html-webpack-plugin默认会创建一个没有任何结构样式的html文件,会自动引入打包输出的所有资源。
但是我们需要有结构的html文件,所以需要再配置options。
// 引入插件
const HtmlWebpackPlugin = require('html-webpack-plugin');

// 不传参数,默认生成一个 index.html 文件,并且将打包后输出的所有资源插入 index.html 中
module.exports = {
	plugins: [
		new HtmlWebpackPlugin()
	]
};
// 传参数
const path = require('path');

module.exports = {
	plugins: [
		new HtmlWebpackPlugin({
			 // 指定要生成的 html 模板文件,生成的 index.html 内容跟 /src/index.html 相同,并且会自动引入打包后输出的所有资源
			template: path.resovle(__dirname, 'src/index.html'),
			filename: 'other.html' // 指定生成的 html 文件名
		})
	]
};
提取 css 为单独文件
安装 mini-css-extract-plugin
yarn add mini-css-extract-plugin
- 使用
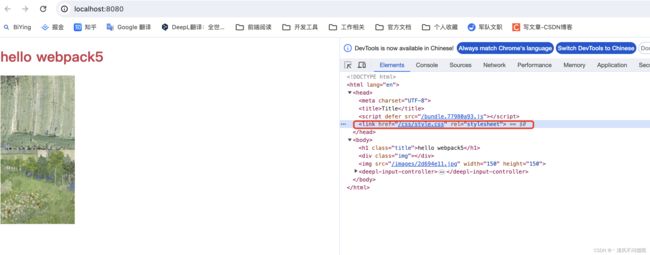
mini-css-extract-plugin可以将打包后的css文件以link的方式插入html中
const MiniCssExtractPlugin = require('mini-css-extract-plugin');

module.exports = {
	module: {
		rules: [
			{
				test: /\.css$/,
				use: [
					// 将 style-loader 换成 MiniCssExtractPlugin 内置的loader
					// 从而将提取出的 css 文件以 link 的方式插入 html 中
					MiniCssExtractPlugin.loader,
					'css-loader',
					'postcss-loader'
				]
			}
		]
	},
	plugins: [
		// 默认输出到 output 指定目录下,和 js 平级,main.css
		new MiniCssExtractPlugin({
			// 可以通过参数指定打包后的路径和文件名,输出为 output 指定目录下的 /css/style.css
			filename: 'css/style.css',
			// chunkFilename: 'css/[name].chunk.css' // css chunk 文件命名
		})
	]
};
压缩 js
mode: 'production'自动压缩jsmode: 'development'设置minimize: true可压缩
module.exports = {
	mode: 'production',
};
module.exports = {
	mode: 'development',
	optimization: {
		minimize: true
    }
};
- 如果使用了
css-minimizer-webpack-plugin压缩css,那么js压缩会失效,需要手动安装terser-webpack-plugin插件
yarn add terser-webpack-plugin
const MiniCssExtractPlugin = require('mini-css-extract-plugin');
const CssMinimizerWebpackPlugin = require("css-minimizer-webpack-plugin");
const TerserWebpackPlugin = require("terser-webpack-plugin");

module.exports = {
	mode: 'development',
	module: {
		rules: [
			{
				test: /\.css$/,
				use: [
					MiniCssExtractPlugin.loader,
					'css-loader',
					'postcss-loader'
				]
			}
		]
	},
	optimization: {
		minimize: true,
        minimizer: [
        	// 压缩 js:解决压缩 css 导致压缩 js 失效的问题
            new TerserWebpackPlugin(),
            // 压缩 css
            new CssMinimizerWebpackPlugin(),
        ],
    },
	plugins: [
		new MiniCssExtractPlugin({
			filename: 'css/style.css'
		})
	]
};
压缩 css
安装 css-minimizer-webpack-plugin
yarn add css-minimizer-webpack-plugin
css-minimizer-webpack-plugin必须要配合mini-css-extract-plugin使用,只能对单独的 css 文件进行压缩;- 只在
mode: 'production‘有效; - 如果希望在
mode: 'developmemt‘有效,需要设置minimize: true
const MiniCssExtractPlugin = require('mini-css-extract-plugin');
const CssMinimizerWebpackPlugin = require("css-minimizer-webpack-plugin");

module.exports = {
	mode: 'production',
	module: {
		rules: [
			{
				test: /\.css$/,
				use: [
					MiniCssExtractPlugin.loader,
					'css-loader',
					'postcss-loader'
				]
			}
		]
	},
	optimization: {
        minimizer: [
            // 压缩 css
            new CssMinimizerWebpackPlugin(),
        ],
    },
	plugins: [
		new MiniCssExtractPlugin({
			filename: 'css/style.css'
		})
	]
};
const MiniCssExtractPlugin = require('mini-css-extract-plugin');
const CssMinimizerWebpackPlugin = require("css-minimizer-webpack-plugin");

module.exports = {
	mode: 'development',
	module: {
		rules: [
			{
				test: /\.css$/,
				use: [
					MiniCssExtractPlugin.loader,
					'css-loader',
					'postcss-loader'
				]
			}
		]
	},
	optimization: {
		minimize: true,
        minimizer: [
            // 压缩 css
            new CssMinimizerWebpackPlugin(),
        ],
    },
	plugins: [
		new MiniCssExtractPlugin({
			filename: 'css/style.css'
		})
	]
};
压缩 html 文件
html-webpack-plugin
module.exports = {
	plugins: [
		new HtmlWebpackPlugin({
			 // 配置 minify 属性进行压缩
			minify: {
				collapseWhitespace: true, // 移除空行
				removeComments: true // 移除注释
			}
		})
	]
};
html-minimizer-webpack-plugin
const HtmlMinimizerWebpackPlugin = require("html-minimizer-webpack-plugin");

module.exports = {
	mode: 'production',
	plugins: [
		// 压缩 html
        new HtmlMinimizerWebpackPlugin()
	]
};
const HtmlMinimizerWebpackPlugin = require("html-minimizer-webpack-plugin");

module.exports = {
	mode: 'development',
	optimization: {
		minimize: true
    },
	plugins: [
		// 压缩 html
        new HtmlMinimizerWebpackPlugin()
	]
};
其他插件
copy-webpack-plugin
yarn add copy-webpack-plugin
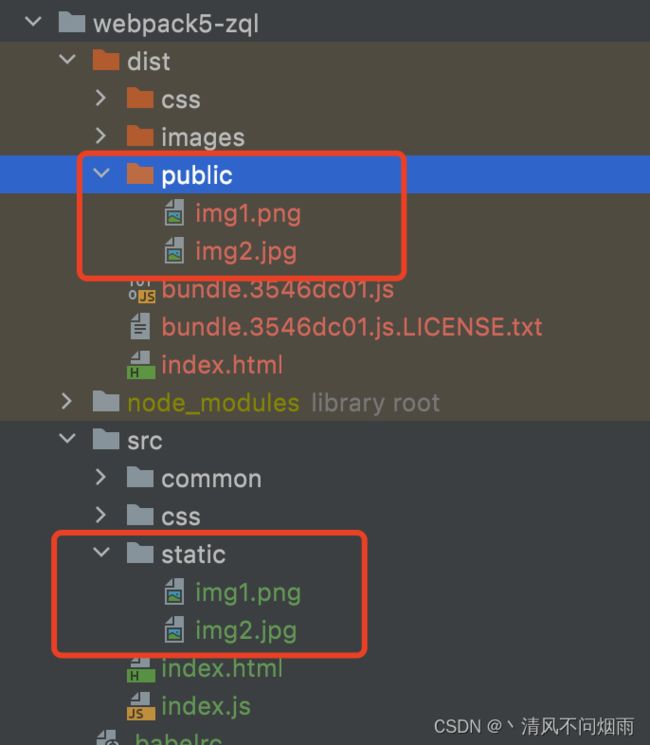
- 拷贝文件:而是用来复制源代码中已经存在的文件(比如一些静态资源),拷贝到指定的地方去;并不是用来复制打包生成的文件。
- 比如有一些全局的配置,直接拷贝到目标文件夹下去,后续这些全局配置文件内容有改变,就不需要重新打包,可以直接替换部署的文件
const CopyPlugin = require("copy-webpack-plugin");

module.exports = {
  plugins: [
    new CopyPlugin({
      patterns: [
        { from: path.resolve(__dirname, "src", "static"), to: "public" }
      ]
    })
  ]
};


