Redis学习——入门篇②
Redis学习——入门篇②
-
- 1. Redis持久化
-
- 1.1 理论介绍
- 1.2 RDB 简介
-
- 1.2.1 RDB配置说明
- 1.2.2 RDB 自动触发
- 1.2.3 RDB如何恢复数据
- 1.2.4 RDB 手动触发
-
- 1.2.4.1 save演示
- 1.2.4.2 bgsave 演示
- 1.2.4.3 LASTSAVE:获取最近一次RDB的时间戳
- 1.2.5 RDB 优缺点
-
- 1.2.5.1 数据丢失案例
- 1.2.6 RDB 修复命令
- 1.2.7 RDB 触发情况
- 1.2.8 RDB禁用
- 1.2.9 RDB 优化参数
-
- 1.2.9.1 stop-writes-on-bgsave-error
- 1.2.9.2 rdbcompression
- 1.2.9.3 rdbchecksum
- 1.2.9.4 rdb-del-sync-files
- 1.3 AOF 简介
-
- 1.3.1 AOF 工作流程和写回策略
- 1.3.2 39 AOF 案例演示
- 1.3.3 如何开启 AOF
- 1.3.4 AOF 恢复案例
- 1.3.5 AOF 异常情况恢复
- 1.3.6 AOF优缺点
- 1.3.7 AOF重写机制(Log rewriting)
- 1.3.8 案例验证
- 1.3.10 手动触发
- 1.3.11 AOF 小总结
- 1.4 混合持久化
- 1.4.5 纯缓存模式
![]()
1. Redis持久化
How Redis writes data to disk
1.1 理论介绍
https://redis.io/docs/management/persistence/
redis持久化的几种方案
- RDB (Redis Database)
- AOF (Append Only File)
- No persistence:
- RDB + AOF
Redis 如何将数据写入磁盘
持久性是指将数据写入持久存储,例如固态磁盘 (SSD)。Redis 提供了一系列持久性选项。这些包括:
- RDB(Redis 数据库):RDB 持久性按指定的时间间隔执行数据集的时间点快照。
- AOF(仅追加文件):AOF 持久性记录服务器接收的每个写入操作。然后,可以在服务器启动时再次重播这些操作,从而重建原始数据集。使用与 Redis 协议本身相同的格式记录命令。
- 无持久性:您可以完全禁用持久性。这有时在缓存时使用。
- RDB + AOF:您还可以在同一实例中组合 AOF 和 RDB。
1.2 RDB 简介
RDB (Redis Database): RDB persistence performs point-in-time snapshots of your dataset at specified intervals.
在指定的时间间隔,执行数据集的时间点快照
- 实现类似照片记录效果的方式,就是把某一时刻的数据和状态以文件的形式写到磁盘上,也就是快照。这样一来即使故障宕机,快照文件也不会丢失,数据的可靠性也就得到了保证。
- 这个快照文件就称为RDB文件(dump.rdb),其中,RDB就是Redis DataBase的缩写。
rdb保存的文件:dump.rdb或者XXXX.rdb文件,

![]()
Redis 6.2
![]()
Redis 7
RDB保存时间调整|将持 久化文件RDB的保存规则发生了改变,尤其是时录频度变化
默认配置:save 3600 1 300 100 60 10000
除非另有说明,默认情况下Redis会保存数据库:*3600秒(一小时)后,如果至少执行了一次更改, *300秒(5分钟)后,如果至少执行了100次更改, *60秒后,如果至少执行了10000次更改 ,您可以通过取消对以下行的注释来显式设置这些值。
# save 3600 1300 100 60 10000
默认情况下,如果启用了RDB快照,Redis将停止接受写入(至少一个保存点),并且最近的后台保存失败。这将使用户(以一种艰难的方式)意识到数据没有持久化正确地放在磁盘上,否则。很可能没有人会注意到
默认情况一个小时(3600秒)至少一个 key 变更就记录RDB。
1.2.1 RDB配置说明
第一步:配置文件写入以下内容
daemonize yes
protected-mode no
#bind 127.0.0.1 -::1
requirepass 123456

save 5 2
dir /root/redis-dump
dbfilename 6379.rdb
第二步:启动服务
第三步:获取配置 CONFIG GET xxxxx
127.0.0.1:6379> CONFIG GET requirepass
1) "requirepass"
2) "123456"
127.0.0.1:6379> CONFIG GET save
1) "save"
2) "5 2"
127.0.0.1:6379> CONFIG GET dir
1) "dir"
2) "/root/redis-dump"
127.0.0.1:6379> CONFIG GET dbfilename
1) "dbfilename"
2) "6379.rdb"
127.0.0.1:6379>
![]()
127.0.0.1:6379> config get requirepass
1) "requirepass"
2) "xxx!"
127.0.0.1:6379> config get port
1) "port"
2) "6379"
127.0.0.1:6379> config get dir
1) "dir"
2) "/myredis"
127.0.0.1:6379> shutdown
not connected> quit
root@matthew-virtual-machine:/myredis# redis-server /myredis/redis7.conf
238023:C 24 Jan 2024 16:35:50.174 # WARNING Memory overcommit must be enabled! Without it, a background save or replication may fail under low memory condition. Being disabled, it can also cause failures without low memory condition, see https://github.com/jemalloc/jemalloc/issues/1328. To fix this issue add 'vm.overcommit_memory = 1' to /etc/sysctl.conf and then reboot or run the command 'sysctl vm.overcommit_memory=1' for this to take effect.
root@matthew-virtual-machine:/myredis# redis-cli -a xxx!
Warning: Using a password with '-a' or '-u' option on the command line interface may not be safe.
127.0.0.1:6379> config get dir
1) "dir"
2) "/myredis/dumpfiles"
![]()
1.2.2 RDB 自动触发
验证 5秒2个key是否可以保存文件
127.0.0.1:6379> config get dir
1) "dir"
2) "/myredis/dumpfiles"
127.0.0.1:6379> keys *
(empty array)
127.0.0.1:6379> set k1 v1
OK
127.0.0.1:6379> set k2 v2
OK
127.0.0.1:6379> quit
root@matthew-virtual-machine:/myredis# pwd
/myredis
root@matthew-virtual-machine:/myredis# cd dumpfiles/
root@matthew-virtual-machine:/myredis/dumpfiles# pwd
/myredis/dumpfiles
root@matthew-virtual-machine:/myredis/dumpfiles# ll
总用量 15
drwxr-xr-x 2 root root   3 1月  24 16:40 ./
drwxr-xr-x 3 root root   6 1月  24 16:35 ../
-rw-r--r-- 1 root root 107 1月  24 16:40 dump6379.rdb
root@matthew-virtual-machine:/myredis/dumpfiles#
在 set k3 后稍等5s后设置 k4
127.0.0.1:6379> set k3 v3
OK
127.0.0.1:6379> set k4 v4
OK
可以看到 RDB 文件变大了
root@matthew-virtual-machine:/# cd myredis
root@matthew-virtual-machine:/myredis# cd dumpfiles
root@matthew-virtual-machine:/myredis/dumpfiles# ll
总用量 15
drwxr-xr-x 2 root root   3 1月  24 16:40 ./
drwxr-xr-x 3 root root   6 1月  24 16:35 ../
-rw-r--r-- 1 root root 107 1月  24 16:40 dump6379.rdb
root@matthew-virtual-machine:/myredis/dumpfiles# ll
总用量 15
drwxr-xr-x 2 root root   3 1月  24 16:46 ./
drwxr-xr-x 3 root root   6 1月  24 16:35 ../
-rw-r--r-- 1 root root 121 1月  24 16:46 dump6379.rdb
root@matthew-virtual-machine:/myredis/dumpfiles#
![]()
1.2.3 RDB如何恢复数据
第一步:备份RDB文件,然后执行 FLUSHALL 命令清空数据。
127.0.0.1:6379> flushall
OK
127.0.0.1:6379> keys *
(empty array)
127.0.0.1:6379>
drwxr-xr-x 2 root root   3 1月  24 16:40 ./
drwxr-xr-x 3 root root   6 1月  24 16:35 ../
-rw-r--r-- 1 root root 107 1月  24 16:40 dump6379.rdb
root@matthew-virtual-machine:/myredis/dumpfiles# ll
总用量 15
drwxr-xr-x 2 root root   3 1月  24 16:46 ./
drwxr-xr-x 3 root root   6 1月  24 16:35 ../
-rw-r--r-- 1 root root 121 1月  24 16:46 dump6379.rdb
root@matthew-virtual-machine:/myredis/dumpfiles# ll
总用量 11
drwxr-xr-x 2 root root  3 1月  24 16:48 ./
drwxr-xr-x 3 root root  6 1月  24 16:35 ../
-rw-r--r-- 1 root root 88 1月  24 16:48 dump6379.rdb
root@matthew-virtual-machine:/myredis/dumpfiles#
第二步:执行 SHUTDOWN 命令,也会产生一个 RDB 文件。
127.0.0.1:6379> shutdown
not connected> quit
root@matthew-virtual-machine:/myredis#
root@matthew-virtual-machine:/myredis/dumpfiles# ll
总用量 15
drwxr-xr-x 2 root root   3 1月  24 17:14 ./
drwxr-xr-x 3 root root   6 1月  24 17:04 ../
-rw-r--r-- 1 root root 121 1月  24 17:14 dump6379.rdb
root@matthew-virtual-machine:/myredis/dumpfiles# mv dump6379.rdb dump6379.rdb.bak
root@matthew-virtual-machine:/myredis/dumpfiles# ll
总用量 15
drwxr-xr-x 2 root root   3 1月  24 17:15 ./
drwxr-xr-x 3 root root   6 1月  24 17:04 ../
-rw-r--r-- 1 root root 121 1月  24 17:14 dump6379.rdb.bak
root@matthew-virtual-machine:/myredis/dumpfiles# ll
总用量 16
drwxr-xr-x 2 root root   4 1月  24 17:15 ./
drwxr-xr-x 3 root root   6 1月  24 17:04 ../
-rw-r--r-- 1 root root  88 1月  24 17:15 dump6379.rdb
-rw-r--r-- 1 root root 121 1月  24 17:14 dump6379.rdb.bak
root@matthew-virtual-machine:/myredis/dumpfiles#
删除关机时的RDB
root@matthew-virtual-machine:/myredis/dumpfiles# ll
总用量 15
drwxr-xr-x 2 root root   3 1月  24 17:22 ./
drwxr-xr-x 3 root root   6 1月  24 17:04 ../
-rw-r--r-- 1 root root 121 1月  24 17:22 dump6379.rdb
root@matthew-virtual-machine:/myredis/dumpfiles# mv dump6379.rdb dump6379.rdb.bak
root@matthew-virtual-machine:/myredis/dumpfiles# ll
总用量 15
drwxr-xr-x 2 root root   3 1月  24 17:23 ./
drwxr-xr-x 3 root root   6 1月  24 17:04 ../
-rw-r--r-- 1 root root 121 1月  24 17:22 dump6379.rdb.bak
root@matthew-virtual-machine:/myredis/dumpfiles# ll
总用量 15
drwxr-xr-x 2 root root   3 1月  24 17:23 ./
drwxr-xr-x 3 root root   6 1月  24 17:04 ../
-rw-r--r-- 1 root root 121 1月  24 17:22 dump6379.rdb.bak
root@matthew-virtual-machine:/myredis/dumpfiles# ll
总用量 16
drwxr-xr-x 2 root root   4 1月  24 17:23 ./
drwxr-xr-x 3 root root   6 1月  24 17:04 ../
-rw-r--r-- 1 root root  88 1月  24 17:23 dump6379.rdb
-rw-r--r-- 1 root root 121 1月  24 17:22 dump6379.rdb.bak
root@matthew-virtual-machine:/myredis/dumpfiles# ll
总用量 16
drwxr-xr-x 2 root root   4 1月  24 17:24 ./
drwxr-xr-x 3 root root   6 1月  24 17:04 ../
-rw-r--r-- 1 root root  88 1月  24 17:24 dump6379.rdb
-rw-r--r-- 1 root root 121 1月  24 17:22 dump6379.rdb.bak
root@matthew-virtual-machine:/myredis/dumpfiles# mv dump6379.rdb.bak dump6379.rdb
root@matthew-virtual-machine:/myredis/dumpfiles# ll
总用量 15
drwxr-xr-x 2 root root   3 1月  24 17:24 ./
drwxr-xr-x 3 root root   6 1月  24 17:04 ../
-rw-r--r-- 1 root root 121 1月  24 17:22 dump6379.rdb
第三步:将备份的RDB文件名称改回去,同时重启Redis服务,验证 key 是否恢复。
127.0.0.1:6379> keys *
1) "k3"
2) "k1"
3) "k4"
4) "k2"
127.0.0.1:6379> flushall
OK
127.0.0.1:6379> keys *
(empty array)
127.0.0.1:6379> shutdown
not connected> quit
// 修改 mv dump6379.rdb.bak dump6379.rdb
root@matthew-virtual-machine:/myredis# redis-server /myredis/redis7.conf
root@matthew-virtual-machine:/myredis# redis-cli -a xxx!

127.0.0.1:6379> keys *
1) "k3"
2) "k2"
3) "k4"
4) "k1"
总结:物理恢复,一定要服务和备份分机隔离。
![]()
1.2.4 RDB 手动触发
Tips:生产环境不能使用 save 命令,会阻塞主线程。
Redis提供了两个命令来生成RDB文件,分别是save和bgsave
1.2.4.1 save演示
在主程序中执行会阻塞当前redis服务器,直到持久化工作完成执行save命令期间,Redis不 能处理其他命令,线上禁止使用
127.0.0.1:6379> flushall
OK
127.0.0.1:6379> set k1  v1
OK
127.0.0.1:6379> save
OK
root@matthew-virtual-machine:/myredis/dumpfiles# ll
总用量 15
drwxr-xr-x 2 root root   3 1月  24 17:24 ./
drwxr-xr-x 3 root root   6 1月  24 17:04 ../
-rw-r--r-- 1 root root 121 1月  24 17:22 dump6379.rdb
root@matthew-virtual-machine:/myredis/dumpfiles# rm -rf dump6379.rdb
root@matthew-virtual-machine:/myredis/dumpfiles# ll
总用量 10
drwxr-xr-x 2 root root 2 1月  24 17:29 ./
drwxr-xr-x 3 root root 6 1月  24 17:04 ../
root@matthew-virtual-machine:/myredis/dumpfiles# ll
总用量 11
drwxr-xr-x 2 root root  3 1月  24 17:29 ./
drwxr-xr-x 3 root root  6 1月  24 17:04 ../
-rw-r--r-- 1 root root 88 1月  24 17:29 dump6379.rdb
root@matthew-virtual-machine:/myredis/dumpfiles# ll
总用量 11
drwxr-xr-x 2 root root   3 1月  24 17:29 ./
drwxr-xr-x 3 root root   6 1月  24 17:04 ../
-rw-r--r-- 1 root root 100 1月  24 17:29 dump6379.rdb
![]()
1.2.4.2 bgsave 演示
Redis会在后台异步进行快照操作,不阻塞快照同时还可以响应客户端请求,该触发方式会fork一个子进程由子进程复制持久化过程
127.0.0.1:6379> set k2 v2
OK
127.0.0.1:6379> bgsave
Background saving started
127.0.0.1:6379>
root@matthew-virtual-machine:/myredis/dumpfiles# ll
总用量 11
drwxr-xr-x 2 root root   3 1月  24 17:29 ./
drwxr-xr-x 3 root root   6 1月  24 17:04 ../
-rw-r--r-- 1 root root 100 1月  24 17:29 dump6379.rdb
root@matthew-virtual-machine:/myredis/dumpfiles# ll
总用量 15
drwxr-xr-x 2 root root   3 1月  24 17:30 ./
drwxr-xr-x 3 root root   6 1月  24 17:04 ../
-rw-r--r-- 1 root root 107 1月  24 17:30 dump6379.rdb
root@matthew-virtual-machine:/myredis/dumpfiles#
![]()
1.2.4.3 LASTSAVE:获取最近一次RDB的时间戳
127.0.0.1:6379> lastsave
(integer) 1706088652
date -d @时间戳
root@matthew-virtual-machine:/myredis/dumpfiles# date -d @1706088652
2024年 01月 24日 星期三 17:30:52 CST
![]()
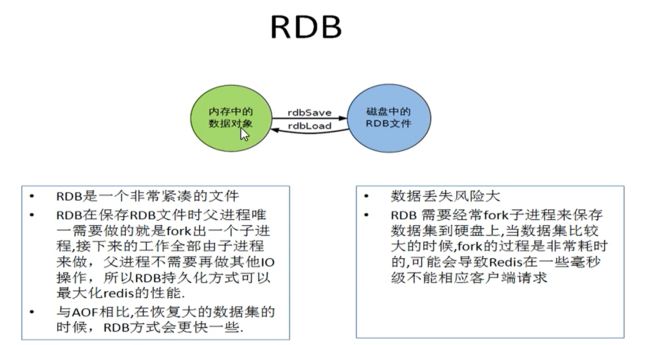
1.2.5 RDB 优缺点
优点:https://redis.io/docs/management/persistence/#rdb-advantages
- RDB是Redis数据的一个非常紧凑的单文件时间点表示。RDB 文件非常适合备份。例如,您可能希望在最近的24小时内每小时归档一次 RDB文件,并在30天内每天保存一个RDB快照。这使您可以在发生灾难时轻松恢复不同版本的数据集。
- RDB非常适合灾难恢复,.它是一个可以传输到远程数据中心或Amazon S3 (可能已加密)的压缩文件。
- RDB最大限度地提高了Redis的性能,因为Redis父进程为了持久化而需要做的唯一工作就是派生一个将完成所有其余工作的子进程。父进程永远不会执行磁盘l/O或类似操作。
- 与AOF相比,RDB允许使用大数据集更快地重启。
- 在副本上,RDB支持重启和故障转移后的部分重新同步。
缺点:https://redis.io/docs/management/persistence/#rdb-disadvantages
- 如果您需要在Redis停止工作时(例如断电后)将数据丢失的可能性降到最低,那么RDB并不好。您可以配置生成RDB的不同保存点(例如,在对数据集至少5分钟和100次写入之后,您可以有多个保存点)。但是,您通常会每五分钟或更长时间创建一次RDB快照,因此,如果Redis由于任何原因在没有正确关闭的情况下停止工作,您应该准备好丢失最新分钟的数据。
- RDB需要经常fork0以便使用子进程在磁盘上持久化。如果数据集很大,fork(可能会很耗时,并且如果数据集很大并且CPU性能不是很好,可能会导致Redis停止为客户端服务几毫秒甚至一秒钟。AOF也需要fork0但频率较低,您可以调整要重写日志的频率,而不需要对持久性进行任何权衡。
- 快照之间的数据会丢失。
- fork() can be time consuming,fork可能会很耗时。
![]()
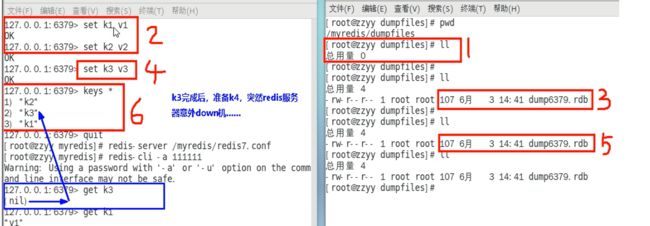
1.2.5.1 数据丢失案例
1.2.6 RDB 修复命令
redis-check-rdb /root/redis-dump/dump6379.rdb
root@matthew-virtual-machine:/myredis/dumpfiles# cd /usr/local/bin
root@matthew-virtual-machine:/usr/local/bin# ll
总用量 21156
drwxr-xr-x  2 root root        8 1月  16 09:34 ./
drwxr-xr-x 11 root root       12 10月 14 22:42 ../
-rwxr-xr-x  1 root root 10806320 1月  16 09:34 redis-benchmark*
lrwxrwxrwx  1 root root       12 1月  16 09:34 redis-check-aof -> redis-server*
lrwxrwxrwx  1 root root       12 1月  16 09:34 redis-check-rdb -> redis-server*
-rwxr-xr-x  1 root root 11355632 1月  16 09:34 redis-cli*
lrwxrwxrwx  1 root root       12 1月  16 09:34 redis-sentinel -> redis-server*
-rwxr-xr-x  1 root root 22982200 1月  16 09:34 redis-server*
root@matthew-virtual-machine:/usr/local/bin#
root@matthew-virtual-machine:/usr/local/bin# redis-check-rdb /root/redis-dump/dump6379.rdb
[offset 0] Checking RDB file /root/redis-dump/dump6379.rdb
![]()
1.2.7 RDB 触发情况
- 手动
save、bgsave flushall、flushdb,但里面是空的。- 执行
shutdown - 主从复制,主节点自动触发
1.2.8 RDB禁用
config set save "",命令级别save "",配置文件
![]()
1.2.9 RDB 优化参数
1.2.9.1 stop-writes-on-bgsave-error
# However if you have setup your proper monitoring of the Redis server
# and persistence, you may want to disable this feature so that Redis will
# continue to work as usual even if there are problems with disk,
# permissions, and so forth.
stop-writes-on-bgsave-error yes
1.2.9.2 rdbcompression
# Compress string objects using LZF when dump .rdb databases?
# By default compression is enabled as it's almost always a win.
# If you want to save some CPU in the saving child set it to 'no' but
# the dataset will likely be bigger if you have compressible values or keys.
rdbcompression yes
1.2.9.3 rdbchecksum
# RDB files created with checksum disabled have a checksum of zero that will
# tell the loading code to skip the check.
rdbchecksum yes
1.2.9.4 rdb-del-sync-files
# An alternative (and sometimes better) way to obtain the same effect is
# to use diskless replication on both master and replicas instances. However
# in the case of replicas, diskless is not always an option.
rdb-del-sync-files no
![]()
1.3 AOF 简介
AOF (Append Only File): AOF persistence logs every write operation received by the server. These operations can then be replayed again at server startup, reconstructing the original dataset. Commands are logged using the same format as the Redis protocol itself.
AOF 持久性记录服务器接收的每个写入操作。然后,可以在服务器启动时再次重播这些操作,从而重建原始数据集。使用与 Redis 协议本身相同的格式记录命令。
1.3.1 AOF 工作流程和写回策略
# appendfsync always
appendfsync everysec
# appendfsync no
-
always
同步写回,每个写命令执行完立刻同步地将日志写回磁盘 -
everysec默认!!!
每秒写回,每个写命令执行完,只是先把日志写到AOF文件的内存缓冲区,每隔1秒把缓冲区中的内容写入磁盘 -
no
操作系统控制的写回,每个写命令执行完,只是先把日志写到AOF文件的内存缓冲区,由操作系统决定何时将缓冲区内容写回磁盘
安全性:always > everysec > no
性能:no > everysec > always

![]()
1.3.2 39 AOF 案例演示
1.3.3 如何开启 AOF
#appendonly no
appendonly yes
redis6:RDB和AOF,dir目录共享同一个dir。且 AOF 文件只有一个。
redis7:三个AOF文件,
appendfilename "appendonly.aof"

# For convenience, Redis stores all persistent append-only files in a dedicated
# directory. The name of the directory is determined by the appenddirname
# configuration parameter.

appenddirname "appendonlydir"
Muti-part AOF
# - appendonly.aof.1.base.rdb as a base file.
# - appendonly.aof.1.incr.aof, appendonly.aof.2.incr.aof as incremental files.
# - appendonly.aof.manifest as a manifest file.
base表示基础AOF,INCR表示增量AOF,manifest
![]()
1.3.4 AOF 恢复案例
127.0.0.1:6379> config get appendonly
1) "appendonly"
2) "no"
127.0.0.1:6379> config get appendonly
1) "appendonly"
2) "yes"
![]()
127.0.0.1:6379> set k1 v1
OK
127.0.0.1:6379> save
OK
drwxr-xr-x  4 root root      7 1月  24 19:26 ./
drwxr-xr-x 20 root root     26 1月  16 09:40 ../
drwxr-xr-x  2 root root      5 1月  24 19:26 appendonlydir/
drwxr-xr-x  2 root root      3 1月  24 19:21 dumpfiles/
-rw-r--r--  1 root root    353 1月  24 16:35 dump.rdb
-rw-r--r--  1 root root 107561 1月  24 19:25 redis7.conf
-rw-r--r--  1 root root  24576 1月  16 09:46 .redis7.conf.swp
root@matthew-virtual-machine:/myredis# ll
总用量 108
drwxr-xr-x  4 root root      8 1月  24 19:27 ./
drwxr-xr-x 20 root root     26 1月  16 09:40 ../
drwxr-xr-x  2 root root      5 1月  24 19:26 appendonlydir/
-rw-r--r--  1 root root    100 1月  24 19:27 dump6379.rdb
drwxr-xr-x  2 root root      3 1月  24 19:21 dumpfiles/
-rw-r--r--  1 root root    353 1月  24 16:35 dump.rdb
-rw-r--r--  1 root root 107561 1月  24 19:25 redis7.conf
-rw-r--r--  1 root root  24576 1月  16 09:46 .redis7.conf.swp
root@matthew-virtual-machine:/myredis# cd appendonlydir/
root@matthew-virtual-machine:/myredis/appendonlydir# ll
总用量 21
drwxr-xr-x 2 root root  5 1月  24 19:26 ./
drwxr-xr-x 4 root root  8 1月  24 19:27 ../
-rw-r--r-- 1 root root 88 1月  24 19:26 appendonly.aof.1.base.rdb
-rw-r--r-- 1 root root 52 1月  24 19:27 appendonly.aof.1.incr.aof
-rw-r--r-- 1 root root 88 1月  24 19:26 appendonly.aof.manifest
root@matthew-virtual-machine:/myredis/appendonlydir#
测试:
127.0.0.1:6379> keys *
(empty array)
127.0.0.1:6379> set k1 v1
OK
127.0.0.1:6379> set k2 v2
OK
127.0.0.1:6379> set k3 v3
OK
127.0.0.1:6379> set k4 v4
OK
127.0.0.1:6379> flushall
OK
127.0.0.1:6379> shutdown
not connected> quit
root@matthew-virtual-machine:/myredis# redis-server /myredis/redis7.conf
17713:C 24 Jan 2024 19:41:43.076 # WARNING Memory overcommit must be enabled! Without it, a background save or replication may fail under low memory condition. Being disabled, it can also cause failures without low memory condition, see https://github.com/jemalloc/jemalloc/issues/1328. To fix this issue add 'vm.overcommit_memory = 1' to /etc/sysctl.conf and then reboot or run the command 'sysctl vm.overcommit_memory=1' for this to take effect.
root@matthew-virtual-machine:/myredis# redis-cli -a 1186981212xxx!
Warning: Using a password with '-a' or '-u' option on the command line interface may not be safe.
127.0.0.1:6379> keys *
1) "k3"
2) "k4"
3) "k1"
4) "k2"
127.0.0.1:6379>
root@matthew-virtual-machine:/myredis# cp -r appendonlydir/ appendonlydir.bak

root@matthew-virtual-machine:/myredis# ll
总用量 112
drwxr-xr-x  4 root root      8 1月  24 19:39 ./
drwxr-xr-x 20 root root     26 1月  16 09:40 ../
drwxr-xr-x  3 root root      6 1月  24 19:35 appendonlydir/
drwxr-xr-x  3 root root      6 1月  24 19:39 appendonlydir.bak/
-rw-r--r--  1 root root    121 1月  24 19:38 dump6379.rdb
-rw-r--r--  1 root root    353 1月  24 16:35 dump.rdb
-rw-r--r--  1 root root 107561 1月  24 19:25 redis7.conf
-rw-r--r--  1 root root  24576 1月  16 09:46 .redis7.conf.swp

root@matthew-virtual-machine:/myredis# rm -f dump6379.rdb

root@matthew-virtual-machine:/myredis# ll
总用量 115
drwxr-xr-x  4 root root      7 1月  24 19:40 ./
drwxr-xr-x 20 root root     26 1月  16 09:40 ../
drwxr-xr-x  3 root root      6 1月  24 19:35 appendonlydir/
drwxr-xr-x  3 root root      6 1月  24 19:39 appendonlydir.bak/
-rw-r--r--  1 root root    353 1月  24 16:35 dump.rdb
-rw-r--r--  1 root root 107561 1月  24 19:25 redis7.conf
-rw-r--r--  1 root root  24576 1月  16 09:46 .redis7.conf.swp


root@matthew-virtual-machine:/myredis# rm -rf appendonlydir/

root@matthew-virtual-machine:/myredis# ll
总用量 106
drwxr-xr-x  3 root root      6 1月  24 19:41 ./
drwxr-xr-x 20 root root     26 1月  16 09:40 ../
drwxr-xr-x  3 root root      6 1月  24 19:39 appendonlydir.bak/
-rw-r--r--  1 root root    353 1月  24 16:35 dump.rdb
-rw-r--r--  1 root root 107561 1月  24 19:25 redis7.conf
-rw-r--r--  1 root root  24576 1月  16 09:46 .redis7.conf.swp

root@matthew-virtual-machine:/myredis# mv appendonlydir.bak/ appendonlydir

root@matthew-virtual-machine:/myredis# ll
drwxr-xr-x  3 root root      6 1月  24 19:41 ./
drwxr-xr-x 20 root root     26 1月  16 09:40 ../
drwxr-xr-x  3 root root      6 1月  24 19:39 appendonlydir/
-rw-r--r--  1 root root    353 1月  24 16:35 dump.rdb
-rw-r--r--  1 root root 107561 1月  24 19:25 redis7.conf
-rw-r--r--  1 root root  24576 1月  16 09:46 .redis7.conf.swp
root@matthew-virtual-machine:/myredis#
![]()
1.3.5 AOF 异常情况恢复
故意乱写 AOF 模拟错误情况
![]()
修改文件后重启 redis 发现启动错误
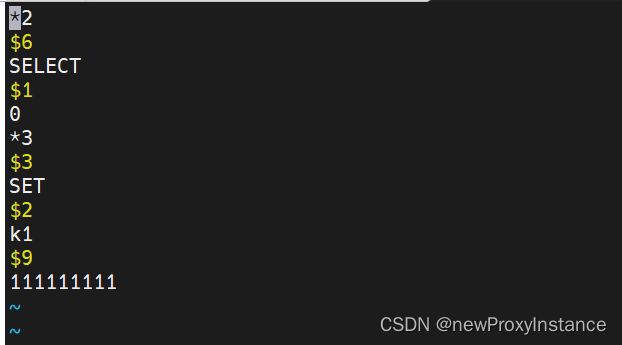
redis-check-aof appendonly.aof.1.incr.aof
redis-check-aof --fix appendonly.aof.1.incr.aof
![]()
1.3.6 AOF优缺点
AOF优点:https://redis.io/docs/management/persistence/#aof-advantages
- 使用 AOF Redis 更加持久:您可以有不同的 fsync 策略:完全没有 fsync、每秒 fsync、每次查询的 fsync。使用每秒 fsync 的默认策略,写入性能仍然很好。fsync 是使用后台线程执行的,当没有 fsync 正在进行时,主线程会努力执行写入,因此您只能丢失一秒钟的写入。
- AOF 日志是仅追加日志,因此在断电时不会出现寻道或损坏问题。即使日志由于某种原因(磁盘已满或其他原因)以半写命令结尾,redis-check-aof 工具也能够轻松修复它。
- Redis 能够在 AOF 变得太大时在后台自动重写它。重写是完全安全的,因为当 Redis 继续追加到旧文件时,会使用创建当前数据集所需的最少操作生成一个全新的文件,一旦第二个文件准备就绪,Redis 就会切换两者并开始追加到新文件。
- AOF以易于理解和解析的格式包含所有操作的日志。您甚至可以轻松导出 AOF 文件。例如,即使您不小心使用 FLUSHALL 命令刷新了所有内容,只要在此期间没有执行日志重写,您仍然可以通过停止服务器、删除最新命令并重新启动 Redis 来保存数据集。
AOF缺点:https://redis.io/docs/management/persistence/#aof-disadvantages
- AOF 文件通常大于同一数据集的等效 RDB 文件。
- AOF 可能比 RDB 慢,具体取决于确切的 fsync 策略。一般来说,将 fsync 设置为每秒一次时,性能仍然非常高,并且在禁用 fsync 的情况下,即使在高负载下,它也应该与 RDB 一样快。尽管如此,RDB 仍然能够提供更多关于最大延迟的保证,即使在巨大的写入负载的情况下也是如此。
Redis < 7.0
- 如果在重写期间对数据库进行写入,则 AOF 可能会使用大量内存(这些内存在内存中缓冲,并在最后写入新的 AOF)。
- 在重写期间到达的所有写入命令都会写入磁盘两次。
- Redis 可能会在重写结束时冻结这些写入命令并将其同步到新的 AOF 文件。
简单说:AOF更安全,更慢
![]()
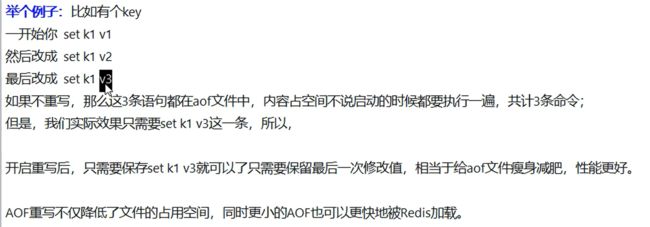
1.3.7 AOF重写机制(Log rewriting)
是什么: 让 AOF 文件瘦身,更精简。
由于AOF持久化是Redis不断将写命令记录到AOF文件中,随着Redis不断的进行,AOF的文件会越来越大,文件越大,占用服务器内存越大以及AOF恢复要求时间越长。
为了解决这个问题,Redis新增了重写机制,当AOF文件的大小超过所设定的峰值时,Redis就会自动启动AOF文件的内容压缩,只保留可以恢复数据的最小指令集或者可以手动使用命令 BGREWRITEAOF 来重新。
手动触发命令
BGREWRITEAOF
自动触发默认配置
# Automatic rewrite of the append only file.
# Redis is able to automatically rewrite the log file implicitly calling
# BGREWRITEAOF when the AOF log size grows by the specified percentage.
#
# This is how it works: Redis remembers the size of the AOF file after the
# latest rewrite (if no rewrite has happened since the restart, the size of
# the AOF at startup is used).
#
# This base size is compared to the current size. If the current size is
# bigger than the specified percentage, the rewrite is triggered. Also
# you need to specify a minimal size for the AOF file to be rewritten, this
# is useful to avoid rewriting the AOF file even if the percentage increase
# is reached but it is still pretty small.
#
# Specify a percentage of zero in order to disable the automatic AOF
# rewrite feature.

auto-aof-rewrite-percentage 100
auto-aof-rewrite-min-size 64mb
1.3.8 案例验证
将文件改为1k
auto-aof-rewrite-min-size 1k

将 aof-use-rdb-preamble 改为 no ,默认为 yes
# Redis can create append-only base files in either RDB or AOF formats. Using
# the RDB format is always faster and more efficient, and disabling it is only
# supported for backward compatibility purposes.
#aof-use-rdb-preamble yes
aof-use-rdb-preamble no
删除之前的 AOF 后启动
写入操作会持续增大 aof 文件大小
vim appendonly.aof.2.base.aof
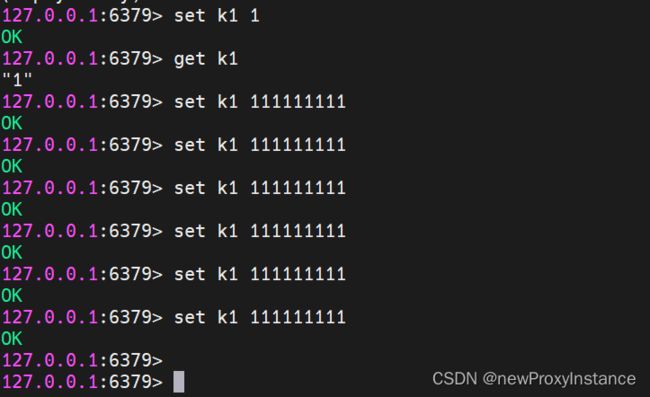
1.3.10 手动触发
![]()
1.3.11 AOF 小总结
#appendonly no
appendonly yes

appendfilename "appendonly.aof"

appenddirname "appendonlydir"

# appendfsync always
appendfsync everysec
# appendfsync no

no-appendfsync-on-rewrite no

auto-aof-rewrite-percentage 100
#auto-aof-rewrite-min-size 64mb
auto-aof-rewrite-min-size 1k

aof-load-truncated yes
![]()
1.4 混合持久化
https://redis.io/docs/management/persistence/#ok-so-what-should-i-use
同时开启 rdb 和 aof ,aof 优先级高于 rdb
开启
#aof-use-rdb-preamble yes
![]()
1.4.5 纯缓存模式
是什么:不进行持久化 同时关闭RDB和AOF
save ""
appendonly no
禁用自动触发,仍然可以使用命令保存 RDB 和 AOF 文件。
![]()
