w3school学习笔记1(python基础)
系列文章目录
文章目录
- 系列文章目录
- 前言
- 一、python简介
-
- 1.1 python介绍
-
- 1.1.1什么是python?
- 1.1.2python可以做什么?
- 1.2 python安装
-
- 1.2.1安装教程
- 二、python入门
-
- 2.1 入门教程
-
- 2.1.1第一个案例"HelloWorld"
- 2.2python语法
-
- 2.2.1python缩进
- 2.2.1python注释
- 2.3python变量
-
- 2.3.1创建变量
- 2.3.2变量名称
- 2.3.3多变量赋值
- 2.3.4变量输出
- 2.3.4全局变量和局部变量
- 2.4python数据类型
-
- 2.4.1内置数据类型
- 2.4.2获取数据类型
- 2.4.3设置数据类型
- 2.5python数字
-
- 2.5.1三种数字类型
- 2.5.2随机数
- 2.6python Casting
-
- 2.6.1指定变量类型
- 2.7python 字符串
-
- 2.7.1字符串字面量
- 2.7.2字符串是数组
- 2.8python 布尔
-
- 2.8.1布尔值
- 2.9python 运算符
-
- 2.9.1算术运算符
- 2.9.2赋值运算符
- 2.9.3比较运算符
- 2.9.4逻辑/身份/成员运算符
- 2.9.5位运算符
- 2.10python 列表
-
- 2.10.1四种集合数据类型
- 2.10.2列表(列表用方括号编写)
- 2.10.3元组(用圆括号编写)
- 2.10.4集合(用花括号编写)
- 2.10.5字典(用花括号编写,拥有键和值)
- 2.11python If Else
-
- 2.11.1 if语句和循环
- 2.11.2 Elif
- 2.11.3 Else
- 2.11.3 简写If,简写If...Else
- 2.11.4 And
- 2.11.5 Or
- 2.11.6 嵌套If
- 2.11.7 pass语句
- 2.12python While循环
-
- 2.12.1 循环命令
- 2.12.2 while循环
- 2.12.3 for循环
- 2.13 python 函数
-
- 2.13.2 Lambda
- 2.14 python 数组
- 2.15 python 类/对象
- 2.16 python 继承
- 2.17 python 迭代
-
- 2.17.1 python迭代器
- 2.18 python 作用域
- 2.19 python 模块
- 2.20 python 日期
- 2.21 python JSON
- 2.22 python RegEx
- 2.23 python PIP
- 2.24 python Try Except
- 2.25 python 命令行输入
- 2.26 python 字符串格式化
-
- 2.26.1 字符串format()
- 三、python文件处理
-
- 3.1 文件处理
- 3.2 文件打开
-
- 3.2.1 open()函数
- 3.3 文件写入
- 3.4 文件删除
- 总结
前言
一、python简介
1.1 python介绍
1.1.1什么是python?
python是一门流行的编程语言,它由 Guido van Rossum 创建,于 1991 年发布。它适用于:
- Web开发(服务器端)
- 软件开发
- 数学
- 系统脚本
1.1.2python可以做什么?
- 网络爬虫:从互联网采集数据。
- 数据分析:对数据进行清洗、去重、存储、分析、可视化等处理。主要用到 Numpy 、Pandas 、Matpoltlib 等 Python 库。
- 办公自动化:提高工作效率。
- 人工智能:
1.2 python安装
1.2.1安装教程
安装教程
二、python入门
2.1 入门教程
2.1.1第一个案例"HelloWorld"
创建HelloWorld.py
print("Hello, World!")
print("HelloWorld")
在命令行运行:python HelloWorld.py
Hello, World!
HelloWorld
2.2python语法
2.2.1python缩进
缩进是指代码开头的空格,在其他编程语言中,代码缩进仅出于可读性的考虑,而python中的缩进非常重要!!!
错误示例:
if 5>3:
print("It is accurate!")
运行结果:
  File ".\rumen.py", line 2
    print("It is accurate!")
        ^
IndentationError: expected an indented block #缩进错误:需要缩进块
正确示例
if 5>3:
    print("It is accurate!") #tab缩进
或
if 5>3:
 print("It is accurate!")  #一个空格缩进
运行结果:
It is accurate!
注:空格数取决于程序员,但至少一个!!而且在同一代码块中要使用相同数量的空格,否则会出错!!!
2.2.1python注释
- 单行注释:用#进行单行注释;
- 多行注释:用三个"""或’’'进行多行注释。
说明:python实际上没有多行注释的语法,但是可以用不完全符合预期的方式,由于python将忽略未分配给变量的字符串文字,因此只要字符串未分配给变量,python就会读取代码,然后忽略它,从而达到多行注释。
2.3python变量
2.3.1创建变量
变量是存放数据的容器,与其它语言不同的是python没有声明变量的命令,首次为其赋值时,才会创建变量。
示例一:
x = 6
y = 8
print(x)
print(y)
运行结果:
6
8
示例二:
x = 6
x = "Steve"
x = 'steve'
print(x)
运行结果:
steve
说明:
- 变量不需要使用任何特定类型声明,甚至可以在设置后更改其类型
- 字符串变量可以使用单引号和双引号
2.3.2变量名称
变量可以使用短名称(如 a 和 b)或更具描述性的名称(age、name、total_volume)
命名规则:
- 变量名必须以字母或下划线字符开头
- 变量名称不能以数字开头
- 变量名只能包含字母数字字符和下划线(A-z、0-9 和 _)
- 变量名称区分大小写(age、Age 和 AGE 是三个不同的变量)
注意:变量名称区分大小写;
2.3.3多变量赋值
示例一:
x, y, z = "I", "love", "python"
print(x)
print(y)
print(z)
运行结果:
I
love
python
示例二:
x = y = z = "insist"
print(x)
print(y)
print(z)
运行结果:
insist
insist
insist
2.3.4变量输出
示例一:
x = "interesting"
print("python is " + x)
运行结果
python is interesting
示例二:
x = "python "
y = "is "
z = "interesting "
ana = x + y + z
print(ana)
运行结果
python is interesting
示例三:
x = 6
y = "python"
print(x + y)
运行结果
  File ".\rumen.py", line 48, in <module>
    print(x + y)
TypeError: unsupported operand type(s) for +: 'int' and 'str'  #类型错误:不支持的操作数类型为+:'int'和'str'
说明:
- print()如需结合文本和变量,python使用"+";
- 对于数字,"+"作为运算符;
- 字符串和数字组合会出错
2.3.4全局变量和局部变量
示例一:
x = "awesome"
def myfunc():
  print("Python is " + x)
myfunc()
运行结果
Python is awesome
说明: 在函数外部创建的变量称为全局变量,可以被函数内外的每个人使用;
示例二:
x = "awesome"
def myfunc():
  x = "fantastic"
  print("Python is " + x)
myfunc()
print("Python is " + x)
运行结果
Python is fantastic
Python is awesome
说明: 在函数内部创建的变量,称为局部变量,只能在函数内部使用,具有相同名称的全局变量将保留原样,并拥有原始值;
示例三:
x = "awesome"
def myfunc():
  global x
  x = "fantastic"
myfunc()
print("Python is " + x)
运行结果
Python is fantastic
说明: 要在函数内部创建全局变量,可以使用global关键字,使用了global关键字,则该变量为全局变量;且要在函数内部更改全局变量的值时,要用global关键字引用该变量;
2.4python数据类型
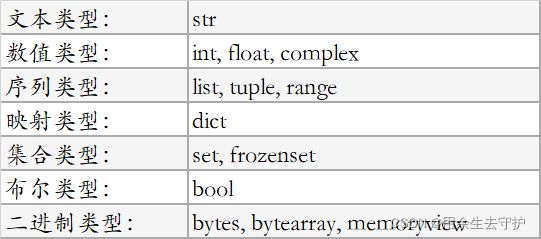
2.4.1内置数据类型
变量可以存储不同类型的数据,python默认拥有以下内置数据类型:
2.4.2获取数据类型
可以使用type()函数获取任何对象的数据类型
实例一:
x = "python"
print(type(x))
运行结果:
<class 'str'>
2.4.3设置数据类型
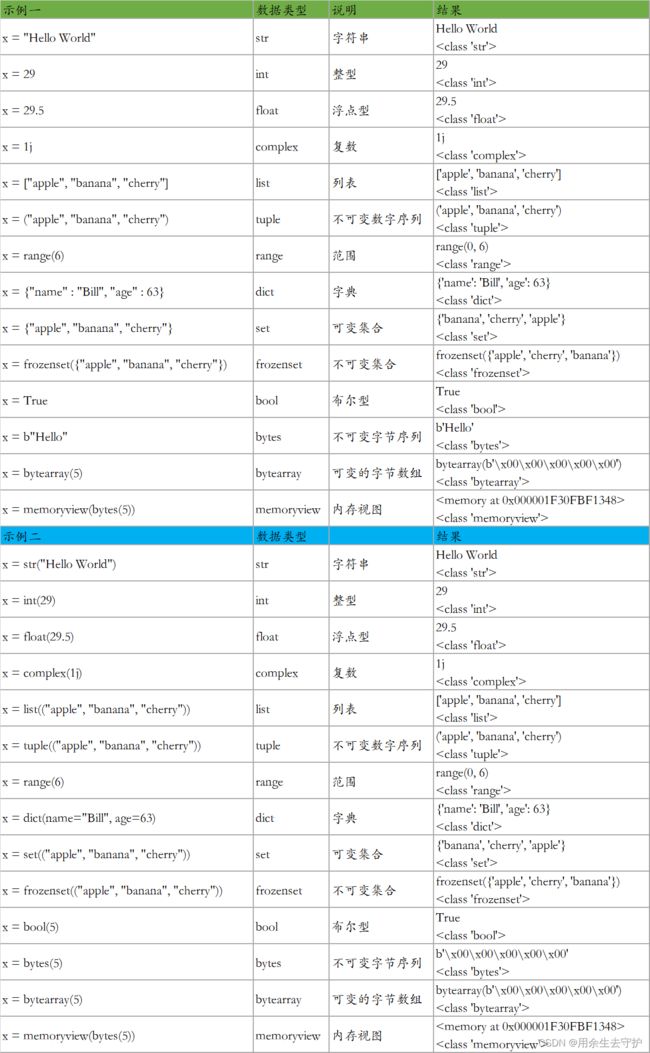
2.5python数字
2.5.1三种数字类型
- int:int或整数是完整的数字,正数或负数,没有小数,长度不限;
- float:浮动或"浮点数"是包含小数的正数或负数,浮点数也可以是带有"e"的科学数字,表示10的幂;
- complex:复数用"j"作为虚部编写,无法将复数转换为其它数字类型;
2.5.2随机数
python没有random()函数来创建随机数,但python有一个名为random的内置模块,可用于生成随机数;
import random
print(random.randrange(1,10))
2.6python Casting
2.6.1指定变量类型
casting可以为变量指定类型,python是一门面向对象的语言,因此它使用类来定义数据类型,包括其原始类型。
- int()
- float()
- str()
2.7python 字符串
2.7.1字符串字面量
python中的字符串字面量是有单引号或双引号括起。‘hello’=“hello”。
a = "Python"  #单行用"或',多行用"""或''';
b = """Life will always undervalue you if you let it.
敷衍人生,人生也会敷衍你。 """
print(a)
print(b)
运行结果:
Python
Life will always undervalue you if you let it.
敷衍人生,人生也会敷衍你。
2.7.2字符串是数组
和许多其他编程语言一样,python中的字符串是标识unicode字符的字节数组,但是python没有字符数据类型,单个字符就是长度为1的字符串;
方括号可用于访问字符串元素
示例:获取位置1处的字符(第一个字符位置为0)
a = "Life will always undervalue you if you let it."
print(a[1])
运行结果:
i
裁切
指定开始索引和结束索引,以冒号分隔,返回字符串的一部分;
示例:获取从位置5:到位置10(不包括)的字符;
a = "Life will always undervalue you if you let it."
print(a[5:10])
运行结果:
will
负的索引
示例:获取从位置10:到位置1的字符,从字符串末尾开始计数;
a = "Life will always undervalue you if you let it."
print(a[-10:-2])
运行结果:
ou let i
字符串长度
示例:返回字符串长度
a = "Life will always undervalue you if you let it."
print(len(a))
运行结果:
46
字符串方法
示例一:strip()方法删除开头和结尾的空白字符
a = " Life will always undervalue you if you let it. "
print(a.strip())
运行结果:
Life will always undervalue you if you let it.
示例二:lower()返回小写/大写字符串
a = "Life will always undervalue you if you let it."
print(a.lower())
print(a.upper())
运行结果:
life will always undervalue you if you let it.
LIFE WILL ALWAYS UNDERVALUE YOU IF YOU LET IT.
示例三:replace()用另一段字符串替换字符串
a = "Life will always undervalue you if you let it."
print(a.replace("Life","Python"))
运行结果:
Python will always undervalue you if you let it.
示例四:split()方法找到分隔符时将字符串拆分为子字符串
a = "Life will always undervalue you, if you let it."
print(a.split(","))
运行结果:
['Life will always undervalue you', ' if you let it.']
示例五:检查字符串
a = "Life will always undervalue you if you let it."
b = "Life" in a
c = "Life" not in a
print(b)
print(c)
运行结果:
True
False
示例六:format()方法组合字符串和数字
name = "若竹"
txt = "My name is {},I am 20"
print(txt.format(name))
运行结果:
My name is 若竹,I am 20
示例七:format()方法不限数量
name = "若竹"
age = 20
sex = "boy"
txt = "My name is {},I am {},I am a {}"
print(txt.format(name,age,sex))
运行结果:
My name is 若竹,I am 20,I am a boy
示例八:format()方法可使用索引号{*}来确保放在正确的占位符中
age = 20
sex = "boy"
name = "若竹"
txt = "My name is {2},I am {0},I am a {1}"
print(txt.format(age,sex,name))
运行结果:
My name is 若竹,I am 20,I am a boy
2.8python 布尔
2.8.1布尔值
布尔表示True或False两值之一。
判断条件
示例:
print(8>7)
print(8<7)
a = 8
b = 7
if a > b:
    print("a is greater than b")
else:
    print("a is not greater than b")
运行结果:
True
False
a is greater than b
评估值和变量
示例:
print(bool("Python"))
print(bool(10))
x = "Python"
y = 10
print(bool(x))
print(bool(y))
运行结果:
True
True
True
True
备注:
- 除空字符串外,任何字符串均为True
- 除0外,任何数字均为True
- 除空列表外,任何列表、元组、集合和字典均为True
示例一:
print(bool(False))
print(bool(None))
print(bool(0))
print(bool(""))
print(bool(()))
print(bool([]))
print(bool({}))
运行结果:
False
False
False
False
False
False
False
注:在这种情况下,一个值或对象的计算结果为False,即如果对象由带有__len__函数的类生成的,且该函数返回0或False;
示例二:
class myclass():
  def __len__(self):
    return 0
myobj = myclass()
print(bool(myobj))
运行结果:
False
函数可返回布尔
示例:
x = 200
print(isinstance(x,int))
运算结果:
True
2.9python 运算符
2.9.1算术运算符

2.9.2赋值运算符

2.9.3比较运算符

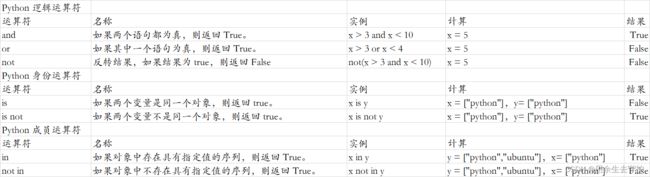
2.9.4逻辑/身份/成员运算符
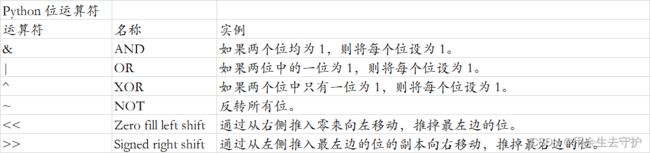
2.9.5位运算符
2.10python 列表
2.10.1四种集合数据类型
- 列表(List)是一种有序和可更改的集合,允许重复的成员;
- 元组(Tuple)是一种有序且不可更改的集合,云秀重复的成员;
- 集合(Set)是一个无序和无索引的集合,没有重复的成员;
- 词典(Dictionary)是一个无序,可变和有索引的集合,没有重复的成员;
2.10.2列表(列表用方括号编写)
索引范围
system = ["windows","linux","Mac","Harmony OS","other"]
print(system[-1])    #打印最后一项
print(system[2:5])   #从索引2(包括)开始,到索引5(不包括)结束;
print(system[-4:-1]) #负索引表示从末尾开始,-1表示最后一个项目,-2表示倒数第二个项目,一次类推;
运行结果:
other
['Mac', 'Harmony OS', 'other']
['linux', 'Mac', 'Harmony OS']
更改项目值
如需要更改特定项目值,请引用索引号;
system = ["windows","linux","Mac","Harmony OS","other"]
system[1] = "Android"
print(system)
运行结果:
['windows', 'Android', 'Mac', 'Harmony OS', 'other']
遍历列表
可以使用for循环遍历列表项
system = ["windows","linux","Mac","Harmony OS","other"]
for x in system:
  print(x)
运行结果:
windows
linux
Mac
Harmony OS
other
检查项目是否存在
system = ["windows","linux","Mac","Harmony OS","other"]
if "linux" in system:
  print("Yes,'linux' is in the system list")
运行结果:
Yes,'linux' is in the system list
列表长度
如需确定列表中有多少项,可以使用len()方法
system = ["windows","linux","Mac","Harmony OS","other"]
print(len(system))
运行结果:
5
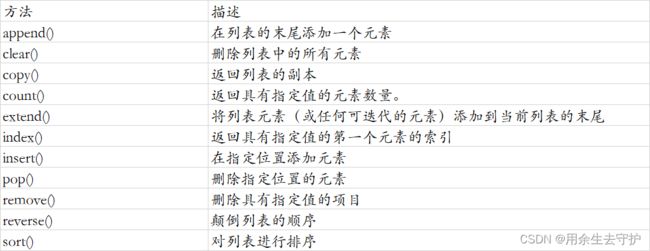
添加项目
如需将项目添加到列表的末尾,可以使用append()方法
如需将项目添加到列表指定位置,可以使用insert()方法
system = ["windows","linux","Mac","Harmony OS","other"]
system.append("Android")
system.insert(1,"Android")
print(system)
运行结果:
['windows', 'Android', 'linux', 'Mac', 'Harmony OS', 'other', 'Android']
删除项目
remove()方法删除指定项目
pop()方法删除指定的索引(如果未指定索引,则删除最后一项)
del关键字删除指定索引
del关键字也能完整的删除列表
clean()方法清空列表
system1 = ["windows","linux","Mac","Harmony OS","other"]
system2 = ["windows","linux","Mac","Harmony OS","other"]
system3 = ["windows","linux","Mac","Harmony OS","other"]
system4 = ["windows","linux","Mac","Harmony OS","other"]
system5 = ["windows","linux","Mac","Harmony OS","other"]

system1.remove("Mac")
system2.pop()
del system3[0]
del system4
system5.clear()

print(system1)
print(system2)
print(system3)
print(system5)
运行结果:
['windows', 'linux', 'Harmony OS', 'other']
['windows', 'linux', 'Mac', 'Harmony OS']
['linux', 'Mac', 'Harmony OS', 'other']
[]
复制列表
只能通过list2 = list1来复制表,因为list2将只是对list1的引用,list1中所做的更改也将自动在list2中进行。有一些地方可以进行复制,一种方法是使用内置的list方法,使用copy()方法来复制列表,另一种制作副本的方法是使用内建的方法list()。
system = ["windows","linux","Mac","Harmony OS","other"]
mysystem1 = system.copy()
mysystem2 = list(system)
print(mysystem1)
print(mysystem2)
运行结果:
['windows', 'linux', 'Mac', 'Harmony OS', 'other']
['windows', 'linux', 'Mac', 'Harmony OS', 'other']
合并两个列表
在python中,有几种方法可以连接或串联两个或多个列表。
方法一:使用+运算符
system = ["windows","linux","Mac","Harmony OS","other"]
version = ["one","two","three","four","five"]
sv = system + version
print(sv)
运行结果:
['windows', 'linux', 'Mac', 'Harmony OS', 'other', 'one', 'two', 'three', 'four', 'five']
方法二:将version中的所有项一个接一个追加到system
system = ["windows","linux","Mac","Harmony OS","other"]
version = ["one","two","three","four","five"]
for x in version:
  system.append(x)
print(system)
运行结果:
['windows', 'linux', 'Mac', 'Harmony OS', 'other', 'one', 'two', 'three', 'four', 'five']
方法三:使用extend(),将一个列表中的元素添加到另一列表中,使用extend()方法将version中的原素添加到system末尾;
system = ["windows","linux","Mac","Harmony OS","other"]
version = ["one","two","three","four","five"]
system.extend(version)
print(system)
运行结果:
['windows', 'linux', 'Mac', 'Harmony OS', 'other', 'one', 'two', 'three', 'four', 'five']
list()构造函数
使用list()构造函数创建列表
system = list(("windows","linux","Mac","Harmony OS","other")) #请注意双括号
print(system)
运行结果:
['windows', 'linux', 'Mac', 'Harmony OS', 'other']
列表方法

2.10.3元组(用圆括号编写)
访问元组项目
system = ("windows","linux","Mac","Harmony OS","other")
print(system[1])    #打印元组中的第二个项目
print(system[-1])   #-1表示最后一个项目,-2表示倒数第二个项目,以此类推
print(system[2:5])  #返回第三四五项目
print(system[-4:-1])#返回从索引-4(包括)到索引-1(不包括)的项目
运行结果:
linux
other
('Mac', 'Harmony OS', 'other')
('linux', 'Mac', 'Harmony OS')
更改元组值
创建元组后,您将无法更改其值,元组是不可变的,也被称为恒定的,但是有一种解决方法,可以将元组转换为列表,然后再将列表转换为元组;
system = ("windows","linux","Mac","Harmony OS","other")
transform = list(system)
transform[1] = "Android"
system = tuple(transform)
print(system)
运行结果:
('windows', 'Android', 'Mac', 'Harmony OS', 'other')
遍历元组
使用for循环遍历元组项目
system = ("windows","linux","Mac","Harmony OS","other")
for x in system:
  print(x)
运行结果:
windows
linux
Mac
Harmony OS
other
检查项目是否存在
system = ("windows","linux","Mac","Harmony OS","other")
if "linux" in system:
  print("Yes,'linux' is in the system tuple")
运行结果:
Yes,'linux' is in the system tuple
元组长度
system = ("windows","linux","Mac","Harmony OS","other")
print(len(system))
运行结果:
5
创建一个项目的元组
如需创建仅含有一个项目的元组,必须在该项目后面添加一个逗号,否则python无法将变量识别为元组
system = ("linux")   #不是元组
system1 = ("linux",) #后面必须添加一个逗号
print(system)
print(system1)
运行结果:
linux
('linux',)
删除项目
注:无法删除元组中的项目,但可以完全删除元组!!!
system = ("windows","linux","Mac","Harmony OS","other")
del system
合并两个元组
如需连接两个或多个元组,可以使用+运算符
system = ("windows","linux","Mac","Harmony OS","other")
version = ("one","two","three","four","five")
tuple = system + version
print(tuple)
运行结果:
('windows', 'linux', 'Mac', 'Harmony OS', 'other', 'one', 'two', 'three', 'four', 'five')
tuple()构造函数
可以使用tuple()构造函数来创建元组
system = tuple(("windows","linux","Mac","Harmony OS","other"))
print(system)
运行结果:
('windows', 'linux', 'Mac', 'Harmony OS', 'other')
元组方法

2.10.4集合(用花括号编写)
访问项目
无法通过索引来访问集合中的项目,因为集合set是无序的,项目没有索引,但是可以使用for循环遍历set项目,或使用in关键字查询集合中是否存在该指定值。
system = {"windows","linux","Mac","Harmony OS","other"}
for x in system:
  print(x)
print("linux" in system)
运行结果:
Harmony OS
Mac
other
windows
linux
True
更改/添加项目
集合一旦创建,无法更改项目,但是可以添加新项目。
1、要将一个项添加到集合,使用add()方法。
2、要向集合中添加多个项目,使用update()方法。
system = {"windows","linux","Mac","Harmony OS","other"}
system.add("Android")
print(system)
system.update(["one","two","three"])
print(system)
运行结果:
{'windows', 'Mac', 'linux', 'other', 'Harmony OS', 'Android'}
{'windows', 'Mac', 'linux', 'two', 'other', 'one', 'three', 'Harmony OS', 'Android'}
获取set的长度
system = {"windows","linux","Mac","Harmony OS","other"}
print(len(system))
运行结果:
5
删除项目
要删除集合中的项目,使用remove()或discard()方法
注:如果要删除的项目不存在,remove()将引发错误;discard()不会引发错误;
system = {"windows","linux","Mac","Harmony OS","other"}
system.remove("other")
print(system)
system.discard("Mac")
print(system)
运行结果:
{'windows', 'Harmony OS', 'Mac', 'linux'}
{'windows', 'Harmony OS', 'linux'}
还可以使用pop()方法删除项目,但此方法将删除最后一项,请记住,set是无序的,因此不知道删除的最后一个是什么项目;
pop()方法的返回值是被删除的项目;
system = {"windows","linux","Mac","Harmony OS","other"}
x = system.pop()
print(x)
print(system)
运行结果:
Harmony OS
{'linux', 'Mac', 'other', 'windows'}
清空和删除集合
system = {"windows","linux","Mac","Harmony OS","other"}
system.clear() #清空集合
del system     #彻底删除集合
合并两个集合
在python中,有几种方法可以连接两个或多个集合。
可以使用union()方法返回包含两个集合中所有项目的新集合,也可以使用update()方法将一个集合中的所有项目插入另一个集合中:
1、union()方法返回一个新集合,其中包含两个集合中所有项目。
2、update()方法将set2中的项目插入到set1中。
注释:union()和update()都将排除任何重复项,
system = {"windows","linux","Mac","Harmony OS","other"}
version = {"one","two","three"}
set = system.union(version)
print(set)
system.update(version)
print(system)
运行结果:
{'two', 'three', 'linux', 'Mac', 'Harmony OS', 'windows', 'one', 'other'}
{'two', 'Mac', 'Harmony OS', 'windows', 'three', 'one', 'linux', 'other'}
set()构造函数
system = set(("windows","linux","Mac","Harmony OS","other")) #注意双括号
print(system)
运行结果:
{'linux', 'Mac', 'windows', 'other', 'Harmony OS'}
set()方法

2.10.5字典(用花括号编写,拥有键和值)
创建并打印字典
dict = {
  "system":"linux",
  "version": "20.20",
  "user":"若竹"
  }
print(dict)
运行结果:
{'system': 'linux', 'version': '20.20', 'user': '若竹'}
访问项目
可以通过在方括号内引用其键名来访问字典中的项目:
dict = {
  "system":"linux",
  "version": "20.20",
  "user":"若竹"
  }
print(dict)
x = dict["system"]
y = dict.get("version")
print(x)
print(y)
运行结果:
{'system': 'linux', 'version': '20.20', 'user': '若竹'}
linux
20.20
更改值
dict = {
  "system":"linux",
  "version": "20.20",
  "user":"若竹"
  }
dict["version"] = 22.22
print(dict)
运行结果:
{'system': 'linux', 'version': 22.22, 'user': '若竹'}
遍历字典
可以使用for循环遍历字典,循环字典时,返回值是字典的键,但也有返回值的方法;
dict = {
  "system":"linux",
  "version": "20.20",
  "user":"若竹"
  }

for x in dict:
  print(x)
print('\n')
for x in dict:
  print(dict[x])
print('\n')
for x in dict.values():
  print(x)
运行结果:
system
version
user

linux
20.20
若竹

linux
20.20
若竹
通过item()函数遍历键和值
dict = {
  "system":"linux",
  "version": "20.20",
  "user":"若竹"
  }
for x,y in dict.items():
  print(x,y)
运行结果:
system linux
version 20.20
user 若竹
检查键是否存在
dict = {
  "system":"linux",
  "version": "20.20",
  "user":"若竹"
  }
if "user" in dict:
  print("Yes,'user' is one of the keys in the dict dictionary")
运行结果:
Yes,'user' is one of the keys in the dict dictionary
字典长度
dict = {
  "system":"linux",
  "version": "20.20",
  "user":"若竹"
  }
print(len(dict))
运行结果:
3
添加项目
通过使用新的索引键并为其赋值,可以将项目添加到字典中。
dict = {
  "system":"linux",
  "version": "20.20",
  "user":"若竹"
  }
dict["sex"] = "boy"
print(dict)
运行结果:
{'system': 'linux', 'version': '20.20', 'user': '若竹', 'sex': 'boy'}
删除项目
1、pop()方法删除具有指定键名的项;
2、popitem()方法删除最后插入的项目(在3.7之前的版本中删除随机项目);
3、del关键字删除具有指定键名的项目;
4、del关键字也可以完全删除字典;
5、clear()关键字清空字典
dict = {
  "system": "linux",
  "version": "20.20",
  "user": "若竹",
  "sex": "boy"
  }
dict.pop("sex")
print(dict)
dict.popitem()
print(dict)
del dict["version"]
print(dict)
dict.clear()
print(dict)
运行结果
{'system': 'linux', 'version': '20.20', 'user': '若竹'}
{'system': 'linux', 'version': '20.20'}
{'system': 'linux'}
{}
复制字典
不能通过dict2 = dict1来复制字典,因为dict2只是对dict1的引用,而dict1中的更改也将自动在dict2中进行。可以通过其它方式进行复制:
1、使用内建的字典方法copy()
2、使用内建方法dict()创建副本
dictname = {
  "system": "linux",
  "version": "20.20",
  "user": "若竹",
  "sex": "boy"
  }
mydict = dictname.copy()
print(mydict)
mydict1 = dict(dictname)
print(mydict1)
运行结果:
{'system': 'linux', 'version': '20.20', 'user': '若竹', 'sex': 'boy'}
{'system': 'linux', 'version': '20.20', 'user': '若竹', 'sex': 'boy'}
嵌套字典
创建包含三个字典的字典
dictname = {
  "system1": {
    "linux":"ubuntu",
    "version":"20.20",
    "year":2022
  },
  "system2":{
    "linux":"centos",
    "version":"20.00",
    "year":2020
  },
  "system3":{
    "linux":"rat",
    "version":"19.19",
    "year":2018
  }
}
嵌套三个已经作为字典存在的字典,创建三个字典,然后创建一个包含其他三个字典的字典
dictname1 = {
  "system": "linux",
  "version": "20.20",
  "user": "若竹",
  "sex": "boy"
  }
dictname2 = {
  "system": "windows",
  "version": "20.20",
  "user": "青橙",
  "sex": "boy"
  }
dictname3 = {
  "system": "centos",
  "version": "20.20",
  "user": "川牧",
  "sex": "boy"
  }
mybrother = {
  "dictname1":dictname1,
  "dictname2":dictname2,
  "dictname3":dictname3
}
print(mybrother)
运行结果:
{'dictname1': {'system': 'linux', 'version': '20.20', 'user': '若竹', 'sex': 'boy'}, 'dictname2': {'system': 'windows', 'version': '20.20', 'user': '青橙', 'sex': 'boy'}, 'dictname3': {'system': 'centos', 'version': '20.20', 'user': '川牧', 'sex': 'boy'}}
dict()构造函数
dictname = dict(system="ubuntu",version="20.20",user="若竹")
print(dictname)
运行结果:
{'system': 'ubuntu', 'version': '20.20', 'user': '若竹'}
字典方法

2.11python If Else
2.11.1 if语句和循环
python依赖缩进,使用空格来定义代码中的范围,其他编程语言通常使用花括号来实现此目的。
a = 100
b = 200
if b > a:
  print("b is greater than a")
Result:
b is greater than a
2.11.2 Elif
elif关键字是python对"如果之前的条件不正确,那么试试这个条件"的表达式
a = 100
b = 200
if b > a:
  print("b is greater than a")
elif a == b:
  print("a and b are equal")
Result:
b is greater than a
2.11.3 Else
else关键字捕获未被之前的条件捕获的任何内容
a = 100
b = 200
if b < a:
  print("a is greater than b")
elif a == b:
  print("a and b are equal")
else:
  print("b is greater than a")
Result:
b is greater than a
2.11.3 简写If,简写If…Else
如果只有一条语句要执行,则可以将其与if语句放在同一行
a = 100
b = 200
if b > a:print("b is greater than a")
print("a") if b > a else print("b")
2.11.4 And
and关键字是一个逻辑运算符,用于组合条件语句
a = 100
b = 200
c = 300
if b > a and c > b:
  print("Both conditions are Ture")
Result:
Both conditions are Ture
2.11.5 Or
a = 100
b = 200
c = 300
if b > a or c > b:
  print("At least one of the conditions is Ture")
Result:
At least one of the conditions is Ture
2.11.6 嵌套If
if语句中包含if语句,称为嵌套if语句
x = 100
if x > 10:
  print("above ten")
  if x > 50:
    print("and also above 50!")
  else:
    print("but not above 50")
Result:
above ten
and also above 50!
2.11.7 pass语句
if语句不能为空,但是如果出现没有内容的if语句,可以使用pass语句来避免错误
x = 100
y = 200
if y > x:
  pass
2.12python While循环
2.12.1 循环命令
python有两个原始的循环命令
- While循环
- for循环
2.12.2 while循环
使用while循环,只要条件为真,执行下一组语句:
while循环要准备好相关的变量;
i = 1
while i <6:
  print(i)
  i +=1  #记得递增,否则循环会永远继续!!!
Result:
1
2
3
4
5
break语句
使用break语句,即使while条件为真,也会停止循环。
i = 1
while i <6:
  print(i)
  if i == 3:
    break
  i += 1
Result:
1
2
3
continue语句
使用continue语句,我们可以停止当前的迭代,并继续下一个。
i = 1
while i <6:
  i += 1
  if i == 3:
    continue
  print(i)
Result:
2
4
5
6
else语句
i = 1
while i <4:
  print(i)
  i +=1
else:
  print("i is no longer less than 4")
Result:
1
2
3
i is no longer less than 4
2.12.3 for循环
for 循环用于迭代序列(即列表、元组、字典、集合或字符串),这与其他编程语言中的for 关键字不太相似,而更像其他面向对象编程语言中的迭代器方法,通过for 循环,我们可以为列表、元组、集合中的每个项目等执行一组语句。
打印system列表中的每种系统:
for 循环不需要预先设置索引变量。
system = ["windows","linux","Mac","Harmony OS","other"]
for x in system:
  print(x)
Result:
windows
linux
Mac
Harmony OS
other
break 语句
break语句可以在循环遍历所有项目之前停止循环
如果x是Mac,则退出循环:
system=["windows","linux","Mac","Harmony OS","other"]
for x in system:
  print(x)
  if x == "Mac":
    break
Result:
windows
linux
Mac
如果x是Mac,则退出循环,在打印之前中断:
system=["windows","linux","Mac","Harmony OS","other"]
for x in system:
  if x == "Mac":
    break
  print(x)
Result:
windows
linux
continue语句
continue语句:停止循环的当前迭代,并继续下一个。
system=["windows","linux","Mac","Harmony OS","other"]
for x in system:
  if x == "Mac":
    continue
  print(x)
Result:
windows
linux
Harmony OS
other
range()函数
range()函数:循环一组代码指定的次数,返回一个数字序列,默认情况下从0开始,并递增1(默认),并以指定的数字结束。
for x in range(4):  #range(4)不是0-4而是0-3
  print(x)
Result:
0
1
2
3
指定起始值
for x in range(4,7):  #不包括7
  print(x)
Result:
4
5
6
指定递增序列
for x in range(4,10,2):  #以2为递增间隔
  print(x)
Result:
4
6
8
for循环中的else
for循环中的else关键字指定循环结束时要执行的代码块:
打印0-5的所有数字,并在循环结束时打印一条消息
for x in range(4):
  print(x)
else:
  print("finally finished")
Result:
0
1
2
3
finally finished
嵌套循环
嵌套循环是循环内的循环,外循环没迭代一次,内循环将执行一次;
打印每个系统的版本
system=["windows","linux","Mac"]
version = ["one","two","three"]
for x in system:
  for y in version:
    print(x,y)
Result:
windows one
windows two
windows three
linux one
linux two
linux three
Mac one
Mac two
Mac three
pass语句
for语句不能为空,如果写了空语句可以用pass语句避免错误。
for x in range(4):
  pass
2.13 python 函数
函数是一种仅在调用时运行的代码块,可以将数据参数传递到函数中,函数可以将数据作为结果返回。在python中,使用def关键字定义函数:
创建&调用函数
def my_function():
  print("Hello World!")

my_function()  #如果需要调用函数,使用函数名称后跟括号;
Result:
Hello World!
参数
信息可以作为参数传递给函数,参数在函数名后的括号内指定,可以添加多个参数,只需要用逗号分隔开即可;
示例一:打印全名
def my_function(fname):
  print(fname + "Gates")

my_function("若竹")
my_function("青橙")
my_function("川牧")
Result:
若竹Gates
青橙Gates
川牧Gates
示例二:调用不带参数的函数,使用默认值
def my_function(country  = "China"):
  print("I am from " + country)

my_function("Norway")
my_function("Sweden")
my_function()
Result:
I am from Norway
I am from Sweden
I am from China
以list传参
我们发送到函数的参数可以是任何数据类型(字符串、数字、列表、字典等),并且在函数内其将被视为相同数据类型。
例如:如果将list作为参数发送,它到达函数时仍将是list列表
def my_function(study):
  for x in study:
    print(x)

system=["windows","linux","Mac"]

my_function(system)
Result:
windows
linux
Mac
返回值
def my_function(x):
  return 5 * x

print(my_function(3))
Result:
15
关键字参数
可以使用key = value语法发送参数,参数的顺序无关紧要,在python中,关键字参数通常称为kwargs。
def my_function(system1,system2,system3):
  print("The better system is " + system1)

my_function(system1 = "Linux",system2 = "windows",system3 = "Mac")
Result:
The better system is Linux
任意参数
如果不知道将传递给我们多少个参数,可以在函数定义的参数名称前添加*,这样,函数将接受一个参数元组,并可以相应的访问各项:
def my_function(*system):
  print("The better system is " + system[0])

my_function("linux","windows","Mac")
Result:
The better system is Linux
pass语句
函数定义不能为空,如果出现无内容的函数定义,请使用pass语句来避免错误
def my_function(*system):
  pass
递归
python也接受函数递归,意味着定义的函数可以调用自身,递归是一种常见的数学和编程概念,调用自身可以循环访问数据以达成结果;开发人员应该非常小心递归,因为它很容易编写一个永不终止的,或使用过量内存或处理器能力的函数,但是,在被正确使用后,递归也是一种非常有效且数学上优雅的编程方法;
示例:
def tri_recursion(k):
  if(k>0):
    result = k + tri_recursion(k-1)
    print(result)
  else:
    result = 0
  return result

print("Recursion Example Results")
tri_recursion(6)
Result:
Recursion Example Results
1
3
6
10
15
21
图示:

递归的两个过程
- 递去
- 归来
递去: 首先,递归会执行“去”的过程,只需要满足终止条件,就会一直在函数内,带着更新的参数,调用函数自身,注意:到内部调用函数, 以下面的代码不会被执行,而是暂停阻塞;此时 随着函数每调用一次自身,还没有触发 返回值和到达终止条件,等同于在原来的基础上不断“向下/向内”开辟新的内存空间,记住,每次调用一次函数,就不是处在同一空间;
递去结束:
- 当前这层空间函数全部执行结束(终止条件)
- 执行到了return 返回值,直接返回
归来: 从结束的空间开始归回;
递归的本质: 每调用一次函数,都会单独开辟一份栈帧空间,递归函数就是不停的开辟和释放栈帧空间的过程,递归每一层间的数据是独立的,不共享,但是可以通过参数或者返回值来形成共享;
2.13.2 Lambda
lambda函数是一种小的匿名函数,lambda函数可以接受任意数量的参数,但只能有一个表达式
语法
lambda arguments : expression
示例:
x = lambda a : a + 10
print(x(5))
x = lambda a,b : a * b
print(x(5,6))
x = lambda a,b,c : a + b + c
print(x(5,6,7))
Result:
15
30
18
为什么使用Lambda函数?
当我们把lambda用作另一个函数内的匿名函数时,会发现它的强大之处;
示例:假设有一个带一个参数的函数定义,并且该参数将乘以未知数字
def my_function(n):   #该函数定义来创建一个总是使发送数字加倍的函数
  return lambda a : a*n

mydoubler = my_function(2)   #可以是增加任意倍数
print(mydoubler(11))
Result:
22
2.14 python 数组
数组是一种特殊变量,能够一次包含多个值,数组用在单个变量中存储多个值。
请注意:python没有内置对数组的支持,但可以使用python列表代替;
创建数组
system=["windows","linux","Mac"] #用列表代替数组
单个变量
system1 = "windows"
system2 = "linux"
system3 = "Mac"
但是当想通过系统品牌查找系统,或变量很多的时候,就要用到数组;数组可以在单个名称下保存多个值,可以通过引用索引号来访问;
访问/修改数组元素
system = ["windows","linux","Mac","Harmony OS","other"]
system[4] = "Android"
x = system[4]
print(x)
Result:
Android
数组长度
system = ["windows","linux","Mac","Harmony OS","other"]
x = len(system)
print(x)
Result:
5 #数组长度总是比最高的数组索引大一;
循环数组元素
system = ["windows","linux","Mac","Harmony OS","other"]
for x in system:
  print(x)
添加数组元素
system=["windows","linux","Mac"]
system.append("Android")
print(system)
Result:
['windows', 'linux', 'Mac', 'Android']
删除数组元素
pop()和remove()
system = ["windows","linux","Mac","Harmony OS","other"]
system.pop(2)
system.remove("other")
print(system)
Result:
['windows', 'linux', 'Harmony OS']
数组方法
python没有内置对数组的支持,可以使用python列表代替!!
2.15 python 类/对象
python是一种面向对象的编程语言,python中几乎所有的东西都是对象,拥有属性和方法,类(class)类似对象构造函数,或者是用于创建对象的蓝图;
创建类
示例:使用名为x的属性,创建一个名为myclass的类
class myclass:
  x = 5
print(myclass)
Result:
<class '__main__.myclass'>
创建对象
使用名为myclass的类来创建对象
class myclass:
  x = 5
print(myclass)
p1 = myclass()
print(p1.x)
Result:
<class '__main__.myclass'>
5
init() 函数
在实际应用中不像上面简单的例子,要理解类的含义,必须要了解内置的__init__()函数;所有的类都有一个名为__init__()的函数,它始终在启动类的时候执行,使用__init__()函数将值赋给对象属性,或在创建对象时需要执行的其它操作;
示例:创建名为system的类,使用__init__()函数赋值;
class system:
  def __init__(self,name,version):
    self.name = name
    self.version = version

p1 =system("linux",20.22)
print(p1.name)
print(p1.version)
Result:
linux
20.22
注意:每次使用类创建新对象时,都会自动调用__init__()函数;
对象方法
对象也可以包含方法,对象中的方法是属于该对象的函数。
class system:
  def __init__(self,name,version):
    self.name = name
    self.version = version

  def my_function(self):
    print("Hello,my system is "+ self.name)

p1 = system("linux",20.22)
p1.my_function()
Result:
Hello,my system is linux
提示:self参数是对类的当前实例的引用,用于访问属于该类的变量。
self参数
self可以改变名称,可以随意调用,但是它必须是类中任意函数的首个参数;
class system:
  def __init__(user,name,version):
    user.name = name
    user.version = version

  def my_function(xz):
    print("Hello,my system is "+ xz.name)

p1 = system("linux",20.22)
p1.my_function()
Result:
Hello,my system is linux
修改对象属性
class system:
  def __init__(user,name,version):
    user.name = name
    user.version = version

  def my_function(xz):
    print("Hello,my system is "+ xz.name)

p1 = system("linux",20.22)
p1.version = 20.66
p1.my_function()
print(p1.version)
Result:
Hello,my system is linux
20.66
删除对象属性&删除对象
del p1.version
del p1
pass语句
类定义不能为空,如果写了无内容的类定义语句,请使用pass语句来避免错误;
2.16 python 继承
继承允许我们定义继承另一个类的所有方法和属性的类;
父类是继承的类,也称为基类;
子类是从另一个类继承的类,也称为派生类;
创建父类
任何类都可以是父类,因此语法与创建任何类相同。
示例:
class system:
  def __init__(user,name,version):
    user.first = name
    user.ver = version

  def printname(user):
    print(user.first,user.ver)

x = system("ubuntu",20.22)
x.printname()
Result:
ubuntu 20.22
创建子类
要创建从其他类继承功能的类,请在创建子类时将父类作为参数发送:
示例:创建名为ubuntu类,从system类继承属性和方法:
class ubuntu(system):
  pass
注:如果不添加任何属性或方法,请使用pass关键字!!
现在,ubuntu类拥有和system类相同的属性和方法。
示例:使用ubuntu类创建一个对象
class system:
  def __init__(user,name,version):
    user.first = name
    user.ver = version

  def printname(user):
    print(user.first,user.ver)

class ubuntu(system):
  pass
x = ubuntu("19.19","21.21")
x.printname()
Result:
19.19 21.21
添加__init__()函数
到目前为止,我们已经创建了一个子类,它继承了父类的属性和方法。
我们想把__init__()函数添加到子类(而不是pass);
注:每次使用类创建新对象时,都会自动调用__init__()函数。
示例:为ububtu类添加__init__()函数:
class system:
  def __init__(user,name,version):
    user.first = name
    user.ver = version

  def printname(user):
    print(user.first,user.ver)

class ubuntu(system):
  def __init__(user,name,version):
    pass
注:当添加__init__()函数时,子类将不再继承父的__init__()函数,即子的__init__()函数会覆盖对父的__init__()函数的继承;如需保持父的__init__()函数的继承,请添加对父的__init__()函数的调用;
class system:
  def __init__(user,name,version):
    user.first = name
    user.ver = version
  def printname(user):
    print(user.first,user.ver)
class ubuntu(system):
  def __init__(user,name,version):
    system.__init__(user,name,version)
此时,我们已经成功添加了__init__()函数,并保留了父类的继承,可以在__init__()函数中添加功能了。
super()函数
python还有一个super()函数,它会使子类从其父继承所有的方法和属性。
class system:
  def __init__(user,name,version):
    pass
class ubuntu(system):
  def __init__(user,name,version):
    super().__init__(name,version)
使用super()函数,不必使用父元素的名称,它将自动从其父元素继承方法和属性。
添加属性
示例:将名为graduationyear属性添加到ububtu类
class system:
  def __init__(user,name,version):
    pass
class ubuntu(system):
  def __init__(user,name,version):
    super().__init__(name,version)
    user.graduationyear = 2020
在这个例子中,2019应该是个变量,并在创建ubuntu对象时传递到ubuntu类,请在__init__()函数中添加另一个参数:
示例:添加year参数,并在创建对象时传递正确的年份
class system:
  def __init__(user,name,version):
    pass
class ubuntu(system):
  def __init__(user,name,version,year):
    super().__init__(name,version)
    user.graduationyear = year

x = ubuntu("20.22","20.21",2020)
print(x.graduationyear)
添加方法
把名为welcome的方法添加到ubuntu类
class system:
  def __init__(user,name,version):
    user.first = name
    user.ver = version

  def printname(user):
    print(user.first,user.ver)

class ubuntu(system):
  def __init__(user,name,version,year):
    super().__init__(name,version)
    user.graduationyear = year

  def welcome(user):
    print("welcome",user.first,user.ver,"to the class of",user.graduationyear)

x = ubuntu("20.22","20.21",2020)
x.welcome()
Result:
welcome 20.22 20.21 to the class of 2020
提示:如果在子类中添加一个与父类中函数同名的方法,则将覆盖父方法的继承;
2.17 python 迭代
2.17.1 python迭代器
迭代器是一种对象,该对象包含值的可计数数字;
迭代器是可迭代的对象,意味着可以遍历所有值;
从技术上讲,在python中,迭代器是实现迭代器协议的对象,它包含方法__iter__()和__next__()。
迭代器&可迭代对象(Iterable)
列表、元组、字典和集合都是可迭代的对象,它们是可迭代的容器,可以从中获取迭代器。
获取迭代器iter()方法
示例一:元组
mytuple = ("windows","linux","Mac")
myit = iter(mytuple)

print(next(myit))
print(next(myit))
print(next(myit))
Result:
windows
linux
Mac
示例二:字符串
mystr = "ubuntu"
myit = iter(mystr)

print(next(myit))
print(next(myit))
print(next(myit))
print(next(myit))
print(next(myit))
print(next(myit))
Result:
u
b
u
n
t
u
遍历迭代器
可以使用for循环遍历可迭代对象:
mytuple = ("windows","linux","Mac")
for x in mytuple:
  print(x)
Result:
windows
linux
Mac
提示:for循环实际上创建了一个迭代器对象,并为每个循环执行next()方法。
创建迭代器
要把对象/类创建为迭代器,必须为对象实现__iter__()和__next__()方法。
所有类都有名为__init__()函数,它允许我们在创建对象时进行一些初始化。
iter()方法的作用相似,可以执行(初始化等),但必须始终返回迭代器对象本身。
next()方法也允许我们执行操作,并且必须返回序列中的下一个项目。
示例:创建一个返回数字的迭代器,从1开始,每个序列增加1(返回1、2、3、4、等)
class MyNumbers:
  def __iter__(self):
    self.a = 1
    return self

  def __next__(self):
    x = self.a
    self.a +=1
    return x

myclass = MyNumbers()
myiter = iter(myclass)

print(next(myiter))
print(next(myiter))
print(next(myiter))
print(next(myiter))
print(next(myiter))
Result:
1
2
3
4
5
StopIteration
如果有足够的next()语句,或者在for循环中使用,则上面的例子将永远继续下去。
为了防止迭代永远进行,我们可以使用StopIteration语句。
class MyNumbers:
  def __iter__(self):
    self.a = 1
    return self

  def __next__(self):
    if self.a <=5:
      x = self.a
      self.a +=1
      return x
    else:
      raise StopIteration

myclass = MyNumbers()
myiter = iter(myclass)

for x in myiter:
  print(x)
Result:
1
2
3
4
5
2.18 python 作用域
变量仅在创建区域内可用,这称为作用域
局部作用域
在函数内部创建的变量属于该函数的局部作用域,并且只能在该函数内部使用。
def myfunc():
  x = 100
  def myinnerfunc():
    print(x)
  myinnerfunc()
myfunc()
Result:
100
如上例所示,变量x在函数外部不可用,但对于函数内部的任何函数都可用。
全局作用域
在python代码主体中创建的变量是全局变量,属于全局作用域。全局变量在任何范围中都可用。
x = 100
def myfunc():
  print(x)
myfunc()
print(x)
Result:
100
100
命名变量
如果在函数内部和外部操作同名变量,python会将它们视作两个单独的变量,一个在全局变量范围内使用(在函数外部),另一个在局部范围内使用(函数内部)。
示例:该函数将打印局部变量x,然后代码还会打印全局变量x
x = 100
def myfunc():
  x = 200
  print(x)

myfunc()
print(x)
Result:
200
100
Global关键字
如果需要创建一个全局变量,但被卡在本地作用域内,可以使用global关键字,使变量成为全局变量。另外,如果要在函数内部更改全局变量,也请使用global关键字。
示例一:
def myfunc():
  global x
  x = 100
myfunc()
print(x)
Result:
100
示例二:
x = 100
def myfunc():
  global x
  x = 200
myfunc()
print(x)
Result:
200
2.19 python 模块
模块是包含一组函数的文件,希望在应用程序中引用。
创建模块
如果需要创建模块,只需要将所需代码保存在文件扩展名为.py文件中。
例如:创建名为mymodule.py文件。
def greeting(name):
  print("Hello,"+name)
使用模块
import mymodule
mymodule.greeting("若竹")
Result:
Hello,若竹
注释:如果使用模块中的函数时,请使用以下语法
module_name.function_name
模块中的变量
模块可以包含已经描述的函数,但也可以包含各种类型的变量(数组、字典、对象等)
示例:在mymodule.py中写入
boy1 = {
"name":"若竹",
"age":25,
"city":"兰州"
}
导入该模块,并访问boy1字典
import mymodule
a = mymodule.boy1["age"]
print(a)
Result:
25
为模块命名
可以随意对模块命名,但扩展名必须是.py
重命名模块
可以在导入模块时使用as关键字创建别名
示例:为mymodule创建别名mx
import mymodule as mx
a = mx.boy1["age"]
print(a)
Result:
25
内建模块
python中有几个内建模块,可以随时导入。
示例一:导入并使用platform模块
import platform
x = platform.system()
print(x)
Result:
Windows
使用dir()函数
有一个内置函数可以列出模块中的所有函数名(或变量名)
import platform
x = dir(platform)
print(x)
Result:
['DEV_NULL', '_UNIXCONFDIR', '_WIN32_CLIENT_RELEASES', '_WIN32_SERVER_RELEASES', '__builtins__', '__cached__', '__copyright__', '__doc__', '__file__', '__loader__', '__name__', '__package__', '__spec__', '__version__', '_default_architecture', '_dist_try_harder', '_follow_symlinks', '_ironpython26_sys_version_parser', '_ironpython_sys_version_parser', '_java_getprop', '_libc_search', '_linux_distribution', '_lsb_release_version', '_mac_ver_xml', '_node', '_norm_version', '_parse_release_file', '_platform', '_platform_cache', '_pypy_sys_version_parser', '_release_filename', '_release_version', '_supported_dists',
'_sys_version', '_sys_version_cache', '_sys_version_parser', '_syscmd_file', '_syscmd_uname', '_syscmd_ver', '_uname_cache', '_ver_output', 'architecture', 'collections', 'dist', 'java_ver', 'libc_ver', 'linux_distribution', 'mac_ver', 'machine', 'node', 'os', 'platform', 'popen', 'processor', 'python_branch', 'python_build', 'python_compiler', 'python_implementation',
'python_revision', 'python_version', 'python_version_tuple', 're', 'release', 'subprocess', 'sys', 'system', 'system_alias', 'uname', 'uname_result', 'version', 'warnings', 'win32_ver']
注释:dir()函数可用于所有模块,也可用于自己创建的模块。
从模块导入
我们可以使用from关键字选择仅从模块导入部件。
示例:名为mymodule的模块拥有一个函数和一个字典
def greeting(name):
print("Hello,"+name)
boy1 = {
"name":"若竹",
"age":25,
"city":"兰州"
}
仅从模块导入boy1字典
from mymodule import boy1
print(boy1["age"])
Result:
25
提示:在使用from关键字导入时,请勿使用引用模块中的元素时使用模块名称。
2.20 python 日期
python中的日期不是其自身的数据类型,但是我们可以导入名为datetime的模块,把日期视作日期对象来处理。
import datetime
x = datetime.datetime.now()
print(x)
Result:
2022-03-07 15:44:19.974206
datetime模块有许多方法可以返回有关日期对象的信息
示例:
import datetime
x = datetime.datetime.now()
print(x.year)
print(x.strftime("%A"))
Result:
2022
Monday
创建日期对象
如需创建对象,我们可以使用datetime模块的datetime()类(构造函数)。datetime()类需要三个参数来创建日期:年月日。
import datetime
x = datetime.datetime(2022,3,7)
print(x)
Result:
2022-03-07 00:00:00
备注:datetime()类还接受时间和时区(小时,分钟,秒,微妙,tzone)的参数,不过是可选的,默认值为0,(时区默认为None)
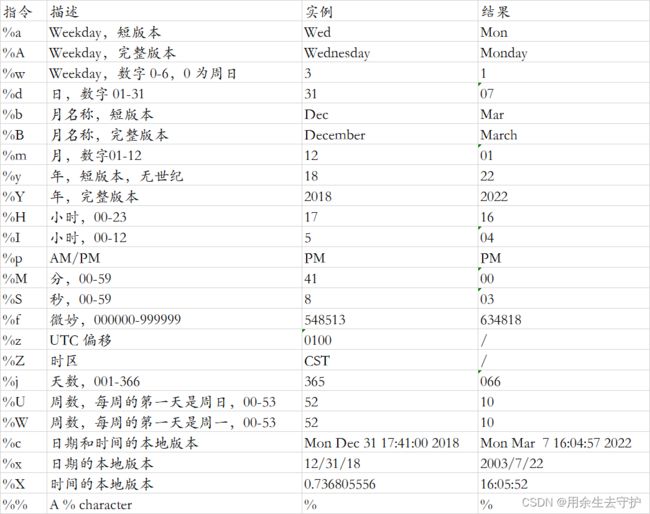
strftime()方法
datetime对象拥有把日期对象格式化为可读字符串的方法,该方法称为strftime(),并使用一个format参数来指定返回字符串的格式。
示例:显示月份名称
import datetime
x = datetime.datetime(2022,3,7)
print(x.strftime("%B"))
Result:
March
格式参考
2.21 python JSON
JSON是用于存储和交换数据的语法。
JSON是用JavaScript对象表示法(JavaScript object notation)编写的文本。
python中的JSON
python有一个名为json内置包,可用于处理JSON数据。
import json #导入json模块
把JSON转换为python
若有JSON字符串,可以使用json.loads()方法对其进行解析,结果将是python字典。
示例一:JSON转Python
import json
x = '{"name":"若竹","age":25,"city":"兰州"}'
y = json.loads(x)
print(y["name"])
Result:
若竹
示例二:Python转JSON
若有python对象,可以使用json.dumps()方法将其转为JSON字符串。
import json
boy1 = {
"name":"若竹",
"age":25,
"city":"兰州"
}
y = json.dumps(boy1)
print(y)
Result:
{"name": "\u82e5\u7af9", "age": 25, "city": "\u5170\u5dde"}
我们可以把以下类型的python对象转为JSON字符串。
- dict
- list
- tuple
- string
- int
- float
- Ture
- False
- None
示例:将python对象转为JSON字符串,并打印值
import json
print(json.dumps({"name": "Bill", "age": 63}))
print(json.dumps(["apple", "bananas"]))
print(json.dumps(("apple", "bananas")))
print(json.dumps("hello"))
print(json.dumps(42))
print(json.dumps(31.76))
print(json.dumps(True))
print(json.dumps(False))
print(json.dumps(None))
Result:
{"name": "Bill", "age": 63}
["apple", "bananas"]
["apple", "bananas"]
"hello"
42
31.76
true
false
null
当python转为JSON时,python对象会被转换为JSON(JavaScript)等效项。

示例:转换包含所有合法数据类型的python对象
import json
x = {
"name": "Bill",
"age": 63,
"married": True,
"divorced": False,
"children": ("Jennifer","Rory","Phoebe"),
"pets": None,
"cars": [
{"model": "Porsche", "mpg": 38.2},
{"model": "BMW M5", "mpg": 26.9}
]
}
print(json.dumps(x))
Result:
{"name": "Bill", "age": 63, "married": true, "divorced": false, "children": ["Jennifer", "Rory", "Phoebe"], "pets": null, "cars": [{"model": "Porsche", "mpg": 38.2}, {"model": "BMW M5", "mpg": 26.9}]}
格式化结果
上面示例打印的JSON字符串,不是很容易阅读,没有缩进和换行,json.dumps()方法提供了令结果更容易阅读的参数。
json.dumps(x,indent=4) #定义缩进
json.dumps(x,indent=4,separators=(".","=")) #定义分隔符,默认值为(",",":"),意味着使用逗号和空格分隔每个对象,使用冒号和空格将键与值分开
示例一:
import json
x = {
"name": "Bill",
"age": 63,
"married": True,
"divorced": False,
"children": ("Jennifer","Rory","Phoebe"),
"pets": None,
"cars": [
{"model": "Porsche", "mpg": 38.2},
{"model": "BMW M5", "mpg": 26.9}
]
}
# use four indents to make it easier to read the result:
print(json.dumps(x, indent=4))
Result:
{
"name": "Bill",
"age": 63,
"married": true,
"divorced": false,
"children": [
"Jennifer",
"Rory",
"Phoebe"
],
"pets": null,
"cars": [
{
"model": "Porsche",
"mpg": 38.2
},
{
"model": "BMW M5",
"mpg": 26.9
}
]
}
示例二:
import json
x = {
"name": "Bill",
"age": 63,
"married": True,
"divorced": False,
"children": ("Jennifer","Rory","Phoebe"),
"pets": None,
"cars": [
{"model": "Porsche", "mpg": 38.2},
{"model": "BMW M5", "mpg": 26.9}
]
}
# use . and a space to separate objects, and a space, a = and a space to separate keys from their values:
print(json.dumps(x, indent=4, separators=(". ", " = ")))
Result:
{
"name" = "Bill".
"age" = 63.
"married" = true.
"divorced" = false.
"children" = [
"Jennifer".
"Rory".
"Phoebe"
].
"pets" = null.
"cars" = [
{
"model" = "Porsche".
"mpg" = 38.2
}.
{
"model" = "BMW M5".
"mpg" = 26.9
}
]
}
对结果排序
sort_keys参数指定是否应对结果进行排序。
import json
x = {
"name": "Bill",
"age": 63,
"married": True,
"divorced": False,
"children": ("Jennifer","Rory","Phoebe"),
"pets": None,
"cars": [
{"model": "Porsche", "mpg": 38.2},
{"model": "BMW M5", "mpg": 26.9}
]
}
# sort the result alphabetically by keys:
print(json.dumps(x, indent=4, sort_keys=True))
Result:
{
"age": 63,
"cars": [
{
"model": "Porsche",
"mpg": 38.2
},
{
"model": "BMW M5",
"mpg": 26.9
}
],
"children": [
"Jennifer",
"Rory",
"Phoebe"
],
"divorced": false,
"married": true,
"name": "Bill",
"pets": null
}
2.22 python RegEx
RegEx或正则表达式是形成搜索模式的字符序列。
RegEx可用于检查字符串是否包含指定的搜索模式。
RegEx模块
python提供名为re的内置包,可用于处理正则表达式。
import re #导入re模块
使用正则表达式
示例:检索字符串以查看它是否以"China"开头并以"country"结尾
import re
txt = "China is a great country"
x = re.search("China.*country$",txt)
print(x)
if (x):
print("Yes! We have a match!")
else:
print("No match")
Result:
<re.Match object; span=(0, 24), match='China is a great country'>
Yes! We have a match!
RegEx函数
re模块提供了一组函数,允许我们检索字符串进行匹配。

findall()函数
findall()函数返回包含所有匹配项的列表
示例:打印所有匹配的列表
import re
str = "China is a great country"
x = re.findall("a",str)
y = re.findall("linux",str)
print(x)
print(y)
Result:
['a', 'a', 'a']
[]
备注:这个列表以被找到的顺序包含匹配项,如果未找到匹配项,则返回空列表。
search()函数
search()函数搜索字符串中的匹配项,如果存在则返回match对象,如果有多个匹配,则仅返回首个匹配项。
import re
str = "China is a great country!"
x = re.search("\s",str) #在字符串中搜索第一个空白字符
y = re.search("linux",str)
print("The first white-space character is located in position:",x.start())
print(y)
Result:
The first white-space character is located in position: 5
None #如果未找到匹配,则返回None
split()函数
split()函数返回一个列表,其中字符串在每次匹配时被拆分
import re
str = "China is a great country!"
x = re.split("\s",str) #在每个空白字符处进行拆分
y = re.split("\s",str,1) #可以通过指定maxsplit参数来控制出现次数
print(x)
print(y)
Result:
['China', 'is', 'a', 'great', 'country!']
['China', 'is a great country!']
sub()函数
sub()函数把匹配替换为我们选择的文本
import re
str = "China is a great country!"
x = re.sub("\s",":",str) #用:替换每个空白符
y = re.sub("\s",":",str,2) #通过指定count参数来控制替换次数
print(x)
print(y)
Result:
China:is:a:great:country!
China:is:a great country!
match()对象
match对象是包含有关搜索和结果信息的对象,如果没有匹配,则返回None,而不是match对象。
import re
str = "China is a great country!"
x = re.search("a",str)
y = re.search(r"\bC\w+",str) #查找以大写"C"开头的任何单词
z = re.search(r"\bC\w+",str)
w = re.search(r"\bC\w+",str)
print(x) #打印一个对象
print(y.span()) #打印首个匹配出现的位置(开始和结束位置)
print(z.string) #打印传入函数的字符串
print(x.group()) #打印匹配的字符串部分
Result:
<re.Match object; span=(4, 5), match='a'>
(0, 5)
China is a great country!
a
2.23 python PIP
PIP是python包或模块的包管理器。
注释:python3.4或更高版本,默认情况下会包含pip。
什么是包(package)?
包中包含模块所需的所有文件。
模块是我们可以包含在项目中的python代码库。
检查是否安装pip
pip --version
安装与删除
pip配置
快速安装库
pip install 库名称
pip uninstall 库名称
2.24 python Try Except
try块允许我们测试代码块以查找错误。
except块允许我们处理错误。
finally块允许我们执行代码,无论try和except块结果如何。
2.25 python 命令行输入
- python2.7使用raw_input()方法
- python3.6使用input()方法
print("Enter your name:")
x = raw_input() #2.7版本
print("Hello",x)
print("Enter your name:")
x = input() #3.6版本
print("Hello",x)
2.26 python 字符串格式化
2.26.1 字符串format()
为了确保字符串按预期显示,我们可以使用format()方法对结果进行格式化。
format()方法允许我们格式化字符串的选定部分。
有时文本的一部分是我们无法控制的,也许它们来自数据库或用户输入,要控制这类值,可以在文本中添加占位符(花括号{}),然后通过format()方法运行。
示例:添加要显示的占位符
name = "青橙"
age = 25
txt = "My brother's name is {}.His age is {:.2f}." #将年龄格式转换为带有两个小数点的数字
print(txt.format(name,age))
Result:
My brother's name is 青橙.His age is 25.00.
备注:
- 如需使用更多值,只需要向format()方法添加更多值;
- 可以使用索引号(花括号{数字}内的数字)来确保将值放在正确的占位符中;
- 还可以通过花括号{名称}来使用命名索引;
三、python文件处理
3.1 文件处理
文件处理是任何web应用程序的重要组成部分,python有几个用于创建、读取、更新和删除文件的函数。
open()函数有两个参数:文件名和模式。
有四种打开文件的不同方式:
- “r” 读取-默认值,打开文件进行读取,如果文件不存在则报错;
- “a” 追加-打开供追加的文件,如果不存在则创建该文件;
- “w” 写入-打开文件进行写入,如果不存在则创建;
- “x” 创建-创建指定文件,如果不存在则返回错误;
此外,我们可以指定文件是应该作为二进制还是文本模式进行处理。
- “t” 文本-默认值
- “b” 二进制-二进制模式
f = open("file.txt")
f = open("file.txt","rt") #可以指定打开方式
备注:因为"r"&"t"是默认值,因此不需要指定。
3.2 文件打开
3.2.1 open()函数
示例:建立demofile.txt文件
Hello! Welcome to demofile.txt
This file is for testing purposes.
Good Lick!
打开文件
f = open("demofile.txt","r")
print(f.read())
Result:
Hello! Welcome to demofile.txt
This file is for testing purposes.
Good Luck!
只读取一部分
默认情况下,read()方法返回整个文本,我们可以指定要返回的字符数。
f = open("demofile.txt","r")
print(f.read(15)) #返回文件前15个字符
Result:
Hello! Welcome
读行
示例一:读取文件中的一行
f = open("demofile.txt","r")
print(f.readline())
Result:
Hello! Welcome to demofile.txt
示例二:两次调用可读取两行
f = open("demofile.txt","r")
print(f.readline())
print(f.readline())
Result:
Hello! Welcome to demofile.txt
This file is for testing purposes.
循环遍历
f = open("demofile.txt","r")
for x in f:
print(x)
Result:
Hello! Welcome to demofile.txt
This file is for testing purposes.
Good Luck!
关闭文件
f = open("demofile.txt","r")
print(f.readline())
f.close()
注释:在某些情况下,由于缓冲,我们应该始终关闭文件,在关闭文件之前,对文件所做的更改可能不会显示。
3.3 文件写入
如需写入已有文件,必须向open()函数添加参数。
- “a” 追加-会追加到文件的末尾
- “w” 写入-会覆盖任何已有的内容
示例:打开demofile.txt,并添加内容
f = open("demofile.txt","a") #覆盖选"w"
f.write("\nNow the file has more content!")
f.close()
f = open("demofile.txt","r")
print(f.read())
Result:
Hello! Welcome to demofile.txt
This file is for testing purposes.
Good Luck!Now the file has more content!
Now the file has more content!
3.4 文件删除
如需要删除文件,必须导入OS模块,并运行os.remove()函数
示例:删除demofile.txt
import os
os.remove("demofile.txt")
检查文件是否存在
import os
if os.path.exists("demofile.txt"):
os.remove("demofile.txt")
else:
print("The file does not exist!")
删除文件夹
如需删除整个文件夹,请使用os.rmdir()方法
import os
os.rmdir("myfolder")
提示:我们只能删除空文件夹!
接w3school学习笔记2
总结
分享:
我们至少要经过三次信念洗礼,才能适应正常世界。第一次是知道人与人之间关系,不是你死我活斗争式的,你的思维必须要能够容纳不同的存在。第二次是知道任何权力都是有边界的,如你相信某人权力无远弗界,你就会被人活活玩死。第三次是知道人性是两面的,敢于坦承自己内心不洁的,才是真正可信的。