4.1 -Springboot 编写http接口
Springboot 编写http接口
回到第一章:目录
文章目录
- Springboot 编写http接口
- 前言
- 新建一个springboot工程
- 一、前后台不分离模式,get和post请求接口的编写方法。
- 二、无前台,仅后台系统间交互的get和post请求接口编写方法
- 三、前后台分离,restful风格的http接口编写方法
- 四 、使用postman测试以上接口
-
- **1、前后台不分离**
- 2、仅有后台的http接口
- 3、restful风格接口
前言
基于 springboot 框架,快速的编写http接口。
1、前后台不分离模式,get和post请求接口的编写方法。
2、无前台,仅后台系统间交互的get和post请求接口编写方法。
3、前后台分离,restful风格的http接口编写方法
提示:以下是本篇文章正文内容,下面案例可供参考
新建一个springboot工程
1、在resources目录下创建配置文件:
application.yml
server:
  port: 9001
spring:
  datasource:
    driver-class-name: com.mysql.jdbc.Driver
    url: jdbc:mysql://192.168.119.1:3306/devops_play?serverTimezone=UTC&useUnicode=true&characterEncoding=utf-8&useSSL=true
    username: root
    password: MySql@0004
  thymeleaf:
    prefix: classpath:/templates/
    check-template-location: true
    suffix: .html
    encoding: UTF-8
    content-type: text/html
    mode: HTML5
    cache: false
  devtools:
      restart:
        enabled: true
2、pom文件增加
<properties>
        <maven.compiler.source>8maven.compiler.source>
        <maven.compiler.target>8maven.compiler.target>
        <project.build.sourceEncoding>UTF-8project.build.sourceEncoding>
        <project.reporting.outputEncoding>UTF-8project.reporting.outputEncoding>
        <java.version>1.8java.version>
    properties>
    <parent>
        <groupId>org.springframework.bootgroupId>
        <artifactId>spring-boot-starter-parentartifactId>
        <version>2.2.10.RELEASEversion>
        <relativePath/>
    parent>

    <dependencies>
        <dependency>
            <groupId>org.springframework.bootgroupId>
            <artifactId>spring-boot-starterartifactId>
        dependency>
        <dependency>
            <groupId>org.springframework.bootgroupId>
            <artifactId>spring-boot-starter-testartifactId>
            <scope>testscope>
        dependency>
        <dependency>
            <groupId>org.springframework.bootgroupId>
            <artifactId>spring-boot-starter-webartifactId>
        dependency>

        <dependency>
            <groupId>org.springframework.bootgroupId>
            <artifactId>spring-boot-devtoolsartifactId>
            <scope>runtimescope>
            <optional>trueoptional>
        dependency>
        <dependency>
            <groupId>org.springframework.bootgroupId>
            <artifactId>spring-boot-starter-data-jpaartifactId>
        dependency>
        <dependency>
            <groupId>org.springframework.bootgroupId>
            <artifactId>spring-boot-starter-thymeleafartifactId>
        dependency>
        <dependency>
            <groupId>mysqlgroupId>
            <artifactId>mysql-connector-javaartifactId>
        dependency>
    dependencies>
MainApp.java
package com;

import org.springframework.boot.SpringApplication;
import org.springframework.boot.autoconfigure.SpringBootApplication;
import org.springframework.boot.autoconfigure.domain.EntityScan;
import org.springframework.context.annotation.ComponentScan;

@SpringBootApplication
@ComponentScan("com.controller")
@EntityScan("com.entity")
public class MainApp {
    public static void main(String[] args) {
        SpringApplication.run(MainApp.class, args);
    }
}
User.java
package com.entity;

import java.util.Date;
import java.util.Objects;

public class User {
    /**id 自增主键*/
    private Long id;
    private String userName;
    /**用户姓名*/
    private String realName;
    /**用户登录密码*/
    private String password;
    /**用户性别:1-男;2=女*/
    private int sex;
    /**用户邮箱*/
    private String email;
    /**手机号*/
    private String mobile;
    /**创建时间*/
    private Date createDate;
    @Override
    public String toString() {
        return "User{" +
                "id=" + id +
                ", userName='" + userName + '\'' +
                ", realName='" + realName + '\'' +
                ", password='" + password + '\'' +
                ", sex=" + sex +
                ", email='" + email + '\'' +
                ", mobile='" + mobile + '\'' +
                ", createDate=" + createDate +
                '}';
    }

    @Override
    public boolean equals(Object o) {
        if (this == o) return true;
        if (o == null || getClass() != o.getClass()) return false;
        User user = (User) o;
        return sex == user.sex && Objects.equals(userName, user.userName) && Objects.equals(realName, user.realName) && Objects.equals(password, user.password) && Objects.equals(email, user.email) && Objects.equals(mobile, user.mobile);
    }

    @Override
    public int hashCode() {
        return Objects.hash(userName, realName, password, sex, email, mobile);
    }

    public Long getId() {
        return id;
    }

    public void setId(Long id) {
        this.id = id;
    }

    public String getUserName() {
        return userName;
    }

    public void setUserName(String userName) {
        this.userName = userName;
    }

    public String getRealName() {
        return realName;
    }

    public void setRealName(String realName) {
        this.realName = realName;
    }

    public String getPassword() {
        return password;
    }

    public void setPassword(String password) {
        this.password = password;
    }

    public int getSex() {
        return sex;
    }

    public void setSex(int sex) {
        this.sex = sex;
    }

    public String getEmail() {
        return email;
    }

    public void setEmail(String email) {
        this.email = email;
    }

    public String getMobile() {
        return mobile;
    }

    public void setMobile(String mobile) {
        this.mobile = mobile;
    }

    public Date getCreateDate() {
        return createDate;
    }

    public void setCreateDate(Date createDate) {
        this.createDate = createDate;
    }
}
一、前后台不分离模式,get和post请求接口的编写方法。
1、 编写 html页面和样式文件css
新建index.html
<html lang="en" xmlns:th="http://www.thymeleaf.org">

<head>
    <title>用户管理演示title>
    <meta charset="utf-8">
    <link rel="stylesheet" type="text/css" href="/css/my.css">
head>

<body>
<div id="main-container" >
    <div id="div-header" >
        <h3 style="margin-bottom:0;">用户管理h3>
        hr>
    div>
    <div id="div-content" >
        br>
        <hr>
        <button class="buttonUser" id="addUserButton" onclick="addUser()">添加用户button><br/><br/>
        <button class="buttonUser" id="searchUserButton" onclick="searchUser()">查询用户button> <br/><br/>
        <button class="buttonUser" id="delUserButton" onclick="delUser()">删除用户button>
        <br><br><br><br>
        <p>当前版本V1.0p>
    div>
div>

<script type="text/javascript">
//点击按钮跳转到登录页面
function addUser()
{
    alert("你点击了添加用户按钮。");
}
function searchUser()
{
    alert("你点击了查询用户按钮。");
}
function delUser()
{
    alert("你点击了删除用户按钮。");
}
script>
body>
html>
新建样式文件my.css
/*所有的 p 标签的样式*/
p {
    color:black;
}

/**最外层区域的样式*/


#main-container
{
    position:absolute;/**采用绝对布局*/
    width:100%;/**宽度填满浏览器*/
    height:100%;/**高度填满浏览器*/
    background-color:#D0D0D0/**设置背景色为灰色*/
}
/** 头部 区域的样式*/
#div-header
{
    text-align:center;/** 区域元素居中显示*/
    color:red;/** 设置字体颜色为红色 */
    position:relative;/**采用相对布局*/
    height:80px;/** 高度 80像素*/
    width:800px; /** 宽度 800像素*/
    margin-left:50px; /** 距离左边的边距 50像素*/
}
/** 内容 区域的样式*/
#div-content
{
    text-align:center;/** 该div区域的所有文本居中显示*/
    position:absolute;/**采用相对布局*/
    background-color:#D0D0D9; /**设置背景色为灰色*/
    height:600px;/** 高度 600像素*/
    width:800px;/** 宽度 800像素*/
    border:2px dashed; /** 边框的像素 2, dashed 含义为 虚线框*/
    border-color:gray; /** 边框颜色为灰色*/
    box-shadow: 2px 2px 5px #D0D0D9; /** 边框阴影效果*/
    margin-top:20px; /** 上边距20 像素*/
    margin-bottom:10px; /** 下边距10 像素*/
    margin-right:50px; /** 右边距50 像素*/
    margin-left:50px; /** 左边距50 像素*/
    border-radius:25px; /** 边框的圆角像素 25像素*/

}
2、新建UserController对象,编写http接口
package com.controller;

import org.springframework.stereotype.Controller;
import org.springframework.web.bind.annotation.GetMapping;
import org.springframework.web.bind.annotation.PostMapping;
import org.springframework.web.bind.annotation.RequestBody;
import org.springframework.web.bind.annotation.RequestMapping;

/**
 * @Controller  表明这个是controller,提供http访问能力。
 * @RequestMapping("/") 表示要访问这个controller类里的方法的根路径,
 */
@Controller
@RequestMapping("/")
public class UserController {

    /**
     *  GET  POST 请求均可以接收到;
     *  返回的是一个 index.html页面
     *  传入的参数name,可以在 url地址后面,也可以在body里
     *  @RequestMapping("/index") 和 类名上的 @RequestMapping("/") 拼接起来,访问路劲为 /index
     *  RequestMapping 支持http所有的请求方式,如get,post,put,delete等
     * @param name
     * @return
     */
    @RequestMapping("/index")
    public String index(String name) {
        System.out.println("/index 接受到的参数为:" + name);
        return "index.html";
    }

    /**
     *  仅支持 GET 请求方式
     *  返回的是一个 index.html页面
     *  传入的参数name,可以在 url地址后面,也可以在body里
     *  GetMapping 只支持get类请求
     * @param name
     * @return
     */
    @GetMapping("/getIndex")
    public String index2(String name) {
        System.out.println("/getIndex 接受到的参数为:" + name);
        return "index.html";
    }

    /**
     *  仅支持 POST 请求方式
     *  返回的是一个 index.html页面
     *  传入的参数name,可以在 url地址后面,也可以在body里  form-data  x-www-form-urlencoded 格式均可
     PostMapping 只支持 post 类请求
     * @param name
     * @return
     */
    @PostMapping("/postIndex")
    public String index3(String name) {
        System.out.println("/postIndex 接受到的参数为:" + name);
        return "index.html";
    }

    /**
     *  仅支持 POST 请求方式
     *  返回的是一个 index.html页面
     *  传入的参数name,必须在请求的body里,x-www-form-urlencoded 格式或json格式
     * @param name
     * @return
     */
    @PostMapping("/postIndex2")
    public String index4(@RequestBody String name) {
        System.out.println("/postIndex 接受到的参数为:" + name);
        return "index.html";
    }
}
二、无前台,仅后台系统间交互的get和post请求接口编写方法
1、编写UserController2对象,内容为:
package com.controller;

import com.entity.User;
import org.springframework.web.bind.annotation.*;

/**
 * RestController 注解,表示这是一个restful风格的http接口对象。
 * 返回的内容为字符串,而不是一个html页面的名字。
 * 返回的字符串,可以是数字,任意格式字符。比如json格式,xml格式,及其他自定义格式等。
 */
@RestController
@RequestMapping("/user")
public class UserController2 {

    /** 新增用户 接口
     *  请求路径:/user/addJson
     *  请求方法:post
     *  参数:User对象的json格式,如:
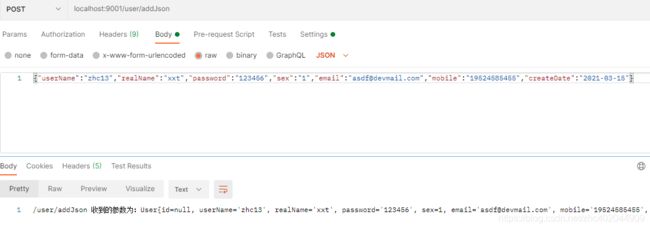
     * {"userName":"zhc2","realName":"xxt","password":"123456","sex":"1","email":"[email protected]","mobile":"19524585455","createDate":"Sat Jan 23 16:26:01 CST 2021"}
     RequestBody 表示这个post请求,必须有请求体。
     * */
    @PostMapping("/addJson")
    public String addUser(@RequestBody User user){
      System.out.println("/user/addJson 收到的参数为:"+user.toString());
      return "/user/addJson 收到的参数为:"+user.toString();
    }

    /** 新增用户 接口
     *  请求路径:/user/addForm
     *  请求方法:post
     *  参数:User对象参数所需要的key-value的格式,如:
     * userName=zhc2
     * realName=xxt
     * password=123456
     * sex=1
     * [email protected]
     * mobile=19524585455
     * createDate=Sat Jan 23 16:26:01 CST 2021
     * */
    @PostMapping("/addForm")
    public String addUser2(User user){
        System.out.println("/user/addForm 收到的参数为:"+user.toString());
        return "/user/addForm 收到的参数为:"+user.toString();
    }

    /** 新增用户 接口
     *  请求路径:/user/addGet?userName=zhc2&realName=xxt&password=123456&sex=1&email=asdf@devmail.com&mobile=19524585455&createDate=Sat Jan 23 16:26:01 CST 2021
     *  请求方法:get
     * */
    @GetMapping("/addGet")
    public String addUser3(User user){
        System.out.println("/user/addForm 收到的参数为:"+user.toString());
        return "/user/addForm 收到的参数为:"+user.toString();
    }

    /**根据id查询用户*/
    @GetMapping("/get")
    public String getUser(Long id){
        System.out.println("/user/get 收到的参数为:"+id);
        return "/user/get 收到的参数为:"+id;
    }

}
三、前后台分离,restful风格的http接口编写方法
restful风格 一般要求请求和返回必须用json格式字符进行交互,但不是必须的。
1、新增RestFulController对象,内容为:
package com.controller;

import org.springframework.web.bind.annotation.*;

/**
 * Restful风格 规范了http请求的方式,这是一种约定的写法,最明显就是:
 * 新增用put请求方式
 * 删除用delete请求方式
 * 修改用post请求方式
 * 查询用get请求方式
 */
@RestController
@RequestMapping("/user")
public class RestFulController {

    /**
     * 增
     * @param name
     * @return
     */
    @PutMapping("/add")
    public String add(String name){
        System.out.println("add 请求参数为:"+name);
        return "add 请求参数为:"+name;
    }

    /**
     *  删
     * @param name
     * @return
     */
    @DeleteMapping("/del")
    public String del(String name){
        System.out.println("del 请求参数为:"+name);
        return "del 请求参数为:"+name;
    }

    /**
     *  改
     * @param name
     * @return
     */
    @PostMapping("/update")
    public String update(String name){
        System.out.println("del 请求参数为:"+name);
        return "del 请求参数为:"+name;
    }

    /**
     *  查
     * @param name
     * @return
     */
    @GetMapping("/list")
    public String list(String name){
        System.out.println("list 请求参数为:"+name);
        return "list 请求参数为:"+name;
    }

    /**
     *  查 1 个
     *  {id}  配合 @PathVariable 是路径参数的写法,大多用来根据id查询某个数据
     *  访问路径如 :/list/1  ,/list/2 等,
     * @param id
     * @return
     */
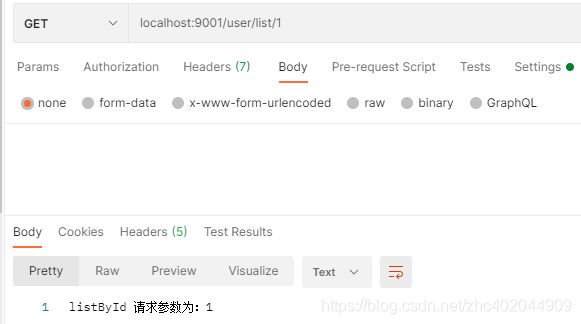
    @GetMapping("/list/{id}")
    public String listById(@PathVariable Long id){
        System.out.println("listById 请求参数为:"+id);
        return "listById 请求参数为:"+id;
    }

}
四 、使用postman测试以上接口
1、前后台不分离
请求方式get
参数可以填在url后面
也可以填在form-data里


