React博客项目系列3 分享功能,时间转换
React博客项目系列1 编写markdown文章,代码高亮,显示文章与目录
React博客项目系列2 文章复制代码,评论添加表情
分享功能
功能需求:
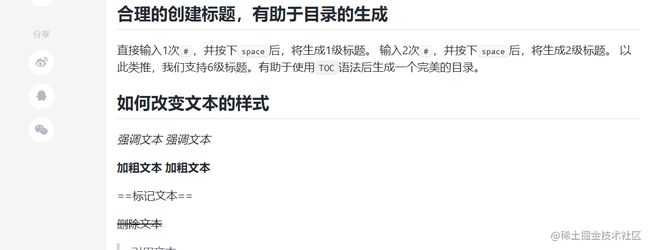
- 文章详情页左侧悬浮三个分享按钮
- 鼠标放上去按钮图标变为有色(用
:hover实现即可,不赘述) - 鼠标点击qq或微博跳转分享页面
- 鼠标点击微信出现二维码
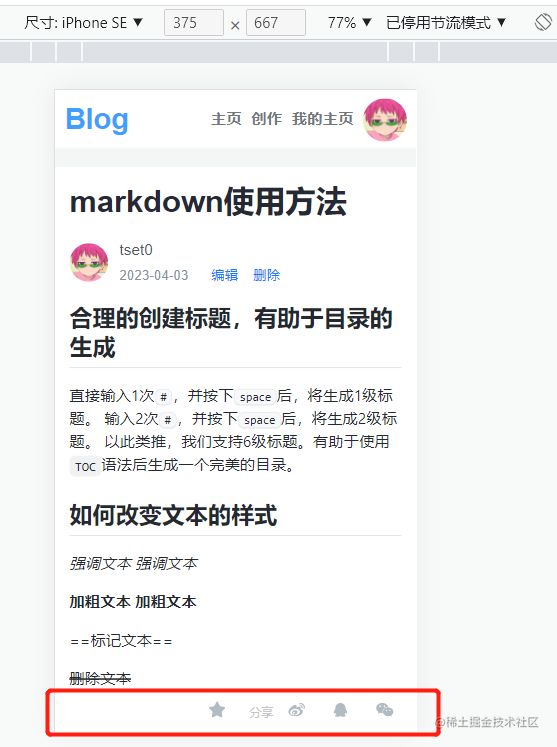
- 响应式布局,移动端左侧悬浮变为底部固定
二维码生成
用于微信分享功能需要用户扫码,这里需要将url生成二维码。
下载依赖
yarn add qrcodejs2
组件封装
import QRCode from "qrcodejs2"
import { useEffect } from "react"
const QrCode = ({ url }) => {
  useEffect(() => {
    creatQrCode()
  })
  const creatQrCode = () => {
    let qrcode = new QRCode("qrcode", {
      width: 108,
      height: 108, // 高度
      text: url, // 二维码内容
      render: "canvas", // 设置渲染方式(有两种方式 table和canvas,默认是canvas)
      background: "#f0f", // 背景色
      foreground: "#ff0", // 前景色
    })
  }
  return (
    <div id="qrcode"></div>
  )
}
export default QrCode
功能实现
import { useState } from "react"
import './index.scss'
// 微信分享需要利用QrCode生成二维码供用户扫码
import QrCode from "../QrCode"
const Action = ({ item }) => {
  // 当前需要分享的页面
  const url = document.location.href
  // 控制二维码的显示与隐藏
  const [show, setShow] = useState(false)
  const share = (type, item) => {
    if (type === "qq") { // qq分享
      window.open( // 携带信息打开分享链接
        "http://connect.qq.com/widget/shareqq/index.html?url=" +
        encodeURIComponent(document.location.href) +
        "&sharesource=qzone&title=" +
        item.title +
        "&summary= " +
        item.bio
      )
    } else if (type === "weibo") { // 微博分享
      window.open(
        "http://service.weibo.com/share/share.php?url=" +
        encodeURIComponent(document.location.href) +
        "?sharesource=weibo&title=" +
        item.title
      )
    }
  }
  return (
      <div className="article-action">
        <div className="art-wrap flex flex-direction">
          <div className="share">
            <span>分享</span>
          </div>
          <div className="btn weibo" onClick={() => share('weibo', item)} ></div >
          <div className="btn qq" onClick={() => share('qq', item)} ></div >
          <div
            className="btn wechat"
            onClick={() => share('wechat')}
            onMouseEnter={() => setShow(true)}
            onMouseLeave={() => setShow(false)}
          ></div >
        </div >
        {show && (<QrCode className="code" url={url}></QrCode>)} // 微信分享(需要扫码)
      </div >
  )
}
export default Action
响应式布局
主要思路是用@media判断当前最大宽为450px时重写样式
@media (max-width: 450px) {
  .article-action {
    top: auto;
    bottom: 0%;
    left: -5px;
    margin-left: 0;
    z-index: 9999;
    width: 100%;
    height: 45px;
    background: white;
    .art-wrap {
      height: 100%;
      flex-direction: row;
      justify-content: flex-end;
      align-items: center;
      .btn {
        margin-right: 10px;
        margin-bottom: 0;
      }
    }
  }
}
效果:
时间转换
export function parseTime (time, cFormat) {
  if (arguments.length === 0) {
    return null
  }
  // 没约定格式就返回年月日时分秒
  const format = cFormat || "{y}-{m}-{d} {h}:{i}:{s}"
  let date
  if (typeof time === "object") {
    date = time
  } else {
    if (("" + time).length === 10) time = parseInt(time) * 1000
    // 因项目需要当时间错误或者空的时候显示 0000-00-00 00:00
    if (time === 0 || !time) {
      return "0000-00-00 00:00"
    }
    date = new Date(time)
  }
  const formatObj = {
    y: date.getFullYear(),
    m: date.getMonth() + 1,
    d: date.getDate(),
    h: date.getHours(),
    i: date.getMinutes(),
    s: date.getSeconds(),
    a: date.getDay(),
  }
  const time_str = format.replace(/{(y|m|d|h|i|s|a)+}/g, (result, key) => {
    let value = formatObj[key]
    // Note: getDay() returns 0 on Sunday
    if (key === "a") {
      return ["日", "一", "二", "三", "四", "五", "六"][value]
    }
    if (result.length > 0 && value < 10) {
      value = "0" + value
    }
    return value || 0
  })
  return time_str
}

export function getDateDiff (time) {
  let minute = 1000 * 60
  let hour = minute * 60
  let day = hour * 24
  let month = day * 30
  let now = new Date().getTime()
  time = new Date(time).getTime()
  let diffValue = now - time
  if (diffValue < 0) {
    return
  }
  // 根据当前时间与给定时间的差值计算
  let monthC = diffValue / month
  let weekC = diffValue / (7 * day)
  let dayC = diffValue / day
  let hourC = diffValue / hour
  let minC = diffValue / minute
  if (monthC >= 1) {
    return "" + parseInt(monthC) + "月前"
  } else if (weekC >= 1) {
    return "" + parseInt(weekC) + "周前"
  } else if (dayC >= 1) {
    return "" + parseInt(dayC) + "天前"
  } else if (hourC >= 1) {
    return "" + parseInt(hourC) + "小时前"
  } else if (minC >= 1) {
    return "" + parseInt(minC) + "分钟前"
  } else return "刚刚"
}
效果:(返回数据应该按照时间由近及远排的,后续会改一下后端代码)


