linux虚拟化之kvm(一个200行的arm64虚拟机代码)
一、背景
之前介绍了X86上的一个简易虚拟机:
linux虚拟化之kvm(一个150行的x86虚拟机代码)-CSDN博客
,但作为一名嵌入式开发者,还是需要在ARM64上尝试一番,ARM64上的虚拟化和X86还是有很多差异点;本文介绍arm64下的基于kvm的虚拟机。
环境依赖:
1、X86下的qemu模拟arm64环境
qemu搭建arm64 linux kernel环境-CSDN博客
2、busybox 中增加基础lib库(libc),避免自己交叉编译的程序在arm64的Host OS下无法执行
将交叉工具编译链下libc相关的库也拷贝到busybox构建的rootfs 根目录即可,如我自己的交叉工具链下libc的路径:
/home/geek/tool/aarch64-none-linux-gnu/aarch64-none-linux-gnu/libc
二、arm64虚拟机架构
简单的说就是在X86电脑上用qemu模拟arm64的执行环境(Host OS),然后在arm64环境中通过kvm在虚拟机中执行一段简单的hello world汇编程序。
上图程序流程:
- 创建arm64 运行环境
- 通过/dev/kvm创建vcpu和设置USER_MEMORY
- 设置vpu type,
- 设置arm64的pc指针
- vcpu执行guest程序
- guest程序向地址0x996 写入"Hello"
- 由于这段地址非VM的memory空间,会触发KVM_EXIT_MMIO 事件
- 事件被host 端程序监听,通过kvm_run结构体信息提取 MMIO信息,获取到guest 程序写入的"Hello"字符
- host端通过printf串口输出
三、源码
1、arm64 host 代码(kvm_sample.c)
#include
#include
#include
#include
#include
#include
#include
#include

#define KVM_DEV  "/dev/kvm"
#define MEM_SIZE  0x1000
#define PHY_ADDR  0x80000

#define AARCH64_CORE_REG(x)        (KVM_REG_ARM64 | KVM_REG_SIZE_U64 | KVM_REG_ARM_CORE | KVM_REG_ARM_CORE_REG(x))

int main(void)
{
    struct kvm_one_reg reg;
    struct kvm_vcpu_init init; //using init the vcpu type
    struct kvm_vcpu_init preferred;
    int ret;

    __u64 guest_entry = PHY_ADDR;
    __u64 guest_pstate;

    int kvmfd = open(KVM_DEV, O_RDWR);

    //ioctl(kvmfd, KVM_GET_API_VERSION, NULL);
    //1. create vm and get the vm fd handler
    int vmfd =  ioctl(kvmfd, KVM_CREATE_VM, 0);

    //2. create vcpu
    int vcpufd = ioctl(vmfd, KVM_CREATE_VCPU, 0);
    if(vcpufd < 0) {
        printf("create vcpu failed\n");
        return -1;
    }

    //3. arm64 type vcpu type init
    //sample code can check the qemu/target/arm/kvm64.c
    memset(&init, 0, sizeof(init));
    //init.target = KVM_ARM_TARGET_GENERIC_V8; //here set KVM_ARM_TARGET_CORTEX_A57 meet failed
    init.target = -1;
    if (init.target == -1) {
        ret = ioctl(vmfd, KVM_ARM_PREFERRED_TARGET, &preferred);
        if(!ret) {
            init.target = preferred.target; //KVM_ARM_TARGET_GENERIC_V8
            printf("preferred vcpu type %d\n", init.target);
        }
    }

    ret = ioctl(vcpufd, KVM_ARM_VCPU_INIT, &init);

    if(ret  < 0) {
        printf("init vcpu type failed\n");
        return -1;
    }

    //4. get vcpu resouce map size and get vcpu  kvm_run status
    int mmap_size = ioctl(kvmfd, KVM_GET_VCPU_MMAP_SIZE, NULL);

    if(mmap_size  < 0) {
        printf("get vcpu mmap size failed\n");
        return -1;
    }

    struct kvm_run *run = mmap(NULL, mmap_size, PROT_READ | PROT_WRITE, MAP_SHARED, vcpufd, 0);


    //5. load the vm running program to buffer 'ram'
    unsigned char *ram = mmap(NULL, MEM_SIZE, PROT_READ | PROT_WRITE,
            MAP_SHARED | MAP_ANONYMOUS, -1, 0);

    int kfd = open("test.bin", O_RDONLY);
    read(kfd, ram, MEM_SIZE);

    struct kvm_userspace_memory_region mem = {
        .slot = 0,
        .flags = 0,
        .guest_phys_addr = PHY_ADDR,
        .memory_size = MEM_SIZE,
        .userspace_addr = (unsigned long)ram,
    };

    //6. set the vm userspace program ram to vm fd handler
    ret = ioctl(vmfd, KVM_SET_USER_MEMORY_REGION, &mem);

    if(ret < 0) {
        printf("set user memory region failed\n");
        return -1;
    }

    //7. change the vcpu register info, arm64 need change the pc value
    // arm64 not support KVM_SET_REGS, and KVM_SET_SREGS only support at x86 ppc arch
    // arm64 using the KVM_SET_ONE_REG

    //sample code from qemu/target/arm/kvm64.c
    reg.id = AARCH64_CORE_REG(regs.pc);
    reg.addr = (__u64)&guest_entry;
    ret = ioctl(vcpufd, KVM_SET_ONE_REG, ®);

    if(ret  < 0) {
        printf("change arm64 pc reg failed err %d\n", ret);
        return -1;
    } else {
        printf("set pc addr success\n");
    }

    //7. run the vcpu and get the vcpu result
    while(1) {
        ret = ioctl(vcpufd, KVM_RUN, NULL);
        if (ret == -1)
        {
            printf("exit unknow\n");
            return -1;
        }

        switch(run->exit_reason)
        {
            //when guest program meet io access error will trigger KVM_EXIT_MMIO event,
            //using the event get guest program output
            case KVM_EXIT_MMIO:
                if (run->mmio.is_write && run->mmio.len == 1) {
                    printf("%c", run->mmio.data[0]);
                }
                break;
            case KVM_EXIT_FAIL_ENTRY:
                puts("entry error");
                return -1;
            default:
                printf("exit_reason: %d\n", run->exit_reason);
                return -1;
        }
    }
    return 0;
}
2、arm64 kvm guest运行的代码(test.S)
/*
 * write "Hello"(ASCII) to port 0x996
 * compile:
 */
.section ".text"
start:
    mov x5, 0x48
    mov x4, 0x996
    strb w5, [x4]
    mov x5, 0x65
    strb w5, [x4]
    mov x5, 0x6c
    strb w5, [x4]
    strb w5, [x4]
    mov x5, 0x6f
    strb w5, [x4]
    mov x5, 0x0a
    strb w5, [x4]
    ret
3、链接文件(test.ld)
OUTPUT_ARCH(aarch64)
ENTRY(start)

SECTIONS
{
    . = 0x80000;
    .text : {*(.text)}
}
4、makefile文件
INCLUDES = -I /home/geek/workspace/linux/linux-6.6.1/usr/include
CC=aarch64-none-linux-gnu-gcc
OBJCOPY=aarch64-none-linux-gnu-objcopy
LD=aarch64-none-linux-gnu-ld

all: test.bin kvm_sample

test.bin:test.S
    $(CC)  -nostdlib -nostartfiles -nostdinc -c test.S -o test.o
    $(LD) -nostdlib test.o -T test.ld -o test.tmp.o
    $(OBJCOPY) -O binary test.tmp.o test.bin

kvm_sample: kvm_sample.c
    $(CC) $(INCLUDES) kvm_sample.c -g -o kvm_sample
clean:
    rm kvm_sample test.bin *.o
Makefile中的INCLUDES的内核头文件需要注意一下,需要指定为编译arm64 运行环境的路径,因为我们编译的kvm_sample是要在arm64 linux 下运行, 在构建arm64 linux kernel 运行环境时,使用命令:
make ARCH=arm64 CROSS_COMPILE=aarch64-none-linux-gnu- headers_install
即可在对应kernel目录下生成 ./usr/include 头文件,这个路径加入到测试程序头文件即可
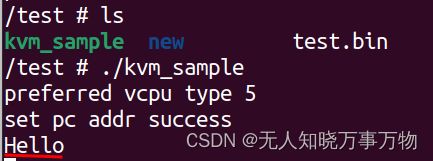
5、执行结果
无图无真相,结果比较简单,虽然只是一个简单的Hello,但是背后的实现并不简单:
四、总结
最后总结下kvm的使用流程:
1、创建虚拟机:vmfd = ioctl(kvmfd, KVM_CREATE_VM, 0);
2、创建vcpu:vcpufd = ioctl(vmfd, KVM_CREATE_VCPU, 0);
3、初始化虚拟机内存:ioctl(vmfd, KVM_SET_USER_MEMORY_REGION, &mem);
4、运行vcpu:ioctl(vcpufd, KVM_RUN, NULL);
无论是arm64还是X86, 流程基本是一样的,差异点在CPU的pc值,CPU类型等参数设置上;上面的流程也和qemu的实现类似,这里的一个加起来200行左右的代码展示了一个VM的基本流程。可扩展的部分:guest程序也可以用c去编写,需要剥离对系统库的依赖(如libc等);guest对host 只有输出,可以通过设置寄存器设置参数传递,完成输入的实验等。
参考:
Documentation - Arm Developer
Documentation - Arm Developer

