vuex &store,mutations,getters,actions
文章目录
-
- 1.vuex概述
- 2.构建vuex【多组件数据共享】环境
-
- Son1.vue
- Son2.vue
- App.vue
- 3.创建一个空仓库
- 4.如何提供&访问vuex的数据
-
- ①核心概念 - state状态
-
- 1.通过store直接访问
- 2.通过辅助函数简化代码
- ②核心概念 - mutations(粗略)
- 5.核心概念 - mutations的基本使用
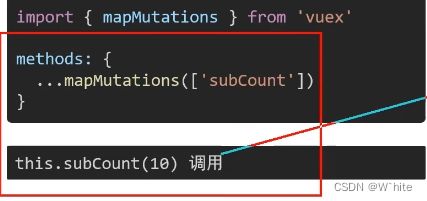
- 6.辅助函数 - mapMutations
- 7.核心概念 - actions和getters
-
- ①核心概念 - actions
- 辅助函数 - mapActions
- ②核心概念 - getters
- 8.核心概念 - 模块module(进阶语法)
- 9.vuex - 分模块 访问模块中的state,mutations等
-
- 1.访问state
- 2.访问getters
- 3.mutation的调用
- 4.action的调用语法
- store,mutation,getters,actions调用总结
-
- 调用 store:
- 调用 mutation:
- 调用 getters:
- 调用 actions:
- 在module模块中调用
-
- 调用 module 的 store:
- 调用 module 的 mutation:
- 调用 module 的 getters:
- 调用 module 的 actions:
1.vuex概述
目标:明确vuex是什么,应用场景,优势
1.是什么:
vuex是一个vue的状态管理工具,状态就是数据
大白话:vuex是一个插件,可以帮我们管理vue通用的数据(多组件共享数据)
2.场景:
①某个状态在很多个组件来使用(个人信息)
②多个组件共同维护一份数据(购物车)
3.优势:
①共同维护一份数据,数据集中化管理
②响应式变化
③操作简捷(vuex提供了一些辅助函数)
2.构建vuex【多组件数据共享】环境
Son1.vue
<template>
    <div class="box">
      <h2>Son1 子组件h2>
      从vuex中获取的值: <label>label>
      <br>
      <button>值 + 1button>
    div>
  template>
<script>
export default {
  name: 'Son1Com'
}
script>
  <style lang="css" scoped>
  .box{
    border: 3px solid #ccc;
    width: 400px;
    padding: 10px;
    margin: 20px;
  }
  h2 {
    margin-top: 10px;
  }
  style>
Son2.vue
<template>
    <div class="box">
      <h2>Son2 子组件h2>
      从vuex中获取的值:<label>label>
      <br />
      <button>值 - 1button>
    div>
  template>

<script>
export default {
  name: 'Son2Com'
}
script>

  <style lang="css" scoped>
  .box {
    border: 3px solid #ccc;
    width: 400px;
    padding: 10px;
    margin: 20px;
  }
  h2 {
    margin-top: 10px;
  }
style>
App.vue
<template>
  <div id="app">
    <h1>根组件h1>
    <input type="text">
    <Son1>Son1>
    <hr>
    <Son2>Son2>
  div>
template>

<script>
import Son1 from './components/Son1.vue'
import Son2 from './components/Son2.vue'

export default {
  name: 'app',
  data: function () {
    return {

    }
  },
  components: {
    Son1,
    Son2
  }
}
script>

<style>
#app {
  width: 600px;
  margin: 20px auto;
  border: 3px solid #ccc;
  border-radius: 3px;
  padding: 10px;
}
style>
3.创建一个空仓库
目标:安装vuex插件,初始化一个空仓库
1.yarn add vue@3
2.新建store/index.js 专门存放vuex

3.Vue.use(Vuex)创建仓库 new Vuex.Store()
4.在main.js中导入挂载到Vue实例上
安装vuex → 新建vuex模块文件 → 创建仓库 → main.js导入挂载
index.js
// 这里面存放的就是 vuex 相关的核心代码
import Vue from 'vue'
import Vuex from 'vuex'
// 插件安装
Vue.use(Vuex)

// 创建仓库
const store = new Vuex.Store()

// 导出给main.js使用
export default store
main.js导入
import store from '@/store/index'
4.如何提供&访问vuex的数据
①核心概念 - state状态
目标:明确如何给仓库提供数据,如何使用仓库的数据
- 提供数据:
state提供唯一的公共数据源,所有共享的数据都要统一放到Store中的State中存储。在state对象中可以添加我们要共享的数据//创建仓库 const store = new Vue.store({ //state 状态,即数据,类似于vue组件中的data //区别: //1.data是组件自己的数据 //2.state时所有组件共享的数据 state:{ cont:101 } })
- 使用数据
- 通过store直接访问
- 通过辅助函数
获取store
(1)this.$store
(2)import 导入 store
模板中:{{ $store.state.xxx }}
组件逻辑中:this.$store.state.xxx
JS模块中:store.state.xxx
1.通过store直接访问
(1). 提供数据就往Vuex.Store中加对象state
index.js
//创建仓库(空仓库)
const store = new.Vuex.Store({
	//通过state提供数据(所有组件可以共享的数据)
	state:{
		title:'大标题',
		count:100
	}
})
(2). 使用数据,先找到store再访问,在App.vue中演示
App.vue
<template>
	<div id="app">
		<h1>根组件 -
		{{ $store.state.title }}
		{{ $store.state.count }}//输入这个就可以了,在Son1,Son2中也可以用
		h1>
		<input type="text">
		<Son1>Son1>
		<hr>
		<Son2>Son2>
	div>
template>
2.通过辅助函数简化代码
mapState是辅助函数,帮助我们把store中的数据自动映射到组件的计算属性中
import { mapState } from 'vuex'

App.vue
<template>
  <div id="app">
    <h1>根组件
      - {{ title }}可简写
      - {{ count }}可简写
    h1>
    <input type="text">
    <Son1>Son1>
    <hr>
    <Son2>Son2>
  div>
template>

<script>
import Son1 from './components/Son1.vue'
import Son2 from './components/Son2.vue'
import { mapState } from 'vuex'
console.log(mapState(['count', 'title']))

export default {
  name: 'app',
  created () {
    console.log(this.$store)
  },
  computed: {
    ...mapState(['count', 'title'])
  },
  data: function () {
    return {

    }
  },
  components: {
    Son1,
    Son2
  }
}
script>
Son2.vue辅助函数简写
<template>
    <div class="box">
      <h2>Son2 子组件h2>
      从vuex中获取的值:<label>{{ count }}label>
      <br />
      <button>值 - 1button>
    div>
  template>

<script>
import { mapState } from 'vuex'// 导入
export default {
  name: 'Son2Com',
  computed: {
    ...mapState(['count'])// 里面放数组,数组里面放需要映射的属性
  }
}
script>
… 是展开运算符
②核心概念 - mutations(粗略)
目标:明确vuex同样遵循单向数据流,组件中不能直接修改仓库的数据
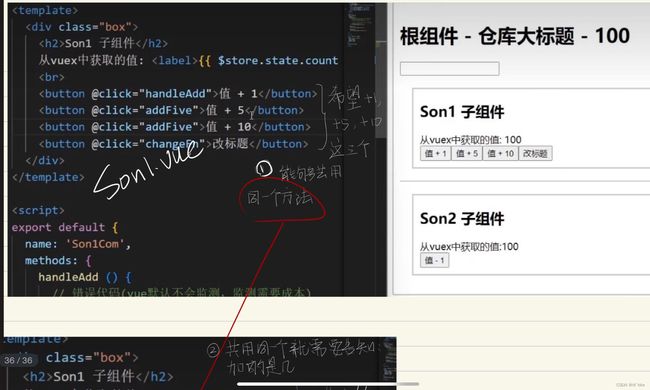
Son1.vue
<template>
    <div class="box">
      <h2>Son1 子组件h2>
      从vuex中获取的值: <label>{{ $store.state.count }}label>
      <br>
      <button @click="handleAdd">值 + 1button>
    div>
  template>
<script>
export default {
  name: 'Son1Com',
  methods: {
    handleAdd () {
      // 应该通过 mutations 核心概念,进行修改数据
      console.log(this.$store.state.count)
    }
  }
}
script>
5.核心概念 - mutations的基本使用
在Vue.js中,"mutation"是指通过改变状态(state)来改变应用程序的数据。通常,我们会定义一个mutation函数来描述状态改变的逻辑,然后通过提交(mutating)一个mutation来触发状态的改变。
// 定义mutation函数
const mutations = {
 increment(state) {
   state.counter++;
 }
}
// 在组件中通过commit调用mutation
this.$store.commit('increment');
总的来说,"mutation"是编程中用于描述对数据进行改变的操作,可以根据具体的框架和语言来进行相应的实现。
举个例子,在Vue.js中,我们可以定义一个mutation函数来增加一个计数器的值:
目标:掌握mutations的操作流程,来修改state数据。(state数据的修改只能通过mutations)
- 定义 mutations 对象,对象中存放修改 state 的方法
const store = new Vuex.Store({
	state: {
	count: 0
	},
	//定义一个mutations
	mutations: {
		//第一个参数是当前store的state属性
		addCount (state) {
			state.count += 1
		}
	}
})
- 组件中提交调用mutations
this.$store.commit('addCount')
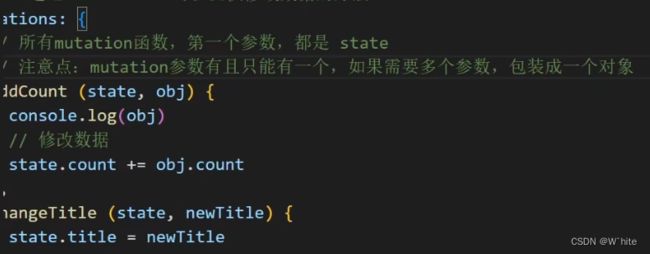
总结:可以先定义一个mutations对象,可以在对象当我提供一系列操作state的方法,每一个mutations方法的第一个参数都是state

目标:掌握mutation的传参语法
提交mutation是可以传递参数的this.$store.commit('increment', 5);(this.$store.commit('xxx', 参数);)
- 提供mutation函数(带参数 - 提交载荷payload)
mutations: {
	...
	addCount (state, n) {
		state.count  += n
	}
},
- 页面中提交调用 mutation
this.$store.commit('addCount',10)
总结
一、Vue.js 中的 mutation 传参语法:
- 在 Vue.js 的 Store 中,可以通过提交(mutating)一个 mutation 并传递参数来改变状态(state)的值。
- Mutation 的定义在 Store 对象的 mutations 属性中,可以接收两个参数:state 和 payload(即传入的参数)。
- 例如,在增加一个计数器的值时,可以传递一个数字作为参数:
// 定义 mutation 函数
const mutations = {
  increment(state, payload) {
    state.counter += payload;
  }
}

// 在组件中通过 commit 调用 mutation 并传递参数
this.$store.commit('increment', 5);
二、Vuex 中的 mutation 传参语法:
- Vuex 是 Vue.js 的官方状态管理库,它支持在 Store 中定义 mutations 来改变状态。
- Mutation 的定义和传参和 Vue.js 中的类似。
- 例如,在改变一个用户对象的名称时,可以传递一个对象作为参数:
// 定义 mutation 函数
const mutations = {
  changeUserName(state, payload) {
    state.user.name = payload.name;
  }
}

// 在组件中通过 commit 调用 mutation 并传递参数
this.$store.commit('changeUserName', { name: 'John' });
6.辅助函数 - mapMutations
目标掌握辅助函数 mapMutations,映射方法
mapMutations 和mapState很像,它是把位mutations中的方法提取了出来,映射到组件methods中

只要通过this.subCount(10) 调用就可以了,所以实际写的代码就下面这一块

Vuex 中使用 mapMutations 辅助函数的传参语法:
- Vuex 的 mapMutations 辅助函数可以简化在组件中使用 mutation 的方式。
- 可以在组件中使用对象展开运算符({…})将 mutation 映射到组件的 methods 中,然后直接调用这些方法,并传递参数。
- 例如:
// 映射 mutations 到组件的 methods
import { mapMutations } from 'vuex';

export default {
 // ...
 methods: {
   ...mapMutations(['increment', 'changeUserName']),
   // 使用传参的方式调用 mutation
   incrementCounter() {
     this.increment(5);
   },
   changeName() {
     this.changeUserName({ name: 'John' });
   }
 }
 // ...
}
7.核心概念 - actions和getters
①核心概念 - actions
目标:明确actions的基本语法, 处理异步操作
需求: 一秒钟之后,修改state的count成666

说明:mutations必须是同步的(便于监测数据变化,记录调试)
mutations: {
	changeCount (state, newCount) {
		state.count = newCount  //不能在这个changeCount的基础上,外面包一层seTimeout
	}
}
实际步骤
1.提供action方法
actions: {
	setAsyncCount (context, num) {  //actions里面提供一个方法setAsyncCount (设置数组,async表示异步),context理解为仓库,num是额外传参
		//一秒后,给一个数,去修改 num
		setTimeout(() => {
			context. commit('changeCount', num)
		}, 1000)
	}
}
2.页面中dispatch调用
this.$store.dispatch('setAsyncCount',200)
Son1.vue
<template>
  <div class="box">
    <button @click="handleChange">一秒后修改成666button>
  div>
template>

<script>
export default {
  name: 'Son1Com',
  created () {
    console.log(this.$store.getters)
  },
    handleChange () {
      // 调用action
      // this.$store.dispatch('action名字', 额外参数)
      this.$store.dispatch('changeCountAction', 666)
    }
  }
}
script>
index.js
  // 3. actions 处理异步
  // 注意:不能直接操作 state,操作 state,还是需要 commit mutation
  actions: {
    // context 上下文 (此处未分模块,可以当成store仓库)
    // context.commit('mutation名字', 额外参数)
    changeCountAction (context, num) {
      // 这里是setTimeout模拟异步,以后大部分场景是发请求
      setTimeout(() => {
        context.commit('changeCount', num)
      }, 1000)
    }
  }
当使用 Vuex 管理状态时,actions 用于封装业务逻辑和异步操作,以及触发 mutations 来改变 state。下面是使用 Vuex 中 actions 的一般步骤:
- 在 Vuex 中定义 actions:
// Vuex store
const store = new Vuex.Store({
 state: {
   // 定义初始的状态
   count: 0
 },
 mutations: {
   // 定义 mutations 来改变 state
   increment(state) {
     state.count++;
   }
 },
 actions: {
   // 定义 actions
   incrementAsync(context) {
     setTimeout(() => {
       // 在异步操作结束后触发 mutations
       context.commit("increment");
     }, 1000);
   }
 }
});
- 在组件中使用 actions:
// Vue 组件
export default {
 // ...
 methods: {
   increment() {
     // 调用 actions 中的方法
    this.$store.dispatch("incrementAsync");
   }
 }
}
在上面的代码中,我们首先定义了一个名为
incrementAsync的action,它接收一个context参数。context提供了与mutations和getters进行交互的方法,包括commit方法用于触发mutations,以及getters属性用于获取状态。
然后,在组件的方法中使用$store.dispatch方法来触发action,调用incrementAsync方法。
通过这种方式,我们可以在action中执行异步任务,比如向服务器发送API 请求或执行定时器操作等。当异步操作完成后,可以通过调用context.commit方法来触发对应的mutations来改变state。
需要注意的是,actions 是可选的,如果只有简单的同步操作,可以直接在组件中调用mutations来改变state,而不用定义actions。
总结起来,actions 负责处理异步操作和封装业务逻辑,在组件中通过调用this.$store.dispatch方法来触发actions,然后在actions中执行异步操作,并通过 context.commit 方法来触发mutations来改变state。这种方式使得代码更模块化和可维护。
辅助函数 - mapActions
目标:掌握辅助函数mapActions,映射方法
mapActions是把位于actions中的方法提取了出来,映射到组件methods中

<button @click="changeCountAction(888)">1秒后改成888button>
<script>
import {mapActions} from 'vuex'
export default {
  name: 'Son2Com',
  methods: {
    // mapMutations 和 mapActions 都是映射方法
    ...mapActions(['changeCountAction']),
  }
}
script>
②核心概念 - getters
目标: 掌握核心概念getters的基本语法(类似于计算属性)
说明: 除了state之外,有时我们还需要从state中派生出一些状态,这些状态是依赖state的,此时会用到getters
例如:state中定义了list,为1-10的数组,组件中,需要显示所有大于5的数据
- 定义 getters
getters: {
	// 注意:
	//(1)getters函数的第一个参数是 state
	//(2)getters函数必须要有返回值
	filterList (state) {
		return state.list.filter(item => item > 5)
	}
}
- 访问getters
①通过store访问getters
{{ $stoer.getters.filterList }}
②通过辅助函数mapGetters映射
computed: {
mapGetters(['filterList'])
},

{{ filterList }}
index.js
// 创建仓库
const store = new Vuex.Store({
  // 严格模式 (有利于初学者,检测不规范的代码 => 上线时需要关闭)
  strict: true,
  // 1. 通过 state 可以提供数据 (所有组件共享的数据)
  state: {
    title: '仓库大标题',
    count: 100,
    list: [1, 2, 3, 4, 5, 6, 7, 8, 9, 10]
  },
})
  Son1.vue
    <div>{{ $store.state.list }}div>
应为要选择出来大于5的,所以就要在index.js中提供一个getters属性
index.js

  // 4. getters 类似于计算属性
  getters: {
    // 注意点:
    // 1. 形参第一个参数,就是state
    // 2. 必须有返回值,返回值就是getters的值
    filterList (state) {
      return state.list.filter(item => item > 5)
    }
  },
提供好了之后,那么在Son的页面中就可以用了
直接使用
<div>{{ $store.getters.filterList }}div>
辅助函数使用
<div>{{ filterList}}div>
<script>
import { mapState, mapMutations, mapActions, mapGetters } from 'vuex'
export default {
  name: 'Son2Com',
  computed: {
    // mapState 和 mapGetters 都是映射属性
    ...mapGetters(['filterList']),
  },
}
script>
8.核心概念 - 模块module(进阶语法)
目标:掌握核心概念module模块的创建
由于vuex使用单一状态数,应用的所有状态会集中到一个比较大的对象.当应用变得非常复杂时,store对象就有可能变得相当臃肿

模块拆分
user模块:store/modules/user.js
const state = {
	userInfo: {
		name: 'zs',
		age: 18
	}
}
const mutations = {}
const actions = {}
const getters = {}
export default {
	state,
	mutations,
	actions,
	getters
}
将来如果要用,就在store对应的核心文件中进行导入,并且配到modules这个核心概念中
import user from './modules/user'

const store = new Vuex. Store({
	modules: {
		user
	}
})
新建一个文件夹modules,里面新建两个js,setting.js和user.js
setting.js
// setting模块
const state = {
  theme: 'light', // 主题色
  desc: '测试demo'
}
const mutations = {
  setTheme (state, newTheme) {
    state.theme = newTheme
  }
}
const actions = {}
const getters = {}

export default {
  namespaced: true,
  state,
  mutations,
  actions,
  getters
}
user.js
// user模块
const state = {
  userInfo: {
    name: 'zs',
    age: 18
  },
  score: 80
}
const mutations = {
  setUser (state, newUserInfo) {
    state.userInfo = newUserInfo
  }
}
const actions = {
  setUserSecond (context, newUserInfo) {
    // 将异步在action中进行封装
    setTimeout(() => {
      // 调用mutation   context上下文,默认提交的就是自己模块的action和mutation
      context.commit('setUser', newUserInfo)
    }, 1000)
  }
}
const getters = {
  // 分模块后,state指代子模块的state
  UpperCaseName (state) {
    return state.userInfo.name.toUpperCase()
  }
}

export default {
  namespaced: true,
  state,
  mutations,
  actions,
  getters
}
在index.js中导入
import user from './modules/user'
import setting from './modules/setting'

//然后就可以使用了
const store = new Vuex.Store({
  // 5. modules 模块
  modules: {
    user,
    setting
  }
})
9.vuex - 分模块 访问模块中的state,mutations等
1.访问state
使用模块中的数据:
- 直接通过模块名访问:
$store.state.模块名.xxx - 通过mapState辅助函数映射
默认根级别的映射mapState(['xxx'])
子模块的映射mapState('模块名',['xxx'])- 需要开启命名空间

①直接通过模块名访问:$store.state.模块名.xxx - 在组件中使用 $store.state 来获取全局状态对象。
- 通过指定完整路径来访问模块中的状态。
// Vue 组件
<template>
  <div>
    <p>{{ message }}p>
  div>
template>

<script>
export default {
  computed: {
    // 使用全局路径访问模块中的状态
    message() {
      return this.$store.state.myModule.message;
    }
  }
}
script>
在上述示例中,我们在组件中使用 $store.state 来获取全局状态对象,然后通过指定完整路径来访问模块中的状态(this.$store.state.myModule.message )
②通过mapState辅助函数映射
使用命名空间(Namespaces):
在定义模块时,设置 namespaced: true,以启用命名空间。
在组件中使用 mapState 辅助函数来获取模块中的状态。
// Vuex store
const store = new Vuex.Store({
  modules: {
    myModule: {
      namespaced: true, // 启用命名空间
      state: {
        message: 'Hello from module'
      }
    }
  }
});
// Vue 组件
<template>
  <div>
    <p>{{ message }}p>
  div>
template>

<script>
import { mapState } from 'vuex';

export default {
  computed: {
    // 使用 mapState 辅助函数
    ...mapState('myModule', ['message'])
  }
}
script>
在上述示例中,我们在模块的定义中设置了 namespaced: true,这会使得模块的状态和操作都具有命名空间。
然后,我们在组件中使用 mapState 辅助函数来获取模块中的状态,通过传递模块名称和需要获取的状态名称的数组。
2.访问getters
目标:掌握模块中getters的访问语法
使用模块中 getters中的数据:
- 直接通过模块名访问
$store.getter['模块名/xxx'] - 通过 mapGetters 映射
默认根级别的映射mapGetters(['xxx'])
子模块的映射mapGetters('模块名',['xxx'])-需要开启命名空间
export default {
	namespaced: true,
	state,
	mutations,
	actions,
	getters
在module中分好模块
const getters = {
  // 分模块后,state指代子模块的state
  UpperCaseName (state) {
    return state.userInfo.name.toUpperCase()
  }
}
原生写法

    <div>{{ $store.getters['user/UpperCaseName'] }}div>
<script>
export default {
  name: 'Son1Com',
  created () {
    console.log(this.$store.getters)
  },
}
script>
辅助函数

<div>{{ UpperCaseName }}div>
<script>
import { mapState, mapMutations, mapActions, mapGetters } from 'vuex'
export default {
  name: 'Son2Com',
  computed: {
    ...mapGetters('user', ['UpperCaseName'])
  },
script>
3.mutation的调用
目标:掌握模块中 mutation的调用语法
注意:默认模块中的 mutation和 actions,会被挂载到全局,需要开启命名空间,才会挂载到子模块。
调用子模块中 mutation:
- 直接通过
store调用$store.commit('模块名/xxx',额外参数) - 通过
mapMutations映射
默认根级别的映射mapMutations(['xxx'])
子模块的映射mapMutations('模块名',['xxx'])-需要开启命名空间
export default {
	namespaced: true,
	state,
	mutations,
	actions,
	getters
}
①原生函数
使用 this.$store.commit:
在组件中使用 this.$store.commit('moduleName/mutationName', payload) 的语法来调用 mutation。
下面是一个示例:
<template>
  <div>
    <button @click="incrementCount">Incrementbutton>
  div>
template>

<script>
export default {
  methods: {
    incrementCount() {
      this.$store.commit('myModule/increment', 1);
    }
  }
}
script>
在上述示例中,我们直接使用 this. s t o r e . c o m m i t ( ′ m y M o d u l e / i n c r e m e n t ′ , 1 ) 的语法来调用 m y M o d u l e 模块中的 i n c r e m e n t m u t a t i o n ,并传入一个 p a y l o a d 参数。通过 t h i s . store.commit('myModule/increment', 1) 的语法来调用 myModule 模块中的 increment mutation,并传入一个 payload 参数。通过 this. store.commit(′myModule/increment′,1)的语法来调用myModule模块中的incrementmutation,并传入一个payload参数。通过this.store.commit 可以直接调用任何模块中的 mutation。模块名和 mutation 名之间用斜杠 (/) 分隔。
②辅助函数
使用辅助函数 mapMutations:
- 在组件中导入 mapMutations 辅助函数。
- 在 methods 属性中使用 …mapMutations([‘mutationName’]) 语法。
下面是一个示例:
// 导入辅助函数
import { mapMutations } from 'vuex';

// 定义 Vuex store
const store = new Vuex.Store({
  modules: {
    myModule: {
      state: {
        count: 0
      },
      mutations: {
        increment(state, payload) {
          state.count += payload;
        }
      }
    }
  }
});
<template>
  <div>
    <button @click="incrementCount">Incrementbutton>
  div>
template>

<script>
export default {
  methods: {
    // 使用 mapMutations 辅助函数
    ...mapMutations('myModule', ['increment'])
  }
}
script>
在上述示例中,我们首先导入了 mapMutations 辅助函数,并指定了要操作的模块 myModule。然后,在组件的 methods 属性中,使用 …mapMutations(‘myModule’, [‘increment’]) 语法将 increment mutation 映射到组件的 incrementCount 方法。这样,我们就可以在组件的模板中使用 incrementCount 方法来调用 myModule 模块中的 increment mutation。
4.action的调用语法
目标:掌握模块中 action的调用语法(同理-直接类比 mutation即可)
注意:默认模块中的 mutation和actions会被挂载到全局,需要开启命名空间,才会挂载到子模块。
调用子模块中 action:
- 直接通过 store 调用
$store.dispatch('模块名/xxx',额外参数) - 通过
mapActions映射
默认根级别的映射mapActions(['xxx'])
子模块的映射mapActions('模块名',['xxx'])-需要开启命名空间
export default {
	namespaced: true,
	state,
	mutations,
	actions,
	getters
}
①原生函数
<template>
  <div>
    <button @click="asyncIncrementCount">Increment Asyncbutton>
  div>
template>

<script>
export default {
  methods: {
    asyncIncrementCount() {
      this.$store.dispatch('myModule/asyncIncrement', 1);
    }
  }
}
script>
在上述示例中,我们直接使用 this. s t o r e . d i s p a t c h ( ′ m y M o d u l e / a s y n c I n c r e m e n t ′ , 1 ) 的语法来调用 m y M o d u l e 模块中的 a s y n c I n c r e m e n t a c t i o n ,并传入一个 p a y l o a d 参数。通过 t h i s . store.dispatch('myModule/asyncIncrement', 1) 的语法来调用 myModule 模块中的 asyncIncrement action,并传入一个 payload 参数。通过 this. store.dispatch(′myModule/asyncIncrement′,1)的语法来调用myModule模块中的asyncIncrementaction,并传入一个payload参数。通过this.store.dispatch 可以直接调用任何模块中的 action。模块名和 action 名之间用斜杠 (/) 分隔
②辅助函数
// 导入辅助函数
import { mapActions } from 'vuex';

// 定义 Vuex store
const store = new Vuex.Store({
  modules: {
    myModule: {
      state: {
        count: 0
      },
      actions: {
        asyncIncrement(context, payload) {
          setTimeout(() => {
            context.commit('increment', payload);
          }, 1000);
        }
      }
    }
  }
});
<template>
  <div>
    <button @click="asyncIncrementCount">Increment Asyncbutton>
  div>
template>

<script>
export default {
  methods: {
    // 使用 mapActions 辅助函数
    ...mapActions('myModule', ['asyncIncrement'])
  }
}
script>
在上述示例中,我们首先导入了 mapActions 辅助函数,并指定了要操作的模块 myModule。然后,在组件的 methods 属性中,使用 …mapActions(‘myModule’, [‘asyncIncrement’]) 语法将 asyncIncrement action 映射到组件的 asyncIncrementCount 方法。这样,我们就可以在组件的模板中使用 asyncIncrementCount 方法来调用 myModule 模块中的 asyncIncrement action。
store,mutation,getters,actions调用总结
调用 store:
- 在 Vue 组件中可以通过 this. s t o r e 访问 V u e x s t o r e 的实例,然后通过 ‘ store 访问 Vuex store 的实例,然后通过 ` store访问Vuexstore的实例,然后通过‘store.state
访问 store 的状态。例如:this.$store.state.count`。 - 可以使用
$store.commit来触发 store 中的 mutation。例如:this.$store.commit('increment')。 - 可以使用
$store.dispatch来触发 store 中的 action。例如:this.$store.dispatch('incrementAsync')。
调用 mutation:
- 在 Vue 组件中可以使用
$store.commit('mutationName', payload)来触发指定的 mutation,并传入可选的 payload。例如:this.$store.commit('increment', 10) - 在 mutation 中更新 store 的状态。例如:
// 定义 mutation
mutations: {
  increment(state, payload) {
    state.count += payload;
  }
}
- mutation 必须是同步的操作。
调用 getters:
- 在 Vue 组件中可以使用
$store.getters.getterName来访问指定的 getter。例如:this.$store.getters.doubleCount - 在 store 中定义 getters,可以通过
getters对象在其中进行访问。例如:
// 定义 getter
getters: {
  doubleCount(state) {
    return state.count * 2;
  }
}
调用 actions:
- 在 Vue 组件中可以使用
$store.dispatch('actionName', payload)来触发指定的 action,并传入可选的 payload。例如:this.$store.dispatch('incrementAsync', 5)。 - 在 action 中可以包含异步操作,然后根据需要通过
commit来触发 mutation,更新 store 的状态。例如:
// 定义 action
actions: {
  incrementAsync({ commit }, payload) {
    setTimeout(() => {
      commit('increment', payload);
    }, 1000);
  }
}
在module模块中调用
调用 module 的 store:
- 在 Vue 组件中,可以通过
this.$store访问 Vuex store 的实例,然后通过$store.state.moduleName访问模块的状态。例如:this.$store.state.moduleName.count。
调用 module 的 mutation:
- 在 Vue 组件中,可以使用
$store.commit('moduleName/mutationName', payload)来触发模块中指定的 mutation,并传入可选的 payload。例如:this.$store.commit('moduleName/increment', 10)。 - 在 mutation 中更新模块的状态。例如:
// 定义模块的 mutation
mutations: {
  increment(state, payload) {
    state.count += payload;
  }
}
调用 module 的 getters:
- 在 Vue 组件中,可以使用
$store.getters['moduleName/getterName']来访问模块中指定的 getter。例如:this.$store.getters['moduleName/doubleCount']。 - 在模块中定义 getters,可以通过 getters 对象在其中进行访问。例如:
// 定义模块的 getter
getters: {
  doubleCount(state) {
    return state.count * 2;
  }
}
调用 module 的 actions:
- 在 Vue 组件中,可以使用
$store.dispatch('moduleName/actionName', payload)来触发模块中指定的 action,并传入可选的 payload。例如:this.$store.dispatch('moduleName/incrementAsync', 5)。 - 在 action 中可以包含异步操作,然后根据需要通过 commit 来触发对应模块中的 mutation,更新模块的状态。例如:
// 定义模块的 action
actions: {
  incrementAsync({ commit }, payload) {
    setTimeout(() => {
      commit('increment', payload, { root: true }); // 使用 "root: true" 来触发根级的 mutation
    }, 1000);
  }
}


