DBA03 1、准备MHA集群环境 2、配置MHA集群环境 3、测试MHA集群
一、准备MHA集群环境
什么是集群?
将多台服务器集中一起,提供同种服务,在客户端看来就像是一台服务器。
集群的分类?
HA(keepalived)、LB(LVS Haproxy nginx)
MHA软件 + 一主多从主从同步结构 ---------->实现mysql高可用集群 (属于mysql专属软件)
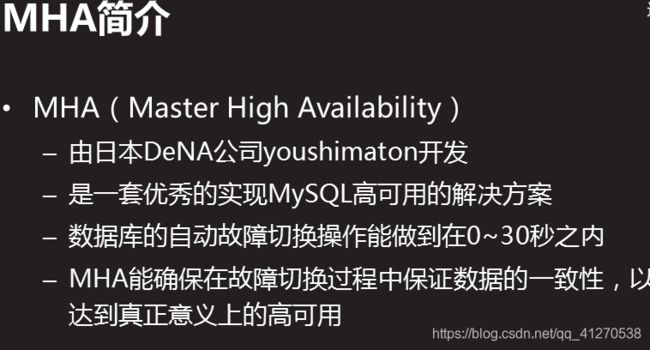


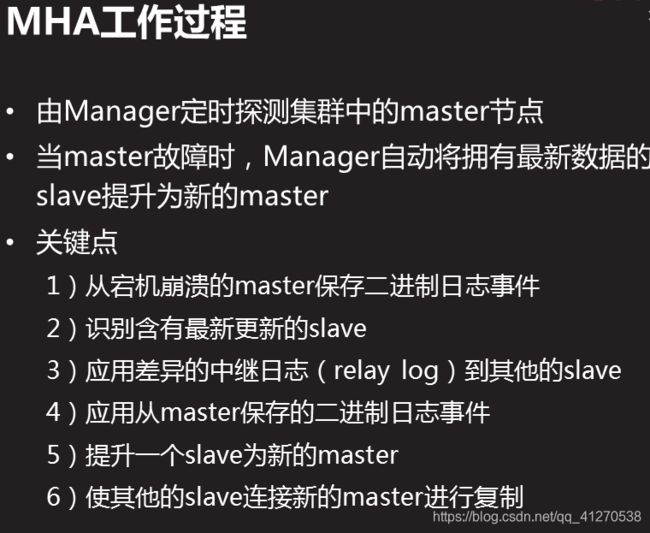
- 准备6台虚拟机,并按照本节规划配置好IP参数
- 在这些虚拟机之间实现SSH免密登录
- 在相应节点上安装好MHA相关的软件包
使用6台RHEL 7虚拟机,如图所示。准备集群环境,安装依赖包,授权用户,配置ssh密钥对认证登陆,所有节点之间互相以root秘钥对认证登录,管理主机以root密钥对认证登录所有数据节点主机,配置mha集群。
 IP规划,如图所示:

步骤一: 准备集群环境
需要的软件:(51~56都要装软件包)
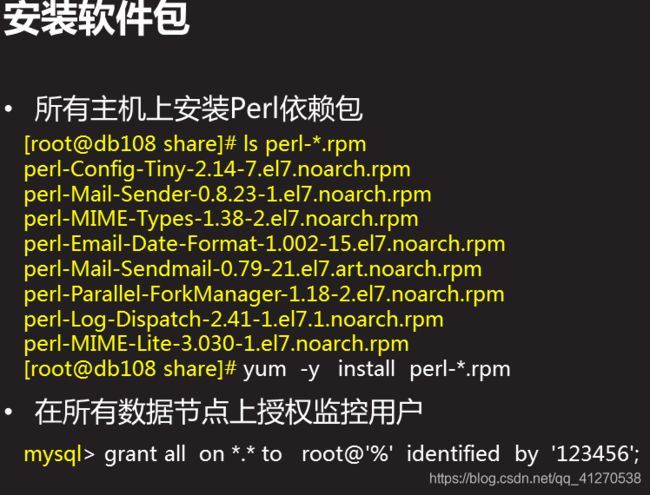
在所有数据节点上授权监控用户(后给)
mysql> grant all on * . * to root@"%" identified by "[email protected];
-
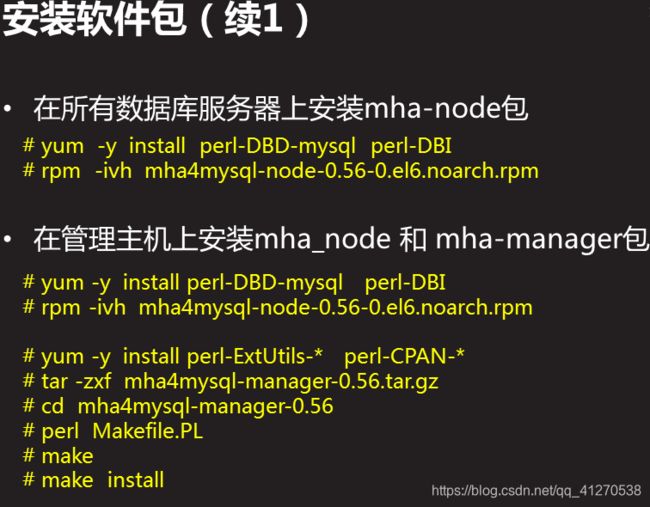
在所有数据库服务器上安装mha_node软件包
-
在管理主机上安装mha_node和mha_manager软件包
-
部署所有mysql数据库服务器之间可以互相ssh免密登陆(使用的是对方的root)
-
部署管理主机可以ssh免密登陆所有mysql数据库服务器(使用的是对方的root)
先装本地yum提供的perl- * 再装其他依赖包]# yum -y install perl-*
2)在所有主机上安装Perl依赖包(51-56操作)
3)在所有数据库服务器上安装mha-node包(51-55操作)
   [root@master51 mha-soft-student]# yum  -y  install  perl-DBD-mysql  perl-DBI
     [root@master51 mha-soft-student]# rpm -ivh mha4mysql-node-0.56-          0.el6.noarch.rpm
    Preparing...                          ################################# [100%]
    Updating / installing...
       1:mha4mysql-node-0.56-0.el6        ################################# [100%]
4)在管理主机上安装mha_node 和 mha-manager包(56操作)
[root@mgm56 mha-soft-student]# yum -y  install perl-DBD-mysql   perl-DBI
[root@mgm56 mha-soft-student]# rpm -ivh  mha4mysql-node-0.56-0.el6.noarch.rpm
Preparing...                          ################################# [100%]
Updating / installing...
   1:mha4mysql-node-0.56-0.el6        ################################# [100%]
[root@mgm56 mha-soft-student]# yum -y  install perl-ExtUtils-*   perl-CPAN-*
[root@mgm56 mha-soft-student]# tar -zxf mha4mysql-manager-0.56.tar.gz
[root@mgm56 mha-soft-student]# cd mha4mysql-manager-0.56/
[root@mgm56 mha4mysql-manager-0.56]# perl  Makefile.PL
*** Module::AutoInstall version 1.03
*** Checking for Perl dependencies...
[Core Features]
- DBI                   ...loaded. (1.627)
- DBD::mysql            ...loaded. (4.023)
- Time::HiRes           ...loaded. (1.9725)
- Config::Tiny          ...loaded. (2.14)
- Log::Dispatch         ...loaded. (2.41)
- Parallel::ForkManager ...loaded. (1.18)
- MHA::NodeConst        ...loaded. (0.56)
*** Module::AutoInstall configuration finished.   //配置完成
Checking if your kit is complete...
Looks good
Writing Makefile for mha4mysql::manager
Writing MYMETA.yml and MYMETA.json
[root@mgm56 mha4mysql-manager-0.56]# make
[root@mgm56 mha4mysql-manager-0.56]# make  install
步骤二: 配置ssh密钥对认证登陆
1)所有节点之间可以互相以ssh密钥对方式认证登陆以(以51为例)
[root@master51 mha-soft-student]# ssh-keygen
[root@master51 mha-soft-student]# ssh-copy-id  192.168.4.52
//除了传给52外,53,54,55也要传,52-55主机也是一样的
2)配置56主机 无密码ssh登录所有数据节点主机
[root@mgm56 mha4mysql-manager-0.56]# ssh-keygen
[root@mgm56 mha4mysql-manager-0.56]# ssh-copy-id  192.168.4.51
//除传给51外,还要传给52-55
二、配置MHA集群环境
(51~55要有装mysql的基础下)
1)部署mysql 一主多从 主从同步结构
-----配置主节点 master51
]# vim /etc/my.cnf
[mysqld]
server_id=51
log-bin=master51			//启用binlog日志
binlog_format="mixed"
relay_log_purge=off		//不自动删除本机的中继日志
rpl-semi-sync-master-enabled=1
rpl-semi-sync-slave-enabled=1
plugin-load="rpl_semi_sync_master=semisync_master.so:rpl_semi_sync_slave=semisync_slave.so"			//开启主库从库的半同步
]#systemctl restart mysqld
]# mysql -u root -p123456
mysql> grant replication slave on * . * to repluser@"%" identified by "[email protected]";			//用户授权
mysql> show master status\G;

mysql> reset master;		//还原
小总结:1、启用binlog日志
2、设置不自动删除本机的中继日志
3、开启主库从库的半同步
4、用户授权
-------配置两个备用主节点 master52、master53
master52
]# vim /etc/my.cnf
[mysqld]
relay_log_purge=off			//不自动删除本机的中继日志
server_id=52
log-bin=master52				//启用binlog日志
binlog_format="mixed"
rpl-semi-sync-master-enabled=1
rpl-semi-sync-slave-enabled=1
 plugin-load="rpl_semi_sync_master=semisync_master.so:rpl_semi_sync_slave=semisync_slave.so"			//开启主库从库的半同步
]# systemctl restart mysqld
]# mysql -u root [email protected]
mysql> grant replication slave on * . * to repluser@"%" identified by "[email protected]";			//用户授权
mysql> show master status\G;
mysql> show slave status;
mysql> change master to master_host="192.168.4.51",
		> master_user="repluser",
		>master_password="[email protected]",
		>master_log_file="master51.000001",
		>master_log_pos=441;
mysql> start slave;
mysql> show slave status\G;
     Slave_IO_Running: Yes
     Slave_SQL_Running: Yes
小总结:1、启用binlog日志
2、设置不自动删除本机的中继日志
3、开启主库从库的半同步
4、用户授权
5、启用从库
master53
]# vim /etc/my.cnf
[mysqld]
relay_log_purge=off			//不自动删除本机的中继日志
server_id=53
log-bin=master53				//启用binlog日志
binlog_format="mixed"
rpl-semi-sync-master-enabled=1
rpl-semi-sync-slave-enabled=1
 plugin-load="rpl_semi_sync_master=semisync_master.so:rpl_semi_sync_slave=semisync_slave.so"			//开启主库从库的半同步
]# systemctl restart mysqld
]# mysql -u root [email protected]
mysql> grant replication slave on * . * to repluser@"%" identified by "[email protected]";			//用户授权
mysql> show master status\G;
mysql> show slave status;
mysql> change master to master_host="192.168.4.51",
		> master_user="repluser",
		>master_password="[email protected]",
		>master_log_file="master51.000001",
		>master_log_pos=441;
mysql> start slave;
mysql> show slave status\G;
     Slave_IO_Running: Yes
     Slave_SQL_Running: Yes
小总结:1、启用binlog日志
2、设置不自动删除本机的中继日志
3、开启主库从库的半同步
4、用户授权
5、启用从库
查看、测试
biglog日志是否开启
mysql> show master status;
是否有授权用户
mysql> select user,host from mysql.user where user="repluser";
------配置两个从节点 slave54、slave55
slave54
]# vim /etc/my.cnf
[mysqld]
server_id=54
]# systemctl restart mysqld
]# mysql -u root [email protected]
mysql> show slave status\G;
mysql> change master to master_host="192.168.4.51",
    		> master_user="repluser",
    		>master_password="[email protected]",
    		>master_log_file="master51.000001",
    		>master_log_pos=441;
mysql> start slave;
mysql> show slave status\G;
         Slave_IO_Running: Yes
         Slave_SQL_Running: Yes
slave55
]# vim /etc/my.cnf
    [mysqld]
    server_id=55
    ]# systemctl restart mysqld
    ]# mysql -u root [email protected]
    mysql> show slave status\G;
    mysql> change master to master_host="192.168.4.51",
        		> master_user="repluser",
        		>master_password="[email protected]",
        		>master_log_file="master51.000001",
        		>master_log_pos=441;
    mysql> start slave;
    mysql> show slave status\G;
             Slave_IO_Running: Yes
             Slave_SQL_Running: Yes
配置管理节点 mgm56
1)创建主配置文件并根据设置做对应的配置
]# mkdir /etc/mha			//创建服务的工作目录
]#cp mha-soft-student/mha4mysql-manager-0.56/samples/conf/app1.cnf /etc/mha/			//copy主配置模版存放到自己创建的工作目录
]# cp /mha-soft-student/master_ip_failover		//copy故障脚本存放到自己创建的工作目录
]# vim  /etc/mha/app1.cnf				//编辑主配置文件
[server default]							 //服务器的默认配置
manager_workdir=/etc/mha		//服务的工作目录
manager_log=/etc/mha/manager.log		//存放的日志目录
master_ip_failover_script=/etc/mha/master_ip_failover		//故障
]# vim /etc/mha/master_ip_failover
my $vip = '192.168.4.100/24';  # Virtual IP
my $key = "1";
my $ssh_start_vip = "/sbin/ifconfig eth0:$key $vip";
my $ssh_stop_vip = "/sbin/ifconfig eth0:$key down";
]# chmod +x /etc/mha/master_ip_failover
继续修改主配置文件
]# vim /etc/mha/app1.cnf		//编辑主配置文件
......
ssh_user=root				//免密登陆的用户名
ssh_port=22					//免密登陆的端口
repl_user=repluser			//主从同步用户名
[email protected]		//主从同步密码
user=root										//数据库用户名
[email protected]			//数据库密码

[server1]									//数据库服务器名称、标识
hostname=192.168.4.51			//主机IP
#port=3308								//若默认的端口是3306可以不设定
candidate_master=1				//竞选主库

[server2]									//数据库服务器名称、标识
hostname=192.168.4.52			//主机IP
candidate_master=1				//若主库宕机备用主库需竞选主库

[server3]									//数据库服务器名称、标识
hostname=192.168.4.53			//主机IP
candidate_master=1				//若主库宕机备用主库需竞选主库

[server4]									//数据库服务器名称、标识
hostname=192.168.4.54			//主机IP
no_master=1							//不是备用机不需竞选主库

[server5]									//数据库服务器名称、标识
hostname=192.168.4.55			//主机IP
no_master=1							//不是备用机不需竞选主库
把VIP地址192.168.4.100 部署在当前主库51上
56]# ping -c2 192.168.4.100
51]# ifconfig eth0:1 192.168.4.100/24		//当51宕机后管理主机调用VIP移到新选举的主库
51]# ifconfig eth0:1       //查看VIP地址
51]# mysql -uroot  [email protected]
mysql> grant all on * . * to root@"%" identified by "[email protected]";			//从库会同步主库的binlog日志
2)测试主配置文件/etc/mha/app1.cnf(56操作)
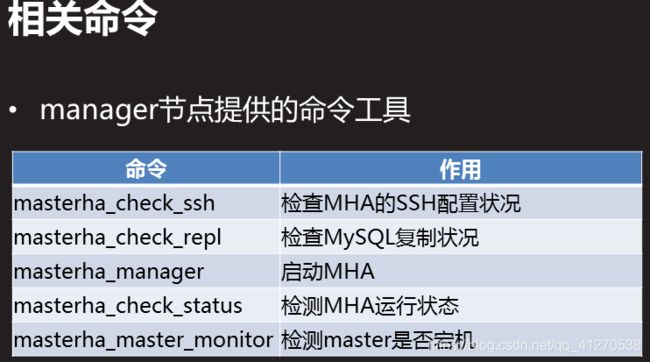
56]# masterha_check_ssh --conf=/etc/mha/app1.cnf		//检查MHA的SSH配置状态
..........
Tue Jan ......[into] All SSH connection tests passed successfully.
56]# masterha_check_repl --conf=/etc/mha/app1.cnf		//检测主从同步
........
MySQL Replication Health is OK
启动管理服务并查看状态(56操作)
56]# masterha_manager --conf=/etc/mha/app1.cnf
–remove_dead_master_conf //若启用管理服务的时候监视发现主库宕机,会自动的从app1.cnf配置文件中删除
–ignore_last_failover //忽略xxx.health文件,忽略最后的故障切换次数,只要出现故障立刻切换
56]# masterha_manager --conf=/etc/mha/app1.cnf --remove_dead_master_conf --ignore_last_failover
另开终端查看状态
56]#masterha_check_status --conf=/etc/mha/app1.cnf
app1 (pid:29307) is running(0:PING_OK),master:192.168.4.51
三、测试MHA集群
在主库51上授权访问数据的用户
51]# mysql -u root [email protected]
mysql> create database db8;
mysql> create table db8.a(id int);
mysql> grant insert,select on * . * to fanny@"%" identified by "[email protected];		//只能插入和查看数据权限
客户端50连接VIP地址 192.168.4.100访问数据库服务
50]# mysql -h192.168.4.100 -ufanny [email protected]
测试能不能写入
1、测试高可用功能
1)停止51上的数据库服务
51]# systemctl stop mysqld
51]# ifconfig eth0:1 down
2)客户端50依然可以连接VIP地址192.168.4.100访问数据库服务
50]# mysql -h192.168.4.100 -u fanny [email protected]
52]# ifconfig eth0:1
在管理主机56的app1.cnf文件里主库51的配置被删除了
所有从库都自动把主库master_host 字段值指向新选举出来的主库IP,把宕机的主库修复后添加到集群里。
