ubuntu网络及基础环境搭建(IP,防火墙,DNS,源 等)
之前有文章介绍过centos的基本环境搭建:
《centos7虚拟机网络与DNS上网配置》
《centos源配置和yum使用》
而针对ubuntu的环境配置,由于很多文件路径以及命令和centos有很大差别。这里针对ubuntu的基本环境搭建写个教程。
文章目录
-
- 一、基本网络环境配置(配IP; 防火墙;DNS)
-
- 1、ip配置
- 2、关闭防火墙
- 2、DNS配置
- 3、本地主机防火墙设置(虚拟机ping不通主机window系统情况)
- 二、源配置与基本工具安装
-
- 1、配置Ubuntu源
- 2、安装ssh等基本工具
- 3、vmware tools安装
- 4、虚拟机共享文件配置
- 5、rc.local启动
版本环境:
cat /proc/version
Linux 5.4.0-42-generic
Ubuntu 18.04.1
一、基本网络环境配置(配IP; 防火墙;DNS)
1、ip配置
刚安装完的ububun虚机,通常会缺少很多工具,包括ifconfig,因此查看ip只能通过ip -a查看。

通过修改如下配置文件来配置IP。
root@ubuntu:/home/ldy# cat  /etc/network/interfaces
# interfaces(5) file used by ifup(8) and ifdown(8)
auto lo
iface lo inet loopback
auto ens33
iface ens33 inet static
address 192.168.1.102
netmask 255.255.255.0
gateway 192.168.1.1
2、关闭防火墙
 ufw disable
 systemctl disable ufw
 systemctl stop ufw
查看防火墙状态,用: ufw status
root@ubuntu:/home/ldy# ufw status
Status: inactive
如果主机能ping通虚拟机表示正常。
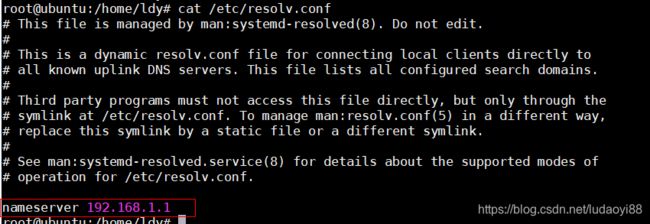
2、DNS配置
ubuntu的DNS配置比较特殊,需要注意。
首先,DNS不能直接在/etc/resolv.conf修改,要不然重启会被自动恢复。文件注释里也有说明这是个动态文件。

网上说的几种方法:在interfaces文件添加dns-nameservers;或修改/etc/resolvconf/resolv.conf.d/base文件。但在我系统里实测并无法生效,可采用如下配置方法,是实测生效的。
-
修改/etc/systemd/resolved.conf,增加DNS

-
重命名resolved.conf,并创建链接文件到/run/systemd/resolve/resolv.conf
root@ubuntu:/home/ldy#mv /etc/resolv.conf /etc/resolv.conf_bak
root@ubuntu:/home/ldy#ln -s   /run/systemd/resolve/resolv.conf  /etc/
root@ubuntu:/home/ldy# ll /etc/resolv.conf
lrwxrwxrwx 1 root root 32 Apr  1 07:26 /etc/resolv.conf -> /run/systemd/resolve/resolv.conf
-
重启系统,再查看resolved.conf。正常。
-
ping www.baidu.com如果正常表示DNS配置生效。

3、本地主机防火墙设置(虚拟机ping不通主机window系统情况)
配置完linux端网络后,有的电脑仍会出现linux虚拟机对window端ping不通的情况。而window端可以ping通虚拟机。原因是window端防火墙也需要进行设置。操作如下:
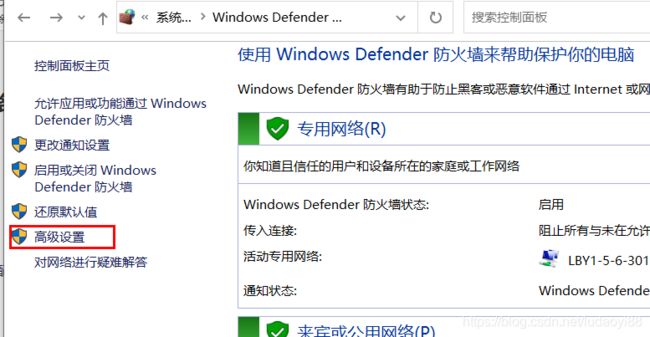
启动如下文件和打印共享选项(专网,公用)。

二、源配置与基本工具安装
1、配置Ubuntu源
先备份一下配置文件
cp /etc/apt/sources.list /etc/apt/sources.list_bak
添加阿里源,将配置文件修改如下:
deb http://mirrors.aliyun.com/ubuntu/ bionic main restricted universe multiverse
deb-src http://mirrors.aliyun.com/ubuntu/ bionic main restricted universe multiverse

deb http://mirrors.aliyun.com/ubuntu/ bionic-security main restricted universe multiverse
deb-src http://mirrors.aliyun.com/ubuntu/ bionic-security main restricted universe multiverse

deb http://mirrors.aliyun.com/ubuntu/ bionic-updates main restricted universe multiverse
deb-src http://mirrors.aliyun.com/ubuntu/ bionic-updates main restricted universe multiverse

deb http://mirrors.aliyun.com/ubuntu/ bionic-proposed main restricted universe multiverse
deb-src http://mirrors.aliyun.com/ubuntu/ bionic-proposed main restricted universe multiverse

deb http://mirrors.aliyun.com/ubuntu/ bionic-backports main restricted universe multiverse
deb-src http://mirrors.aliyun.com/ubuntu/ bionic-backports main restricted universe multiverse
配置完源后就可以从源上下载安装相关软件。
2、安装ssh等基本工具
- 安装ifconfig
安装net-tools则包含了ifconfig工具。
apt-get install net-tools
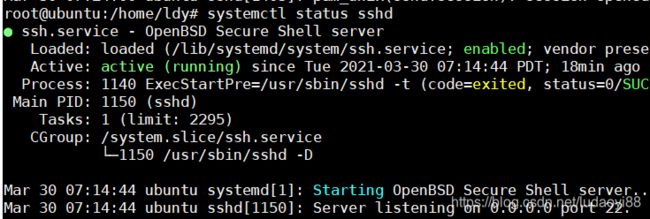
- ssh 实现远程连接
查看sshd服务,系统无该服务,说明缺少相关安装包。

需要在线安装如下两个工具:
apt-get install openssh-client
apt-get install  openssh-server
再查看服务,正常生效,远端就可以通过ssh登入到虚机:
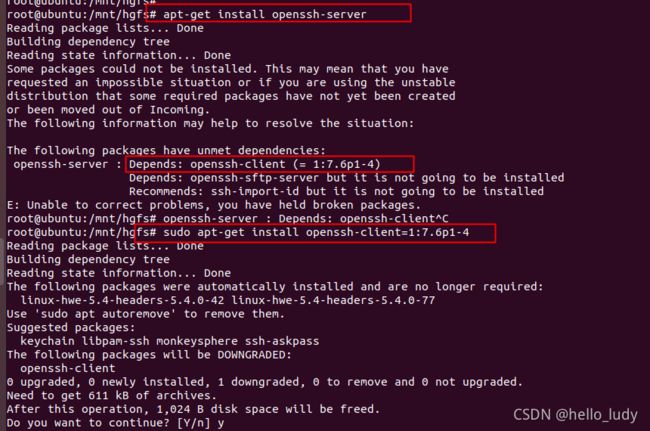
注: 安装openssh-server如果报如下图错误,但系统已经安装了openssh-client,说明版本不匹配:
The following packages have
unmet dependencies: openssh-server : Depends: openssh-client (=
1:7.6p1-4)
解决: 需要安装对应client版本 : apt-get install openssh-client=1:7.6p1-4,然后再安装openssh-server即可
3、vmware tools安装
如果在虚拟机中安装该工具报错(通过CD使用ISO镜像方式),则可以在ubuntu系统中进行安装。

ubunu系统下安装着两个工具,即可
apt-get install open-vm-tools
apt-get install open-vm-tools-desktop
4、虚拟机共享文件配置
设置虚拟机共享文件,会依赖如上第三步的vmware tools安装。
在设置页面中添加共享文件夹。
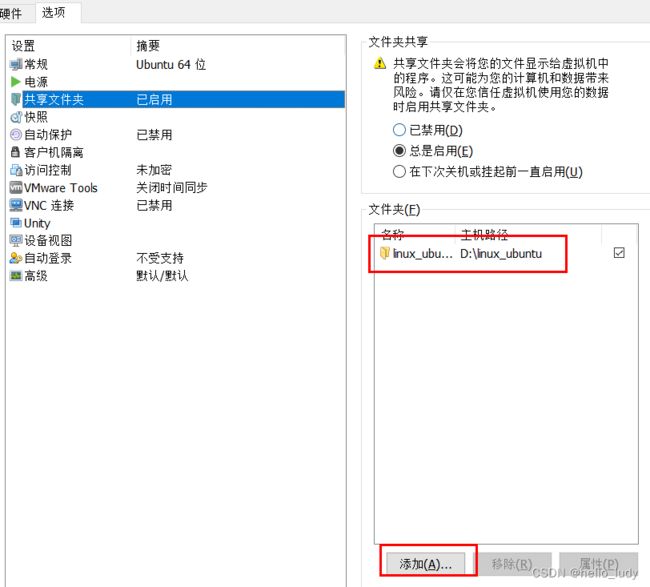
添加完后,ubuntu系统里会在**/mnt/hgfs/** 显示共享文件名称,如果不显示,说明需要做下挂载:
mount -t fuse.vmhgfs-fuse .host:/ /mnt/hgfs -o allow_other
为了每次开机都能自动挂载,需要添加到rc.loal中。
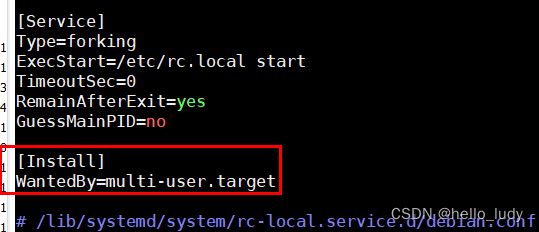
5、rc.local启动
ubuntu 18.04 系统默认已经将 /etc/rc.local 文件移除,需要手动创建一个,启动rc.local需要注意如下几个注意事项。
- /etc/rc.loca脚本中必须有#!/bin/bash 解释器加入,否则会服务启动失败。
rc-local.service: Failed to execute command: Exec format error
- 启动服务rc-local.service 文件,需要加入[Install] 选项, 否则enable 服务会报错