Swagger学习与使用
目录
一、Swagger简介
二、Swagger学习
1.Swagger用法
1.导入Spring-fox依赖
2.启动类上添加@EnableSwagger2注解
3.访问Swagger-ui
2.Swagger UI用法
3.Swagger配置
1.配置基本信息
2.设置扫描的包
3.自定义注解设置不需要生成接口文档的方法
4.Swagger常用注解
1 @Api
2 @ApiOperation
3 @ApiParam
4 @ApiModel
5 @ ApiModelProperty
6 @ ApiIgnore
7 @ ApiImplicitParam
一、Swagger简介
Swagger 是一套围绕 Open API 规范构建的开源工具,可以帮助设计,构建,记录和使用 REST API。
Swagger 工具包括的组件:
Swagger Editor :基于浏览器编辑器,可以在里面编写 Open API规范。类似 Markdown 具有实时预览描述文件的功能。
Swagger UI:将 Open API 规范呈现为交互式 API 文档。用可视化UI 展示描述文件。Swagger Codegen:将 OpenAPI 规范生成为服务器存根和客户端库。通过 Swagger Codegen 可以将描述文件生成 html 格式和 cwiki 形式的接口文档,同时也可以生成多种言语的客户端和服务端代码。
Swagger Inspector:和 Swagger UI 有点类似,但是可以返回更多信息,也会保存请求的实际参数数据。
Swagger Hub:集成了上面所有项目的各个功能,你可以以项目和版本为单位,将你的描述文件上传到 Swagger Hub 中。在 Swagger Hub 中可以完成上面项目的所有工作,需要注册账号,分免费版和收费版。
使用 Swagger,就是把相关的信息存储在它定义的描述文件里面 (yml 或 json 格式),再通过维护这个描述文件可以去更新接口文档,以及生成各端代码。
Open API是什么?
Open API 规范(OpenAPI Specification)以前叫做 Swagger 规范,是REST API 的 API 描述格式。
Open API 文件允许描述整个 API,包括:
1.每个访问地址的类型。POST 或 GET。
2.每个操作的参数。包括输入输出参数。
3.认证方法。
4.连接信息,声明,使用团队和其他信息。
Open API 规范可以使用 YAML 或 JSON 格式进行编写。这样更利于我们和机器进行阅读。
Open API源码和参照说明:
https://github.com/OAI/OpenAPI-Specification/blob/master/versions/3.0.0.md#oasDocument
Springfox
Springfox是基于Spring的组件Swagger-Springmvc编写而来的全新项目。Spring-fox 是根据代码生成接口文档,所以正常的进行更新项目版本,修改代码即可,而不需要跟随修改描述文件。Spring-fox 利用自身 AOP 特性,把 Swagger 集成进来,底层还是Swagger。但是使用起来确方便很多。
所以在实际开发中,都是直接使用 spring-fox。
二、Swagger学习
1.Swagger用法
创建springboot项目,导入web、lombok依赖
编写实体类
@Data
@AllArgsConstructor
@NoArgsConstructor
public class People {
    private Long id;
    private String name;
    private String address;
}
编写controller类
@RequestMapping("/people")
@RestController
public class DemoController {

    @RequestMapping("/getPeople")
    public People getPeople(Long id, String name) {
        People people = new People();
        people.setId(id);
        people.setName(name);
        people.setAddress("广州");
        return people;
    }
}
1.导入Spring-fox依赖
版本最好为2.9.2, 2.10.5版本没有@EnableSwagger2注解
            io.springfox
            springfox-swagger2
            2.9.2


            io.springfox
            springfox-swagger-ui
            2.9.2
2.启动类上添加@EnableSwagger2注解
@SpringBootApplication
@EnableSwagger2
@EnableWebMvc
public class Springbootswagger1Application {

    public static void main(String[] args) {
        SpringApplication.run(Springbootswagger1Application.class, args);
    }

}则需要在启动类上添加@EnableWebMve注解
同时要在application.properties文件配置:
spring.mvc.pathmatch.matching-strategy=ANT_PATH_MATCHER如果是application.yml:
spring:
  mvc:
    pathmatch:
      matching-strategy: ant_path_matcher
不然就会出现错误:
Failed to start bean 'documentationPluginsBootstrapper'; nested exception is java.lang.NullPointerException
原因是Springboot2.6以后将SpringMVC 默认路径匹配策略从AntPathMatcher 更改为PathPatternParser,导致出错。
3.访问Swagger-ui
启动项目后在浏览器中输入http://ip:port/swagger-ui.html即可以访问到 swagger-ui 页面,在页面中可以可视化的进行操作项目中所有接口。
http://localhost:8080/swagger-ui.html
2.Swagger UI用法

每个控制器中间包含多所有控制器方法的各种访问方式。如果使用的是@RequestMapping 进行映射,将显示下面的所有请求方式。如果使用@PostMapping 将只有 Post 方式可以能访问,下面也就只显示Post 的一个.

选择某个请求方式,在里面点击 trt it out

再界面中输入要求的值,点击执行Execute

返回的数据、装团啊、响应头等: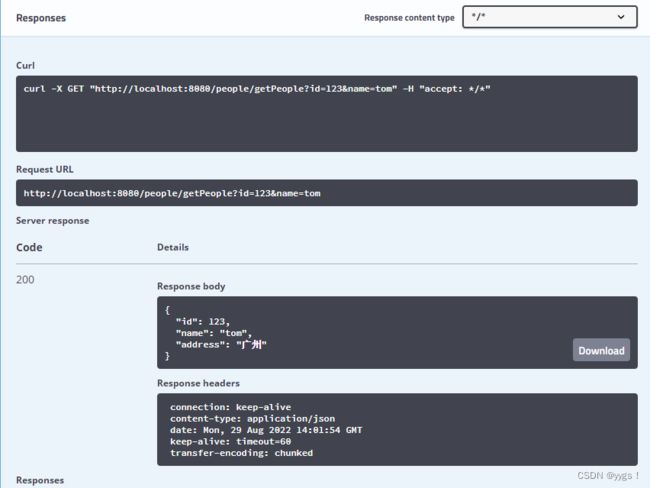
3.Swagger配置
可以在项目中创建 SwaggerConfig,进行配置文档内容。
1.配置基本信息
Docket:摘要对象,通过对象配置描述文件的信息。
apiInfo:设置描述文件中 info。参数类型 ApiInfo
select():返回 ApiSelectorBuilder 对象,通过对象调用 build()可以创建 Docket 对象
ApiInfoBuilder:ApiInfo 构建器。
编写配置类config\SwaggerConfig.class
package com.yygs.demo.config;

import org.springframework.context.annotation.Bean;
import org.springframework.context.annotation.Configuration;
import springfox.documentation.builders.ApiInfoBuilder;
import springfox.documentation.service.ApiInfo;
import springfox.documentation.service.Contact;
import springfox.documentation.spi.DocumentationType;
import springfox.documentation.spring.web.plugins.Docket;

@Configuration
public class SwaggerConfig {

    @Bean
    public Docket getDocket(){
        return new Docket(DocumentationType.SWAGGER_2).apiInfo(getApiInfo()).select().build();
    }

    private ApiInfo getApiInfo(){
        return new ApiInfoBuilder().title("第一个swagger的标题").description("这里是描述").version("1.0.0")
                .contact(new Contact("yygs","www.yygs.world","[email protected]")).build();
    }
}
重启项目后:

2.设置扫描的包
可以通过 apis()方法设置哪个包中内容被扫描。
@Configuration
public class SwaggerConfig {

    @Bean
    public Docket getDocket(){
        return new Docket(DocumentationType.SWAGGER_2)
                .apiInfo(getApiInfo())
                .select()
                // 设置要扫描的包
                .apis(RequestHandlerSelectors.basePackage("com.yygs.controller"))
                .build();
    }

    private ApiInfo getApiInfo(){
        return new ApiInfoBuilder().title("第一个swagger的标题").description("这里是描述").version("1.0.0")
                .contact(new Contact("yygs","www.yygs.world","[email protected]")).build();
    }
}
3.自定义注解设置不需要生成接口文档的方法
1.编写自定义注解接口
package com.yygs.demo.config;

import java.lang.annotation.ElementType;
import java.lang.annotation.Retention;
import java.lang.annotation.RetentionPolicy;
import java.lang.annotation.Target;

@Target(ElementType.METHOD)
@Retention(RetentionPolicy.RUNTIME)
public @interface NotIncludeSwagger {
}
2.在配置类中编写
package com.yygs.demo.config;

import org.springframework.context.annotation.Bean;
import org.springframework.context.annotation.Configuration;
import springfox.documentation.builders.ApiInfoBuilder;
import springfox.documentation.builders.RequestHandlerSelectors;
import springfox.documentation.service.ApiInfo;
import springfox.documentation.service.Contact;
import springfox.documentation.spi.DocumentationType;
import springfox.documentation.spring.web.plugins.Docket;

import static com.google.common.base.Predicates.not;
import static springfox.documentation.builders.RequestHandlerSelectors.withMethodAnnotation;

@Configuration
public class SwaggerConfig {

    @Bean
    public Docket getDocket(){
        return new Docket(DocumentationType.SWAGGER_2)
                .apiInfo(getApiInfo())
                .select()
                // 设置要扫描的包
                .apis(RequestHandlerSelectors.basePackage("com.yygs.controller"))
                // 设置自定义注解--NotIncludeSwagger
                .apis(not(withMethodAnnotation(NotIncludeSwagger.class)))
                .build();
    }

    private ApiInfo getApiInfo(){
        return new ApiInfoBuilder().title("第一个swagger的标题").description("这里是描述").version("1.0.0")
                .contact(new Contact("yygs","www.yygs.world","[email protected]")).build();
    }
}
3.在类上使用注解 @NotIncludeSwagger
4.Swagger常用注解
1 @Api
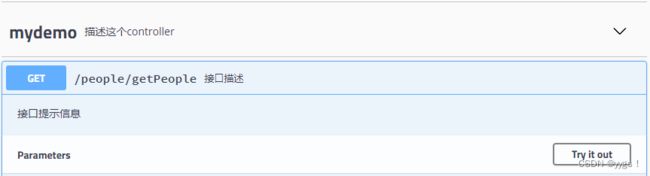
@Api 是类上注解。控制整个类生成接口信息的内容。
tags: 类的名称。可以有多个值,多个值表示多个副本。
description: 描述,已过时。
@RequestMapping("/people")
@RestController
@Api(tags = {"mydemo"},description = "描述这个controller")
public class DemoController {

}
在swagger-ui.html中的展示效果

2 @ApiOperation
@ApiOperation 写在方法上,对方法进行总体描述
value:接口描述
notes:提示信息
    @RequestMapping("/getPeople")
    @ApiOperation(value = "接口描述",notes = "接口提示信息")
    public People getPeople(Long id, String name) {

    }
在swagger-ui.html中的展示效果
3 @ApiParam
@ApiParam 写在方法参数前面。用于对参数进行描述或说明是否
为必添项等说明。
name:参数名称
value:参数描述
required:是否是必须
public People getPeople(Long id, @ApiParam(value = "姓名",required = true) String name) {
}
在swagger-ui.html中的展示效果

4 @ApiModel
@ApiModel 是类上注解,主要应用 Model,也就是说这个注解一
般都是写在实体类上。
value:名称
description:描述
@ApiModel(value = "人类", description = "这是一个描述")
public class People {

}
在swagger-ui.html中的展示效果

5 @ ApiModelProperty
@ApiModelProperty 可以用在方法或属性上。用于当对象作为参
数时定义这个字段的内容。
value:描述
name:重写属性名
required:是否是必须的
example:示例内容
hidden:是否隐藏。
@ApiModelProperty(value = "姓名", name = "name", required = true, example = "张三")
private String name;
在swagger-ui.html中的展示效果

6 @ ApiIgnore
@ApiIgnore 用于方法或类或参数上,表示这个方法或类被忽略。和之前讲解的自定义注解@NotIncludeSwagger 效果类似。只是这个注解是 Swagger 内置的注解,而@NotIncludeSwagger 是我们自定义的注解
7 @ ApiImplicitParam
@ApiImplicitParam 用在方法上,表示单独的请求参数,总体功能
和@ApiParam 类似。
name:属性名
value:描述
required:是否是必须的
paramType:属性类型
dataType:数据类型
@PostMapping("/getPeople")
@ApiImplicitParam(name = "address",value = "地址",required = true,paramType = "query",dataType = "string")如果希望在方法上配置多个参数时,使用@ApiImplicitParams 进行配置。
@ApiImplicitParams(value={@ApiImplicitParam(name="id",value = "编号",required = true),@ApiImplicitParam(name="name",value = "姓名",required = true)})