RabbitMQ
docker安装
拉取镜像
docker pull rabbitmq
运行容器
docker run -itd --name rabbitmq -p 5673:5672 -p 15673:15672 rabbitmq:latest
或者可设置默认用户名和密码
docker run -itd --name rabbitmq -e RABBITMQ_DEFAULT_USER mrtuzi -e RABBITMQ_DEFAULT_PASS 123456 -p 5673:5672 -p 15673:15672 rabbitmq:latest
进入容器运行management
docker exec -it 容器id /bin/bash
rabbitmq-plugins enable rabbitmq_management
通过ip访问web界面
http://ip:15673,用户名和密码默认是guest
RabbitMQ原理
work模型
默认情况下,它会将消息依次推送给订阅队列的每一个消费者,并不会考虑消费者是否处理完消息,可能会造成消息堆积。
spring:
  rabbitmq:
    host: 192.168.174.128
    port: 5673
    username: guest
    password: guest
    listener:
      simple:
        # 每次只能获取1条消息,处理完才能获取下一条
        prefetch: 1
- 多个消费者绑定同一个队列,可以加快消费的速度
- 同一条消息只会被一个消费者处理
- 通过prefetch控制消费者预取的数量,消费完再处理下一条消息,这样,能力强的消费者可以消费更多的消息
fanout交换机
真正生产环境都会经过exchange来发送消息,而不是直接发送到消息队列。
交换机类型:
- fanout 广播
- direct 定向
- topic 话题
Fanout:广播
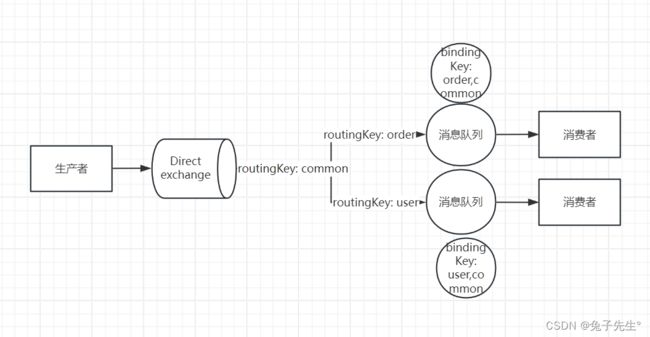
Direct:定向
direct交换机会将接收到的消息根据规则发送到消息队列。
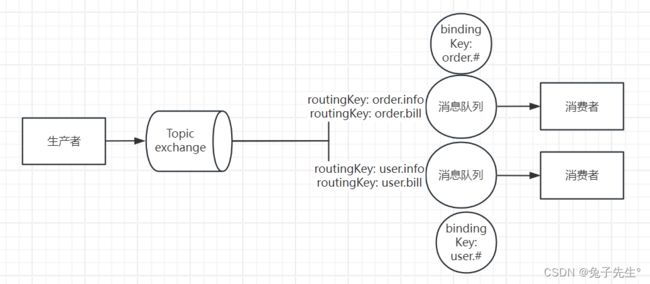
Topic: 主题
topic交换机和direct类似,但是direct只能是完整的词,而topic交换机的routingKey可以是多个词,每个词以英文点**.**隔开。
bindingKey通配符:
Spring整合
pom文件引入amqp依赖
        <dependency>
            <groupId>org.springframework.bootgroupId>
            <artifactId>spring-boot-starter-amqpartifactId>
        dependency>
yml配置文件
spring:
  rabbitmq:
    host: 192.168.174.128
    port: 5673
    username: guest
    password: guest
使用RabbitTemplate发送消息
    @Resource
    RabbitTemplate rabbitTemplate;

    @Test
    void testDirect() {
        String msg = "hello world order";
        String exchange = "direct.ex";
        rabbitTemplate.convertAndSend(exchange, "order", msg);
        log.info("发送成功");
    }
使用RabbitListener监听队列消息
队列和交换机的绑定可以使用配置类配置,也可以使用注解配置。
配置类配置
@Configuration
public class DirectConfig {
    @Bean
    public DirectExchange directExchange() {
        return ExchangeBuilder.directExchange("demo.direct").build();
    }

    @Bean(name = "directQueue")
    public Queue directQueue() {
        return QueueBuilder.durable("demo.direct.queue").build();
    }

    @Bean(name = "directBinding")
    public Binding directBinding(@Qualifier("directQueue") Queue queue, DirectExchange exchange) {
        return BindingBuilder.bind(queue).to(exchange).with("red");
    }
}
    @RabbitListener(queues = {"demo.direct.queue"})
    public void listenerSimpleQueueUser(String msg) {
        log.info("接收到消息2: {}", msg);
    }
注解配置
    @RabbitListener(bindings = {
            @QueueBinding(
                    value = @Queue(name = "direct.queue2"),
                    exchange = @Exchange(name = "direct.ex", type = ExchangeTypes.DIRECT),
                    key = {"blue", "red"}
            )
    })
    public void listenerDirectQueue(String msg) {
        log.info("接收到消息direct.queue2: {}", msg);
    }
配置消息序列化
    @Bean
    public MessageConverter messageConverter() {
        return new Jackson2JsonMessageConverter();
    }
消息可靠性
1. 生产者可靠
连接重连
当前重连是阻塞式重连,会阻塞当前业务,可异步执行发送消息。
spring:
  rabbitmq:
    host: 192.168.174.128
    port: 5673
    username: guest
    password: guest
    # 超时时间
    connection-timeout: 1s
    template:
      retry:
        # 开启重连
        enabled: true
        # 失败后初始等待时间
        initial-interval: 1000ms
        # 失败后下次等待时间倍数, 下次等待时长=initial-interval * multiplier
        multiplier: 1
        # 最大重试次数
        max-attempts: 3
生产者确认
rabbitmq提供了Publisher Confirm和Publisher Return确认机制。开启后,MQ收到消息后会返回确认消息给生产者,有几种情况:
- 消息投递到了MQ,但是路由失败。这时会通过PublisherReturn返回路由异常原因,饭后返回ack,告知投递成功
- 临时消息投递到了MQ,并且入队成功,返回ack,告知投递成功
- 持久消息投递到了MQ,并且入队完成了持久化,返回ack,告知投递成功
- 其它情况都会返回nack,告知投递失败
生产者确认消息需要额外的网络开销,尽量不使用;如果要使用不需要开启return机制,一般路由失败是代码问题;对nack消息可以进行重试,可以记录失败异常消息。
spring:
  rabbitmq:
    host: 192.168.174.128
    port: 5673
    username: guest
    password: guest
    # 开始confirm机制, none: 关闭, simple: 同步阻塞等待MQ回执, correlated: 异步回调等待MQ回执
    publisher-confirm-type: correlated
    # 开始return机制,一般不需要开启
    publisher-returns: true
    @Test
    void testSend() {
        String queueName = "demo.queue2";
        JsonResult jsonResult = new JsonResult();
        jsonResult.setMsg("成功了啊");
        jsonResult.setCode("200");
        CorrelationData correlationData = new CorrelationData();
        correlationData.getFuture().addCallback(new ListenableFutureCallback<>() {
            @Override
            public void onFailure(Throwable ex) {
                // future发生异常时触发,基本不会触发
            }

            @Override
            public void onSuccess(CorrelationData.Confirm result) {
                // 回执处理
                if (result.isAck()) {
                    // 发送消息成功
                    log.info("发送消息成功");
                } else {
                    // 发送消息失败
                    log.error("发送消息失败");
                }
            }
        });
        rabbitTemplate.convertAndSend(queueName, jsonResult, correlationData);
        log.info("发送成功");
    }
2. MQ可靠
数据持久化
如果同时开启持久化和消息确认机制,MQ只有在消息完成持久化才发送ack回执。
- 交换机持久化
将Durability设置为durable - 队列持久化
将Durability设置为durable - 消息持久化
将delivery-mode设置为2
lazy queue
从3.6.0版本开始,增加了Lazy Queue,惰性队列。
3.12版本后,所有队列都是Lazy Queue模式,无法更改。
- 接收到消息后直接存入磁盘而不是内存,内存中只保留最近的消息,默认2048条
- 消费者要消费时才会从磁盘中读取加入到内存
- 支持数百万的消息存储
3. 消费者可靠
消费者确认机制
为了确认消费者是否成功处理消息,MQ提供了消费者确认机制,(Consumer Acknowledgement)。当消费者处理完消息后,应该向MQ发送一个回执,告诉MQ自己是否处理完成。
三种回执:
- ack:成功处理消息,MQ从队列中删除消息
- nack:失败处理消息,MQ再次投递消息
- reject:失败并拒绝该消息,MQ从队列中删除消息
SpringAMQP实现了消费者确认机制,还允许通过配置文件选择ack处理方式, - none:不处理。消费者接收到消息后直接发送ack,消息会立刻被删除。不安全,不建议使用
- manual:手动模式。需要在业务中调用api,发送ack或者reject,存在业务入侵,但是灵活
- auto:自动模式。SpringAMQP利用AOP对消息处理逻辑做了增强,当业务正常执行时自动返回ack,当业务出现异常时,根据异常判断返回不同结果-如果时业务异常会自动返回nack,如果是消息处理或校验异常会自动返回reject
spring:
  rabbitmq:
    host: 192.168.174.128
    port: 5673
    username: guest
    password: guest
    # 开始confirm机制, none: 关闭, simple: 同步阻塞等待MQ回执, correlated: 异步回调等待MQ回执
    publisher-confirm-type: none
    # 开始return机制
    publisher-returns: false
    # 超时时间
    connection-timeout: 1s
    template:
      retry:
        # 开启重连
        enabled: true
        # 失败后初始等待时间
        initial-interval: 1000ms
        # 失败后下次等待时间倍数, 下次等待时长=initial-interval * multiplier
        multiplier: 1
        # 最大重试次数
        max-attempts: 3
    listener:
      simple:
        prefetch: 1
        # 消费者确认机制
        acknowledge-mode: none
消费者失败重试
当消费者异常后,消息会不断requeue重新入队到队列,再次发送给消费者,然后再次异常,再次重新入队,无限循环,导致MQ的消息处理飙升,带来不必要的压力。
可以使用spring的重试机制,防止无限重试。
spring:
  rabbitmq:
    host: 192.168.174.128
    port: 5673
    username: guest
    password: guest
    # 开始confirm机制, none: 关闭, simple: 同步阻塞等待MQ回执, correlated: 异步回调等待MQ回执
    publisher-confirm-type: none
    # 开始return机制
    publisher-returns: false
    # 超时时间
    connection-timeout: 1s
    template:
      retry:
        # 开启重连
        enabled: true
        # 失败后初始等待时间
        initial-interval: 1000ms
        # 失败后下次等待时间倍数, 下次等待时长=initial-interval * multiplier
        multiplier: 1
        # 最大重试次数
        max-attempts: 3
    listener:
      simple:
        prefetch: 1
        acknowledge-mode: auto
        retry:
          # 开启重试机制
          enabled: true
          # 初始的失败等待时长,1秒
          initial-interval: 1000ms
          # 失败下次等待时间倍数
          multiplier: 1
          # 重试次数
          max-attempts: 2
          # true 无状态;false 有状态。如果业务包含事务,则改为false
          stateless: true
重试失败处理策略
开启重试后,重试多次依旧失败,则可以通过MessageRecoverer接口来处理,包含三种实现:
- RejectAndDontRequeueRecoverer:重试耗尽后,直接reject,丢弃消息,默认的方式
- ImmediateRequeueMessageRecoverer:重试耗尽后,返回nack,消息重新入队
- RepublishMessageRecoverer:重试耗尽后,将失败消息投递到指定交换机
/**
 * 只有开启消费失败重试才生效,所以使用ConditionalOnProperty判断开启重试才启动当前配置类
 */
@Configuration
@ConditionalOnProperty(prefix = "spring.rabbitmq.listener.simple.retry", name = "enabled", havingValue = "true")
public class ErrorExchangeConfig {
    @Bean
    public DirectExchange errorExchange() {
        return ExchangeBuilder.directExchange("error.direct").build();
    }

    @Bean(name = "errorQueue")
    public Queue directQueue() {
        return QueueBuilder.durable("error.queue").build();
    }

    @Bean(name = "errorBinding")
    public Binding directBinding(@Qualifier("errorQueue") Queue queue, DirectExchange exchange) {
        return BindingBuilder.bind(queue).to(exchange).with("error");
    }

    @Bean
    public MessageRecoverer messageRecoverer(RabbitTemplate rabbitTemplate) {
        return new RepublishMessageRecoverer(rabbitTemplate, "error.direct", "error");
    }
}
**总结:**保证消费者的可靠性,需要开启消费者消息确认机制为auto,让Spring确认消息处理成功后返回ack,异常时返回nack;开启失败重试机制,并设置MessageRecoverer,多次重试失败后将消息投递到用来专门处理异常的交换机,由人工处理。
业务幂等性
唯一消息id
- 每一条消息生成一个唯一id,利用id区分消息是否为重复消息。唯一id和消息一起发送给消费者,消费者接收消息处理完业务,将消息id存到数据库,如果后面收到相同id,判断是否存在,如果存在则不处理。
    @Bean
    public MessageConverter messageConverter() {
        Jackson2JsonMessageConverter converter = new Jackson2JsonMessageConverter();
        converter.setCreateMessageIds(true);
        return converter;
    }
- 11
延迟消息


