java实现延迟/超时/定时
DelayQueue
DelayQueue是JDK提供的api,是一个延迟队列
DelayQueue泛型参数得实现Delayed接口,Delayed继承了Comparable接口。
getDelay方法返回这个任务还剩多久时间可以执行,小于0的时候说明可以这个延迟任务到了执行的时间了。
compareTo这个是对任务排序的,保证最先到延迟时间的任务排到队列的头。
demo
@Getter
public class SanYouTask implements Delayed {

    private final String taskContent;

    private final Long triggerTime;

    public SanYouTask(String taskContent, Long delayTime) {
        this.taskContent = taskContent;
        this.triggerTime = System.currentTimeMillis() + delayTime * 1000;
    }

    @Override
    public long getDelay(TimeUnit unit) {
        return unit.convert(triggerTime - System.currentTimeMillis(), TimeUnit.MILLISECONDS);
    }

    @Override
    public int compareTo(Delayed o) {
        return this.triggerTime.compareTo(((SanYouTask) o).triggerTime);
    }

}
SanYouTask实现了Delayed接口,构造参数
-
taskContent:延迟任务的具体的内容
-
delayTime:延迟时间,秒为单位
测试
@Slf4j
public class DelayQueueDemo {

    public static void main(String[] args) {
        DelayQueue sanYouTaskDelayQueue = new DelayQueue<>();

        new Thread(() -> {
            while (true) {
                try {
                    SanYouTask sanYouTask = sanYouTaskDelayQueue.take();
                    log.info("获取到延迟任务:{}", sanYouTask.getTaskContent());
                } catch (Exception e) {
                }
            }
        }).start();

        log.info("提交延迟任务");
        sanYouTaskDelayQueue.offer(new SanYouTask("三友的java日记5s", 5L));
        sanYouTaskDelayQueue.offer(new SanYouTask("三友的java日记3s", 3L));
        sanYouTaskDelayQueue.offer(new SanYouTask("三友的java日记8s", 8L));
    }
}
开启一个线程从DelayQueue中获取任务,然后提交了三个任务,延迟时间分为别5s,3s,8s。
测试结果:
成功实现了延迟任务。
实现原理
offer方法在提交任务的时候,会通过根据compareTo的实现对任务进行排序,将最先需要被执行的任务放到队列头。
take方法获取任务的时候,会拿到队列头部的元素,也就是队列中最早需要被执行的任务,通过getDelay返回值判断任务是否需要被立刻执行,如果需要的话,就返回任务,如果不需要就会等待这个任务到延迟时间的剩余时间,当时间到了就会将任务返回。
Timer
Timer也是JDK提供的api
demo
@Slf4j
public class TimerDemo {

    public static void main(String[] args) {
        Timer timer = new Timer();

        log.info("提交延迟任务");
        timer.schedule(new TimerTask() {
            @Override
            public void run() {
                log.info("执行延迟任务");
            }
        }, 5000);
    }

}通过schedule提交一个延迟时间为5s的延迟任务
实现原理
提交的任务是一个TimerTask
public abstract class TimerTask implements Runnable {
    //忽略其它属性

    long nextExecutionTime;
}TimerTask内部有一个nextExecutionTime属性,代表下一次任务执行的时间,在提交任务的时候会计算出nextExecutionTime值。
Timer内部有一个TaskQueue对象,用来保存TimerTask任务的,会根据nextExecutionTime来排序,保证能够快速获取到最早需要被执行的延迟任务。
在Timer内部还有一个执行任务的线程TimerThread,这个线程就跟DelayQueue demo中开启的线程作用是一样的,用来执行到了延迟时间的任务。
所以总的来看,Timer有点像整体封装了DelayQueue demo中的所有东西,让用起来简单点。
虽然Timer用起来比较简单,但是在阿里规范中是不推荐使用的,主要是有以下几点原因:
-
Timer使用单线程来处理任务,长时间运行的任务会导致其他任务的延时处理
-
Timer没有对运行时异常进行处理,一旦某个任务触发运行时异常,会导致整个Timer崩溃,不安全
ScheduledThreadPoolExecutor
由于Timer在使用上有一定的问题,所以在JDK1.5版本的时候提供了ScheduledThreadPoolExecutor,这个跟Timer的作用差不多,并且他们的方法的命名都是差不多的,但是ScheduledThreadPoolExecutor解决了单线程和异常崩溃等问题。
demo
@Slf4j
public class ScheduledThreadPoolExecutorDemo {

    public static void main(String[] args) {
        ScheduledThreadPoolExecutor executor = new ScheduledThreadPoolExecutor(2, new ThreadPoolExecutor.CallerRunsPolicy());

        log.info("提交延迟任务");
        executor.schedule(() -> log.info("执行延迟任务"), 5, TimeUnit.SECONDS);
    }

}
结果
实现原理
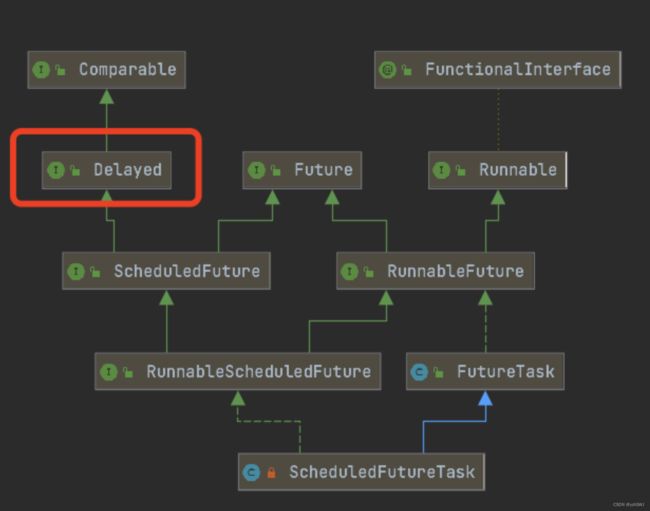
ScheduledThreadPoolExecutor继承了ThreadPoolExecutor,也就是继承了线程池,所以可以有很多个线程来执行任务。
ScheduledThreadPoolExecutor在构造的时候会传入一个DelayedWorkQueue阻塞队列,所以线程池内部的阻塞队列是DelayedWorkQueue。
在提交延迟任务的时候,任务会被封装一个任务会被封装成ScheduledFutureTask对象,然后放到DelayedWorkQueue阻塞队列中。
ScheduledFutureTask实现了前面提到的Delayed接口,所以其实可以猜到DelayedWorkQueue会根据ScheduledFutureTask对于Delayed接口的实现来排序,所以线程能够获取到最早到延迟时间的任务。
当线程从DelayedWorkQueue中获取到需要执行的任务之后就会执行任务。
监听Redis过期key
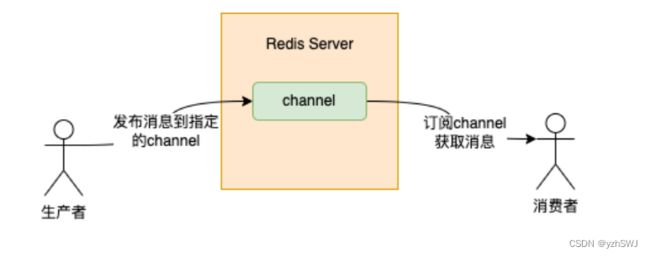
在Redis中,有个发布订阅的机制
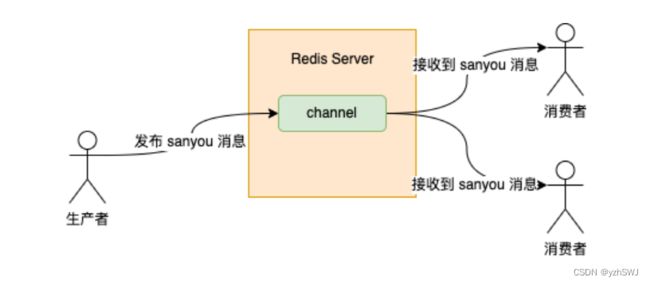
生产者在消息发送时需要到指定发送到哪个channel上,消费者订阅这个channel就能获取到消息。图中channel理解成MQ中的topic。
并且在Redis中,有很多默认的channel,只不过向这些channel发送消息的生产者不是我们写的代码,而是Redis本身。这里面就有这么一个channel叫做__keyevent@,db是指Redis数据库的序号。
当某个Redis的key过期之后,Redis内部会发布一个事件到__keyevent@这个channel上,只要监听这个事件,那么就可以获取到过期的key。
所以基于监听Redis过期key实现延迟任务的原理如下:
-
将延迟任务作为key,过期时间设置为延迟时间
-
监听
__keyevent@这个channel,那么一旦延迟任务到了过期时间(延迟时间),那么就可以获取到这个任务__:expired
demo
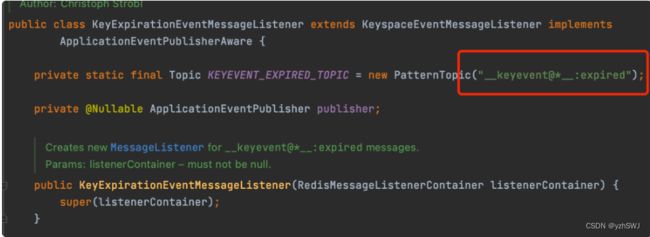
Spring已经实现了监听__keyevent@*__:expired这个channel这个功能,__keyevent@*__:expired中的*代表通配符的意思,监听所有的数据库。
所以demo写起来就很简单了,只需4步即可
依赖
    org.springframework.boot
    spring-boot-starter-data-redis
    2.2.5.RELEASE
配置文件
spring:
  redis:
    host: 192.168.200.144
    port: 6379
配置类
@Configuration
public class RedisConfiguration {

    @Bean
    public RedisMessageListenerContainer redisMessageListenerContainer(RedisConnectionFactory connectionFactory) {
        RedisMessageListenerContainer redisMessageListenerContainer = new RedisMessageListenerContainer();
        redisMessageListenerContainer.setConnectionFactory(connectionFactory);
        return redisMessageListenerContainer;
    }

    @Bean
    public KeyExpirationEventMessageListener redisKeyExpirationListener(RedisMessageListenerContainer redisMessageListenerContainer) {
        return new KeyExpirationEventMessageListener(redisMessageListenerContainer);
    }

}KeyExpirationEventMessageListener实现了对__keyevent@*__:expiredchannel的监听
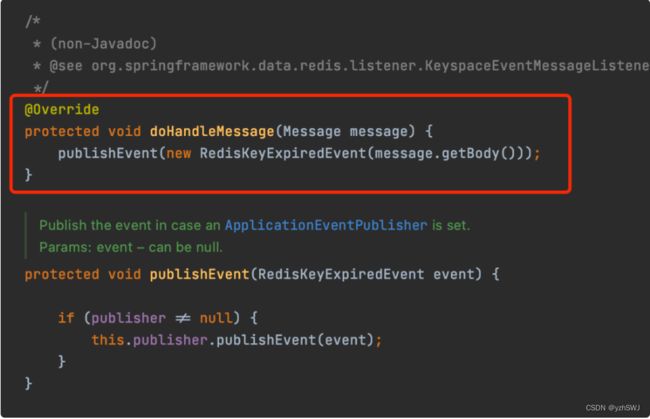
当KeyExpirationEventMessageListener收到Redis发布的过期Key的消息的时候,会发布RedisKeyExpiredEvent事件
所以我们只需要监听RedisKeyExpiredEvent事件就可以拿到过期消息的Key,也就是延迟消息。
对RedisKeyExpiredEvent事件的监听实现MyRedisKeyExpiredEventListener
@Component
public class MyRedisKeyExpiredEventListener implements ApplicationListener {

    @Override
    public void onApplicationEvent(RedisKeyExpiredEvent event) {
        byte[] body = event.getSource();
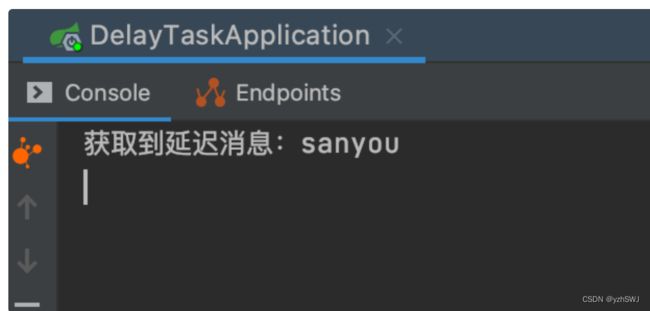
        System.out.println("获取到延迟消息:" + new String(body));
    }

}
代码写好,启动应用
之后我直接通过Redis命令设置消息,消息的key为sanyou,值为task,值不重要,过期时间为5s
set sanyou task

expire sanyou 5
成功获取到延迟任务
虽然这种方式可以实现延迟任务,但是这种方式坑比较多
任务存在延迟
Redis过期事件的发布不是指key到了过期时间就发布,而是key到了过期时间被清除之后才会发布事件。
而Redis过期key的两种清除策略,就是面试八股文常背的两种:
-
惰性清除。当这个key过期之后,访问时,这个Key才会被清除
-
定时清除。后台会定期检查一部分key,如果有key过期了,就会被清除
所以即使key到了过期时间,Redis也不一定会发送key过期事件,这就到导致虽然延迟任务到了延迟时间也可能获取不到延迟任务。
丢消息太频繁
Redis实现的发布订阅模式,消息是没有持久化机制,当消息发布到某个channel之后,如果没有客户端订阅这个channel,那么这个消息就丢了,并不会像MQ一样进行持久化,等有消费者订阅的时候再给消费者消费。
所以说,假设服务重启期间,某个生产者或者是Redis本身发布了一条消息到某个channel,由于服务重启,没有监听这个channel,那么这个消息自然就丢了。
消息消费只有广播模式
Redis的发布订阅模式消息消费只有广播模式一种。
所谓的广播模式就是多个消费者订阅同一个channel,那么每个消费者都能消费到发布到这个channel的所有消息。
如图,生产者发布了一条消息,内容为sanyou,那么两个消费者都可以同时收到sanyou这条消息。
所以,如果通过监听channel来获取延迟任务,那么一旦服务实例有多个的话,还得保证消息不能重复处理,额外地增加了代码开发量。
接收到所有key的某个事件
这个不属于Redis发布订阅模式的问题,而是Redis本身事件通知的问题。
当监听了__keyevent@的channel,那么所有的Redis的key只要发生了过期事件都会被通知给消费者,不管这个key是不是消费者想接收到的。
所以如果你只想消费某一类消息的key,那么还得自行加一些标记,比如消息的key加个前缀,消费的时候判断一下带前缀的key就是需要消费的任务。
Redisson的RDelayedQueue
Redisson他是Redis的儿子(Redis son),基于Redis实现了非常多的功能,其中最常使用的就是Redis分布式锁的实现,但是除了实现Redis分布式锁之外,它还实现了延迟队列的功能。
demo
引入pom
    org.redisson
    redisson
    3.13.1
封装了一个RedissonDelayQueue类
@Component
@Slf4j
public class RedissonDelayQueue {

    private RedissonClient redissonClient;

    private RDelayedQueue delayQueue;
    private RBlockingQueue blockingQueue;

    @PostConstruct
    public void init() {
        initDelayQueue();
        startDelayQueueConsumer();
    }

    private void initDelayQueue() {
        Config config = new Config();
        SingleServerConfig serverConfig = config.useSingleServer();
        serverConfig.setAddress("redis://localhost:6379");
        redissonClient = Redisson.create(config);

        blockingQueue = redissonClient.getBlockingQueue("SANYOU");
        delayQueue = redissonClient.getDelayedQueue(blockingQueue);
    }

    private void startDelayQueueConsumer() {
        new Thread(() -> {
            while (true) {
                try {
                    String task = blockingQueue.take();
                    log.info("接收到延迟任务:{}", task);
                } catch (Exception e) {
                    e.printStackTrace();
                }
            }
        }, "SANYOU-Consumer").start();
    }

    public void offerTask(String task, long seconds) {
        log.info("添加延迟任务:{} 延迟时间:{}s", task, seconds);
        delayQueue.offer(task, seconds, TimeUnit.SECONDS);
    }

}
这个类在创建的时候会去初始化延迟队列,创建一个RedissonClient对象,之后通过RedissonClient对象获取到RDelayedQueue和RBlockingQueue对象,传入的队列名字叫SANYOU,这个名字无所谓。
当延迟队列创建之后,会开启一个延迟任务的消费线程,这个线程会一直从RBlockingQueue中通过take方法阻塞获取延迟任务。
添加任务的时候是通过RDelayedQueue的offer方法添加的。
controller类,通过接口添加任务,延迟时间为5s
@RestController
public class RedissonDelayQueueController {

    @Resource
    private RedissonDelayQueue redissonDelayQueue;

    @GetMapping("/add")
    public void addTask(@RequestParam("task") String task) {
        redissonDelayQueue.offerTask(task, 5);
    }

}
启动项目,在浏览器输入如下连接,添加任务
http://localhost:8080/add?task=sanyou
静静等待5s,成功获取到任务。
实现原理
如下是Redisson延迟队列的实现原理
SANYOU前面的前缀都是固定的,Redisson创建的时候会拼上前缀。
-
redisson_delay_queue_timeout:SANYOU,sorted set数据类型,存放所有延迟任务,按照延迟任务的到期时间戳(提交任务时的时间戳 + 延迟时间)来排序的,所以列表的最前面的第一个元素就是整个延迟队列中最早要被执行的任务,这个概念很重要 -
redisson_delay_queue:SANYOU,list数据类型,也是存放所有的任务,但是研究下来发现好像没什么用。。 -
SANYOU,list数据类型,被称为目标队列,这个里面存放的任务都是已经到了延迟时间的,可以被消费者获取的任务,所以上面demo中的RBlockingQueue的take方法是从这个目标队列中获取到任务的 -
redisson_delay_queue_channel:SANYOU,是一个channel,用来通知客户端开启一个延迟任务
任务提交的时候,Redisson会将任务放到redisson_delay_queue_timeout:SANYOU中,分数就是提交任务的时间戳+延迟时间,就是延迟任务的到期时间戳
Redisson客户端内部通过监听redisson_delay_queue_channel:SANYOU这个channel来提交一个延迟任务,这个延迟任务能够保证将redisson_delay_queue_timeout:SANYOU中到了延迟时间的任务从redisson_delay_queue_timeout:SANYOU中移除,存到SANYOU这个目标队列中。
于是消费者就可以从SANYOU这个目标队列获取到延迟任务了。
所以从这可以看出,Redisson的延迟任务的实现跟前面说的MQ的实现都是殊途同归,最开始任务放到中间的一个地方,叫做redisson_delay_queue_timeout:SANYOU,然后会开启一个类似于定时任务的一个东西,去判断这个中间地方的消息是否到了延迟时间,到了再放到最终的目标的队列供消费者消费。
Redisson的这种实现方式比监听Redis过期key的实现方式更加可靠,因为消息都存在list和sorted set数据类型中,所以消息很少丢。
Hutool的SystemTimer
Hutool工具类也提供了延迟任务的实现SystemTimer
demo
@Slf4j
public class SystemTimerDemo {

    public static void main(String[] args) {
        SystemTimer systemTimer = new SystemTimer();
        systemTimer.start();

        log.info("提交延迟任务");
        systemTimer.addTask(new TimerTask(() -> log.info("执行延迟任务"), 5000));
    }

}
执行结果
Qurtaz
Qurtaz是一款开源作业调度框架,基于Qurtaz提供的api也可以实现延迟任务的功能。
demo
依赖
    org.quartz-scheduler
    quartz
    2.3.2
SanYouJob实现Job接口,当任务到达执行时间的时候会调用execute的实现,从context可以获取到任务的内容
@Slf4j
public class SanYouJob implements Job {
    @Override
    public void execute(JobExecutionContext context) throws JobExecutionException {
        JobDetail jobDetail = context.getJobDetail();
        JobDataMap jobDataMap = jobDetail.getJobDataMap();
        log.info("获取到延迟任务:{}", jobDataMap.get("delayTask"));
    }
}
测试类
public class QuartzDemo {

    public static void main(String[] args) throws SchedulerException, InterruptedException {
        // 1.创建Scheduler的工厂
        SchedulerFactory sf = new StdSchedulerFactory();
        // 2.从工厂中获取调度器实例
        Scheduler scheduler = sf.getScheduler();

        // 6.启动 调度器
        scheduler.start();

        // 3.创建JobDetail,Job类型就是上面说的SanYouJob
        JobDetail jb = JobBuilder.newJob(SanYouJob.class)
                .usingJobData("delayTask", "这是一个延迟任务")
                .build();

        // 4.创建Trigger
        Trigger t = TriggerBuilder.newTrigger()
                //任务的触发时间就是延迟任务到的延迟时间
                .startAt(DateUtil.offsetSecond(new Date(), 5))
                .build();

        // 5.注册任务和定时器
        log.info("提交延迟任务");
        scheduler.scheduleJob(jb, t);
    }
}
执行结果:
实现原理
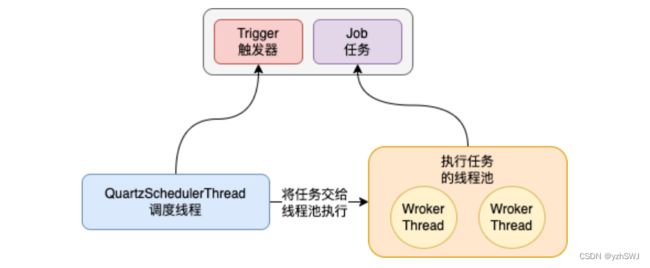
核心组件
-
Job:表示一个任务,execute方法的实现是对任务的执行逻辑
-
JobDetail:任务的详情,可以设置任务需要的参数等信息
-
Trigger:触发器,是用来触发业务的执行,比如说指定5s后触发任务,那么任务就会在5s后触发
-
Scheduler:调度器,内部可以注册多个任务和对应任务的触发器,之后会调度任务的执行
启动的时候会开启一个QuartzSchedulerThread调度线程,这个线程会去判断任务是否到了执行时间,到的话就将任务交给任务线程池去执行。
无限轮询延迟任务
无限轮询的意思就是开启一个线程不停的去轮询任务,当这些任务到达了延迟时间,那么就执行任务。
demo
@Slf4j
public class PollingTaskDemo {

    private static final List DELAY_TASK_LIST = new CopyOnWriteArrayList<>();

    public static void main(String[] args) {
        new Thread(() -> {
            while (true) {
                try {
                    for (DelayTask delayTask : DELAY_TASK_LIST) {
                        if (delayTask.triggerTime <= System.currentTimeMillis()) {
                            log.info("处理延迟任务:{}", delayTask.taskContent);
                            DELAY_TASK_LIST.remove(delayTask);
                        }
                    }
                    TimeUnit.MILLISECONDS.sleep(100);
                } catch (Exception e) {
                }
            }
        }).start();

        log.info("提交延迟任务");
        DELAY_TASK_LIST.add(new DelayTask("三友的java日记", 5L));
    }

    @Getter
    @Setter
    public static class DelayTask {

        private final String taskContent;

        private final Long triggerTime;

        public DelayTask(String taskContent, Long delayTime) {
            this.taskContent = taskContent;
            this.triggerTime = System.currentTimeMillis() + delayTime * 1000;
        }
    }

}
任务可以存在数据库又或者是内存,看具体的需求,这里我为了简单就放在内存里了。
执行结果:
这种操作简单,但是就是效率低下,每次都得遍历所有的任务。


