Netty服务器+消息队列
文章目录
- Netty服务器+消息队列
-
- 一、系统架构图
- 二、搭建netty服务器
- 三、将netty接收到的信息发布到消息队列
- 四、创建消息队列消费者
- 五、将拿到的数据存储到数据库中
Netty服务器+消息队列
一、系统架构图
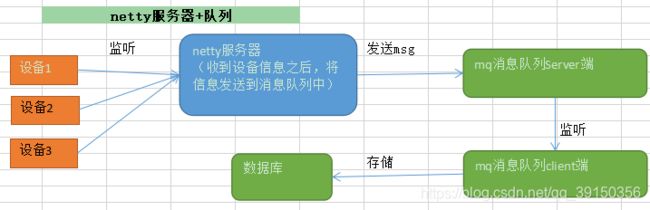
实现:创建netty服务器,服务器发送消息,发送到消息队列上
客户端依次从队列中获取信息
目标1:搭建netty服务端
目标2:搭建mq消息服务器
mq一端发送信息之后,接收端能够接收到
netty收到设备的信息之后,不进行转发,而是将收到的信息发送到消息队列上
消息队列这边的一直在监听,拿到消息后,做消息处理
二、搭建netty服务器
   <dependency>
            <groupId>io.nettygroupId>
            <artifactId>netty-allartifactId>
            <version>4.1.50.Finalversion>
    dependency>
//netty服务
public class GroupServer {
    private int port;//监听端口

    public GroupServer(int port) {
        this.port = port;
    }

    //编写run方法处理客户端请求
    public void run() throws Exception{
        //创建两个线程组
        NioEventLoopGroup bossGroup = new NioEventLoopGroup(1);
        NioEventLoopGroup workGGroup = new NioEventLoopGroup();

        try{
            ServerBootstrap b = new ServerBootstrap();
            b.group(bossGroup,workGGroup)
                    .channel(NioServerSocketChannel.class)
                    .option(ChannelOption.SO_BACKLOG,128)
                    .childOption(ChannelOption.SO_KEEPALIVE,true)
                    .childHandler(new ChannelInitializer<SocketChannel>() {
                        @Override
                        protected void initChannel(SocketChannel ch) throws Exception {
                            //获取到pipline
                            ChannelPipeline pipeline = ch.pipeline();
                            //向pipeline中加入解码器
                            pipeline.addLast("decoder", new StringDecoder());
                            //向pipeline中加入编码器
                            pipeline.addLast("encoder", new StringEncoder());
                            //加入自己的业务处理handler
                            pipeline.addLast(new GroupServerHandler());
                        }
                    });

            System.out.println("netty 服务器启动");
            ChannelFuture channelFuture = b.bind(port).sync();
            //监听关闭
            channelFuture.channel().closeFuture().sync();
        }finally {
            bossGroup.shutdownGracefully();
            workGGroup.shutdownGracefully();
        }
    }
//自定义处理器
public class GroupServerHandler extends SimpleChannelInboundHandler<String> {

    //定义一个channel组,管理所有的channel
    //GlobalEventExecutor是全局的事件执行器,是一个单例
    private static ChannelGroup channelGroup = new DefaultChannelGroup(GlobalEventExecutor.INSTANCE);
    //显示时间
    SimpleDateFormat sdf=new SimpleDateFormat("yyyy-MM-dd HH:mm:ss");

    //表示一旦连接,第一个执行的,将channel加入channelGroup中
    @Override
    public void handlerAdded(ChannelHandlerContext ctx) throws Exception {
        Channel channel = ctx.channel();
        //该方法会将channelGroup中所有的channel遍历,并发送消息,自己不需要遍历
        channelGroup.writeAndFlush("[设备]" + channel.remoteAddress() + " 加入服务器" + sdf.format(new Date()) + "\n");
        channelGroup.add(channel);
    }

    //读取数据
    @Override
    protected void channelRead0(ChannelHandlerContext ctx, String msg) throws Exception {
        //获取当前的channel
        Channel channel = ctx.channel();
        //显示设备信息以及发送的消息
        System.out.println("[设备]" + channel.remoteAddress() + " 发送了消息: " + msg + "\n");

//        //这时遍历channelGroup,根据不同的情况,回送不同的消息
//        channelGroup.forEach(ch -> {
//            if (channel != ch) {//不是当前的channel,转发消息
//                ch.writeAndFlush("[设备]" + channel.remoteAddress() + " 发送了消息" + msg + "\n");
//            } else {//回显自己发送的消息给自己
//                ch.writeAndFlush("[服务器]发送了消息" + msg + "\n");
//            }
//        });
    }

    //表示处于活跃状态,提示xx上线
    @Override
    public void channelActive(ChannelHandlerContext ctx) throws Exception {
        System.out.println("[设备]"+ctx.channel().remoteAddress() + " 上线了---");
    }

    //表示不再活跃状态,提示离线
    @Override
    public void channelInactive(ChannelHandlerContext ctx) throws Exception {
        System.out.println("[设备]"+ctx.channel().remoteAddress() + " 离线了---");
    }


    //断开连接
    @Override
    public void handlerRemoved(ChannelHandlerContext ctx) throws Exception {
        Channel channel = ctx.channel();
        channelGroup.writeAndFlush("[设备]" + channel.remoteAddress() + " 离开了\n");
        System.out.println(sdf.format(new Date())+" [当前设备数量]: " + channelGroup.size());
    }

    //错误处理
    @Override
    public void exceptionCaught(ChannelHandlerContext ctx, Throwable cause) throws Exception {
       //出现异常关闭通道
        ctx.close();
    }
}
三、将netty接收到的信息发布到消息队列

队列
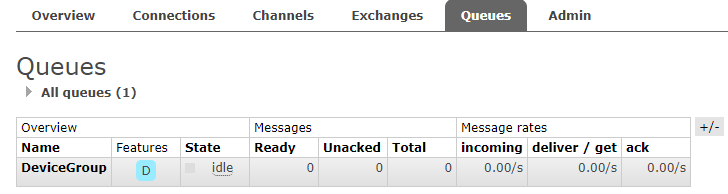
 消息队列平台端口号:15672
 <dependency>
    <groupId>com.rabbitmqgroupId>
    <artifactId>amqp-clientartifactId>
    <version>4.0.3version>
dependency>
GroupServerHandler修改
 //读取数据
    @Override
    protected void channelRead0(ChannelHandlerContext ctx, String msg) throws Exception {
        //获取当前的channel
        Channel channel = ctx.channel();
        //显示设备信息以及发送的消息
        String message="[设备]" + channel.remoteAddress() + " 发送了消息: " + msg + "\n";
        System.out.println(message);
        //将消息上传到MQ服务器
        MQHelper.sendMesssage(message);
public class MQHelper {
    //队列名称
    private static final String QUEUE = "DeviceGroup";
    //消息 参数
    private static String HOST = "localhost";
    private static int PORT=5672;
    private static String USERNAME = "guest";
    private static String PASSWORD = "guest";
    private static String VIRTUALHOST = "/";//虚拟机
    //发送消息
    public static void sendMesssage(String message) throws Exception {
        Connection connection = null;
        Channel channel = null;
        try {
            ConnectionFactory factory = new ConnectionFactory();
            //初始化
            factory.setHost(HOST);
            factory.setPort(PORT);
            factory.setUsername(USERNAME);
            factory.setPassword(PASSWORD);

            //rabbitmq默认虚拟机名称为“/”,虚拟机相当于一个独立的mq服务器
            factory.setVirtualHost(VIRTUALHOST);

            //创建与RabbitMQ服务的TCP连接
            connection  = factory.newConnection();
            //创建与Exchange的通道,每个连接可以创建多个通道,每个通道代表一个会话任务
            channel = connection.createChannel();

            /**
             * 声明队列,如果Rabbit中没有此队列将自动创建
             * param1:队列名称
             * param2:是否持久化
             * param3:队列是否独占此连接
             * param4:队列不再使用时是否自动删除此队列
             * param5:队列参数
             */
            channel.queueDeclare(QUEUE, true, false, false, null);

            /**
             * 消息发布方法
             * param1:Exchange的名称,如果没有指定,则使用Default Exchange
             * param2:routingKey,消息的路由Key,是用于Exchange(交换机)将消息转发到指定的消息队列
             * param3:消息包含的属性
             * param4:消息体
             */
            /**
             * 这里没有指定交换机,消息将发送给默认交换机,每个队列也会绑定那个默认的交换机,但是不能显示绑定或解除绑定
             * 默认的交换机,routingKey等于队列名称
             */
            channel.basicPublish("", QUEUE, null, message.getBytes());

        } catch (Exception e) {
            e.printStackTrace();
        }finally {
            if(channel != null)
            {
                channel.close();
            }
            if(connection != null)
            {
                connection.close();
            } }}}
四、创建消息队列消费者

mQ监听程序创建过程
-
创建连接
-
创建通道
-
声明队列
-
监听队列
-
接收消息
-
ack回复
public class Consumer {
    //队列名称
    private static final String QUEUE = "DeviceGroup";

    public static void main(String[] args) throws Exception {
        ConnectionFactory factory = new ConnectionFactory();
        //设置mq所在的服务器的ip和端口
        factory.setHost("127.0.0.1");
        factory.setPort(5672);
        Connection connection = factory.newConnection();
        Channel channel = connection.createChannel();
        //声明队列
        channel.queueDeclare(QUEUE, true, false, false, null);
        //定义消费方法
        DefaultConsumer consumer = new DefaultConsumer(channel){
            /**
             * 消费者接收消息调用此方法
             * @param consumerTag 消费者的标签,在channel.basicConsume()去指定
             * @param envelope 消息包的内容,可从中获取消息id,消息routingkey,交换机,消息和重传标志(收到消息失败后是否需要重新发送)
             * @param properties
             * @param body
             * @throws IOException
             */
            @Override
            public void handleDelivery(String consumerTag, Envelope envelope, AMQP.BasicProperties properties, byte[] body) throws IOException {
               //交换机
                String exchange = envelope.getExchange();
                //路由key
                String routingKey = envelope.getRoutingKey();
                //消息id
                long deliveryTag = envelope.getDeliveryTag();
                //消息内容
                String msg = new String(body, "utf-8");
                System.out.println("接收的消息为:" + msg+" 消息id为:"+deliveryTag);
            }
        };
        /**
         * 监听队列String queue, boolean autoAck,Consumer callback
         * 参数明细
         * 1、队列名称
         * 2、是否自动回复,设置为true为表示消息接收到自动向mq回复接收到了,mq接收到回复会删除消息,设置为false则需要手动回复
         * 3、消费消息的方法,消费者接收到消息后调用此方法
         */
        channel.basicConsume(QUEUE, true, consumer);
    }
}
五、将拿到的数据存储到数据库中

数据库设计:

操作:将拿到的消息与消息id存储到数据库中
  public static void add(String msg) {
        Decivemsg decivemsg = new Decivemsg();
        decivemsg.setMsg(msg);
        //测试代理方式
        SqlSession sqlSession = null;
        try {
            //获取mybatis框架生成的mapper接口

            sqlSession=MybatisHelper.getSqlSession();
            DeviceMsgMapper deviceMsgMapper = sqlSession.getMapper(DeviceMsgMapper.class);
            deviceMsgMapper.addOne(decivemsg);
        } catch (Exception e) {
            e.printStackTrace();
            //回滚
            sqlSession.rollback();
        }finally {
            sqlSession.commit();
            sqlSession.close();
        }
    }