一个设备树驱动程序Demo(linux)
目录
1 编写节点参数
2 编写驱动代码
3 编写测试程序
4 运行测试
系统环境:
使用Linux内核: linux-imx-4.1.15-2.1.0-g3dc0a4b-v2.7.tar.bz2
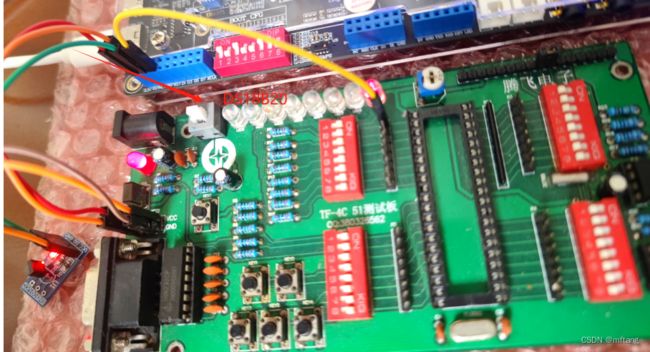
硬件:正点原子ATK-DL6Y2C开发板
内核启动位置:eMMC
platform 驱动框架分为总线、设备和驱动,其中总线不需要我们这些驱动程序员去管理,这个是 Linux 内核提供的,在编写驱动的时候只要关注于设备和驱动的具体实现即可。在使用设备树架构,设备的描述被放到了设备树中,因此 platform_device 就不需要去编写了,只需要实现 platform_driver 即可。
下面实现一个基于platfrom架构的程序,其具体方法如下:
1 编写节点参数
在imx6ull-14x14-evk.dts中编写节点参数,参数内容包括:IO-PIN引脚,状态信息等,具体代码如下:
    //mftang: user's led, 2024-1-26
	// IO: GPIO-4-PIN20
	userleds {
		compatible = "atk-dl6y2c,userled";
		pinctrl-names = "default";
		pinctrl-0 = <&pinctrl_gpio_userleds>;
		gpios = <&gpio4 20 GPIO_ACTIVE_HIGH>;
		status = "okay";
	};
其中compatible和驱动代码中的compatible相比较,如果字符串一致,则match成功

修改完成后,使用如下命令编译.dts文件,使其转换为.dtb文件, 注意: 编译文件时,必须在内核的根目录下进行:
make dtbs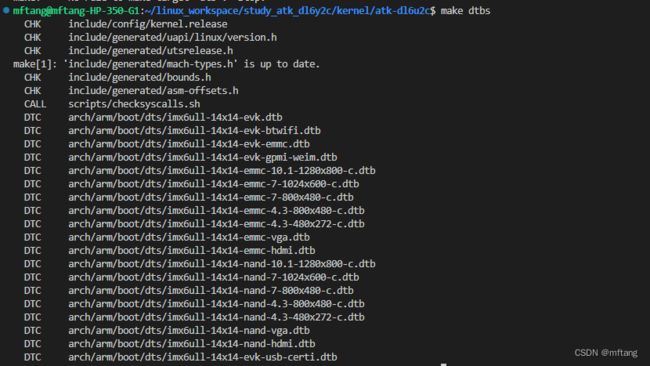
编译后在arch/arm/boot/dts/目录下可以看见生成的 .dtb

挂载NFS服务器

从NFS挂载的目录中将 imx6ull-14x14-emmc-4.3-480x272-c.dtb文件复制到开发板的 /run/media/mmcblk1p1目录,使用命令:
cp /mnt/atk_dl6y2c/imx6ull-14x14-emmc-4.3-480x272-c.dtb /run/media/mmcblk1p1

在开发板中看见:

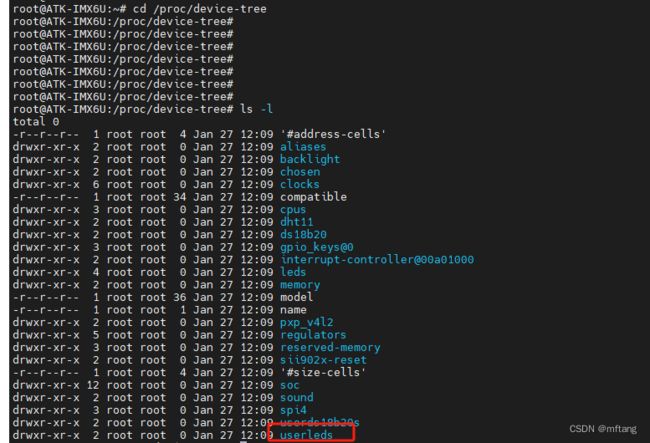
reboot 开发板,然后查看driver是否被内核解析到,查看方法:
cd /proc/device-tree
ls -l
2 编写驱动代码
1) 编写驱动程序
通过上节方法,驱动已经加载到内核中,现在编写设备驱动
/***************************************************************
Copyright  2024-2029. All rights reserved.
文件名     : drv_05_platform_template.c
作者       : [email protected]
版本       : V1.0
描述       : led 驱动程序, GPIO4_PIN20-----led port
其他       : 无
日志       : 初版V1.0 2024/1/27

使用方法:
1) 在.dts文件中定义节点信息
    //mftang: user's led, 2024-1-26
    // IO: GPIO-4-PIN20
    userleds {
        compatible = "atk-dl6y2c,userled";
        pinctrl-names = "default";
        pinctrl-0 = <&pinctrl_gpio_userleds>;
        gpios = <&gpio4 20 GPIO_ACTIVE_HIGH>;
        status = "okay";
    };

2) 在驱动匹配列表
static const struct of_device_id led_of_match[] = {
    { .compatible = "atk-dl6y2c,userled" },
    { } // Sentinel
};
***************************************************************/
#include
#include
#include
#include
#include
#include
#include
#include
#include
#include
#include
#include
#include
#include
#include
#include
#include
#include
#include
#include
#include
#include

#define LEDDEV_CNT         1                /* 设备号长度     */
#define LEDDEV_NAME        "userled"        /* device name    */

#define OFF             0
#define ON              1

/* leddev设备结构体 */
struct leddev_dev{
    dev_t   devid;                 /* 设备号    */
    struct  cdev cdev;             /* cdev        */
    struct  class *class;          /* 类         */
    struct  device *device;        /* 设备        */
    int     major;                 /* 主设备号    */
    struct  device_node *node;     /* LED设备节点 */
    int     usedled;              /* LED灯GPIO标号 */
};

struct leddev_dev leddev;         /* led设备 */

/*
 * @description : LED打开/关闭
 * @param - sta : ON(0) 打开LED,OFF(1) 关闭LED
 * @return      : 无
 */
void usedled_switch(u8 sta)
{
    if (sta == ON )
        gpio_set_value(leddev.usedled, 0);
    else if (sta == OFF)
        gpio_set_value(leddev.usedled, 1);
}

/*
 * @description   : 打开设备
 * @param - inode : 传递给驱动的inode
 * @param - filp  : 设备文件,file结构体有个叫做private_data的成员变量
 *                  一般在open的时候将private_data指向设备结构体。
 * @return        : 0 成功;其他 失败
 */
static int led_open(struct inode *inode, struct file *filp)
{
    filp->private_data = &leddev; /* 设置私有数据  */
    return 0;
}

/*
 * @description  : 向设备写数据
 * @param - filp : 设备文件,表示打开的文件描述符
 * @param - buf  : 要写给设备写入的数据
 * @param - cnt  : 要写入的数据长度
 * @param - offt : 相对于文件首地址的偏移
 * @return       : 写入的字节数,如果为负值,表示写入失败
 */
static ssize_t led_write(struct file *filp, const char __user *buf,
                                            size_t cnt, loff_t *offt)
{
    int retvalue;
    unsigned char databuf[2];
    unsigned char ledstat;

    retvalue = copy_from_user(databuf, buf, cnt);
    if(retvalue < 0) {

        printk("kernel write failed!\r\n");
        return -EFAULT;
    }

    ledstat = databuf[0];
    if (ledstat == ON)
    {
        usedled_switch(ON);
    }
    else if (ledstat == OFF)
    {
        usedled_switch(OFF);
    }
    return 0;
}

/* 设备操作函数 */
static struct file_operations led_fops = {
    .owner = THIS_MODULE,
    .open = led_open,
    .write = led_write,
};

/*
 * @description : flatform驱动的probe函数,当驱动与
 *                设备匹配以后此函数就会执行
 * @param - dev : platform设备
 * @return      : 0,成功;其他负值,失败
 */
static int led_probe(struct platform_device *dev)
{
    printk("led driver and device was matched!\r\n");

    /* 1、设置设备号 */
    if (leddev.major) {
        leddev.devid = MKDEV(leddev.major, 0);
        register_chrdev_region(leddev.devid, LEDDEV_CNT, LEDDEV_NAME);
    }
    else {
        alloc_chrdev_region(&leddev.devid, 0, LEDDEV_CNT, LEDDEV_NAME);
        leddev.major = MAJOR(leddev.devid);
    }

    /* 2、注册设备      */
    cdev_init(&leddev.cdev, &led_fops);
    cdev_add(&leddev.cdev, leddev.devid, LEDDEV_CNT);

    /* 3、创建类      */
    leddev.class = class_create(THIS_MODULE, LEDDEV_NAME);
    if (IS_ERR(leddev.class)) {
        return PTR_ERR(leddev.class);
    }

    /* 4、创建设备 */
    leddev.device = device_create(leddev.class, NULL, leddev.devid, NULL, LEDDEV_NAME);
    if (IS_ERR(leddev.device)) {
        return PTR_ERR(leddev.device);
    }

    /* 5、初始化IO */
    /*
        //mftang: user's led, 2024-1-26
        // IO: GPIO-4-PIN20
        userleds {
            compatible = "atk-dl6y2c,userled";
            pinctrl-names = "default";
            pinctrl-0 = <&pinctrl_gpio_userleds>;
            gpios = <&gpio4 20 GPIO_ACTIVE_HIGH>;
            status = "okay";
        };
    */
    leddev.node = of_find_node_by_path("/userleds");   /* find this from root */
    if (leddev.node == NULL){
        printk("kernel can't find userleds node!\r\n");
        return -EINVAL;
    }

    leddev.usedled = of_get_named_gpio(leddev.node, "gpios", 0); /* 找到对应的IO-pin*/
    if (leddev.usedled < 0) {
        printk("can't get led-gpio\r\n");
        return -EINVAL;
    }

    gpio_request(leddev.usedled, "usedled");
    gpio_direction_output(leddev.usedled, 1);   /* usedled IO设置为输出,默认高电平    */
    return 0;
}

/*
 * @description : platform驱动的remove函数,移除platform驱动的时候此函数会执行
 * @param - dev : platform设备
 * @return      : 0,成功;其他负值,失败
 */
static int led_remove(struct platform_device *dev)
{
    gpio_set_value(leddev.usedled, 1);        /* 卸载驱动的时候关闭LED */
    gpio_free(leddev.usedled);                /* 释放IO             */

    cdev_del(&leddev.cdev);                   /*  删除cdev */

    unregister_chrdev_region(leddev.devid, LEDDEV_CNT); /* 注销设备号 */
    device_destroy(leddev.class, leddev.devid);
    class_destroy(leddev.class);

    return 0;
}

/* 匹配列表 */
static const struct of_device_id led_of_match[] = {
    { .compatible = "atk-dl6y2c,userled" },
    { /* Sentinel */ }
};

/* platform驱动结构体 */
static struct platform_driver led_driver = {
   .driver = {
        .name           = "atk-dl6u2c-led",  /* driver's name */
        .of_match_table = led_of_match,      /* 设备树匹配表   */
    },
   .probe  = led_probe,
   .remove = led_remove,
};

/*
 * @description : 驱动模块加载函数
 * @param       : 无
 * @return      : 无
 */
static int __init leddriver_init(void)
{
    return platform_driver_register(&led_driver);
}

/*
 * @description : 驱动模块卸载函数
 * @param       : 无
 * @return      : 无
 */
static void __exit leddriver_exit(void)
{
    platform_driver_unregister(&led_driver);
}

module_init(leddriver_init);
module_exit(leddriver_exit);
MODULE_LICENSE("GPL");
MODULE_AUTHOR("[email protected]");
2)编写驱动程序的Makefile
PWD := $(shell pwd)

KERNEL_DIR=/home/mftang/linux_workspace/study_atk_dl6y2c/kernel/atk-dl6u2c
ARCH=arm
CROSS_COMPILE=/home/ctools/gcc-linaro-4.9.4-arm-linux-gnueabihf/bin/arm-linux-gnueabihf-

export  ARCH  CROSS_COMPILE

obj-m:= drv_05_platform_template.o

all:
	$(MAKE) -C $(KERNEL_DIR) M=$(PWD) modules


clean:
	rm -rf .*.cmd *.o *.mod.c *.ko .tmp_versions *.order *.symvers
3) 编译驱动,并将它复制到NFS挂载的目录下
编译驱动文件,生成.ko文件

复制文件到NFS挂载的目录

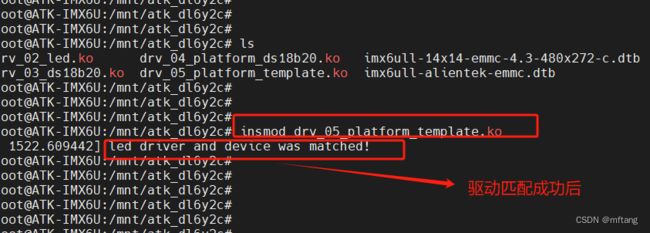
4) 在板卡中装载驱动
3 编写测试程序
1)上节已经完成驱动程序的加载,下面编写测试程序来验证驱动程序是否能够正常工作。创建测试程序.c文件,编写代码
/***************************************************************
Copyright  2024-2029. All rights reserved.
文件名  : test_05_led.c
作者    : [email protected]
版本    : V1.0
描述    : LED 测试程序,用于测试 drv_05_led
日志    : 初版V1.0 2024/1/23
使用方法:./test_05_led 1       开灯
          ./test_05_led 0       关灯
***************************************************************/
#include
#include
#include
#include
#include
#include

#define DEV_NAME    "/dev/userled"

int main(int argc, char **argv)
{
    int fd;
    char status;

    if (argc < 1){
        printf("Usage: %s \n", argv[0]);
        printf(" %s -r\n", argv[0]);
        return -1;
    }

    fd = open(DEV_NAME, O_RDWR);
    if (fd < 0){
        printf("can not open file %s \r\n", DEV_NAME);
        return -1;
    }

    printf("parameters lists: %s  %s \r\n",argv[0], argv[1] );
    if ((0 == strcmp(argv[1], "1")) && (argc == 2)){
        status = 1;
        write(fd, &status, 1);
        printf("turn on led, status is %d  \r\n", status);
    }
    else{
        status = 0;
        write(fd, &status, 0);
        printf("turn off led, status is %d  \r\n", status);
    }

    close(fd);

    return 0;
}
2) 编写Makefile
CFLAGS= -Wall -O2
CC=/home/ctools/gcc-linaro-4.9.4-arm-linux-gnueabihf/bin/arm-linux-gnueabihf-gcc
STRIP=/home/ctools/gcc-linaro-4.9.4-arm-linux-gnueabihf/bin/arm-linux-gnueabihf-strip


test_05_led: test_05_led.o
	$(CC) $(CFLAGS) -o test_05_led test_05_led.o
	$(STRIP) -s test_05_led

clean:
	rm -f test_05_led test_05_led.o
3)编译代码,并将其复制到NFS共享文件夹中

4 运行测试
1)关灯功能
./test_05_led 1
2)开灯功能
./test_05_led 0
运行结果如下:
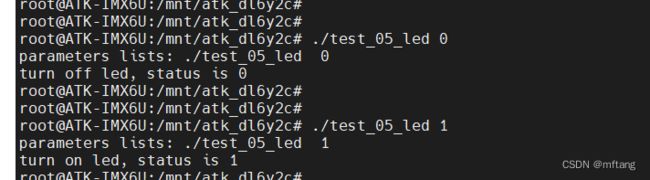
系统测试硬件: