SpringBoot集成SpringSecurity(二) 登录认证流程解析
需求
公司打算重构权限系统,主要因为现有的系统存在这些问题:
查询用户步骤繁琐:选系统(主要是这一点)——用户名——查询按钮;
简化权限只分配到角色:现在权限全部汇总到一起,不知道权限从何而来;
角色承担职责过多,杂而乱;
登录名不唯一,无账号找回功能
…
总之就是一个很乱的权限系统,考虑到security的强大功能,灵活易拓展(各种自定义),耦合性低,所以打算用security去是实现。
上一篇我们着重讲解了没有被security封装之前的登录流程,那么这篇我们去详细了解一下security登录认证内部原理吧。
上一篇链接:SpringBoot集成SpringSecurity(一) 入门
本文代码已上传至GitHub
代码参考:https://github.com/wanglongsxr/springsecurity.git
注:本篇并不打算讲解如何通过代码去搭建完成的springboot整合security工程(一方面因为网上已经有很多优秀的案例代码,另一方面我感觉如果用大量的代码去讲解的话,很多人看着看着就绕进去了,或者看到一半迷茫了,从而去纠结为什么这么做,这么做的目的是什么),如有需要或疑惑,请到github下载源码,内部含有详细注释。
工作原理
结构
security它所解决的问题就是安全访问控制,而安全访问控制功能就是对所有进入系统的请求进行拦截,校验他是否可以访问到期望的资源。从技术层面上来讲,实现这些功能有过滤器,AOP等,而security对web资源的保护是通过Filter实现的,准确的说时通过springSecurityFilterChain这个类,那我们从这个Filter来入手;
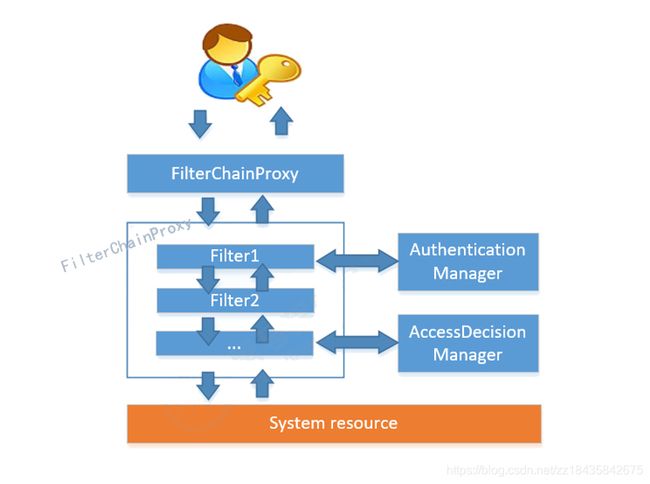
当我们开始用security开始控制安全访问时,我们会引入一个secuirty的配置文件,并且会写上这个注解@EnableWebSecurity,而正是这个注解,我们的springSecurity的过滤器被初始化了(因为@EnableWebSecurity内部含有一个@Import,而import引入了两个类,其中WebSecurityConfiguration负责过滤器的创建)。所以,外部的请求都会经过此类,以下是springSecurity过滤器链的结构图:

FilterChainProxy是一个代理,真正起作用的是FilterChainProxy中SecurityFilterChain所包含的各个Filter,同时 这些Filter作为Bean被Spring管理,它们是Spring Security核心,各有各的职责,但他们并不直接处理用户的认 证,也不直接处理用户的授权,而是把它们交给了认证管理器(AuthenticationManager)和决策管理器 (AccessDecisionManager)进行处理,下图是FilterChainProxy相关类的UML图示
spring Security功能的实现主要是由一系列过滤器链相互配合完成!
- SecurityContextPersistenceFilter 这个Filter是整个拦截过程的入口和出口(也就是第一个和后一个拦截 器),会在请求开始时从配置好的 SecurityContextRepository 中获取 SecurityContext,然后把它设置给 SecurityContextHolder。在请求完成后将 SecurityContextHolder 持有的 SecurityContext 再保存到配置好 的 SecurityContextRepository,同时清除 securityContextHolder 所持有的 SecurityContext;
- UsernamePasswordAuthenticationFilter 用于处理来自表单提交的认证。该表单必须提供对应的用户名和密 码,其内部还有登录成功或失败后进行处理的 AuthenticationSuccessHandler 和 AuthenticationFailureHandler,这些都可以根据需求做相关改变;
- FilterSecurityInterceptor 是用于保护web资源的,使用AccessDecisionManager对当前用户进行授权访问,前 面已经详细介绍过了;
- ExceptionTranslationFilter 能够捕获来自 FilterChain 所有的异常,并进行处理。但是它只会处理两类异常: AuthenticationException 和 AccessDeniedException,其它的异常它会继续抛出。
认证流程
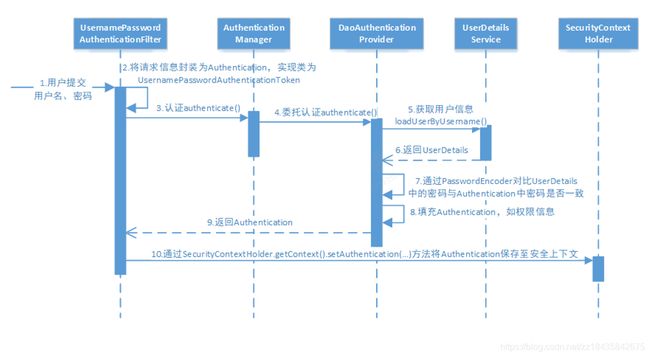
我们先来看一组图:
其实图上并不完全正确,他在用户提交完用户名密码之后,忽略了几个过程,那我们来详细分析一下:(内含源码,切勿迷路,先按流程走完在看源码)
-
我们先说一下图上没有的步骤吧
-
在上文曾经提到SecurityContextPersistenceFilter 是作为拦截过程的入口,所以它应该是第一步,他是干什么的上文说的很清楚了,那我们来看一下源码:
public void doFilter(ServletRequest req, ServletResponse res, FilterChain chain) throws IOException, ServletException { ... //HttpRequestResponseHolder 对象 HttpRequestResponseHolder holder = new HttpRequestResponseHolder(request, response); // 从配置好的 SecurityContextRepository 中获取 SecurityContext,判断session是否存在,如果不存在则新建一个session SecurityContext contextBeforeChainExecution = this.repo.loadContext(holder); boolean var13 = false; try { var13 = true; //将securiryContext设置给 SecurityContextHolder SecurityContextHolder.setContext(contextBeforeChainExecution); //调用下一个拦截器,也就是之后所有的拦截器 chain.doFilter(holder.getRequest(), holder.getResponse()); var13 = false; } finally { if (var13) { //获取从context SecurityContext contextAfterChainExecution = SecurityContextHolder.getContext(); //清空SecurityContextHolder 中的contex 临时保存 SecurityContextHolder.clearContext(); //保存后面过滤器生成的数据 到SecurityContextRepository中 this.repo.saveContext(contextAfterChainExecution, holder.getRequest(), holder.getResponse()); request.removeAttribute("__spring_security_scpf_applied"); if (debug) { this.logger.debug("SecurityContextHolder now cleared, as request processing completed"); } } } //从SecurityContextHolder获取SecurityContext实例 SecurityContext contextAfterChainExecution = SecurityContextHolder.getContext(); //清除 securityContextHolder 所持有的 SecurityContext SecurityContextHolder.clearContext(); //将 SecurityContextHolder 持有的 SecurityContext 再保存到配置好 的 SecurityContextRepository // 将SecurityContext实例保存到session中,以便下次请求时候用 this.repo.saveContext(contextAfterChainExecution, holder.getRequest(), holder.getResponse()); request.removeAttribute("__spring_security_scpf_applied"); if (debug) { this.logger.debug("SecurityContextHolder now cleared, as request processing completed"); } } -
进入AbstractAuthenticationProcessingFilter类
至于这个类,它是干嘛的呢,是处理所有HTTP Request和Response对象,并将其封装成AuthenticationMananger可以处理的Authentication,但其本身不做任何认证的处理。并且在身份验证成功或失败之后将对应的行为转换为HTTP的Response。同时还要处理一些Web特有的资源比如Session和Cookie。总结成一句话,就是替AuthenticationMananger把所有和Authentication没关系的事情全部给包圆了。
-
-
其次,分析一下图上已有的过程
-
第二步:进入UsernamePasswordAuthenticationFilter 类
它其实是对AbstractAuthenticationProcessingFilter的继承和拓展,重写了attemptAuthentication方法,引入了username和password,封装了一个UsernamePasswordAuthenticationToken 对象,调用authenticate方法,进行token验证。其实,这个token是有什么用呢,它其实就是交给AuthenticationMananger决定调哪个provider去进行认证,就是选妃翻牌,从而判断出是用户名密码验证还是验证码或者二维码验证。
public Authentication attemptAuthentication(HttpServletRequest request, HttpServletResponse response) throws AuthenticationException { if (this.postOnly && !request.getMethod().equals("POST")) { throw new AuthenticationServiceException("Authentication method not supported: " + request.getMethod()); } else { String username = this.obtainUsername(request); String password = this.obtainPassword(request); if (username == null) { username = ""; } if (password == null) { password = ""; } username = username.trim(); //构建token ,此时没有进行验证 UsernamePasswordAuthenticationToken authRequest = new UsernamePasswordAuthenticationToken(username, password); this.setDetails(request, authRequest); // AuthenticationManager 将token传递给 的 authenticate方法 进行 token验证 return this.getAuthenticationManager().authenticate(authRequest); } } //获取密码 protected String obtainPassword(HttpServletRequest request) { return request.getParameter(this.passwordParameter); } //获取账号 protected String obtainUsername(HttpServletRequest request) { return request.getParameteblic Authentication attemptAuthentication(HttpServletRequest request, HttpServletResponse response) throws AuthenticationException { if (this.postOnly && !request.getMethod().equals("POST")) { throw new AuthenticationServiceException("Authentication method not supported: " + request.getMethod()); } else { String username = this.obtainUsername(request); String password = this.obtainPassword(request); if (username == null) { username = ""; } if (password == null) { password = ""; } username = username.trim(); //构建token ,此时没有进行验证 UsernamePasswordAuthenticationToken authRequest = new UsernamePasswordAuthenticationToken(username, password); this.setDetails(request, authRequest); // AuthenticationManager 将token传递给 的 authenticate方法 进行 token验证 return this.getAuthenticationManager().authenticate(authRequest); } } //获取密码 protected String obtainPassword(HttpServletRequest request) { return request.getParameter(this.passwordParameter); } //获取账号 protected String obtainUsername(HttpServletRequest request) { return request.getParameter(this.usernameParameter); } -
第三步:终于来到了神秘已久的AuthenticationMananger接口,它自己什么也不做,就是指挥
public interface AuthenticationManager { Authentication authenticate(Authentication var1) throws AuthenticationException; } -
第四步 :SecurityContextHolder 安全上下文容器将第3步填充了信息的 Authentication ,通过 SecurityContextHolder.getContext().setAuthentication(…)方法,设置到其中。 可以看出AuthenticationManager接口(认证管理器)是认证相关的核心接口,也是发起认证的出发点,它 的实现类为ProviderManager。而Spring Security支持多种认证方式,因此ProviderManager维护着一个 List 列表,存放多种认证方式,终实际的认证工作是由 AuthenticationProvider完成的。咱们知道web表单的对应的AuthenticationProvider实现类为 DaoAuthenticationProvider,它的内部又维护着一个UserDetailsService负责UserDetails的获取。终 AuthenticationProvider将UserDetails填充至Authentication。 认证核心组件的大体关系如下:
-
-
AuthenticationProvide接口
 public interface AuthenticationProvider {

        Authentication authenticate(Authentication authentication) throws AuthenticationException;
        boolean supports(Class<?> authentication);
    }
authenticate()方法定义了认证的实现过程,它的参数是一个Authentication,里面包含了登录用户所提交的用 户、密码等。而返回值也是一个Authentication,这个Authentication则是在认证成功后,将用户的权限及其他信 息重新组装后生成。
Spring Security中维护着一个 List 列表,存放多种认证方式,不同的认证方式使用不 同的AuthenticationProvider。如使用用户名密码登录时,使用AuthenticationProvider1,短信登录时使用 AuthenticationProvider2等等这样的例子很多。 每个AuthenticationProvider需要实现supports()方法来表明自己支持的认证方式,如我们使用表单方式认证, 在提交请求时Spring Security会生成UsernamePasswordAuthenticationToken,它是一个Authentication,里面 封装着用户提交的用户名、密码信息。而对应的,哪个AuthenticationProvider来处理它? 我们在DaoAuthenticationProvider的基类AbstractUserDetailsAuthenticationProvider发现以下代码:
public boolean supports(Class<?> authentication) {
		return (UsernamePasswordAuthenticationToken.class
				.isAssignableFrom(authentication));
	}
也就是说当web表单提交用户名密码时,Spring Security由DaoAuthenticationProvider处理。
-
Authentication类:UsernamePasswordAuthenticationToken就是它的实现之一
public interface Authentication extends Principal, Serializable {
        Collection<? extends GrantedAuthority> getAuthorities();
        Object getCredentials();
        Object getDetails();
        Object getPrincipal();
        boolean isAuthenticated();
        void setAuthenticated(boolean isAuthenticated) throws IllegalArgumentException;
    }
(1)Authentication是spring security包中的接口,直接继承自Principal类,而Principal是位于 java.security 包中的。它是表示着一个抽象主体身份,任何主体都有一个名称,因此包含一个getName()方法。
(2)getAuthorities(),权限信息列表,默认是GrantedAuthority接口的一些实现类,通常是代表权限信息的一系 列字符串。
(3)getCredentials(),凭证信息,用户输入的密码字符串,在认证过后通常会被移除,用于保障安全。
(4)getDetails(),细节信息,web应用中的实现接口通常为 WebAuthenticationDetails,它记录了访问者的ip地 址和sessionId的值。
(5)getPrincipal(),身份信息,大部分情况下返回的是UserDetails接口的实现类,UserDetails代表用户的详细 信息,那从Authentication中取出来的UserDetails就是当前登录用户信息,它也是框架中的常用接口之一 -
UserDetailsService
现在咱们现在知道DaoAuthenticationProvider处理了web表单的认证逻辑,认证成功后既得到一个 Authentication(UsernamePasswordAuthenticationToken实现),里面包含了身份信息(Principal)。这个身份 信息就是一个 Object ,大多数情况下它可以被强转为UserDetails对象。 DaoAuthenticationProvider中包含了一个UserDetailsService实例,它负责根据用户名提取用户信息 UserDetails(包含密码),而后DaoAuthenticationProvider会去对比UserDetailsService提取的用户密码与用户提交 的密码是否匹配作为认证成功的关键依据,因此可以通过将自定义的 UserDetailsService 公开为spring bean来定 义自定义身份验证。
public interface UserDetailsService{ public UserDetails loadUserByUsername(String username) throws UsernameNotFoundException(); } -
PasswordEncoder
上述讲完了从数据库拿取的数据,那么接下来是不是盖判断一下用户的输入密码是否跟数据库的一致呢,所以, 这个时候,我们的PasswordEncoder就排上用场了。
在这里Spring Security为了适应多种多样的加密类型,又做了抽象,DaoAuthenticationProvider通过 PasswordEncoder接口的matches方法进行密码的对比,而具体的密码对比细节取决于实现:
public interface PasswordEncoder {     String encode(CharSequence var1);       boolean matches(CharSequence var1, String var2);       default boolean upgradeEncoding(String encodedPassword) {
    return false;
         }
}
Spring Security提供很多内置的PasswordEncoder,比如BCryptPasswordEncoder加密…
具体用法:
@Bean
public PasswordEncoder passwordEncoder(){
    return new BCryptPasswordEncoder();
}
最后,我们来看一下springsecurity中的各种filter的执行顺序(相较于上面比较全):
| Alias | Filter Class | Namespace Element or Attribute |
|---|---|---|
| CHANNEL_FILTER | ChannelProcessingFilter | http/intercept-url@requires-channel |
| SECURITY_CONTEXT_FILTER | SecurityContextPersistenceFilter | http |
| CONCURRENT_SESSION_FILTER | ConcurrentSessionFilter | session-management/concurrency-control |
| HEADERS_FILTER | HeaderWriterFilter | http/headers |
| CSRF_FILTER | CsrfFilter | http/csrf |
| LOGOUT_FILTER | LogoutFilter | http/logout |
| X509_FILTER | X509AuthenticationFilter | http/x509 |
| PRE_AUTH_FILTER | AbstractPreAuthenticatedProcessingFilter Subclasses | N/A |
| CAS_FILTER | CasAuthenticationFilter | N/A |
| FORM_LOGIN_FILTER | UsernamePasswordAuthenticationFilter | http/form-login |
| BASIC_AUTH_FILTER | BasicAuthenticationFilter | http/http-basic |
| SERVLET_API_SUPPORT_FILTER | SecurityContextHolderAwareRequestFilter | http/@servlet-api-provision |
| JAAS_API_SUPPORT_FILTER | JaasApiIntegrationFilter | http/@jaas-api-provision |
| REMEMBER_ME_FILTER | RememberMeAuthenticationFilter | http/remember-me |
| ANONYMOUS_FILTER | AnonymousAuthenticationFilter | http/anonymous |
| SESSION_MANAGEMENT_FILTER | SessionManagementFilter | session-management |
| EXCEPTION_TRANSLATION_FILTER | ExceptionTranslationFilter | http |
| FILTER_SECURITY_INTERCEPTOR | FilterSecurityInterceptor | http |
| SWITCH_USER_FILTER | SwitchUserFilter | N/A |
总结
到这里,我们security的登录认证流程就结束了,我在大致总结一下:
-
首先,当用户名输完用户名跟密码之后,会进入security的安全访问机制,也就是security的Filiter的过滤链;
-
然后,它来到了过滤链的入口同时也是过滤连的出口即SecurityContextPersistenceFilter过滤器,在这里,他会进行上下文内容的设置;
-
第三步就走到了AbstractAuthenticationProcessingFilter,这个类的作用相当于处理所有HTTP Request和Response对象,并将其封装成AuthenticationMananger可以处理的Authentication,因为
Authentication只能处理Authentication类;
-
第四步就走到了我们的UsernamePasswordAuthenticationFilter 类,继承与拓展了AbstractAuthenticationProcessingFilter的功能,引入了username,password并封装了UsernamePasswordAuthenticationToken 对象
-
第五步就该AuthenticationMananger去委托认证,挑选妃子们,哦,不,挑选众多providers中的一个去认证;
-
第六步到了我们的providerManager的实现类DaoAuthenticationProvider,在这里是完成认证逻辑的,包括维护数据库查询到的用户userServicedetails,以及密码校验的PasswordEncoder;
-
如果信息正确,通过SecurityContextHolder.getContext().setAuthentication(…)保存Authentication,在这一步,我可能上面漏说了一些内容,这一步其实也是完成会话管理的功能,将session储存到了SecurityContextHolder中。
拓展
在上文中我们曾经提到了@EnableWebSecurity这个注解,那么我们来详细解释一下这个注解都干了什么事。
@Retention(value = java.lang.annotation.RetentionPolicy.RUNTIME)
@Target(value = { java.lang.annotation.ElementType.TYPE })
@Documented
@Import({ WebSecurityConfiguration.class,
		SpringWebMvcImportSelector.class,
		OAuth2ImportSelector.class })
@EnableGlobalAuthentication
@Configuration
public @interface EnableWebSecurity {
	boolean debug() default false;
}
-
在@Import处激活了3个配置类,其中在WebSecurityConfiguration配置类中, 注入了一个非常重要的bean, bean的name为: springSecurityFilterChain,这是Spring Secuity的核心过滤器, 这是请求的认证入口。
-
又使用了EnableGlobalAuthentication 注解,其源码如下:
@Retention(value = java.lang.annotation.RetentionPolicy.RUNTIME)
@Target(value = { java.lang.annotation.ElementType.TYPE })
@Documented
@Import(AuthenticationConfiguration.class)
@Configuration
public @interface EnableGlobalAuthentication {
}
在这个注解中,激活了AuthenticationConfiguration配置类, 而这个类是主要作用是,向spring容器中注入AuthenticationManagerBuilder, 他可以建造AuthenticationManager, 这个类是认证相关的核心接口。
综上所述,@EnableWebSecurity这个注解的作用是:
- 加载了WebSecurityConfiguration配置类,使springSecurity的过滤器被初始化了;
- 加载了AuthenticationConfiguration, 配置了认证信息。
另: 如果项目导入的jar包是springboot start这种类型的依赖,就不需要加@EnableWebSecurity这个注解,因为springbootAutoconfigure这个jar包里的SpringBootWebSecurityConfiguration这个类,已经帮你自动加上了,所以不要在加@EnableWebSecurity这个注解了 ;
但是你如果单独导入的是 spring-security-core类似这种的依赖,就需要加上@EnableWebSecurity,因为springboot没有帮你自动装配。
参考文献
Spring Security小教程 Vol 3. 身份验证的入口-AbstractAuthenticationProcessingFilter
springSecurity 登录以及用户账号密码解析原理
推荐视频:https://www.bilibili.com/video/av73730658?from=search&seid=10438598876647660573
因为我就是用这个视频去入手的,特别适合入门,讲的很透彻,大家感兴趣的可以看看
另:如有总结不对的地方,麻烦大家指出,希望我们共同给进步_


