ELK(ElasticSearch, Logstash, Kibana)从入门到精通
简介
“ELK”是三个开源项目的首字母缩写,这三个项目分别是:Elasticsearch、Logstash 和 Kibana。Elasticsearch 是一个搜索和分析引擎。Logstash 是服务器端数据处理管道,能够同时从多个来源采集数据,转换数据,然后将数据发送到诸如 Elasticsearch 等“存储库”中。Kibana 则可以让用户在 Elasticsearch 中使用图形和图表对数据进行可视化。
原理图
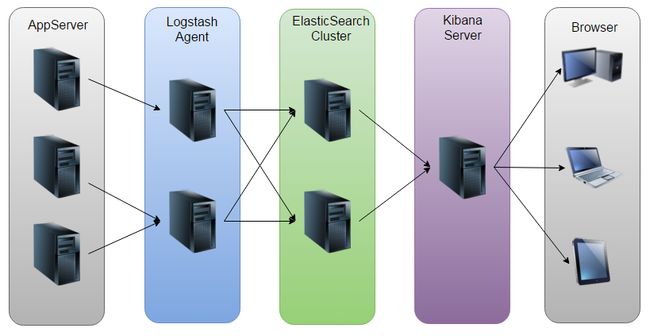
如图:Logstash收集AppServer产生的Log,并存放到ElasticSearch集群中,而Kibana则从ES集群中查询数据生成图表,再返回给Browser。
ELK组件介绍
Elasticsearch
Elasticsearch 是一个实时的分布式搜索和分析引擎,它可以用于全文搜索,结构化搜索以及分析。它是一个建立在全文搜索引擎 Apache Lucene基础上的搜索引擎,使用Java语言编写
主要特点 实时分析 分布式实时文件存储,并将每一个字段都编入索引 文档导向,所有的对象全部是文档 高可用性,易扩展,支持集群(Cluster)、分片和复制(Shards 和 Replicas)。支持 JSON。


Logstash
Logstash 是一个具有实时渠道能力的数据收集引擎。使用 JRuby 语言编写。其作者是世界著名的运维工程师乔丹西塞 (JordanSissel)
主要特点
- 几乎可以访问任何数据
- 可以和多种外部应用结合
- 支持弹性扩展
它由三个主要部分组成:
- Shipper-发送日志数据
- Broker-收集数据,缺省内置 Redis
- Indexer-数据写入
Kibana
Kibana是一款基于 Apache开源协议,使用 JavaScript语言编写,为 Elasticsearch提供分析和可视化的 Web 平台。它可以在Elasticsearch的索引中查找,交互数据,并生成各种维度的表图.
Filebeat
ELK 协议栈的新成员,一个轻量级开源日志文件数据搜集器,基于 Logstash-Forwarder源代码开发,是对它的替代。在需要采集日志数据的 server 上安装Filebeat,并指定日志目录或日志文件后,Filebeat就能读取数据,迅速发送到Logstash进行解析,亦或直接发送到 Elasticsearch进行集中式存储和分析。
常用架构
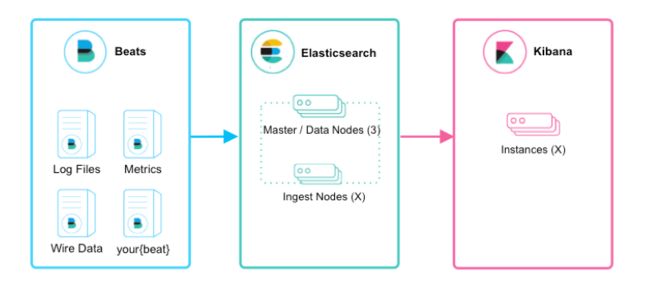
beats+elasticsearch+kibana模式
如上图所示,该ELK框架由beats(日志分析我们通常使用filebeat)+elasticsearch+kibana构成,这个框架比较简单,入门级的框架。其中filebeat也能通过module对日志进行简单的解析和索引。并查看预建的Kibana仪表板。
该框架适合简单的日志数据,一般可以用来玩玩,生产环境建议接入logstash
beats+logstash+elasticsearch+kibana模式

该框架是在上面的框架的基础上引入了logstash,引入logstash带来的好处如下:
- 通Logstash具有基于磁盘的自适应缓冲系统,该系统将吸收传入的吞吐量,从而减轻背压
- 从其他数据源(例如数据库,S3或消息传递队列)中提取
- 将数据发送到多个目的地,例如S3,HDFS或写入文件
- 使用条件数据流逻辑组成更复杂的处理管道
filebeat结合logstash带来的优势:
1、水平可扩展性,高可用性和可变负载处理:filebeat和logstash可以实现节点之间的负载均衡,多个logstash可以实现logstash的高可用
2、消息持久性与至少一次交付保证:使用Filebeat或Winlogbeat进行日志收集时,可以保证至少一次交付。从Filebeat或Winlogbeat到Logstash以及从Logstash到Elasticsearch的两种通信协议都是同步的,并且支持确认。Logstash持久队列提供跨节点故障的保护。对于Logstash中的磁盘级弹性,确保磁盘冗余非常重要。
3、具有身份验证和有线加密的端到端安全传输:从Beats到Logstash以及从 Logstash到Elasticsearch的传输都可以使用加密方式传递 。与Elasticsearch进行通讯时,有很多安全选项,包括基本身份验证,TLS,PKI,LDAP,AD和其他自定义领域
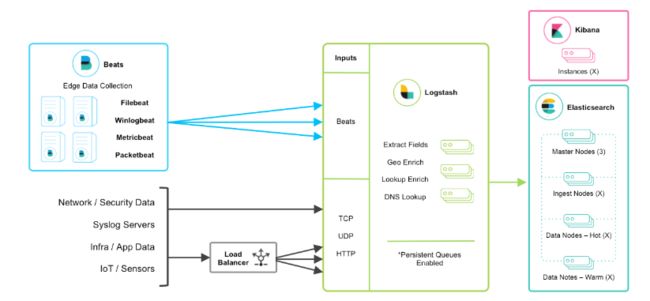
当然在该框架的基础上还可以引入其他的输入数据的方式:比如:TCP,UDP和HTTP协议是将数据输入Logstash的常用方法(如下图所示):
beats+缓存/消息队列+logstash+elasticsearch+kibana模式
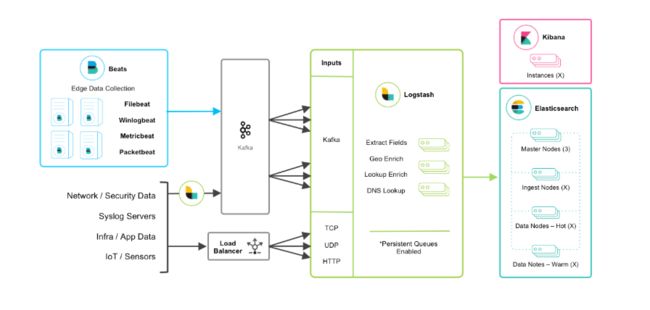
在如上的基础上我们可以在beats和logstash中间添加一些组件redis、kafka、RabbitMQ等,添加中间件将会有如下好处:
第一,降低对日志所在机器的影响,这些机器上一般都部署着反向代理或应用服务,本身负载就很重了,所以尽可能的在这些机器上少做事;
第二,如果有很多台机器需要做日志收集,那么让每台机器都向Elasticsearch持续写入数据,必然会对Elasticsearch造成压力,因此需要对数据进行缓冲,同时,这样的缓冲也可以一定程度的保护数据不丢失;
第三,将日志数据的格式化与处理放到Indexer中统一做,可以在一处修改代码、部署,避免需要到多台机器上去修改配置
ELK环境搭建完整说明
环境说明:
    系统:centos7.5
    ElasticSerach:6.4.2
    Logstash:6.4.2
    Kibana:6.4.2
    Filebeat:6.4.2
elk各个组件的网址可以在官网下载:https://www.elastic.co/cn/
或者在中文社区下载:https://elasticsearch.cn/download/
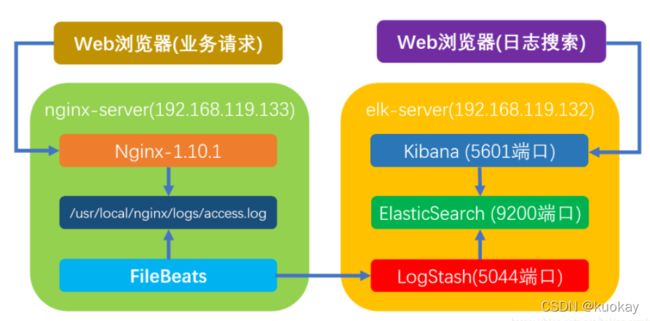
- 业务请求到达nginx-server机器上的Nginx;
- Nginx响应请求,并在access.log文件中增加访问记录;
- FileBeat搜集新增的日志,通过LogStash的5044端口上传日志;
- LogStash将日志信息通过本机的9200端口传入到ElasticSerach;
- 搜索日志的用户通过浏览器访问Kibana,服务器端口是5601;
- Kibana通过9200端口访问ElasticSerach;
1.安装java环境
因为ElasticSerach运行需要java环境支持,所以首先要配置java环境,具体操作方法自行百度吧,网上比较多。
2.下载ELK安装包
ELK官网:https://www.elastic.co/downloads
手动下载ELK安装的tag.gz文件,这里我们放入/usr/local/work/下,并解压缩,最终效果如下:
3.创建用户
因为ElasticSerach运行时不允许以root用户身份的,所以这里需要手动创建用户并分配权限,具体如下:
-
创建用户组:
groupadd elasticsearch -
创建用户加入用户组:
useradd elasticsearch -g elasticsearch -
设置ElasticSerach文件夹为用户elasticsearch所有:
chown -R elasticsearch.elasticsearch /usr/local/work/elasticsearch-6.4.2
4.系统设置部分
-
打开文件/etc/security/limits.conf,添加下面4处内容:
soft nofile 65536 * hard nofile 131072 * soft nproc 2048 * hard nproc 4096 -
打开文件/etc/sysctl.conf,添加下面内容:
vm.max_map_count=655360 -
加载sysctl配置,执行命令:sysctl -p
-
重启电脑,执行命令:reboot
5.启动ElasticSerach
- 切换到用户elasticsearch:su elasticsearch
- 进入目录/usr/local/work/elasticsearch-6.4.2
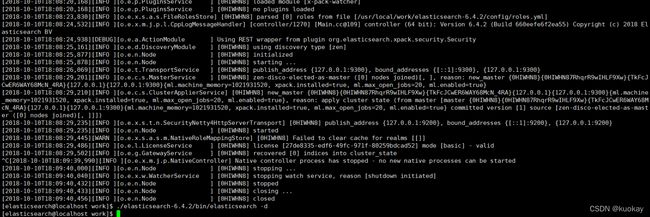
- 执行启动命令:bin/elasticsearch -d,此时会在后台启动elasticsearch(如果启动报错没有权限的话,重新执行上面的chown那部分命令设置权限)
- 查看启动日志可执行命令:tail -f /usr/local/work/elasticsearch-6.4.2/logs/elasticsearch.log
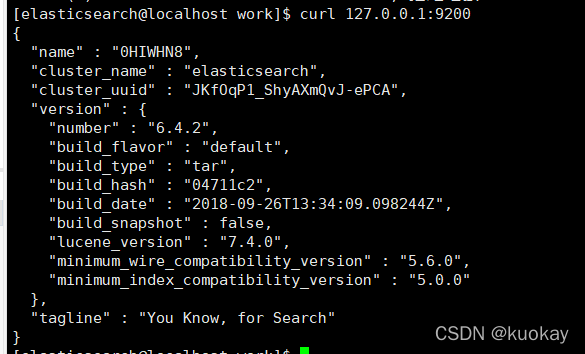
- 执行curl命令检查服务是否正常响应:curl 127.0.0.1:9200,收到响应如下:
6.配置启动Logstash
1.在目录/usr/local/work/logstash-6.4.2下创建文件default.conf,内容如下:
监听5044端口作为输入 input { beats { port => “5044” } } # 数据过滤 filter { grok { match => { “message” => “%{COMBINEDAPACHELOG}” } } geoip { source => “clientip” } } # 输出配置为本机的9200端口,这是ElasticSerach服务的监听端口 output { elasticsearch { hosts => [“127.0.0.1:9200”] } }
-
后台启动Logstash服务:
nohup bin/logstash -f default.conf –config.reload.automatic & -
查看启动日志:tail -f logs/logstash-plain.log,启动成功的信息如下:
7.Kibana
- 打开Kibana的配置文件/usr/local/work/kibana-6.4.2-linux-x86_64/config/kibana.yml,找到下面这行:
#server.host: “localhost”
改成如下内容:
server.host: “192.168.21.128”
- 进入Kibana的目录:
/usr/local/work/kibana-6.4.2-linux-x86_64
- 执行启动命令:
nohup bin/kibana &
- 查看启动日志:
tail -f nohup.out
5.在浏览器访问http://192.168.21.128:5601,看到如下页面:
https://ask.qcloudimg.com/http-save/yehe-1141560/si85o0ggj6.png?imageView2/2/w/1620
注意:
这里访问5601的时候可能访问不通,centos有自己的防火墙及端口限制,参考以下做法
关闭swap分区
内存 2G
iptables -nL
iptables -F
iptables -X
iptables -Z
iptables -nL
#关闭selinux
临时⽣效:
setenforce 0
getenforce
永久⽣效:
setenforce 0
vim /etc/selinux/config
SELINUX=disabled
8.配置Filebeat,传送nginx日志至LogStash
-
打开文件/usr/local/work/filebeat-6.4.2-linux-x86_64/filebeat.yml,找到如下图的位置并设置:

-
继续修改filebeat.yml文件,找到下图中的内容并设置:
nohup ./filebeat -e -c filebeat.yml -d “publish” &
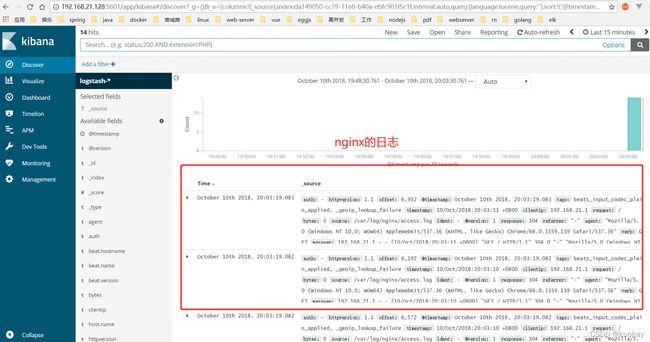
- 验证kibana是否能显示nginx的日志
备注
配置加密通信证书
方法一:
./bin/elasticsearch-certutil ca -out config/elastic-certificates.p12 -pass “password”
查看config目录,有elastic-certificates.p12文件生成
./bin/elasticsearch-certutil ca #创建集群认证机构,需要交互输入密码
./bin/elasticsearch-certutil cert --ca elastic-stack-ca.p12 #为节点颁发证书,与上面密码一样
执行./bin/elasticsearch-keystore add xpack.security.transport.ssl.keystore.secure_password 并输入第一步输入的密码
执行./bin/elasticsearch-keystore add xpack.security.transport.ssl.truststore.secure_password 并输入第一步输入的密码
将生成的elastic-certificates.p12、elastic-stack-ca.p12文件移动到config目录下
head插件安装
https://github.com/mobz/elasticsearch-head #head官网
https://nodejs.org/zh-cn/download/ #nodejs下载
官方说明,elasticsearch7有三种方式使用head插件,这里我只试过两种:
第一种:使用谷歌浏览器head插件,这个直接在谷歌浏览器上面安装插件就可以使用了
第二种:使用head服务(把head当做一个服务来使用),安装如下
#Running with built in server
git clone git://github.com/mobz/elasticsearch-head.git
cd elasticsearch-head
npm install
npm run start
open http://localhost:9100/
如果在如上的安装过程中报错,可以尝试下这个命令再继续安装npm install [email protected] --ignore-scripts
实战案例分析
我们弄一个beats+缓存/消息队列+logstash+elasticsearch+kibana的实例:
中间组件我们使用kafka,我们看下filebeat把kafka作为output的官网:https://www.elastic.co/guide/en/beats/filebeat/7.7/kafka-output.html
假如你已经有kafka集群了,我这里安装的是一个单机版本(1.1.1):
数据集我们采用apache的日志格式,下载地址:https://download.elastic.co/demos/logstash/gettingstarted/logstash-tutorial.log.gz
日志格式如下:
[elk@gk ~]$ tail -3 logstash-tutorial.log
86.1.76.62 - - [04/Jan/2015:05:30:37 +0000] "GET /projects/xdotool/ HTTP/1.1" 200 12292 "http://www.haskell.org/haskellwiki/Xmonad/Frequently_asked_questions" "Mozilla/5.0 (X11; Linux x86_64; rv:24.0) Gecko/20140205 Firefox/24.0 Iceweasel/24.3.0"
86.1.76.62 - - [04/Jan/2015:05:30:37 +0000] "GET /reset.css HTTP/1.1" 200 1015 "http://www.semicomplete.com/projects/xdotool/" "Mozilla/5.0 (X11; Linux x86_64; rv:24.0) Gecko/20140205 Firefox/24.0 Iceweasel/24.3.0"
86.1.76.62 - - [04/Jan/2015:05:30:37 +0000] "GET /style2.css HTTP/1.1" 200 4877 "http://www.semicomplete.com/projects/xdotool/" "Mozilla/5.0 (X11; Linux x86_64; rv:24.0) Gecko/20140205 Firefox/24.0 Iceweasel/24.3.0"
1. 首先我们配置filebeat的配置文件filebeat.yml
#=========================== Filebeat inputs =============================

filebeat.inputs:

# Each - is an input. Most options can be set at the input level, so
# you can use different inputs for various configurations.
# Below are the input specific configurations.

- type: log

  # Change to true to enable this input configuration.
  enabled: true

  # Paths that should be crawled and fetched. Glob based paths.
  paths:
    - /data/elk/logstash-tutorial.log  #这里使用的是apache的日志格式
    #- c:\programdata\elasticsearch\logs\*

  # Exclude lines. A list of regular expressions to match. It drops the lines that are
  # matching any regular expression from the list.
  #exclude_lines: ['^DBG']

  # Include lines. A list of regular expressions to match. It exports the lines that are
  # matching any regular expression from the list.
  #include_lines: ['^ERR', '^WARN']

  # Exclude files. A list of regular expressions to match. Filebeat drops the files that
  # are matching any regular expression from the list. By default, no files are dropped.
  #exclude_files: ['.gz$']

  # Optional additional fields. These fields can be freely picked
  # to add additional information to the crawled log files for filtering
  #fields:
  #  level: debug
  #  review: 1

  ### Multiline options

  # Multiline can be used for log messages spanning multiple lines. This is common
  # for Java Stack Traces or C-Line Continuation

  # The regexp Pattern that has to be matched. The example pattern matches all lines starting with [
  #multiline.pattern: ^\[

  # Defines if the pattern set under pattern should be negated or not. Default is false.
  #multiline.negate: false

  # Match can be set to "after" or "before". It is used to define if lines should be append to a pattern
  # that was (not) matched before or after or as long as a pattern is not matched based on negate.
  # Note: After is the equivalent to previous and before is the equivalent to to next in Logstash
  #multiline.match: after
#================================ Outputs =====================================
output.kafka:
  hosts: ["192.168.110.130:9092"]   #配置kafka的broker
  topic: 'filebeat_test'   #配置topic 名字
  partition.round_robin:
    reachable_only: false
  required_acks: 1
  compression: gzip
  max_message_bytes: 1000000
2.然后使用命令后台启动:
cd filebeat-7.7.0-linux-x86_64 && nohup ./filebeat -e &
3.接下来我们配置logstash的配置文件
cd logstash-7.7.0/ && mkidr conf.d
cd conf.d
vim apache.conf
################apache.conf文件中填入如下内容##############################
input {
        kafka{
                bootstrap_servers => "192.168.110.130:9092"
                topics => ["filebeat_test"]
                group_id => "test123"
                auto_offset_reset => "earliest"
        }
    }
filter {
json
        {
                source => "message"
        }
        grok {
        match => { "message" => "%{COMBINEDAPACHELOG}"}
        remove_field => "message"
    }
}
output {
    stdout { codec => rubydebug }
    elasticsearch {
                    hosts => ["192.168.110.130:9200","192.168.110.131:9200","10.18.126.224:9200","192.168.110.132:9200"]
                    index => "test_kakfa"
                    user => "elastic"
                    password => "${ES_PWD}"
                }
}
4.然后后台启动logstash命令
cd logstash-7.7.0/ && nohup ./bin/logstash -f conf.d/apache.conf &


