Spring Cloud OpenFeign进阶实战
OpenFeign实战
替换默认的Client
Feign默认是使用JDK原生的URLConnection发送HTTP请求,没有连接池,但是对每个地址会保持一个长连接,就是利用HTTP的persistence connection.。这样可以使用其他优秀的Client去替换。这样可以设置连接池,超时时间等对服务之间的调用调优。下面介绍使用Http Client和Okhttp替换Feign默认的Client。步骤也很简单。
使用Http Client替换默认的Client
pom.xml
    <dependencies>
        <dependency>
            <groupId>org.springframework.bootgroupId>
            <artifactId>spring-boot-starter-webartifactId>
        dependency>

        <dependency>
            <groupId>org.springframework.cloudgroupId>
            <artifactId>spring-cloud-starter-openfeignartifactId>
        dependency>

        <dependency>
            <groupId>org.apache.httpcomponentsgroupId>
            <artifactId>httpclientartifactId>
        dependency>
        <dependency>
            <groupId>io.github.openfeigngroupId>
            <artifactId>feign-httpclientartifactId>
        dependency>
    dependencies>
application.yml
server:
  port: 8010
spring:
  application:
    name: openfeign-httpclient
feign:
  httpclient:
    enabled: true
关于Http Client的一些配置也是可以在配置文件中配置的
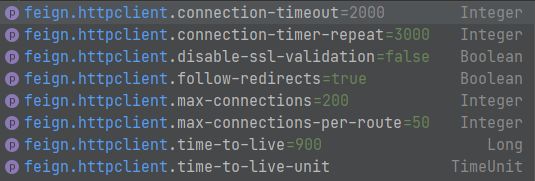
在org.springframework.cloud.openfeign.clientconfig.HttpClientFeignConfiguration中是关于HttpClient的配置:
@Configuration(
    proxyBeanMethods = false
)
@ConditionalOnMissingBean({CloseableHttpClient.class})
public class HttpClientFeignConfiguration {
    private final Timer connectionManagerTimer = new Timer("FeignApacheHttpClientConfiguration.connectionManagerTimer", true);
    private CloseableHttpClient httpClient;
    @Autowired(
        required = false
    )
    private RegistryBuilder registryBuilder;

    public HttpClientFeignConfiguration() {
    }

    @Bean
    @ConditionalOnMissingBean({HttpClientConnectionManager.class})
    public HttpClientConnectionManager connectionManager(ApacheHttpClientConnectionManagerFactory connectionManagerFactory, FeignHttpClientProperties httpClientProperties) {
        final HttpClientConnectionManager connectionManager = connectionManagerFactory.newConnectionManager(httpClientProperties.isDisableSslValidation(), httpClientProperties.getMaxConnections(), httpClientProperties.getMaxConnectionsPerRoute(), httpClientProperties.getTimeToLive(), httpClientProperties.getTimeToLiveUnit(), this.registryBuilder);
        this.connectionManagerTimer.schedule(new TimerTask() {
            public void run() {
                connectionManager.closeExpiredConnections();
            }
        }, 30000L, (long)httpClientProperties.getConnectionTimerRepeat());
        return connectionManager;
    }

    @Bean
    @ConditionalOnProperty(
        value = {"feign.compression.response.enabled"},
        havingValue = "true"
    )
    public CloseableHttpClient customHttpClient(HttpClientConnectionManager httpClientConnectionManager, FeignHttpClientProperties httpClientProperties) {
        HttpClientBuilder builder = HttpClientBuilder.create().disableCookieManagement().useSystemProperties();
        this.httpClient = this.createClient(builder, httpClientConnectionManager, httpClientProperties);
        return this.httpClient;
    }

    @Bean
    @ConditionalOnProperty(
        value = {"feign.compression.response.enabled"},
        havingValue = "false",
        matchIfMissing = true
    )
    public CloseableHttpClient httpClient(ApacheHttpClientFactory httpClientFactory, HttpClientConnectionManager httpClientConnectionManager, FeignHttpClientProperties httpClientProperties) {
        this.httpClient = this.createClient(httpClientFactory.createBuilder(), httpClientConnectionManager, httpClientProperties);
        return this.httpClient;
    }

    private CloseableHttpClient createClient(HttpClientBuilder builder, HttpClientConnectionManager httpClientConnectionManager, FeignHttpClientProperties httpClientProperties) {
        RequestConfig defaultRequestConfig = RequestConfig.custom().setConnectTimeout(httpClientProperties.getConnectionTimeout()).setRedirectsEnabled(httpClientProperties.isFollowRedirects()).build();
        CloseableHttpClient httpClient = builder.setDefaultRequestConfig(defaultRequestConfig).setConnectionManager(httpClientConnectionManager).build();
        return httpClient;
    }

    @PreDestroy
    public void destroy() throws Exception {
        this.connectionManagerTimer.cancel();
        if (this.httpClient != null) {
            this.httpClient.close();
        }

    }
}
很明显当没有CloseableHttpClient这个bean的时候,就是会由这个类来生成Http Client的默认配置。所以说对于HttpClient的自定义配置可以通过自己注入CloseableHttpClient。还有HttpClientConnectionManager管理连接的bean。其实OpenFeign对HttpClient的支持很好,因为它的一些属性可以在配置文件中配置。
使用Okhttp替换默认的Client
其实和Http Client一样的配置,也是在配置文件中开启
pom.xml
    <dependencies>
        <dependency>
            <groupId>org.springframework.bootgroupId>
            <artifactId>spring-boot-starter-webartifactId>
        dependency>

        <dependency>
            <groupId>org.springframework.cloudgroupId>
            <artifactId>spring-cloud-starter-openfeignartifactId>
        dependency>
        <dependency>
            <groupId>io.github.openfeigngroupId>
            <artifactId>feign-okhttpartifactId>
        dependency>
    dependencies>
application.yml
server:
  port: 8011
spring:
  application:
    name: openfeign-okhttp
feign:
  okhttp:
    enabled: true
# 日志
logging:
  level:
    com.msr.better.feign.service.HelloFeignService: debug
这样开启之后,Client就被替换了。同理在org.springframework.cloud.openfeign.clientconfig包下,也有一个关于Okhttp的配置类。
@Configuration(
    proxyBeanMethods = false
)
@ConditionalOnMissingBean({OkHttpClient.class})
public class OkHttpFeignConfiguration {
    private OkHttpClient okHttpClient;

    public OkHttpFeignConfiguration() {
    }

    @Bean
    @ConditionalOnMissingBean({ConnectionPool.class})
    public ConnectionPool httpClientConnectionPool(FeignHttpClientProperties httpClientProperties, OkHttpClientConnectionPoolFactory connectionPoolFactory) {
        Integer maxTotalConnections = httpClientProperties.getMaxConnections();
        Long timeToLive = httpClientProperties.getTimeToLive();
        TimeUnit ttlUnit = httpClientProperties.getTimeToLiveUnit();
        return connectionPoolFactory.create(maxTotalConnections, timeToLive, ttlUnit);
    }

    @Bean
    public OkHttpClient client(OkHttpClientFactory httpClientFactory, ConnectionPool connectionPool, FeignHttpClientProperties httpClientProperties) {
        Boolean followRedirects = httpClientProperties.isFollowRedirects();
        Integer connectTimeout = httpClientProperties.getConnectionTimeout();
        this.okHttpClient = httpClientFactory.createBuilder(httpClientProperties.isDisableSslValidation()).connectTimeout((long)connectTimeout, TimeUnit.MILLISECONDS).followRedirects(followRedirects).connectionPool(connectionPool).build();
        return this.okHttpClient;
    }

    @PreDestroy
    public void destroy() {
        if (this.okHttpClient != null) {
            this.okHttpClient.dispatcher().executorService().shutdown();
            this.okHttpClient.connectionPool().evictAll();
        }

    }
}
很明显OkHttpClient是核心功能执行的类。因为OpenFeign中有一个类FeignHttpClientProperties,有了这个类关于HttpClient的属性就可以在配置文件中设置了。但是Okhttp没有这一个类似的类,所以一般可以自己注入一个OkHttpClient去设置这些属性
@Configuration
@ConditionalOnClass(Feign.class)
@AutoConfigureBefore(FeignAutoConfiguration.class)
public class OkHttpConfig {

    @Bean
    public okhttp3.OkHttpClient okHttpClient() {
        return new okhttp3.OkHttpClient.Builder()
                //设置连接超时
                .connectTimeout(60, TimeUnit.SECONDS)
                //设置读超时
                .readTimeout(60, TimeUnit.SECONDS)
                //设置写超时
                .writeTimeout(60, TimeUnit.SECONDS)
                //是否自动重连
                .retryOnConnectionFailure(true)
                .connectionPool(new ConnectionPool())
                //构建OkHttpClient对象
                .build();
    }
}
关于自定义OkHttpClient的配置,可以参考OpenFeign里OkHttpFeignConfiguration的配置,例如ConnectionPool这个bean。
Post和Get的多参数传递
在使用OpenFeign实现服务之间的调用时,很多时候是要传递多个参数。
创建cloud-openfeign-eureka-server模块
Eureka Server注册中心
    <dependencies>
        <dependency>
            <groupId>org.springframework.cloudgroupId>
            <artifactId>spring-cloud-starter-netflix-eureka-serverartifactId>
        dependency>
        <dependency>
            <groupId>org.springframework.bootgroupId>
            <artifactId>spring-boot-starter-actuatorartifactId>
        dependency>

        <dependency>
            <groupId>org.springframework.bootgroupId>
            <artifactId>spring-boot-starter-webartifactId>
            <exclusions>
                <exclusion>
                    <artifactId>spring-boot-starter-tomcatartifactId>
                    <groupId>org.springframework.bootgroupId>
                exclusion>
            exclusions>
        dependency>

        <dependency>
            <groupId>org.springframework.bootgroupId>
            <artifactId>spring-boot-starter-undertowartifactId>
        dependency>
        <dependency>
            <groupId>io.undertowgroupId>
            <artifactId>undertow-servletartifactId>
        dependency>
    dependencies>
配置文件application.yml
server:
  port: 8761
eureka:
  instance:
    hostname: localhost
  server :
    enable-self-preservation: false
  client:
    registerWithEureka: false
    fetchRegistry: false
    serviceUrl:
      defaultZone: http://${eureka.instance.hostname}:${server.port}/eureka/
启动类
@SpringBootApplication
@EnableEurekaServer
public class EurekaApplication {
    public static void main(String[] args) {
        SpringApplication.run(EurekaApplication.class, args);
    }
}
创建cloud-openfeign-provider模块
服务提提供者
    <dependencies>
        <dependency>
            <groupId>org.springframework.cloudgroupId>
            <artifactId>spring-cloud-starter-netflix-eureka-clientartifactId>
        dependency>
        <dependency>
            <groupId>org.springframework.bootgroupId>
            <artifactId>spring-boot-starter-webartifactId>
        dependency>

        <dependency>
            <groupId>org.springframework.cloudgroupId>
            <artifactId>spring-cloud-starter-openfeignartifactId>
        dependency>
    dependencies>
配置文件application.yml
server:
  port: 8012
spring:
  application:
    name: openfeign-provider
eureka:
  client:
    serviceUrl:
      defaultZone: http://localhost:8761/eureka/
  #eureka.instance.prefer-ip-address  表示将自己的IP注册到Eureka Server上,
  #如果不配置,会将当前服务提供者所在的主机名注册到Eureka Server上。
  instance:
    prefer-ip-address: true
实体类和控制器
public class Order {
    private Long id;
    private String name;
    private int age;

    public Long getId() {
        return id;
    }

    public void setId(Long id) {
        this.id = id;
    }

    public String getName() {
        return name;
    }

    public void setName(String name) {
        this.name = name;
    }

    public int getAge() {
        return age;
    }

    public void setAge(int age) {
        this.age = age;
    }
}
@RestController
@RequestMapping("/order")
public class OrderController {

    @GetMapping(value = "/add")
    public String addUser(Order order, HttpServletRequest request) {
        String token = request.getHeader("oauthToken");
        return "hello," + order.getName();
    }

    @PostMapping(value = "/update")
    public String updateUser(@RequestBody Order order) {
        return "hello," + order.getName();
    }
}
启动类
@SpringBootApplication
@EnableDiscoveryClient
public class ProviderApplication {
    public static void main(String[] args) {
        SpringApplication.run(ProviderApplication.class, args);
    }
}
创建cloud-openfeign-consumer模块
消费者服务
<dependencies>
        <dependency>
            <groupId>org.springframework.cloudgroupId>
            <artifactId>spring-cloud-starter-netflix-eureka-clientartifactId>
        dependency>
        <dependency>
            <groupId>org.springframework.bootgroupId>
            <artifactId>spring-boot-starter-webartifactId>
        dependency>

        <dependency>
            <groupId>org.springframework.cloudgroupId>
            <artifactId>spring-cloud-starter-openfeignartifactId>
        dependency>

        <dependency>
            <groupId>org.apache.httpcomponentsgroupId>
            <artifactId>httpclientartifactId>
        dependency>
        <dependency>
            <groupId>io.github.openfeigngroupId>
            <artifactId>feign-httpclientartifactId>
        dependency>
    dependencies>
配置文件application.yml
server:
  port: 8011
spring:
  application:
    name: openfeign-consumer
eureka:
  client:
    service-url:
      defaultZone: http://localhost:8761/eureka
feign:
  httpclient:
    enabled: true
实体类
package com.msr.better.feign.model;

public class Order {
    private Long id;
    private String name;
    private int nums;
	// 此处省略了getter和setter
}
FeignClient接口
@FeignClient("openfeign-provider")
public interface OrderApiService {
    @GetMapping(value = "/order/add")
    String addUser(@SpringQueryMap Order order);

    @PostMapping(value = "/order/update")
    String updateUser(@RequestBody Order order);
}
此处的Client接口中对于GET请求传递实体类使用了注解@SpringQueryMap。OpenFeign@QueryMap批注支持将POJO用作GET参数映射。但是默认的OpenFeign QueryMap注释与Spring不兼容,因为它缺少value属性。
Spring Cloud OpenFeign提供了等效的@SpringQueryMap注释,该注释用于将POJO或Map参数注释为查询参数映射。
在一些资料中说什么OpenFeign的什么GET不能传递POJO,写了个拦截器把实体类转换了,估计是OpenFeign的版本低,在新的OpenFeign中是有了对QueryMap的支持了。
配置类
@Configuration
public class CoreAutoConfiguration {

    @Autowired
    private HttpClient httpClient;

    @Bean
    public HttpComponentsClientHttpRequestFactory httpComponentsClientHttpRequestFactory() {
        HttpComponentsClientHttpRequestFactory factory = new HttpComponentsClientHttpRequestFactory();
        factory.setHttpClient(httpClient);
        factory.setReadTimeout(3000);
        factory.setConnectTimeout(3000);
        factory.setConnectionRequestTimeout(3000);
        return factory;
    }

    /**
     * {@link RestTemplate }的setRequestFactory方法支持HttpClient和Okhttp等Client
     * 默认是使用{@link SimpleClientHttpRequestFactory } Http的请求是使用原生的URLConnection
     *
     * @return RestTemplate的bean
     */
    @LoadBalanced
    @Bean
    public RestTemplate restTemplate() {
        RestTemplate restTemplate = new RestTemplate();
        restTemplate.setRequestFactory(httpComponentsClientHttpRequestFactory());
        return restTemplate;
    }
}
上面是替换了RestTemplate的Client。因为RestTemplate默认是使用URLConnection。这里是使用HttpClient替换了。
控制器
@RestController
@RequestMapping("api")
public class OrderController {

    @Autowired
    private OrderApiService orderApiService;

    /**
     * @param order
     * @return
     */
    @PostMapping("/get/pojo")
    public String getPojo(@RequestBody Order order) {
        return orderApiService.addUser(order);
    }

    @PostMapping("/post/pojo")
    String postPojo(@RequestBody Order order){
        return orderApiService.updateUser(order);
    }
}
最后就可以测试http://localhost:8011/get/pojo和http://localhost:8011/post/pojo了。
文件上传
继续使用上一节创建的Eureka Server。然后创建一下两个模块用作文件上传。
想要实现文件上传功能,需要编写Encoder去实现文件上传。现在OpenFeign提供了子项目feign-form(https://github.com/OpenFeign/feign-form)
创建cloud-openfeign-fileupload-server
文件上传接口的提供者
    <dependencies>
        <dependency>
            <groupId>org.springframework.bootgroupId>
            <artifactId>spring-boot-starter-webartifactId>
        dependency>
        <dependency>
            <groupId>org.springframework.cloudgroupId>
            <artifactId>spring-cloud-starter-netflix-eureka-clientartifactId>
        dependency>
    dependencies>
配置文件application.yml
server:
  port: 8012
spring:
  application:
    name: openfeign-file-server

eureka:
  server:
    enableSelfPreservation: false
  client:
    serviceUrl:
      defaultZone: http://localhost:8761/eureka/
  instance:
    prefer-ip-address: true
启动类
@SpringBootApplication
@EnableDiscoveryClient
public class SCFeignFileServerApplication {
    public static void main(String[] args) {
        SpringApplication.run(SCFeignFileServerApplication.class, args);
    }
}
上传接口
@RestController
public class FileController {

    @PostMapping(value = "/uploadFile/server", consumes = MediaType.MULTIPART_FORM_DATA_VALUE)
    public String fileUploadServer(MultipartFile file ) throws Exception{
        return file.getOriginalFilename();
    }
}
创建cloud-openfeign-fileupload-client
文件上传接口的调用者
    <dependencies>
        <dependency>
            <groupId>org.springframework.bootgroupId>
            <artifactId>spring-boot-starter-webartifactId>
        dependency>

        <dependency>
            <groupId>org.springframework.cloudgroupId>
            <artifactId>spring-cloud-starter-netflix-eureka-clientartifactId>
        dependency>


        <dependency>
            <groupId>org.springframework.cloudgroupId>
            <artifactId>spring-cloud-starter-openfeignartifactId>
        dependency>


        <dependency>
            <groupId>io.github.openfeign.formgroupId>
            <artifactId>feign-formartifactId>
            <version>3.8.0version>
        dependency>

        <dependency>
            <groupId>io.github.openfeign.formgroupId>
            <artifactId>feign-form-springartifactId>
        dependency>
    dependencies>
配置文件application.yml
server:
  port: 8011
spring:
  application:
    name: openfeign-upload-client
eureka:
  client:
    service-url:
      defaultZone: http://localhost:8761/eureka
配置类
@Configuration
public class FeignMultipartSupportConfig {

    @Bean
    @Primary
    @Scope("prototype")
    public Encoder multipartFormEncoder() {
        return new SpringFormEncoder();
    }
}
控制器
@RestController
@RequestMapping("file")
public class FeignUploadController {

    @Autowired
    private FileUploadApiService fileUploadApiService;

    @PostMapping(value = "/upload", consumes = MediaType.MULTIPART_FORM_DATA_VALUE)
    public String imageUpload(MultipartFile file) throws Exception {
        return fileUploadApiService.fileUpload(file);
    }
}
FeignClient
@FeignClient(value = "openfeign-file-server", configuration = FeignMultipartSupportConfig.class)
public interface FileUploadApiService {
    /***
     * 1.produces,consumes必填
     * 2.注意区分@RequestPart和RequestParam,不要将
     * @RequestPart(value = "file") 写成@RequestParam(value = "file")
     * @param file
     * @return
     */
    @PostMapping(value = "/uploadFile/server",
            produces = {MediaType.APPLICATION_JSON_UTF8_VALUE},
            consumes = MediaType.MULTIPART_FORM_DATA_VALUE)
    String fileUpload(@RequestPart(value = "file") MultipartFile file);
}
测试
运行Eureka Server、cloud-openfeign-fileupload-client模块和cloud-openfeign-fileupload-server模块,使用PostMan进行测试。最后成功返回文件的名字,文件成功的上传到server上了。
解决首次请求失败问题
由于OpenFeign整合了Ribbon和Hystrix,可能会出现首次调用失败的问题。
主要原因是:Hystrix默认的超时时间是1秒,如果超过这个时间没有响应,就会进入fallback代码。由于Bean的装配和懒加载的机制,Feign首次请求都会比较慢。如此一来当响应时间大于1秒就会进入fallback而导致请求失败。解决方法:
-
将Hystrix的超时时间调大,此方法比较好
hystrix: command: default: execution: isolation: thread: timeoutInMillseconds: 5000 # 5秒 -
禁用Hystrix的超时时间
hystrix: command: default: execution: timout: enable: false -
使用Feign的时候关闭Hystrix,这是不推荐的
feign:
  hystrix:
    enable: false
返回图片流的处理方式
对于返回的是图片,一般都是字节数组。但是Contrller不能直接返回byte,所以被调用的API返回的类型应该使用Response。
使用上面的文件上传创建的模块中添加一个返回图片的接口。以生成一个二维码为例。
cloud-openfeign-fileupload-server的一些修改
添加新的依赖,使用hutool快速生成二维码
		<dependency>
            <groupId>cn.hutoolgroupId>
            <artifactId>hutool-allartifactId>
            <version>5.6.3version>
        dependency>
        <dependency>
            <groupId>com.google.zxinggroupId>
            <artifactId>coreartifactId>
            <version>3.3.3version>
        dependency>
        <dependency>
            <groupId>io.github.openfeigngroupId>
            <artifactId>feign-coreartifactId>
        dependency>
controller的接口,这里仅简单的生成了一个二维码,二维码还可以添加更加多的信息。这里就不详细介绍,hutool的QrCodeUtil有很多方法,有兴趣的可以自行研究。
	@GetMapping(value = "/qrcode")
    public byte[] image() {
        return generateQrCode();
    }
    /**
     * 先简单的生成一个url的二维码,指向百度
     * @return
     */
    private byte[] generateQrCode() {
        return QrCodeUtil.generatePng("https://www.baidu.cn/", 300, 300);
    }
cloud-openfeign-fileupload-client的一些修改
添加新依赖
<dependency>
    <groupId>commons-iogroupId>
    <artifactId>commons-ioartifactId>
    <version>2.6version>
dependency>
feignclient添加新接口
	@GetMapping("/qrcode")
    Response getQrCode();
controller的修改,对于要在前端页面显示图片,一般用的最多的是返回页面一个url,但是这都是存储好的图片,但是每次生成验证码和二维码这些,服务端可能并不会存储起来。所以并不能返回一个url地址,对于验证码用的返回前端Base64编码。二维码的话可以基于HttpServletResponse,produces返回字节流和Base64图片。
这里使用HttpServletResponse,添加方法:
    @GetMapping("/qrcode")
    public void getQrCode(HttpServletResponse response) {
        Response res = fileUploadApiService.getQrCode();
        try {
            InputStream inputStream = res.body().asInputStream();
            response.setContentType(MediaType.IMAGE_PNG_VALUE);
            IOUtils.copy(inputStream,response.getOutputStream());
        } catch (IOException e) {
            e.printStackTrace();
        }
    }
浏览器访问:http://localhost:8011/file/qrcode,结果

调用传递token
正常的来说,系统都是有认证鉴权的功能,不管是JWT还是security,在外部请求到A服务时,是带有token过来的,但是此请求在A服务内部通过Feign调用B服务时,就会发生token的丢失。
解决方法也是不难,就是在使用Feign远程调用时,在请求头里携带一下token,一般token是放在请求头里面。
Feign提供的拦截器RequestInterceptor,这样可以拦截Feign的请求,在请求头里添加token。对于这部分代码,在cloud-openfeign-consumer和cloud-openfeign-provider上进行添加。
修改cloud-openfeign-provider
修改一下方法,便于展示结果
@PostMapping(value = "/update")
public String updateOrder(@RequestBody Order order, HttpServletRequest request) {
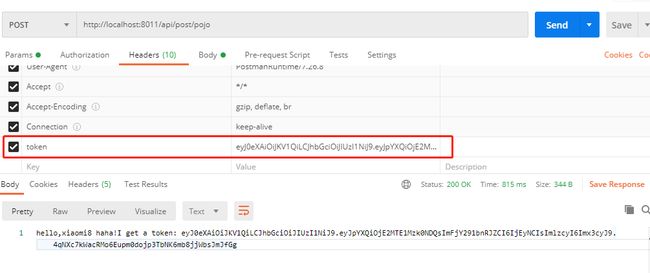
String token = request.getHeader("token");
return "hello," + order.getName() + " " + "haha!I get a token: " + token;
}
修改cloud-openfeign-consumer
添加拦截器实现feign.RequestInterceptor
@Component
public class FeignTokenInterceptor implements RequestInterceptor {
    @Override
    public void apply(RequestTemplate requestTemplate) {
        if (null == getHttpServletRequest()) {
            //此处可以记录一些日志
            return;
        }
        //将获取Token对应的值往下面传
        requestTemplate.header("token", getHeaders(getHttpServletRequest()).get("token"));
    }

    private HttpServletRequest getHttpServletRequest() {
        try {
            return ((ServletRequestAttributes) RequestContextHolder.getRequestAttributes()).getRequest();
        } catch (Exception e) {
            return null;
        }
    }

    /**
     * Feign拦截器拦截请求获取Token对应的值
     *
     * @param request
     * @return
     */
    private Map<String, String> getHeaders(HttpServletRequest request) {
        Map<String, String> map = new LinkedHashMap<>();
        Enumeration<String> enumeration = request.getHeaderNames();
        while (enumeration.hasMoreElements()) {
            String key = enumeration.nextElement();
            String value = request.getHeader(key);
            map.put(key, value);
        }
        return map;
    }
}
最后启动服务就可以开始测试了,测试结果:
最后
可关注我的微信公众号
