【实例教学】在 PyQt 中嵌入 Matplotlib 图表的简易教程
文章目录
- 在 PyQt 中嵌入 Matplotlib 图表的简易教程
-
- 步骤 1: 安装 PyQt5 和 Matplotlib
- 步骤 2: 编写代码
- 步骤 3: 运行应用程序
- 调整优化
-
- 1.扩大界面
- 2.图像切换坍缩
- 结语
在 PyQt 中嵌入 Matplotlib 图表的简易教程
在 PyQt 中嵌入 Matplotlib 允许用户通过图形用户界面(GUI)与数据进行交互。在这篇教程中,我们将演示如何使用 PyQt5 和 Matplotlib 创建一个简单的应用程序,其中包含一个可以切换显示饼图和柱状图的图表。
步骤 1: 安装 PyQt5 和 Matplotlib
首先,请确保你已经安装了 PyQt5 和 Matplotlib。你可以使用以下命令进行安装:
pip install PyQt5 matplotlib
步骤 2: 编写代码
创建一个 Python 脚本,使用以下代码创建一个简单的 PyQt5 应用程序,嵌入 Matplotlib 图表。
import sys
from PyQt5.QtWidgets import QApplication, QMainWindow, QVBoxLayout, QLabel, QPushButton, QWidget, QGroupBox, QHBoxLayout
from PyQt5.QtWidgets import QDesktopWidget
from PyQt5.QtCore import Qt
from matplotlib.backends.backend_qt5agg import FigureCanvasQTAgg as FigureCanvas
import matplotlib.pyplot as plt
class VisualizationApp(QMainWindow):
def __init__(self):
super(VisualizationApp, self).__init__()
# 创建页面
self.setWindowTitle("可视化应用")
# 获取屏幕大小
screen = QDesktopWidget().screenGeometry()
screen_width, screen_height = screen.width(), screen.height()
# 计算窗口应该出现在屏幕正中央的位置
window_width, window_height = 900, 600
x = (screen_width - window_width) // 2
y = (screen_height - window_height) // 2
# 设置窗口的位置和大小
self.setGeometry(x, y, window_width, window_height)
self.central_widget = QWidget(self)
self.setCentralWidget(self.central_widget)
self.layout = QHBoxLayout(self.central_widget)
# 左侧 groupBox
self.label_box = QGroupBox("可视化", self)
self.label_box.setFixedWidth(150) # 固定宽度
self.layout.addWidget(self.label_box)
# 垂直布局
self.group_layout = QVBoxLayout(self.label_box)
self.group_layout.setAlignment(Qt.AlignTop) # 顶格分布
# 饼图按钮
self.pie_button = QPushButton("饼图", self)
self.pie_button.clicked.connect(self.show_pie_chart)
self.group_layout.addWidget(self.pie_button)
# 柱状图按钮
self.bar_button = QPushButton("柱状图", self)
self.bar_button.clicked.connect(self.show_bar_chart)
self.group_layout.addWidget(self.bar_button)
# Matplotlib 白板
self.figure, self.ax = plt.subplots()
self.canvas = FigureCanvas(self.figure)
self.layout.addWidget(self.canvas)
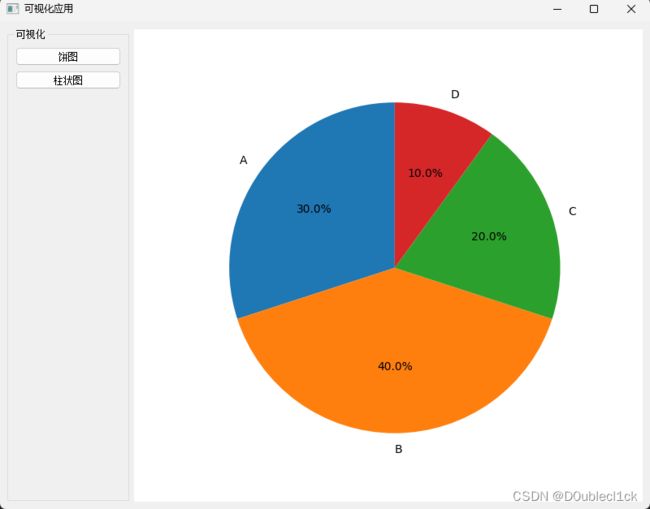
def show_pie_chart(self):
data = [30, 40, 20, 10] # 示例数据
labels = ['A', 'B', 'C', 'D'] # 示例标签
self.ax.clear()
self.ax.pie(data, labels=labels, autopct='%1.1f%%', startangle=90)
self.ax.axis('equal') # Equal aspect ratio ensures that pie is drawn as a circle.
self.canvas.draw()
def show_bar_chart(self):
data = [10, 30, 50, 20] # 示例数据
categories = ['Category 1', 'Category 2', 'Category 3', 'Category 4'] # 示例类别
self.ax.clear()
self.ax.bar(categories, data)
self.canvas.draw()
if __name__ == "__main__":
app = QApplication(sys.argv)
window = VisualizationApp()
window.show()
sys.exit(app.exec_())
-
主窗口类
VisualizationApp:__init__方法用于初始化主窗口的基本设置,包括标题和大小。- 创建了一个中心部件
central_widget,并设置为主窗口的中心部件。 - 创建了一个水平布局
layout,用于容纳左侧的QGroupBox和右侧的 Matplotlib 图表区域。
-
左侧 QGroupBox 部分:
- 创建
QGroupBox,并设置了一个固定宽度。 - 创建了一个垂直布局
group_layout,用于容纳标签和按钮。 - 创建了两个按钮,分别用于显示饼图和柱状图。
- 创建
-
Matplotlib 图表区域:
- 使用
FigureCanvas将 Matplotlib 图表嵌入到 PyQt5 中。
- 使用
-
显示图表的方法:
show_pie_chart方法用于清空 Matplotlib 图表并显示一个简单的饼图。show_bar_chart方法用于清空 Matplotlib 图表并显示一个简单的柱状图。
-
主程序入口:
- 创建
QApplication实例和主窗口实例。 - 显示主窗口并运行应用程序。
- 创建
步骤 3: 运行应用程序
下面是可视化GUI运行结果:
运行主页

饼图的显示
柱状图显示

调整优化
1.扩大界面
# self.figure, self.ax = plt.subplots()
self.figure, self.ax = plt.subplots(figsize=(12, 6))  # 设置图表大小为 8x6 英寸

# 同时记得调大UI的大小
window_width, window_height = 900, 600
window_width, window_height = 1200, 800
2.图像切换坍缩
当从饼图切换到柱状图的时候会出现图像探索的情况,这似乎是坐标轴被清除掉的问题,索性使用子图的模式,切换的时候直接清除子图然后创建新的子图。

下面是使用子图解决切换问题的代码
import sys
from PyQt5.QtWidgets import QApplication, QMainWindow, QVBoxLayout, QLabel, QPushButton, QWidget, QGroupBox, QHBoxLayout, QDesktopWidget
from PyQt5.QtCore import Qt
from matplotlib.backends.backend_qt5agg import FigureCanvasQTAgg as FigureCanvas
import matplotlib.pyplot as plt


# 创建主窗口类
class VisualizationApp(QMainWindow):
    def __init__(self):
        super(VisualizationApp, self).__init__()

        # 设置主窗口的标题和大小
        self.setWindowTitle("可视化应用")
        # 获取屏幕大小
        screen = QDesktopWidget().screenGeometry()
        screen_width, screen_height = screen.width(), screen.height()
        # 计算窗口应该出现在屏幕正中央的位置
        window_width, window_height = 1200, 800
        x = (screen_width - window_width) // 2
        y = (screen_height - window_height) // 2
        # 设置窗口的位置和大小
        self.setGeometry(x, y, window_width, window_height)

        # 创建主窗口的中心部件(QWidget)
        self.central_widget = QWidget(self)
        self.setCentralWidget(self.central_widget)

        # 创建整体布局(水平布局)
        self.layout = QHBoxLayout(self.central_widget)

        # 创建左侧的 QGroupBox,用于容纳标签和按钮
        self.label_box = QGroupBox("可视化", self)
        self.label_box.setFixedWidth(100)  # 固定宽度
        self.layout.addWidget(self.label_box)

        # 创建左侧 QGroupBox 内的垂直布局
        self.group_layout = QVBoxLayout(self.label_box)
        self.group_layout.setAlignment(Qt.AlignTop)  # 顶格分布

        # 创建饼图按钮
        self.pie_button = QPushButton("饼图", self)
        self.pie_button.clicked.connect(self.show_pie_chart)
        self.group_layout.addWidget(self.pie_button)

        # 创建柱状图按钮
        self.bar_button = QPushButton("柱状图", self)
        self.bar_button.clicked.connect(self.show_bar_chart)
        self.group_layout.addWidget(self.bar_button)

        # 创建 Matplotlib 图表区域
        self.figure, self.ax = plt.subplots(figsize=(12, 6))  # 设置图表大小为 12x6 英寸
        self.canvas = FigureCanvas(self.figure)
        self.layout.addWidget(self.canvas)

        # 初始化时显示饼图
        self.show_pie_chart()

    # 显示饼图的方法
    def show_pie_chart(self):
        data = [30, 40, 20, 10]  # 示例数据
        labels = ['A', 'B', 'C', 'D']  # 示例标签
        self.ax.clear()  # 清除当前子图
        self.ax = self.figure.add_subplot(111)  # 创建新的子图
        self.ax.pie(data, labels=labels, autopct='%1.1f%%', startangle=90)
        self.ax.axis('equal')  # 保证饼图是一个圆
        self.canvas.draw()

    # 显示柱状图的方法
    def show_bar_chart(self):
        data = [10, 30, 50, 20]  # 示例数据
        categories = ['Category 1', 'Category 2', 'Category 3', 'Category 4']  # 示例类别
        self.ax.clear()  # 清除当前子图
        self.ax = self.figure.add_subplot(111)  # 创建新的子图
        self.ax.bar(categories, data)
        self.canvas.draw()


# 主程序入口
if __name__ == "__main__":
    # 创建应用程序实例
    app = QApplication(sys.argv)
    # 创建主窗口实例
    window = VisualizationApp()
    # 显示主窗口
    window.show()
    # 运行应用程序
    sys.exit(app.exec_())
在每个 show_XXX_chart 方法中添加了 self.ax = self.figure.add_subplot(111),确保每次调用这些方法时都会创建一个新的子图。解决图表切换时的缩放问题。
结语
这只是一个简单的例子,演示了如何在 PyQt5 中嵌入 Matplotlib 图表。希望这个教程对你有所帮助!