Vue3.0(六):VueX 4.x详解
Vuex4状态管理
什么是状态管理
- 在开发中,我们的应用程序需要处理各种各样的数据,这些数据需要保存在应用程序的某一个位置,对于这些数据的管理,就是 状态管理
- 目前前端项目越来越复杂,多组件共享同一数据的状态很常见,因此需要一个更加方便地状态管理库
Vuex状态管理
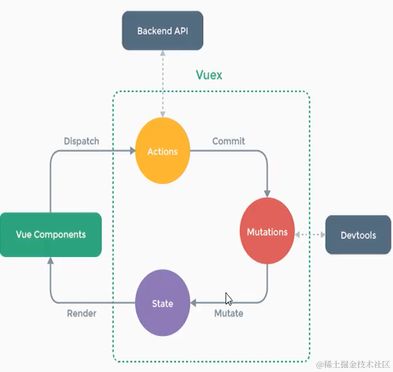
- 在Vuex中,组件通过读取Vuex中的State数据状态,显示到页面上
- 而组件想要修改State中的数据,需要通过Dispatch,提交Mutations进行修改,禁止直接对State进行修改
Vuex安装和基本使用
-
在用脚手架搭建的过程中,可以直接进行安装
-
同时,我们也可以手动进行安装
npm install vuex -
在安装完成之后,在 src目录下创建store文件夹,并创建index.js文件
//引入createStore函数
import { createStore } from "vuex";

//创建store对象
const store = createStore({
  //会直接把对象返回出去
  state: () => ({
    counter: 100,
  }),
  //等同于以下写法
  //   state() {
  //     return { counter: 100 };
  //   },
});

export default store;
- 之后再 main.js文件中,引入store即可
import { createApp } from "vue";
import App from "./App.vue";
//引入store对象
import store from "./store";

const app = createApp(App);
//使用store对象
app.use(store);
app.mount("#app");
- 在组件 template中使用
<div>
    {{$store.state.counter}}
div>
- 在options API中使用
- 通常是在 computed计算属性中进行使用
computed:{
    counterStore(){
        return this.$store.state.counter
    }
}
- 在composition API中使用
- 需要引入 useStore函数进行使用
- 若直接定义变量进行赋值,则不会是响应式
const counter = store.state.counter - 需要进行响应式的处理
import { computed, toRef } from "vue";
import { useStore } from "vuex";
const store = useStore();
//可以用计算属性返回
const counter = computed(() => {
  return store.state.counter;
});
//可以通过toRef转成响应式
const counterRef = toRef(store.state.counter);
与单纯的全局对象有什么区别
- Vuex的状态存储是响应式的
- 不能直接改变store中的状态(代码上可以直接更改,但是规范上不可以)
单一状态树
- Vuex使用的是单一状态树
- 用一个对象就包含了全部应用层级的状态
- 即一个项目中,只会创建一个store进行状态管理
- 若多个组件有不同的状态进行管理
- 可以进行module进行模块化,管理多个组件的状态
- 优势
- 单一状态树能够让我们 最直接的方式找到某个状态的片段
- 方便维护和调试
- 但是相对于pinia不够灵活
Vuex-Store的State映射到组件中
目的是取状态更为方便一点,就像在组件内部定义变量一样使用
options API–mapState
- 在options API中我们可以使用 mapState函数进行映射
- 传入参数
- 数组:需要是state中存在的属性
- 对象:用于 state中的属性与组件本身的变量命名冲突
- 返回值
- 返回的就是一个函数,可以直接用于computed中
//比如现在store中存在以下属性
//name: "zhangcheng",
//age: "18",
//address: "hebei",

import { mapState } from "vuex";
computed: {
    //传入数组参数
    ...mapState(["name", "age", "address"]),
        //等同于以下写法
        // name() {
        //   return this.$store.state.name
        // }
        //传入对象参数
        ...mapState({
        sName: (state) => state.name,
    }),
},
composition API中将state映射到组件
前面我们知道在vuex中有一个mapState函数,可以帮助我们完成映射
- mapState返回的函数,内部实际上用到了
this.$store.state- 我们知道,composition中,无法使用this,且this中没有$store
- 而在前面,我们知道composition API中需要用到 useState函数
import { useStore } from "vuex";
const store = useStore();
//通过store.state.name获取
- 如果想将 useState函数和mapState函数结合使用
- 将 mapState返回值,传入到computed计算属性中(computed内部接收一个函数)
- 同时改变 参数的this指向
//获取计算属性
import { computed } from "vue";
//获取mapState与useStore函数
import { mapState, useStore } from "vuex";

//获取返回值,此时的name是一个函数
const { name } = mapState(["name"]);

const store = useStore();
//在传入name的时候,通过bind改变this指向
//因为computed需要传入一个函数,而call和apply返回值都是函数本身的返回值
//而bind返回的是一个函数
const cName = computed(name.bind({ $store: store }));
- 以上方法比较繁琐,我们可以通过以下方式进行
- 通过解构的方法,用toRefs包裹即可
import { toRefs } from "vue";
import { useStore } from "vuex";

const store = useStore();
//解构的时候对变量重命名
//注意使用toRefs
const { name: cName, age } = toRefs(store.state);
getter的基本使用
类似于computed计算属性,对state中的数据可以进行复杂逻辑的处理
- 在定义store对象的时候,可以配置getters选项
- 第一个参数state,接收的就是state中的变量
- 第二个参数getters,接收的就是getter中的变量
- 返回值可以返回一个函数,这样就可以让外界传值进来
//引入createStore函数
import { createStore } from "vuex";

//创建store对象
const store = createStore({
  //会直接把对象返回出去
  state: () => ({
    name: "zhangcheng",
    age: "18",
    address: "hebei",
  }),
  getters: {
    //第一个参数用于接收state中的变量
    nameAge(state) {
      return state.name + state.age; //"zhangcheng18"
    },
    //第二个参数,用于接收getters中的变量
    info(state, getters) {
      return getters.nameAge + state.address; //"zhangcheng18hebei"
    },
    //可以返回一个函数,用于接收变量
    returnInfo(state) {
      return function (name) {
        return `${name} is ${state.name} friend`;
      };
    },
  },
});
- 实际调用
<div>nameAge{{ $store.getters.nameAge }}div>
<div>info{{ $store.getters.info }}div>
<div>returnInfo{{ $store.getters.returnInfo("lisi") }}div>
nameAgezhangcheng18
infozhangcheng18hebei
returnInfolisi is zhangcheng friend
- 对于 getters中的变量,也有相应的映射函数,mapGetters的用法同mapState的用法一样
Mutation基本使用
是Vuex中修改State的唯一途径
在mutation中写的都是同步代码,不能写异步代码,比如进行网络请求
- 首先在创建 创建 store对象时候,配置mutation选项
- 第一个参数 state用于访问state中的状态
- 第二个参数 payload用于接收传入的参数
//创建store对象
const store = createStore({
  //会直接把对象返回出去
  state: () => ({
    name: "zhangcheng",
    age: "18",
    address: "hebei",
  }),
  mutations: {
    changeName(state,payload) {
      state.name = payload;
    },
  },
});
在options API中的使用
- 仅需在对应的methods中,使用commit访问即可
- commit中的第一个参数,要与mutation中准备调用方法的名字保持一致
methods:{
    change(){
        this.$store.commit("changeName","lisi")
    }
}

在compositions API中的使用
- 在setup中,引入useStore函数
- 调用commit方法即可
import {useStore} from "vuex"

const store = useStore()
const changeInfo = store.commit("changeInfo")
actions的基本使用
-
Action类似于mutation,但是不同的地方在于
- Action提交的是mutation,而不是直接变更状态
- 在action中,并不是对State进行修改,而是通过mutation进行修改
- Action可以包含任何异步操作
- Action提交的是mutation,而不是直接变更状态
-
在创建store实例的时候
 mutations: {
    changeName(state, payload) {
      state.name = payload;
    },
  },
  actions: {
    changeNameAction(context, payload) {
      //第一个参数相当于store实例,但实际上不是
      //第二个参数是通过dispatch调用方法,传入的参数
      context.commit("changeName", payload);
    },
  },
- 调用
- 通过 dispatch函数进行调用
change() {
    this.$store.dispatch("changeNameAction", "lisi");
},
实际用法
- actions中通常是进行网络请求的
- 而mutations中是修改state的唯一途径
- 下面是一个实际案例的做法
- 我们通过Vuex进行状态管理
- 在actions中,请求数据,通过commit提交mutation
- 在mutation中修改state
//创建store对象
const store = createStore({
  //会直接把对象返回出去
  state: () => ({
    list: [],
  }),
  mutations: {
    //修改state
    changeName(state, payload) {
      state.list = payload;
    },
  },
  actions: {
    //进行网络请求,并且提交commit申请
    changeNameAction(context, payload) {
      fetch(xxxxx)
        .then((res) => {
          return res.json();
        })
        .then((res) => {
          context.commit("changeName", res);
        });
    },
  },
});
- 若在组件中,通过 dispatch函数调用了actions中的方法,也想拿到返回值
- 那么这个方法需要返回一个promise
actions:{
    changeName(){
        return new Promise((resolve)=>{
            resolve(123)
        })
    }
}

//实际调用的时候
this.$store.dispatch("changeName").then((res)=>{
    console.log(res)
})
module的基本使用
-
在使用Vuex进行状态管理的时候,难免维护的状态会十分庞大
-
因此我们可以使用 modules将store分割成模块
-
每个模块都拥有自己的state、mutation、action、getter,甚至可以嵌套子模块
-
创建一个模块
export default{
    state:()=>({}),
    getters:{},
    mutations:{},
    actions:{}
}
- 在 创建 store对象的时候,引入模块
import homeModule from "../home.js"
import { createStore } from "vuex";

const store = createStore({
    modules:{
        //引入模块的名字:实际引入的模块
        home:homeModule
    }
})

//在实际使用中,mutation以及action、getters   可以直接读取
//而读取state中的数据有所变化
store.state.home.name
module的局部状态
上面我们知道可以进行分模块的操作
-
那么我们想在模块中,访问根模块的内容需要怎么访问
-
比如在 home模块中
getters:{
    changeCounter(state,getters,rootState){
        //state是本模块中的状态
        //getters是本模块中的getters
        //rootState是根模块的state
    }
}
//同理mutation和actions
- 且 actions、mutations和getters中的命名不能与根组件中重复