RSIC-V
RISC-V环境搭建 riscv-gnu-toolchain
- 一、编译安装riscv-gnu-toolchain
-
- 方式一、手动编译安装
-
- 1、Clone riscv-toolchain
- 2、安装相关依赖库
- 3、创建riscv文件夹,并设置权限
- 4、设置环境变量
- 5、编译(预计三个小时左右)
- 方式二、编译压缩包安装(只适用于ubuntu)
-
- 1、下载压缩包
- 2、安装相关依赖库
- 3、设置环境变量
- 二、下载并编译riscv-fesvr
- 三、安装riscv-tools
-
-
- 1、下载riscv-tools
- 2、三个修改
-
- 修改build.sh文件
- 修改riscv-tests/env/v/vm.c文件
- 修改riscv-tools/riscv-pk/util/string.c
- 3、安装依赖
- 4、编译
-
- 四、测试
一、编译安装riscv-gnu-toolchain
方式一、手动编译安装
详细可参考:riscv-gnu-toolchain仓库目录
1、Clone riscv-toolchain
全部一次性下载 (预计几个小时,而且容易失败,与网络有关)
git clone --recursive https://github.com/riscv-collab/riscv-gnu-toolchain.git
分开下载(推荐使用这个)
- 先下载主仓库
git clone https://gitee.com/mirrors/riscv-gnu-toolchain.git
或
git clone https://github.com/riscv/riscv-gnu-toolchain
- 查看子仓库的分支
cd riscv-gnu-toolchain
cat .gitmodules
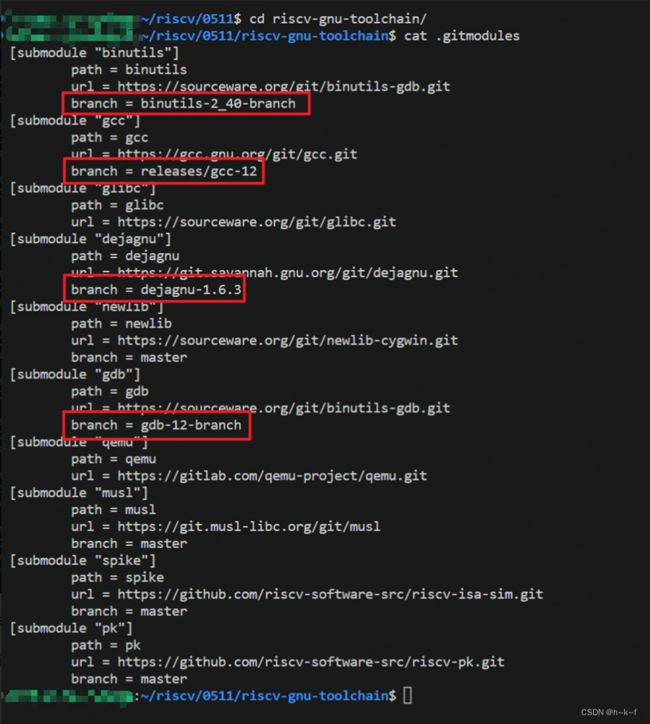
- 根据子仓库分支分别下载子仓库
- binutils 下载 binutils-2_40-branch 分支
git clone -b binutils-2_40-branch https://github.com/bminor/binutils-gdb.git
rm -rf binutils
mv binutils-gdb binutils
- gcc 下载 releases/gcc-12 分支
git clone -b releases/gcc-12 https://github.com/gcc-mirror/gcc.git
- glibc 下载主分支
git clone https://mirrors.tuna.tsinghua.edu.cn/git/glibc.git
- dejagnu 下载主分支,不使用.gitmodules中的分支
git clone https://github.com/riscvarchive/riscv-dejagnu.git
rm -rf dejagnu
mv riscv-dejagnu dejagnu
- newlib 下载主分
git clone https://gitee.com/mirrors/riscv-newlib
rm -rf newlib
mv riscv-newlib newlib
- gdb 下载 gdb-12-branch 分支
git clone -b gdb-12-branch https://github.com/bminor/binutils-gdb.git
rm -rf gdb
mv binutils-gdb gdb
- qemu 下载主分支
git clone https://mirrors.tuna.tsinghua.edu.cn/git/qemu.git
- musl 下载主分支
git clone https://gitee.com/mirrors/musl.git
- spike 下载主分支
git clone https://github.com/riscv-software-src/riscv-isa-sim.git
rm -rf spike
mv riscv-isa-sim spike
- pk 下载主分支
git clone https://github.com/riscv-software-src/riscv-pk.git
rm -rf pk
mv riscv-pk pk
2、安装相关依赖库
- Ubuntu
sudo apt-get install autoconf automake autotools-dev curl python3 libmpc-dev libmpfr-dev libgmp-dev gawk build-essential bison flex texinfo gperf libtool patchutils bc zlib1g-dev libexpat-dev ninja-build
- Fedora/CentOS/RHEL OS
sudo yum install autoconf automake python3 libmpc-devel mpfr-devel gmp-devel gawk bison flex texinfo patchutils gcc gcc-c++ zlib-devel expat-devel
- Arch Linux
sudo pacman -Syyu autoconf automake curl python3 libmpc mpfr gmp gawk base-devel bison flex texinfo gperf libtool patchutils bc zlib expat
3、创建riscv文件夹,并设置权限
sudo mkdir /opt/riscv
sudo chmod 777 /opt/riscv
4、设置环境变量
#编辑 ~/.bashrc文件
sudo vim ~/.bashrc

#在 ~/.bashrc文件中加入这两句
export RISCV="/opt/riscv"
export PATH=$PATH:$RISCV/bin

#让环境变量生效
source ~/.bashrc

5、编译(预计三个小时左右)
- 配置安装路径
- 构建同时支持 32 位和 64 位的交叉编译器
./configure --prefix=/opt/riscv --enable-multilib
- 构建64 位的交叉编译器
./configure --prefix=/opt/riscv
- 构建32 位的交叉编译器
./configure --prefix=/opt/riscv --with-arch=rv32gc --with-abi=ilp32d
- 编译工具链
riscv-gnu-toolchain 工具链分elf-gcc,linux-gnu-gcc两个版本,以及他们对应的32位和64位版本。两个的主要区别在于:
○ riscv32-unknown-elf-gcc,riscv64-unknown-elf-gcc:使用的riscv-newlib库(面向嵌入式的C库),只支持静态链接,不支持动态链接。
○ riscv32-unknown-linux-gnu-gcc,riscv64-unknown-linux-gnu-gcc:使用的是glibc标准库,支持动态链接。
如果是编译简单,较小的elf程序,使用elf-gcc版本即可,如果编译比较大的程序或者需要动态库(比如编译linux,或opencv库等),推荐使用linux-gnu-gcc版本。
# Newlib 执行这个
sudo make -j4

# linux 执行这个
sudo make linux -j4
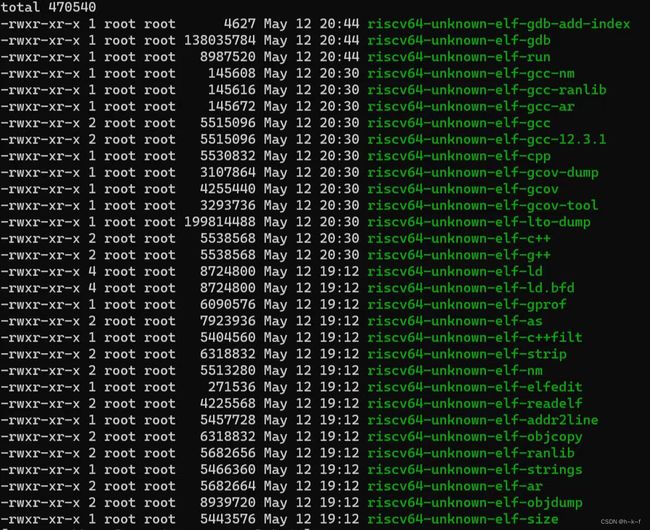
- 检查生成的二进制文件
ls /opt/riscv/bin -lt
方式二、编译压缩包安装(只适用于ubuntu)
如果不想自己编译,也可以选择使用 Release 页面中预先编译好的压缩包。
1、下载压缩包
链接:https://github.com/riscv-collab/riscv-gnu-toolchain/releases
直接下载 riscv64-elf-ubuntu- 开头,且与读者 Ubuntu 版本相符的压缩包。64表示编译的是64位版本,elf代表c运行库是newlib,glibc代表c运行库是glibc,musl代表c运行库是musl。

解压:
# riscv 64位 elf 版本
tar -xzvf riscv64-elf-ubuntu-20.04-nightly-2023.05.24-nightly.tar.gz

# riscv 32位 elf 版本
tar -xzvf riscv32-elf-ubuntu-20.04-nightly-2023.05.24-nightly.tar.gz
解压后会在当前目录得到一个riscv的文件夹,需拷贝到opt目录:
sudo cp -rf riscv /opt/riscv
sudo chmod 777 /opt/riscv
2、安装相关依赖库
sudo apt-get install autoconf automake autotools-dev curl python3 libmpc-dev libmpfr-dev libgmp-dev gawk build-essential bison flex texinfo gperf libtool patchutils bc zlib1g-dev libexpat-dev ninja-build
3、设置环境变量
sudo vim ~/.bashrc

#加入:
export RISCV="/opt/riscv"
export PATH=$PATH:$RISCV/bin

#让环境变量生效
source ~/.bashrc

二、下载并编译riscv-fesvr
git clone https://github.com/riscv/riscv-fesvr.git
cd riscv-fesvr
mkdir build && cd build

#riscv 64位 elf 版本执行这个
../configure --prefix=/opt/riscv --target=riscv64-unknown-elf

#riscv 32位 elf 版本执行这个
../configure --prefix=/opt/riscv --target=riscv32-unknown-elf

sudo make install
三、安装riscv-tools
1、下载riscv-tools
git clone https://github.com/riscv-software-src/riscv-tools
cd riscv-tools
git submodule update --init --recursive
2、三个修改
如果是安装 riscv 32位 elf 版本只需要修改riscv-tools/riscv-pk/util/string.c就行。
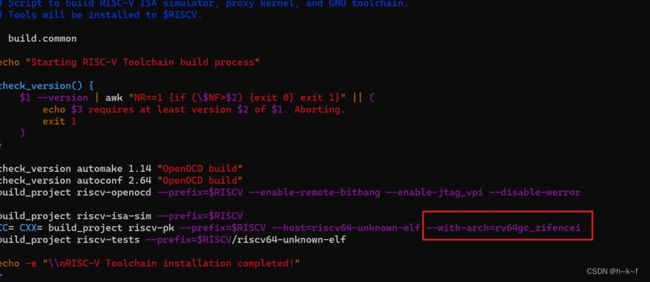
修改build.sh文件
编译到riscv-pk时,会有以下报错:
../machine/flush_icache.c:4: Error: unrecognized opcode `fence.i', extension `zifencei' required
需修改build.sh文件,在riscv-pk的编译配置后加入 --with-arch=rv64gc_zifencei,参考。
#在riscv-tools目录下
vim build.sh
修改riscv-tests/env/v/vm.c文件
不修改,编译时,riscv-tests会报错,错误信息具体可参考。
在riscv-tests/env/v/vm.c文件的tohost、fromhost 前加入extern
#在riscv-tools目录下
vim riscv-tests/env/v/vm.c

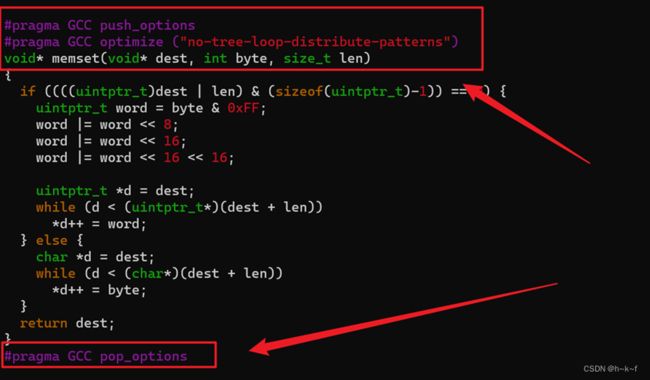
修改riscv-tools/riscv-pk/util/string.c
使用spike pk运行可执行文件时,遇到以下错误:

修改方法,在memset函数前后加入这三句 #pragma,参考:
#pragma GCC push_options
#pragma GCC optimize ("no-tree-loop-distribute-patterns")
void* memset(void* dest, int byte, size_t len)
{
   .......
}
#pragma GCC pop_options
#在riscv-tools目录下
vim riscv-pk/util/string.c
3、安装依赖
#ubuntu
sudo apt-get install autoconf automake autotools-dev curl libmpc-dev libmpfr-dev libgmp-dev libusb-1.0-0-dev gawk build-essential bison flex texinfo gperf libtool patchutils bc zlib1g-dev device-tree-compiler pkg-config libexpat-dev
4、编译
- riscv 64位 elf 版本执行这个
#在riscv-tools目录下 使用root权限
su
export RISCV=/opt/riscv
./build.sh
- riscv 32位 elf 版本执行这个
#在riscv-tools目录下 使用root权限
su
export RISCV=/opt/riscv
./build-rv32ima.sh
5分钟左右安装成功,提示:RISC-V Toolchain installation completed!
四、测试
新建一个hello.c文件,输入以下内容:
#include
int main(){
    printf("hello world!\n");
    return 0;
}
- riscv 64位 elf 版本执行这个
riscv64-unknown-elf-gcc -o hello hello.c
spike pk ./hello
- riscv 32位 elf 版本执行这个
参考。
 riscv32-unknown-elf-gcc -o hello hello.c
spike --isa=rv32imafdc /opt/riscv/riscv32-unknown-elf/bin/pk hello

到这里,RSIC-V的编译工具链和模拟器都以及安装成功。