jmesa应用
一直以来,都没发现什么好的分页组件,最初时用过displaytag,仔细研究了一下,发现它并没有别人说的那么强大,至少离自己的期望还很远,因此尝试寻找其它新的分页组件,但很久以来都没发现自己满意的。无意中又发现了jmesa,也受到了很多的人的吹捧。于是自己也尝试用一下,不过发现其资料相当的少,就算其官方网站上也没多少资料,把整个2.4.5的ZIP包下载下来后,发现连基本的文档都没有,更让人郁闷的是基本的API文档都没有。看来要看看基本的效果也不是那么简单的事情,唯一的资料就是官方的几个例子,实在搞不明白也只有看源码,说实话,源码的注释很少,有些方法或类是用来做什么的根本就没说,理解起来确实有点难度,说了这么多,也把这一两天的成果写下来,怕自己坚持不了多久,索性写一点算一点。
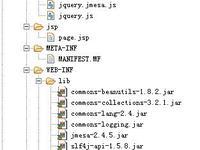
需要用到的组件有点多,如附件图所示。需要注意的是,web层用了Stripes,个人认为此框架很好,源码也写得很好。2.4.5的ZIP包中,有大多数文件,但是有些也没有,如slf4j与jquery等。
jmesa分页的方式有两种,一种是通过java代码直接控制,第二种是通过标签来控制。
首先介绍一下直接在java代码中控制的方式:
上面的代码中最重要的就是那上html方法,此方法完成了整个表格的定制工作,包括链接在内。如果要重新设置每页显示的记录数(默认每页可显示15,50,100),要么修改jmesa.properties文件,要么通过java代码设置。修改配置文件的话,同时要修改两个地方:
limit.rowSelect.maxRows=15
html.toolbar.maxRowsDroplist.increments=15,50,100
如果修改,必须满足第一行的数字必须是第二行所有数字中的一个。用java代码修改的也要遵照同样的原则。
jsp代码很简单:
上面这段代码中,需要注意一下JS声明的顺序,而且还要申明一个form,不然分页的时候JS会出错。还要加上上面的那段JS代码。
第二种方式是直接通过标签的方式申明,因此需要在JSP头部申明:
将${actionBean.html}替换成:
这部分代码的作用与上面action直接操纵表格的方式一样,只是把工作转移到JSP中。只是上面的${items}表示一个将要显示的collection,不用再使用字符串的方式显示。如果两种方式都用的话,则以JSP中的方式为准。
jmesa的配置文件已经集成在JAR中,如果需要改变,可以将此文件复制出来,改变其内容,然后在web.xml重新指定其路径:
需要用到的组件有点多,如附件图所示。需要注意的是,web层用了Stripes,个人认为此框架很好,源码也写得很好。2.4.5的ZIP包中,有大多数文件,但是有些也没有,如slf4j与jquery等。
jmesa分页的方式有两种,一种是通过java代码直接控制,第二种是通过标签来控制。
首先介绍一下直接在java代码中控制的方式:
- public class PaginationActionBean implements ActionBean {
- //此id表示将要创建的table的id
- private String id = "user_table";
- private ActionBeanContext context;
- private String html;
- public String getHtml() {
- return html;
- }
- public void setHtml(String html) {
- this.html = html;
- }
- ........
- @DefaultHandler
- public Resolution display() {
- TableFacade tableFacade = TableFacadeFactory.createTableFacade(id, this
- .getContext().getRequest());
- addItems(tableFacade);
- html = html(tableFacade);
- ForwardResolution resolution = new ForwardResolution("/jsp/page.jsp");
- return resolution;
- }
- private void addItems(TableFacade tableFacade) {
- tableFacade.setItems(FillListData.getData());
- }
- private String html(TableFacade tableFacade) {
- tableFacade.setColumnProperties("name", "password", "deleteUser");
- HtmlTable table = (HtmlTable) tableFacade.getTable();
- table.setCaption("用户列表");
- table.getTableRenderer().setWidth("600px");
- HtmlRow row = table.getRow();
- HtmlColumn name = row.getColumn("name");
- name.setTitle("名字");
- HtmlColumn password = row.getColumn("password");
- password.setTitle("密码");
- HtmlColumn delete = row.getColumn("deleteUser");
- delete.setTitle("删除");
- delete.setWidth("100px");
- // Using an anonymous class to implement a custom editor.
- // 用于演示在表格中增加超链接
- name.getCellRenderer().setCellEditor(new CellEditor() {
- public Object getValue(Object item, String property, int rowcount) {
- Object value = new BasicCellEditor().getValue(item, property,
- rowcount);
- HtmlBuilder html = new HtmlBuilder();
- html.a().href().quote().append("http://baidu.com").quote()
- .close();
- html.append(value);
- html.aEnd();
- return html.toString();
- }
- });
- delete.getCellRenderer().setCellEditor(new CellEditor() {
- public Object getValue(Object item, String property, int rowcount) {
- HtmlBuilder html = new HtmlBuilder();
- // 取得每一行的id号
- Object user = ItemUtils.getItemValue(item, "name");
- String js = " onclick='javascript:del(\"user\"," + user + ") '";
- html.a().append(js).href().quote().append(
- getContext().getRequest().getContextPath()
- + "/Pagination.action?delete&user=" + user)
- .quote().close();
- html.append("删除");
- html.aEnd();
- return html.toString();
- }
- });
- return tableFacade.render(); // Return the Html.
- }
- ..............
- }
public class PaginationActionBean implements ActionBean {


//此id表示将要创建的table的id

	private String id = "user_table";

	private ActionBeanContext context;

	private String html;


	public String getHtml() {

		return html;

	}

	public void setHtml(String html) {

		this.html = html;

	}

........


	@DefaultHandler

	public Resolution display() {

		TableFacade tableFacade = TableFacadeFactory.createTableFacade(id, this

				.getContext().getRequest());


		addItems(tableFacade);

		html = html(tableFacade);

		ForwardResolution resolution = new ForwardResolution("/jsp/page.jsp");

		return resolution;

	}


	private void addItems(TableFacade tableFacade) {

		tableFacade.setItems(FillListData.getData());

	}


	private String html(TableFacade tableFacade) {


		tableFacade.setColumnProperties("name", "password", "deleteUser");


		HtmlTable table = (HtmlTable) tableFacade.getTable();

		table.setCaption("用户列表");

		table.getTableRenderer().setWidth("600px");


		HtmlRow row = table.getRow();


		HtmlColumn name = row.getColumn("name");

		name.setTitle("名字");


		HtmlColumn password = row.getColumn("password");

		password.setTitle("密码");


		HtmlColumn delete = row.getColumn("deleteUser");

		delete.setTitle("删除");

		delete.setWidth("100px");


		// Using an anonymous class to implement a custom editor.

		// 用于演示在表格中增加超链接

		name.getCellRenderer().setCellEditor(new CellEditor() {

			public Object getValue(Object item, String property, int rowcount) {

				Object value = new BasicCellEditor().getValue(item, property,

						rowcount);

				HtmlBuilder html = new HtmlBuilder();

				html.a().href().quote().append("http://baidu.com").quote()

						.close();

				html.append(value);

				html.aEnd();

				return html.toString();

			}

		});


		delete.getCellRenderer().setCellEditor(new CellEditor() {

			public Object getValue(Object item, String property, int rowcount) {


				HtmlBuilder html = new HtmlBuilder();

				// 取得每一行的id号

				Object user = ItemUtils.getItemValue(item, "name");

				String js = " onclick='javascript:del(\"user\"," + user + ") '";

				html.a().append(js).href().quote().append(

						getContext().getRequest().getContextPath()

								+ "/Pagination.action?delete&user=" + user)

						.quote().close();

				html.append("删除");

				html.aEnd();

				return html.toString();

			}

		});


		return tableFacade.render(); // Return the Html.

	}


..............

}
上面的代码中最重要的就是那上html方法,此方法完成了整个表格的定制工作,包括链接在内。如果要重新设置每页显示的记录数(默认每页可显示15,50,100),要么修改jmesa.properties文件,要么通过java代码设置。修改配置文件的话,同时要修改两个地方:
limit.rowSelect.maxRows=15
html.toolbar.maxRowsDroplist.increments=15,50,100
如果修改,必须满足第一行的数字必须是第二行所有数字中的一个。用java代码修改的也要遵照同样的原则。
jsp代码很简单:
- <script type="text/javascript"
- src="${pageContext.request.contextPath}/js/jquery.js"></script>
- <script type="text/javascript"
- src="${pageContext.request.contextPath}/js/jquery.jmesa.js"></script>
- <script type="text/javascript"
- src="${pageContext.request.contextPath}/js/jmesa.js"></script>
- <link rel="stylesheet" type="text/css" href="${pageContext.request.contextPath}/css/jmesa.css"></link>
- </head>
- <body>
- <h1>Stripes Calculator</h1>
- <form>
- ${actionBean.html}
- <script type="text/javascript">
- function onInvokeAction(id) {
- createHiddenInputFieldsForLimitAndSubmit(id);
- }
- </script>
- </form>
- </body>
<script type="text/javascript"

              src="${pageContext.request.contextPath}/js/jquery.js"></script>

<script type="text/javascript"

              src="${pageContext.request.contextPath}/js/jquery.jmesa.js"></script>

<script type="text/javascript"

              src="${pageContext.request.contextPath}/js/jmesa.js"></script>

<link rel="stylesheet" type="text/css" href="${pageContext.request.contextPath}/css/jmesa.css"></link>

</head>

<body>

<h1>Stripes Calculator</h1>


<form>

	${actionBean.html}

<script type="text/javascript">

        function onInvokeAction(id) {

            createHiddenInputFieldsForLimitAndSubmit(id);

        }

</script>

</form>

</body>
上面这段代码中,需要注意一下JS声明的顺序,而且还要申明一个form,不然分页的时候JS会出错。还要加上上面的那段JS代码。
第二种方式是直接通过标签的方式申明,因此需要在JSP头部申明:
- <%@ taglib uri="/WEB-INF/tld/jmesa.tld" prefix="jmesa" %>
- .........
- ...............
<%@ taglib uri="/WEB-INF/tld/jmesa.tld" prefix="jmesa" %>

.........

...............
将${actionBean.html}替换成:
- <jmesa:tableFacade id="user_table" items="${items}" var="bean" >
- <jmesa:htmlTable width="600px">
- <jmesa:htmlRow>
- <jmesa:htmlColumn property="name"/>
- <jmesa:htmlColumn property="password" title="Last Name"/>
- </jmesa:htmlRow>
- </jmesa:htmlTable>
- </jmesa:tableFacade>
<jmesa:tableFacade id="user_table" items="${items}" var="bean" >

        <jmesa:htmlTable width="600px">

            <jmesa:htmlRow>

                <jmesa:htmlColumn property="name"/>

                <jmesa:htmlColumn property="password" title="Last Name"/>

            </jmesa:htmlRow>

        </jmesa:htmlTable>

</jmesa:tableFacade>
这部分代码的作用与上面action直接操纵表格的方式一样,只是把工作转移到JSP中。只是上面的${items}表示一个将要显示的collection,不用再使用字符串的方式显示。如果两种方式都用的话,则以JSP中的方式为准。
jmesa的配置文件已经集成在JAR中,如果需要改变,可以将此文件复制出来,改变其内容,然后在web.xml重新指定其路径:
- <context-param>
- <param-name>jmesaPreferencesLocation</param-name>
- <param-value>WEB-INF/jmesa.properties</param-value>
- </context-param>
<context-param>

	<param-name>jmesaPreferencesLocation</param-name>

	<param-value>WEB-INF/jmesa.properties</param-value>

</context-param>


