Storm系列(一)集群的安装配置
安装前说明:
- 必须先安装zookeeper集群
- 该Storm集群由三台机器构成,主机名分别为chenx01,chenx02,chenx03,对应的IP分别为192.168.1.110,192.168.1.111,192.168.1.112,其中chenx01为MAST
1、修改主机名
vim /etc/sysconfig/network
NETWORKING=yes
HOSTNAME=chenx01
2、修改主机和IP的映射关系
vim /etc/hosts
127.0.0.1 localhost localhost.localdomain localhost4 localhost4.localdomain4
::1 localhost localhost.localdomain localhost6 localhost6.localdomain6
192.168.1.110 chenx01
192.168.1.111 chenx02
192.168.1.112 chenx03
3、修改IP:
vim /etc/sysconfig/network-scripts/ifcfg-eth0
DEVICE="eth0"
BOOTPROTO="static"
IPADDR="192.168.1.116"
NETMASK="255.255.255.0"
GATEWAY="192.168.1.110"
4.关闭防火墙
4.1修改配置文件:
vim /etc/sysconfig/selinux
This file controls the state of SELinux on the system.
# SELINUX= can take one of these three values:
# enforcing - SELinux security policy is enforced.
# permissive - SELinux prints warnings instead of enforcing.
# disabled - No SELinux policy is loaded.
SELINUX=disabled
4.2执行以下命令:
service iptables stop
chkconfig iptables off
reboot
5、安装JDK(1.6以上),并在/etc/profile中配置对应的环境变量
6、编译安装ZMQ
下载安装zeromq依赖包:
rpm -i libstdc++-devel-4.4.7-3.el6.x86_64.rpm
rpm -i gcc-c++-4.4.7-3.el6.x86_64.rpm
rpm -i libuuid-devel-2.17.2-12.9.el6.x86_64.rpm
然后 tar -xzf zeromq-2.1.7.tar.gz 解压zeromq安装包,再 cd zeromq-2.1.7 ,执行 ./configure && make && make install
7、编译安装JZMQ
下载安装jzmq依赖包:
rpm -i autoconf-2.63-5.1.el6.noarch.rpm
rpm -i automake-1.11.1-4.el6.noarch.rpm
rpm -i libtool-2.2.6-15.5.el6.x86_64.rpm
解压jzmq安装包(unzip jzmq-master.zip),切换到解压后的目录,执行./autogen.sh
最后执行:./configure && make && make install
8、安装storm
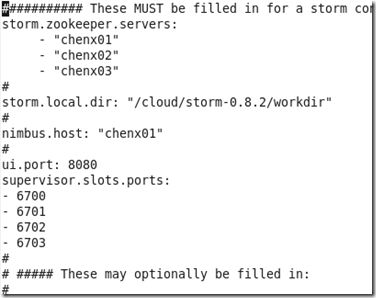
解压安装包(unzip storm-0.8.2.zip),切换到解压文件 storm-0.8.2/conf/ 目录下,vi storm.yaml 修改如下:
9、启动Storm集群
启动Nimbus: 在Storm主控节点上运行 /bin/storm nimbus ;
启动Supervisor: 在Storm各个工作节点上运行"bin/storm supervisor
启动UI: 在Storm主控节点上运行 bin/storm ui,启动后可以通过http://{nimbus host}:8080观察集群的worker资源使用情况、Topologies的运行状态等信息。
注意事项:
1、Storm后台进程被启动后,将在Storm安装部署目录下的logs/子目录下生成各个进程的日志文件。
2、Storm UI必须和Storm Nimbus部署在同一台机器上,否则UI无法正常工作,因为UI进程会检查本机是否存在Nimbus链接。
