WAMP设置
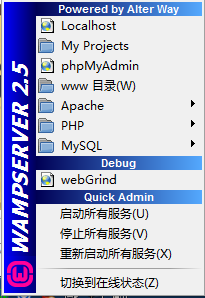
当安装好WAMP后,windows右下角会出现WAMP Server的图标,如图所示!

当中集成了PHP开发的常用功能。
Localhost:表示启动浏览器打开本地首页
My Projects:项目文件夹(目前没有任何作用)
phpMyAdmin:MySql Web管理工具。
Apache:Apache服务器管理相关内容,有版本管理,服务管理,模块管理,虚拟目录管理,配置文件,日志文件。
PHP:PHP相关管理,版本,设置和扩展。
MySQL:MySQL相关管理,版本,服务,MySql控制台,配置文件,日志。
WebGrid:调试窗口
快速设置:启动、关闭、重启所有服务。
切换在线状态:是否能被外部访问,在线表示可以访问,离线表示只能被本机访问。
一、修改WAMP默认的文本编辑器
1、在WAMP根目录中打开wampmanager.conf文件。
将:
editor = "notepad.exe"
修改为:
editor = "C:\Program Files\Notepad++\notepad++.exe"
然后保存,重新启动WAMP。
二、配置WAMP网站根目录。
1、首先在F:盘新建一个Demo文件夹,用来存放网站代码。
2、修改Apache的中httpd.conf中
修改:
DocumentRoot "D:/php/wamp/www/" 为 DocumentRoot "F:/Demo/"
<Directory "D:/php/wamp/www/"> 为 <Directory "F:/Demo/">
注意:所有配置文件修改后,都必须重新启动服务。
这时Apache中的文件就已经修改完成,就可以通过localhost访问F:/Demo中的文件了。
但是WAMP菜单中的www目录还没有改变,如果需要改变WAMP菜单中的目录,还需要修改WAMP安装目录下的wampmanager.ini和wampmanager.tpl文件。
3、修改wampmanager.ini文件。
搜索"menu.left";将
Type: item; Caption: "www 目录"; Action: shellexecute; FileName: "D:/php/wamp/www"; Glyph: 2
修改为:
Type: item; Caption: "Demo目录"; Action: shellexecute; FileName: "F:/Demo"; Glyph: 2
4、修改wampmanager.tpl文件
搜索"menu.left";将:
Type: item; Caption: "${w_wwwDirectory}"; Action: shellexecute; FileName: "${wwwDir}"; Glyph: 2
修改为:
Type: item; Caption: "Demo目录"; Action: shellexecute; FileName: "F:/Demo"; Glyph: 2
修改后重新启动WAMP。
三、WAMP多站点的配置
第1步,修改httpd.conf,增加8080端口的监听
#Listen 12.34.56.78:80
Listen 80
Listen 8080
第2步,修改virtual hosts的配置,同样在httpd.conf这个文件中。
# Virtual hosts
#Include conf/extra/httpd-vhosts.conf
#修改为
# Virtual hosts
Include conf/extra/httpd-vhosts.conf
第3步,增加虚拟主机配置,修改httpd-vhosts.conf文件。
#
# Use name-based virtual hosting.
#
NameVirtualHost *:80
NameVirtualHost *:8080
#
# VirtualHost example:
# Almost any Apache directive may go into a VirtualHost container.
# The first VirtualHost section is used for all requests that do not
# match a ServerName or ServerAlias in any <VirtualHost> block.
#
<VirtualHost *:80>
ServerAdmin [email protected]
DocumentRoot "C:/wamp/www/"
ServerName dummy-host.example.com
ServerAlias www.dummy-host.example.com
ErrorLog "logs/dummy-host.example.com-error.log"
CustomLog "logs/dummy-host.example.com-access.log" common
<Directory "C:/wamp/www/">
Options Indexes FollowSymLinks
AllowOverride All
Order allow,deny
Allow from all
</Directory>
</VirtualHost>
<VirtualHost *:8080>
ServerAdmin [email protected]
DocumentRoot "C:/wamp/www2/"
ServerName dummy-host.example.com
ServerAlias www.dummy-host.example.com
ErrorLog "logs/dummy-host.example.com-error.log"
CustomLog "logs/dummy-host.example.com-access.log" common
<Directory "C:/wamp/www2/">
Options Indexes FollowSymLinks
AllowOverride All
Order allow,deny
Allow from all
</Directory>
</VirtualHost>
第4步,重启apache,就可以看到效果了
四、添加本地域名访问
1、修改httpd-vhosts.conf文件。
<VirtualHost *:80>
DocumentRoot "D:\php\wamp\www\test01"
ServerName test1.com
</VirtualHost>
<VirtualHost *:80>
DocumentRoot "D:\php\wamp\www\test02"
ServerName test2.com
</VirtualHost>
2、修改hosts文件
C:\Windows\System32\drivers\etc\hosts
添加:
127.0.0.1 test1.com
127.0.0.1 test2.com
在hosts中只能使用默认端口绑定域名,也就是只能绑定80端口,指定其他端口后就无法访问。