css3的那些高级选择器二
在上个星期我介绍了css3的属性选择器,伪类选择器和结构伪类选择器,今天楼主继续把其它的css3选择器说完。
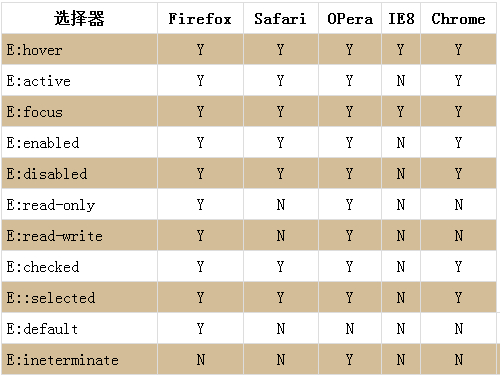
在css3中,共有11中UI状态伪类选择器,分别是E:hover,E:active,E:focus,E:enabled,E:disabled,E:read-only,E:read-write,E:checked,E:default,E:indeterminate及E::selection我们来看下这11种选择器被浏览器的支持的情况

一,选择器E:hover,E:active,E:focus
E:hover选择器用来指定当鼠标指针移动到元素上面时元素所使用的样式,用法如下:
<元素>:hover {

    指定样式

}
对于E:hover大家都会想到a元素;不错E:hover在ie6下只支持a元素,到ie7后才支持其他的标签元素
所有的UI元素状态伪类选择器的使用方法均与此类似
E:active选择器用来指定元素被激活(鼠标在元素上面按下还未松开)时元素所使用的样式
E:focus选择器用来指定当元素获得焦点时所使用的样式
综合例子演示:

<!DOCTYPE HTML>

<html lang="en-US">

<head>

    <meta charset="UTF-8">

    <title> css属性选择器二 </title>

    <style type="text/css">

        8 {margin:0; padding:0;}

        table {width:500px; margin:0 auto; line-height:28px; border:1px solid #DDD; border-collapse:collapse; border-spacing:0;}

        table th {text-align:center; border:1px solid #DDD;}

        table td {text-align:left; padding-left:5px; border:1px solid #DDD;}

        input {width:280px; height:20px; color:#999;}


        input[name="uName"]:hover {

            background:yellow;

        }


        input[name="uName"]:focus {

            background:#FFF;

            color:blue;

        }


        input[name="uName"]:active {

            background:#FFF;

            color:red;

        }


    </style>

<body>

    <table>

        <tr>

            <td>姓名:</td>

            <td><input type="text" name="uName" value="琦恒" /></td>

        </tr>

        <tr>

            <td>密码:</td>

            <td><input type="password" name="pwd" /></td>

        </tr>

    </table>

</body>

</html>
当鼠标划过姓名这个input元素时背景变成黄色,当获得焦点的时候背景变成白色,字体颜色变成蓝色,当鼠标按下还没松开时候字体颜色变成红色。
二、选择器E:enabled,E:disabled
E:enabled选择器匹配每个已启用的元素(大多用在表单元素上),所有主流浏览器均支持 :enabled 选择器,除了 IE8 及更早的版本
E:disabled选择器匹配每个被禁用的元素(大多用在表单元素上),所有主流浏览器均支持 :disabled 选择器,除了 IE8 及更早的版本
实例演示:

<!DOCTYPE HTML>

<html lang="en-US">

<head>

    <meta charset="UTF-8">

    <title> css属性选择器二 </title>

    <style type="text/css">

        8 {margin:0; padding:0;}

        table {width:500px; margin:0 auto; line-height:28px; border:1px solid #DDD; border-collapse:collapse; border-spacing:0;}

        table th {text-align:center; border:1px solid #DDD;}

        table td {text-align:left; padding-left:5px; border:1px solid #DDD;}

        input {width:280px; height:20px; color:#333;}


        input[name="txt"]:disabled {

            background:#ddd;

            color:#999;

        }


        input[name="txt"]:enabled {

            background:yellow;

            color:blue;

        }


    </style>

    <script type="text/javascript">

        function r_change() {

            var oRadio = document.getElementById('radio1');

            var oTxt = document.getElementById('txt');

            if ( oRadio.checked ) {

                oTxt.disabled = '';

            }else {

                oTxt.disabled = 'disabled';

            }

        }

    </script>

<body>

    <table>

        <tr>

            <td>

                <label for=""><input id="radio1" type="radio" name="radio" onchange="r_change();" />可用</label>

                <label for=""><input id="radio2" type="radio" name="radio" onchange="r_change();" />不可用</label>

            </td>

        </tr>

        <tr>

            <td><input type="text" id="txt" name="txt" value="测试" /></td>

        </tr>

    </table>

</body>

</html>
三、选择器E:read-only,E:read-write
E:read-only匹配当元素处于只读状态时的样式
E:read-write匹配元素处于非只读状态时的样式
实例演示:

<!DOCTYPE HTML>

<html lang="en-US">

<head>

    <meta charset="UTF-8">

    <title> css属性选择器二 </title>

    <style type="text/css">

        8 {margin:0; padding:0;}

        table {width:500px; margin:0 auto; line-height:28px; border:1px solid #DDD; border-collapse:collapse; border-spacing:0;}

        table th {text-align:center; border:1px solid #DDD;}

        table td {text-align:left; padding-left:5px; border:1px solid #DDD;}

        input {width:280px; height:20px; color:#333;}


        input[name="uName"]:read-only {

            background:#ddd;

            color:#999;

        }


        input[name="uName"]:-moz-read-only {

            background:#ddd;

            color:#999;

        }


        input[name="pwd"]:read-write {

            background:yellow;

            color:blue;

        }


        input[name="pwd"]:-moz-read-write {

            background:yellow;

            color:blue;

        }


    </style>

<body>

    <table>

        <tr>

            <td>姓名:</td>

            <td><input type="text" name="uName" value="琦恒" readonly="readonly" /></td>

        </tr>

        <tr>

            <td>密码:</td>

            <td><input type="password" name="pwd" value="123456" /></td>

        </tr>

    </table>

</body>

</html>
ps:火狐下需要使用“-moz-read-only”或“-moz-read-write”
四、选择器E:checked,E:default,E:indeterminate
E:checked匹配每个已被选中的 input 元素(只用于单选按钮和复选框).
E:default匹配当页面打开时默认处于选取状态的单选或复选框的样式,目前只有Firefox支持
E:indeterminate用来指定当页面打开时,如果一组单选框中任何一个单选框都没有被设定为选取状态时整组单选框的样式,如果用户选取了其中一个单选框,则该样式被取消指定。目前是有Opera支持
综合实例:

<!DOCTYPE HTML>

<html lang="en-US">

<head>

    <meta charset="UTF-8">

    <title> css属性选择器二 </title>

    <style type="text/css">

        8 {margin:0; padding:0;}

        table {width:500px; margin:0 auto; line-height:28px; border:1px solid #DDD; border-collapse:collapse; border-spacing:0;}

        table th {text-align:center; border:1px solid #DDD;}

        table td {text-align:left; padding-left:5px; border:1px solid #DDD;}

        input[name="uName"] {width:280px; height:20px; color:#333;}


        input[name="uName"]:read-only {

            background:#ddd;

            color:#999;

        }


        input[name="sex"]:checked {

            outline:2px solid yellow;

        }


        input[name="like"]:default {

            outline:2px solid red;

        }


        input[name="like"]:indeterminate {

            outline:2px solid blue;

        }


    </style>

<body>

    <table>

        <tr>

            <td>姓名:</td>

            <td><input type="text" name="uName" value="琦恒" readonly="readonly" /></td>

        </tr>

        <tr>

            <td>性别:</td>

            <td>

                <label for=""><input type="radio" name="sex" />读书</label>

                <label for=""><input type="radio" name="sex" />音乐</label>

            </td>

        </tr>

        <tr>

            <td>爱好:</td>

            <td>

                <label for=""><input type="checkbox" name="like" checked="checked" />电影</label>

                <label for=""><input type="checkbox" name="like" />读书</label>

                <label for=""><input type="checkbox" name="like" />音乐</label>

            </td>

        </tr>

        <tr>

            <td>地区:</td>

            <td>

                <label for=""><input type="radio" name="place" />江西</label>

                <label for=""><input type="radio" name="place" />深圳</label>

                <label for=""><input type="radio" name="place" />上海</label>

            </td>

        </tr>

    </table>

</body>

</html>
五、选择器E::selection
E::selection选择器匹配被用户选取的选取是部分,IE9+、Opera、Google Chrome 以及 Safari 中支持 ::selection 选择器.
ps:Firefox 支持替代的 ::-moz-selection
实例:

<!DOCTYPE html>

<html>

<head>

<style>

::selection

{

color:#ff0000;

}

::-moz-selection

{

color:#ff0000;

}

</style>

</head>

<body>


<h1>请试着选取页面上的文本</h1>


<p>这是一个段落。</p>


<div>这是 div 元素中的文本。</div>


</body>

</html>
六、通用兄弟元素选择器
兄弟元素选择器是指定位于同一个父元素之中的的某个元素之后的所有其他某个种类的兄弟元素所使用的样式,用法如下:
<子元素> ~ <子元素之后的同级兄弟元素>
实例演示:

<!DOCTYPE HTML>

<html lang="en-US">

<head>

    <meta charset="UTF-8">

    <title> css属性选择器二 </title>

    <style type="text/css">

        8 {margin:0; padding:0;}

        div ~ p {background:red;}


    </style>

<body>

    <p>p元素是div的兄弟元素</p>

    <hr />

    <div>

        <p>p元素是div的子元素</p>

        <p>p元素是div的子元素</p>

    </div>

        <hr />

    <p>p元素是div的兄弟元素</p>

        <hr />

    <p>p元素是div的兄弟元素</p><div>

        <p>p元素是div的子元素</p>

        <p>p元素是div的子元素</p>

        <p>p元素是div的子元素</p>

    </div>

        <hr />

    <p>p元素是div的兄弟元素</p>

</body>

</html>
好啦,css3的高级选择器到这里就华丽丽的讲完啦,要是这些选择器能够被所有浏览器支持的话,对我们前端的童鞋是一种福音啊,使用它们可以大幅度提高前端编码的效率。
