【详细】linux 打包QT程序
【详细】linux 打包QT程序
-
- 一. 安装linuxdeployqt
-
- 1.1 下载linuxdeployqt源码并修改如下
- 二. 安装patchelf
- 三. 打包appimage
- 四. 打包成 Debian包
-
- 4.1 control文件内容
- 4.2 postinst文件内容
- 4.3 postrm文件内容
- 4.4 打包命令
- 4.4 安装命令
- 4.5 卸载命令
一. 安装linuxdeployqt
下载地址:https://github.com/probonopd/linuxdeployqt/releases
注意,直接使用官网版本后面打包会提示你系统版本太新不可用,错误提示如下:
linuxdeployqt 5 (commit fc64c50), build 609 built on 2023-01-06 03:55:18 UTC
Please run on a system no newer than the oldest still-supported Ubuntu LTS release.
This is so that the resulting bundle can run on all still-supported releases of Ubuntu.
下面是解决方案:
1.1 下载linuxdeployqt源码并修改如下
git clone https://github.com/probonopd/linuxdeployqt.git
cd ./linuxdeployqt/tools/linuxdeployqt
- 源码下的cmaklists第八行开始的位置删掉如下代码:
find_program(GIT git)

if("${GIT}" STREQUAL "GIT-NOTFOUND")
    message(WARNING "Could not find git, commit and tag info cannot be updated")

    if(NOT GIT_COMMIT)
        message(FATAL_ERROR "Commit ID not set, please call with -DGIT_COMMIT=...")
    endif()

    if(NOT GIT_TAG_NAME)
        message(FATAL_ERROR "Tag name not set, please call with -DGIT_TAG_NAME=...")
    endif()
else()
    # make sure Git revision ID and latest tag is not stored in the CMake cache
    # otherwise, one would have to reset the CMake cache on every new commit to make sure the Git commit ID is up to date
    unset(GIT_COMMIT CACHE)
    unset(GIT_LATEST_TAG CACHE)

    # read Git revision ID and latest tag number
    execute_process(
        COMMAND "${GIT}" rev-parse --short HEAD
        WORKING_DIRECTORY ${PROJECT_SOURCE_DIR}
        OUTPUT_VARIABLE GIT_COMMIT
        OUTPUT_STRIP_TRAILING_WHITESPACE
        RESULT_VARIABLE GIT_COMMIT_RESULT
    )
    if(NOT GIT_COMMIT_RESULT EQUAL 0)
        message(FATAL_ERROR "Failed to determine git commit ID")
    endif()
    mark_as_advanced(GIT_COMMIT GIT_COMMIT_RESULT)

    execute_process(
        COMMAND "${GIT}" rev-list --tags --skip=1 --max-count=1
        WORKING_DIRECTORY ${PROJECT_SOURCE_DIR}
        OUTPUT_VARIABLE GIT_TAG_ID
        OUTPUT_STRIP_TRAILING_WHITESPACE
        RESULT_VARIABLE GIT_TAG_ID_RESULT
    )
    if(NOT GIT_TAG_ID_RESULT EQUAL 0)
        message(FATAL_ERROR "Failed to determine git tag ID")
    endif()
    mark_as_advanced(GIT_TAG_ID GIT_TAG_ID_RESULT)

    execute_process(
        COMMAND "${GIT}" describe --tags ${GIT_TAG_ID} --abbrev=0
        WORKING_DIRECTORY ${PROJECT_SOURCE_DIR}
        OUTPUT_VARIABLE GIT_TAG_NAME
        OUTPUT_STRIP_TRAILING_WHITESPACE
        RESULT_VARIABLE GIT_TAG_NAME_RESULT
    )
    if(NOT GIT_TAG_NAME_RESULT EQUAL 0)
        message(FATAL_ERROR "Failed to determine git tag name")
    endif()
    mark_as_advanced(GIT_TAG_NAME GIT_TAG_NAME_RESULT)
endif()
- linuxdeployqt/tools/linuxdeployqt/main.cpp删掉:
if (strverscmp (glcv, "2.28") >= 0) {
    qInfo() << "ERROR: The host system is too new.";
    qInfo() << "Please run on a system with a glibc version no newer than what comes with the oldest";
    qInfo() << "currently still-supported mainstream distribution (Ubuntu Bionic), which is glibc 2.27.";
    qInfo() << "This is so that the resulting bundle will work on most still-supported Linux distributions.";
    qInfo() << "For more information, please see";
    qInfo() << "https://github.com/probonopd/linuxdeployqt/issues/340";
    return 1;
}
- linuxdeployqt/tools/linuxdeployqt/cmakelists.txt删掉:
if(NOT EXCLUDELIST_RESULT EQUAL 0)
    message(WARNING "Updating excludelist failed, using outdated copy")
endif()
执行构建
cd ./../../        #跳转到源码根目录
cmake .
cmake --build .
显示如下即为成功
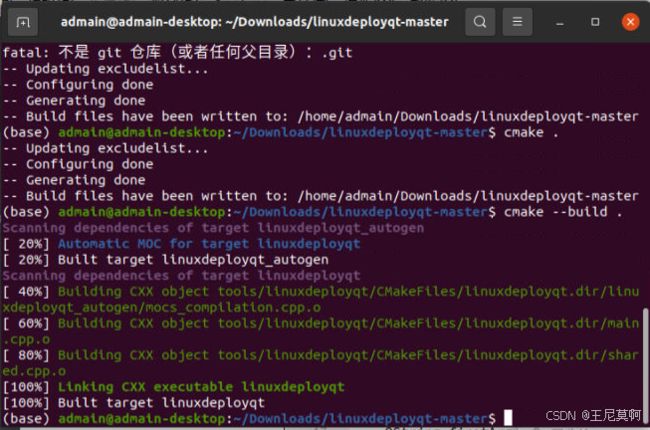
在linuxdeployqt/tools/linuxdeployqt文件夹下生成了linuxdeployqt程序:
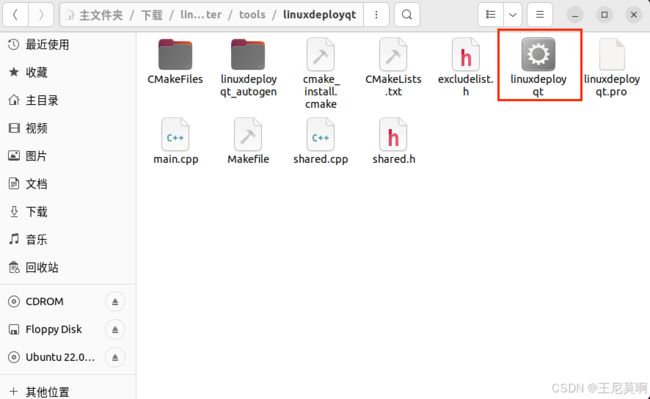
1.2安装linuxdeployqt到系统
cd ./tool/linuxdeployqt
在linuxdeployqt所在的目录,执行
cp ./linuxdeployqt /usr/local/bin/linuxdeployqt
参考:解决linuxdeployqt报错——系统版本过新的问题
二. 安装patchelf
下载地址:https://nixos.org/releases/patchelf/patchelf-0.9/patchelf-0.9.tar.gz
下载完成后解压,进入到patcherlf-0.9目录,在该目录下命令行输入以下命令:
./configure
make
sudo make install
以上命令执行完之后,进入到/usr/local/bin输入ls命令:
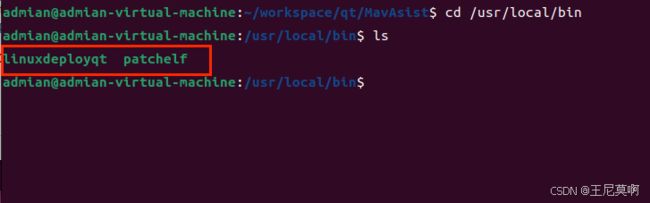
可以看到目录下会出现patchelf和linuxdeployqt文件。
参考:Linux下使用appimage打包程序
三. 打包appimage
新建一个文件夹,整体结构如下
source
├── DEBIAN
│   └── control
│   └── postinst
│   └── postrm
├── opt
    └── App
        ├── app   //QT编译完成的release程序
        └── xxx   //其他文件
把QtCreator Release模式下编译的可执行文件拷贝到source/opt/App/中。
进入该目录下执行:
sudo linuxdeployqt app -appimage
该目录下即会生成一堆程序运行所需要的文件,此时的文件夹移植到其他同系统的计算机,程序也是可以正常使用的。
参考:Linux下Qt程序的打包发布
四. 打包成 Debian包
注意以下文件无后缀名
4.1 control文件内容
Package: mytest
Version: 0.1.0
Section: utils
Priority: optional
Architecture: amd64
Depends:
Installed-Size: 512
Maintainer: [email protected]
Description: my test package
control文件主要描述软件包的名称(Package),版本(Version),Installed-Size(大小),Maintainer(打包人和联系方式)以及描述(Description)等,是deb包必须具备的描述性文件,以便于软件的安装管理和索引。
4.2 postinst文件内容
#!/bin/sh
chmod 777 /opt/Test/Test.desktop
cp /opt/Test/Test.desktop /usr/share/applications/
cp /opt/Test/Test.desktop ~/Desktop/
该脚本内容主要是要在Desktop目录下,自动生成桌面快捷方式。在applications目录下,显示到已安装应用。
修改postinst文件权限:
chmod 775 postinst
4.3 postrm文件内容
#!/bin/sh
rm /usr/share/applications/Test.desktop
rm ~/Desktop/Test.desktop
该脚本作用于卸载的时候删除postinst创建的2个文件。
修改postrm文件权限:
chmod 775 postrm
4.4 打包命令
对source目录下执行:
dpkg -b . ./test_amd64_0.1.0.deb
test_amd64_0.1.0.deb为自己命名,会打包在当前source目录下。deb包到此即打包完成。
4.4 安装命令
sudo dpkg -i test_amd64_0.1.0.deb
4.5 卸载命令
sudo dpkg -r test_amd64_0.1.0.deb
参考:使用linuxdeployqt在linux下进行Qt打包发布(超详细)