TensorRT模型量化实践

文章目录

    • 量化基本概念
    • 量化的方法
      • 方式1:trtexec(PTQ的一种)
      • 方式2:PTQ
        • 2.1 python onnx转trt
        • 2.2 polygraphy工具:应该是对2.1量化过程的封装
      • 方式3:QAT(追求精度时推荐)
    • 使用TensorRT量化实践(C++版)
    • 使用TensorRT量化(python版)
    • 参考文献

TensorRT模型量化实践_第1张图片

量化基本概念

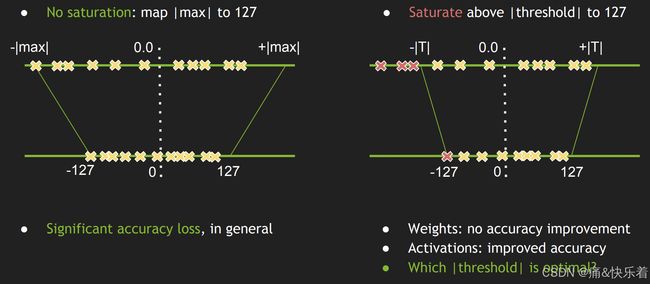
后训练量化Post Training Quantization (PTQ)

量化过程仅仅通过离线推理一些sample数据对权重和激活值进行量化,无需要进行训练微调。

量化感知训练Quantization Aware Training (QAT)

在量化的过程中,对网络进行训练,从而让网络参数能更好地适应量化带来的信息损失。这种方式更加灵活,因此准确性普遍比后训练量化要高。缺点是操作起来不太方便。大多数情况下比训练后量化精度更高,部分场景不一定比部分/混合精度量化好很多。

量化的方法

方式1:trtexec(PTQ的一种)

(1)int8量化

trtexec --onnx=XX.onnx --saveEngine=model.plan --int8 --workspace=4096

如果使用int8量化;量化需要设置calib文件夹;

trtexec 
--onnx=model.onnx 
--minShapes=input:1x1x224x224  
--optShapes=input:2x1x224x224 
--maxShapes=input:10x1x224x224 
--workspace=4096 
--int8 
--best 
--calib=D:\images 
--saveEngine=model.engine 
--buildOnly  

精度损失很大,不建议直接采用。
trtexec 有提供 --calib=接口进行校正,但需要对中间特征进行cache文件保存,比较麻烦,官方文档也是采用上述方式进行int8量化;与fp16的模型在测试集上测试指标,可以看到精度下降非常严重;
(2)int8 fp16混合量化
trtexec --onnx=XX.onnx --saveEngine=model.plan --int8 --fp16 --workspace=4096
测试集上统计指标:相比纯int8量化,效果要好,但是相比fp16,精度下降依然非常严重

方式2:PTQ

engine序列化时执行

2.1 python onnx转trt

操作流程:
按照常规方案导出onnx,onnx序列化为tensorrt engine之前打开int8量化模式并采用校正数据集进行校正;
优点:
1.导出onnx之前的所有操作都为常规操作;2. 相比在pytorch中进行PTQ int8量化,所需显存小;
缺点:
1.量化过程为黑盒子,无法看到中间过程;
2.校正过程需在实际运行的tensorrt版本中进行并保存tensorrt engine;
3.量化过程中发现,即使模型为动态输入,校正数据集使用时也必须与推理时的输入shape[N, C, H, W]完全一致,否则,效果非常非常差,动态模型慎用。
操作示例参看onnx2trt_ptq.py

2.2 polygraphy工具:应该是对2.1量化过程的封装

操作流程:
按照常规方案导出onnx,onnx序列化为tensorrt engine之前打开int8量化模式并采用校正数据集进行校正;
优点: 1. 相较于1.1,代码量更少,只需完成校正数据的处理代码;
缺点: 1. 同上所有; 2. 动态尺寸时,校正数据需与–trt-opt-shapes相同;3.内部默认最多校正20个epoch;

安装polygraphy

pip install colored polygraphy --extra-index-url https://pypi.ngc.nvidia.com

量化

polygraphy convert XX.onnx --int8 --data-loader-script loader_data.py --calibration-cache XX.cache -o XX.pl

方式3:QAT(追求精度时推荐)

注:在pytorch中执行导出的onnx将产生一个明确量化的模型,属于显式量化
操作流程:
安装pytorch_quantization库->加载训练数据->加载模型(在加载模型之前,启用quant_modules.initialize() 以保证原始模型层替换为量化层)->训练->导出onnx;
优点:
1.模型量化参数重新训练,训练较好时,精度下降较少; 2. 通过导出的onnx能够看到每层量化的过程;2. onnx导出为tensort engine时可以采用trtexec(注:命令行需加–int8,需要fp16和int8混合精度时,再添加–fp16),比较简单;3.训练过程可在任意设备中进行;
缺点:
1.导出onnx时,显存占用非常大;2.最终精度取决于训练好坏;3. QAT训练shape需与推理shape一致才能获得好的推理结果;4. 导出onnx时需采用真实的图片输入作为输入设置
操作示例参看yolov5_pytorch_qat.py感知训练,参看export_onnx_qat.py

使用TensorRT量化实践(C++版)

该方式则是利用TensorRT的API将onnx转换engine文件的过程中进行量化,其中需要校准数据(准备一个存放几百张图像的文件夹即可)。为了读取校正图像,需要写一个Int8校正类,如下所示:
calibrator.h

#pragma once
#include 
#include
#include 
class Calibrator : public nvinfer1::IInt8EntropyCalibrator2 {
public:
	Calibrator(int batchsize, int input_w, int input_h, std::string img_dir, const char* calib_table_name, bool read_cache = true);

	virtual ~Calibrator();
	int getBatchSize() const noexcept override;
	bool getBatch(void* bindings[], const char* names[], int nbBindings) noexcept override;
	const void* readCalibrationCache(size_t& length) noexcept override;
	void writeCalibrationCache(const void* cache, size_t length) noexcept override;

private:
	int BATCHSIZE;
	int WIDTH;
	int HEIGHT;
	int INDEX;
	std::string IMAGEDIR;
	std::vector<std::string> IMAGEFILES;
	size_t INPUTSIZE;
	std::string CALIBRATORTABLE;
	bool READCACHE;
	void* DEVICEINPUT;
	std::vector<char> CALIBRATORCACHE;

	cv::Mat preprocess_img(cv::Mat& img, int input_w, int input_h);
	void getFiles(std::string path, std::vector<std::string>& files);
};

calibrator.cpp

#include 
#include 
#include "calibrator.h"

cv::Mat Calibrator::preprocess_img(cv::Mat& img, int input_w, int input_h) {
    int w, h, x, y;
    float r_w = input_w / (img.cols * 1.0);
    float r_h = input_h / (img.rows * 1.0);
    if (r_h > r_w) {
        w = input_w;
        h = r_w * img.rows;
        x = 0;
        y = (input_h - h) / 2;
    }
    else {
        w = r_h * img.cols;
        h = input_h;
        x = (input_w - w) / 2;
        y = 0;
    }
    cv::Mat re(h, w, CV_8UC3);
    cv::resize(img, re, re.size(), 0, 0, cv::INTER_LINEAR);
    cv::Mat out(input_h, input_w, CV_8UC3, cv::Scalar(128, 128, 128));
    re.copyTo(out(cv::Rect(x, y, re.cols, re.rows)));
    return out;
}

void Calibrator::getFiles(std::string path, std::vector<std::string>& files){
    intptr_t Handle;
    struct _finddata_t FileInfo;
    std::string p;
    Handle = _findfirst(p.assign(path).append("\\*").c_str(), &FileInfo);

    while (_findnext(Handle, &FileInfo) == 0) {
        if (strcmp(FileInfo.name, ".") != 0 && strcmp(FileInfo.name, "..") != 0) {
            files.push_back(FileInfo.name);
        }
    }
}

Calibrator::Calibrator(int batchsize, int input_w, int input_h, std::string img_dir, const char* calib_table_name, bool read_cache){
    BATCHSIZE = batchsize;
    WIDTH = input_w;
    HEIGHT = input_h;
    INDEX = 0;
    IMAGEDIR = img_dir;
    CALIBRATORTABLE = calib_table_name;
    READCACHE = read_cache;
    INPUTSIZE = BATCHSIZE * 3 * WIDTH * HEIGHT;

    cudaMalloc(&DEVICEINPUT, INPUTSIZE * sizeof(float));
    getFiles(IMAGEDIR, IMAGEFILES);
}

Calibrator::~Calibrator() {
    cudaFree(DEVICEINPUT);
}

int Calibrator::getBatchSize() const noexcept {
    return BATCHSIZE;
}

bool Calibrator::getBatch(void* bindings[], const char* names[], int nbBindings) noexcept {
    if (INDEX + BATCHSIZE > (int)IMAGEFILES.size()) return false;

    std::vector<cv::Mat> input_imgs;
    for (int i = INDEX; i < INDEX + BATCHSIZE; i++) {
        cv::Mat temp = cv::imread(IMAGEDIR + IMAGEFILES[i]);
        if (temp.empty()) {
            std::cerr << "Image cannot open!" << std::endl;
            return false;
        }
        cv::Mat pr_img = preprocess_img(temp, WIDTH, HEIGHT);
        input_imgs.push_back(pr_img);
    }
    INDEX += BATCHSIZE;
    cv::Mat blob = cv::dnn::blobFromImages(input_imgs, 1.0 / 255.0, cv::Size(WIDTH, HEIGHT), cv::Scalar(0, 0, 0), true, false);

    cudaMemcpy(DEVICEINPUT, blob.ptr<float>(0), INPUTSIZE * sizeof(float), cudaMemcpyHostToDevice);
    bindings[0] = DEVICEINPUT;
    return true;
}

const void* Calibrator::readCalibrationCache(size_t& length) noexcept {
    std::cout << "reading calib cache: " << CALIBRATORTABLE << std::endl;
    CALIBRATORCACHE.clear();
    std::ifstream input(CALIBRATORTABLE, std::ios::binary);
    input >> std::noskipws;
    if (READCACHE && input.good()) {
        std::copy(std::istream_iterator<char>(input), std::istream_iterator<char>(), std::back_inserter(CALIBRATORCACHE));
    }
    length = CALIBRATORCACHE.size();
    return length ? CALIBRATORCACHE.data() : nullptr;
}

void Calibrator::writeCalibrationCache(const void* cache, size_t length) noexcept {
    std::cout << "writing calib cache: " << CALIBRATORTABLE << std::endl;
    std::ofstream output(CALIBRATORTABLE, std::ios::binary);
    output.write(reinterpret_cast<const char*>(cache), length);
}

最后,通过以下代码将onnx量化转换为engine文件。

#include 
#include 
#include "calibrator.h"
#include "NvInfer.h"
#include "NvOnnxParser.h"

// 实例化记录器界面,捕获所有警告性信息,但忽略信息性消息
class Logger : public nvinfer1::ILogger {
	void log(Severity severity, const char* msg) noexcept override {
		if (severity <= Severity::kWARNING) {
			std::cout << msg << std::endl;
		}
	}
}logger;

void ONNX2TensorRT(const char* ONNX_file, std::string& Engine_file, bool& FP16, bool& INT8, std::string& image_dir, const char*& calib_table) {
	std::cout << "Load ONNX file form: " << ONNX_file << "\nStart export..." << std::endl;
	// 1.创建构建器的实例
	nvinfer1::IBuilder* builder = nvinfer1::createInferBuilder(logger);

	// 2.创建网络定义
	uint32_t flag = 1U << static_cast<uint32_t>(nvinfer1::NetworkDefinitionCreationFlag::kEXPLICIT_BATCH);
	nvinfer1::INetworkDefinition* network = builder->createNetworkV2(flag);

	// 3.创建一个 ONNX 解析器来填充网络
	nvonnxparser::IParser* parser = nvonnxparser::createParser(*network, logger);
	
	// 4.读取模型文件并处理任何错误
	parser->parseFromFile(ONNX_file, static_cast<int32_t>(nvinfer1::ILogger::Severity::kWARNING));
	for (int32_t i = 0; i < parser->getNbErrors(); ++i)
		std::cout << parser->getError(i)->desc() << std::endl;

	// 5.创建构建配置,指定TensorRT如何优化模型
	nvinfer1::IBuilderConfig* config = builder->createBuilderConfig();
	
	// 如果是动态模型,则需要设置大小
	/*
	auto profile = builder->createOptimizationProfile();
    auto input_tensor = network->getInput(0);
    auto input_dims = input_tensor->getDimensions();
	// 配置最小允许batch
    input_dims.d[0] = 1;
    profile->setDimensions(input_tensor->getName(), nvinfer1::OptProfileSelector::kMIN, input_dims);
    profile->setDimensions(input_tensor->getName(), nvinfer1::OptProfileSelector::kOPT, input_dims);
    // 配置最大允许batch
    // if networkDims.d[i] != -1, then minDims.d[i] == optDims.d[i] == maxDims.d[i] == networkDims.d[i]
    input_dims.d[0] = maxBatchSize;
    profile->setDimensions(input_tensor->getName(), nvinfer1::OptProfileSelector::kMAX, input_dims);
    config->addOptimizationProfile(profile);
    */

	// 6.设置属性来控制 TensorRT 如何优化网络
	// 设置内存池的空间
	config->setMemoryPoolLimit(nvinfer1::MemoryPoolType::kWORKSPACE, 16 * (1 << 20));
	if (FP16) {
		// 判断硬件是否支持FP16
		if (!builder->platformHasFastFp16()) {
			std::cout << "不支持FP16量化!" << std::endl;
			system("pause");
			return;
		}
		config->setFlag(nvinfer1::BuilderFlag::kFP16);
	}
	else if (INT8) {
		if (!builder->platformHasFastInt8()) {
			std::cout << "不支持INT8量化!" << std::endl;
			system("pause");
			return;
		}
		config->setFlag(nvinfer1::BuilderFlag::kINT8);
		nvinfer1::IInt8EntropyCalibrator2* calibrator = new Calibrator(1, 640, 640, image_dir, calib_table);
		config->setInt8Calibrator(calibrator);
	}

	// 7.指定配置后,构建引擎
	nvinfer1::IHostMemory* serializeModel = builder->buildSerializedNetwork(*network, *config);

	// 8.保存TensorRT模型
	std::ofstream engine(Engine_file, std::ios::binary);
	engine.write(reinterpret_cast<const char*>(serializeModel->data()), serializeModel->size());

	// 9.序列化引擎包含权重的必要副本,因此不再需要解析器、网络定义、构建器配置和构建器,可以安全地删除
	delete parser;
	delete network;
	delete config;
	delete builder;

	// 10.将引擎保存到磁盘后 ,并且可以删除它被序列化到的缓冲区
	delete serializeModel;
	std::cout << "Export success, Save as: " << Engine_file << std::endl;
}

int main(int argc, char** argv) {
	// ONNX 文件路径
	const char* ONNX_file = "../weights/yolov8s.onnx";
	// ENGINE 文件保存路径
	std::string Engine_file = "../weights/yolov8s.engine";

	// 当量化为INT8时,图片路径
	std::string image_dir = "../images/";
	// 当量化为INT8时,校准表路径(存在读取,不存在创建)
	const char* calib_table = "../weights/calibrator.table";

	// 选择量化方式,若两个都为false,使用FP32生成 ENGINE文件
	bool FP16 = false;
	bool INT8 = true;

	std::ifstream file(ONNX_file, std::ios::binary);
	if (!file.good()) {
		std::cout << "Load ONNX file failed!" << std::endl;
	}

	ONNX2TensorRT(ONNX_file, Engine_file, FP16, INT8, image_dir, calib_table);

	return 0;
}

使用TensorRT量化(python版)

流程C++版本的一样,这个没进行测试,以下版本是别人量化yolov5的代码,感兴趣的朋友可以尝试一下。

import tensorrt as trt
import os
import numpy as np
import pycuda.driver as cuda
import pycuda.autoinit
import cv2


def get_crop_bbox(img, crop_size):
    """Randomly get a crop bounding box."""
    margin_h = max(img.shape[0] - crop_size[0], 0)
    margin_w = max(img.shape[1] - crop_size[1], 0)
    offset_h = np.random.randint(0, margin_h + 1)
    offset_w = np.random.randint(0, margin_w + 1)
    crop_y1, crop_y2 = offset_h, offset_h + crop_size[0]
    crop_x1, crop_x2 = offset_w, offset_w + crop_size[1]
    return crop_x1, crop_y1, crop_x2, crop_y2

def crop(img, crop_bbox):
    """Crop from ``img``""" 
    crop_x1, crop_y1, crop_x2, crop_y2 = crop_bbox
    img = img[crop_y1:crop_y2, crop_x1:crop_x2, ...]
    return img

class yolov5EntropyCalibrator(trt.IInt8EntropyCalibrator2):
    def __init__(self, imgpath, batch_size, channel, inputsize=[384, 1280]):
        trt.IInt8EntropyCalibrator2.__init__(self)
        self.cache_file = 'yolov5.cache'
        self.batch_size = batch_size
        self.Channel = channel
        self.height = inputsize[0]
        self.width = inputsize[1]
        self.imgs = [os.path.join(imgpath, file) for file in os.listdir(imgpath) if file.endswith('jpg')]
        np.random.shuffle(self.imgs)
        self.imgs = self.imgs[:2000]
        self.batch_idx = 0
        self.max_batch_idx = len(self.imgs) // self.batch_size
        self.calibration_data = np.zeros((self.batch_size, 3, self.height, self.width), dtype=np.float32)
        # self.data_size = trt.volume([self.batch_size, self.Channel, self.height, self.width]) * trt.float32.itemsize
        self.data_size = self.calibration_data.nbytes
        self.device_input = cuda.mem_alloc(self.data_size)
        # self.device_input = cuda.mem_alloc(self.calibration_data.nbytes)

    def free(self):
        self.device_input.free()

    def get_batch_size(self):
        return self.batch_size

    def get_batch(self, names, p_str=None):
        try:
            batch_imgs = self.next_batch()
            if batch_imgs.size == 0 or batch_imgs.size != self.batch_size * self.Channel * self.height * self.width:
                return None
            cuda.memcpy_htod(self.device_input, batch_imgs)
            return [self.device_input]
        except:
            print('wrong')
            return None
    def next_batch(self):
        if self.batch_idx < self.max_batch_idx:
            batch_files = self.imgs[self.batch_idx * self.batch_size: \
                                    (self.batch_idx + 1) * self.batch_size]
            batch_imgs = np.zeros((self.batch_size, self.Channel, self.height, self.width),
                                  dtype=np.float32)
            for i, f in enumerate(batch_files):
                img = cv2.imread(f)  # BGR
                crop_size = [self.height, self.width]
                crop_bbox = get_crop_bbox(img, crop_size)
                # crop the image
                img = crop(img, crop_bbox)
                img = img.transpose((2, 0, 1))[::-1, :, :]  # BHWC to BCHW ,BGR to RGB
                img = np.ascontiguousarray(img)
                img = img.astype(np.float32) / 255.
                assert (img.nbytes == self.data_size / self.batch_size), 'not valid img!' + f
                batch_imgs[i] = img
            self.batch_idx += 1
            print("batch:[{}/{}]".format(self.batch_idx, self.max_batch_idx))
            return np.ascontiguousarray(batch_imgs)
        else:
            return np.array([])
    def read_calibration_cache(self):
        # If there is a cache, use it instead of calibrating again. Otherwise, implicitly return None.
        if os.path.exists(self.cache_file):
            with open(self.cache_file, "rb") as f:
                return f.read()

    def write_calibration_cache(self, cache):
        with open(self.cache_file, "wb") as f:
            f.write(cache)
            f.flush()
            # os.fsync(f)


def get_engine(onnx_file_path, engine_file_path, cali_img, mode='FP32', workspace_size=4096):
    """Attempts to load a serialized engine if available, otherwise builds a new TensorRT engine and saves it."""
    TRT_LOGGER = trt.Logger(trt.Logger.WARNING)
    def build_engine():
        assert mode.lower() in ['fp32', 'fp16', 'int8'], "mode should be in ['fp32', 'fp16', 'int8']"
        explicit_batch_flag = 1 << int(trt.NetworkDefinitionCreationFlag.EXPLICIT_BATCH)
        with trt.Builder(TRT_LOGGER) as builder, builder.create_network(
            explicit_batch_flag
        ) as network, builder.create_builder_config() as config, trt.OnnxParser(
            network, TRT_LOGGER
        ) as parser:
            with open(onnx_file_path, "rb") as model:
                print("Beginning ONNX file parsing")
                if not parser.parse(model.read()):
                    print("ERROR: Failed to parse the ONNX file.")
                    for error in range(parser.num_errors):
                        print(parser.get_error(error))
                    return None
            config.max_workspace_size = workspace_size * (1024 * 1024)  # workspace_sizeMiB
            # 构建精度
            if mode.lower() == 'fp16':
                config.flags |= 1 << int(trt.BuilderFlag.FP16)

            if mode.lower() == 'int8':
                print('trt.DataType.INT8')
                config.flags |= 1 << int(trt.BuilderFlag.INT8)
                config.flags |= 1 << int(trt.BuilderFlag.FP16)
                calibrator = yolov5EntropyCalibrator(cali_img, 26, 3, [384, 1280])
                # config.set_quantization_flag(trt.QuantizationFlag.CALIBRATE_BEFORE_FUSION)
                config.int8_calibrator = calibrator
            # if True:
            #     config.profiling_verbosity = trt.ProfilingVerbosity.DETAILED

            profile = builder.create_optimization_profile()
            profile.set_shape(network.get_input(0).name, min=(1, 3, 384, 1280), opt=(12, 3, 384, 1280), max=(26, 3, 384, 1280))
            config.add_optimization_profile(profile)
            # config.set_calibration_profile(profile)
            print("Completed parsing of ONNX file")
            print("Building an engine from file {}; this may take a while...".format(onnx_file_path))
            # plan = builder.build_serialized_network(network, config)
            # engine = runtime.deserialize_cuda_engine(plan)
            engine = builder.build_engine(network,config)
            print("Completed creating Engine")
            with open(engine_file_path, "wb") as f:
                # f.write(plan)
                f.write(engine.serialize())
            return engine
        
    if os.path.exists(engine_file_path):
        # If a serialized engine exists, use it instead of building an engine.
        print("Reading engine from file {}".format(engine_file_path))
        with open(engine_file_path, "rb") as f, trt.Runtime(TRT_LOGGER) as runtime:
            return runtime.deserialize_cuda_engine(f.read())
    else:
        return build_engine()


def main(onnx_file_path, engine_file_path, cali_img_path, mode='FP32'):
    """Create a TensorRT engine for ONNX-based YOLOv3-608 and run inference."""

    # Try to load a previously generated YOLOv3-608 network graph in ONNX format:
    get_engine(onnx_file_path, engine_file_path, cali_img_path, mode)


if __name__ == "__main__":
    onnx_file_path = '/home/models/boatdetect_yolov5/last_nms_dynamic.onnx'
    engine_file_path = "/home/models/boatdetect_yolov5/last_nms_dynamic_onnx2trtptq.plan"
    cali_img_path = '/home/data/frontview/test'
    main(onnx_file_path, engine_file_path, cali_img_path, mode='int8')

参考文献

tensorrt官方int8量化方法汇总
深度学习模型量化基础
模型量化5:onnx模型的静态量化和动态量化
有用的 模型量化!ONNX转TensorRT(FP32, FP16, INT8)
TensorRT-Int8量化详解
TensorRT中的INT 8 优化
TensorRT——INT8推理
TensorRT模型,INT8量化Python实践教程

你可能感兴趣的:(深度学习,TensorRT,c++,深度学习)