spring与axis2整合发布webservice
最近在研究整合spring框架和axis2发布webservice服务,由于本人也才学java不久,为了便于以后的查看,在这里记录下发布过程。
所需的工具包,spring.jar和axis2链接地址为http://pan.baidu.com/s/1gdgVBoB,这里发布服务只需要两个包,spring-framework-3.2.1.RELEASE-dist.zip和axis2-1.6.2-war.zip。首先解压axis2-1.6.2-war.zip,得到axis2.war文件,放入tomcat的webapps目录中,启动tomcat,浏览器中输入http://ip:端口号/axis2/出现

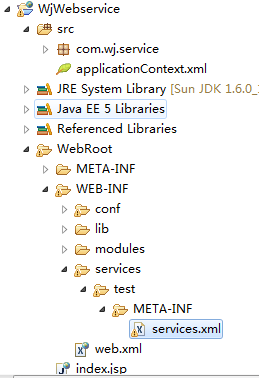
说明axis2运行成功,会在webapps中生成一个叫axis2的目录。接着在myeclipse中新建一个web工程,这里我取名为WjWebservice,工程目录结构
解压上面的两个包,将其中的jar包全部放入WebRoot/WEB-INF/lib目录中,在WEB-INF目录下新建conf和modules目录,将tomcat的webapps/axis2/WEB-INF下的conf和modules目录中的文件分别倒入在web工程中新建的conf和modules下。新建services目录,新建test(这个目录名字可以自己随便取)目录,新建META-INF目录,新建services.xml。
在com.wj.service中新建HelloWorld接口,代码为:
package com.wj.service;

public interface HelloWorld {
    public String greeting(String name);
    public void print();
}
在com.wj.service中新建HelloWorldImpl类实现HelloWorld接口,代码为:
package com.wj.service;

public class HelloWorldImpl implements HelloWorld{

    public String greeting(String name) {

        return name+"hello world!";
    }

    public void print() {
        System.out.println("Hi!");

    }

}
在com.wj.service中新建webservice javabean对象HelloWorldService类,代码为:
package com.wj.service;

public class HelloWorldService {
    public HelloWorld helloWorld;

    public HelloWorld getHelloWorld() {
        return helloWorld;
    }

    public void setHelloWorld(HelloWorld helloWorld) {
        this.helloWorld = helloWorld;
    }
    public String sayGreeting(String name)
    {
        return helloWorld.greeting(name);
    }
    public void sayPrint()
    {
        helloWorld.print();
    }
}
配置spring的applicationContext.xml:
<?xml version="1.0" encoding="UTF-8"?>
<beans xmlns="http://www.springframework.org/schema/beans"
    xmlns:xsi="http://www.w3.org/2001/XMLSchema-instance"
    xmlns:aop="http://www.springframework.org/schema/aop"
    xmlns:tx="http://www.springframework.org/schema/tx"
    xsi:schemaLocation="http://www.springframework.org/schema/beans http://www.springframework.org/schema/beans/spring-beans-2.0.xsd
           http://www.springframework.org/schema/aop http://www.springframework.org/schema/aop/spring-aop-2.0.xsd
           http://www.springframework.org/schema/tx http://www.springframework.org/schema/tx/spring-tx-2.0.xsd">

    <bean id= "applicationContext" class = "org.apache.axis2.extensions.spring.receivers.ApplicationContextHolder"  />
    <bean id="helloWorldImpl" class="com.wj.service.HelloWorldImpl">
    </bean>
    <bean id="helloWorldService" class="com.wj.service.HelloWorldService">
        <property name="helloWorld" ref="helloWorldImpl"></property>
    </bean>
</beans>
配置web.xml:
<?xml version="1.0" encoding="UTF-8"?>
<web-app version="2.5"
    xmlns="http://java.sun.com/xml/ns/javaee"
    xmlns:xsi="http://www.w3.org/2001/XMLSchema-instance"
    xsi:schemaLocation="http://java.sun.com/xml/ns/javaee
    http://java.sun.com/xml/ns/javaee/web-app_2_5.xsd">
    <!-- 注册axis2的servlet -->
    <servlet>
        <servlet-name>AxisServlet</servlet-name>
        <servlet-class>org.apache.axis2.transport.http.AxisServlet</servlet-class>
        <load-on-startup>1</load-on-startup>
    </servlet>
    <servlet-mapping>
        <servlet-name>AxisServlet</servlet-name>
        <url-pattern>/services/*</url-pattern>
    </servlet-mapping>
     <!-- 加载spring的配置文件  -->
    <context-param>
      <param-name>contextConfigLocation</param-name>
      <param-value>classpath:applicationContext.xml</param-value>
    </context-param>
    <!-- 增加spring监听器 -->
    <listener>
        <listener-class>org.springframework.web.context.ContextLoaderListener</listener-class>
    </listener>
  <welcome-file-list>
    <welcome-file>index.jsp</welcome-file>
  </welcome-file-list>
</web-app>
配置services.xml:
<?xml version="1.0" encoding="UTF-8"?>
<service name= "helloWorldWebservice" targetNamespace="http://www.wujianjun.org">
        <description>simple spring example</description>
        <parameter name= "ServiceObjectSupplier" >
            org.apache.axis2.extensions.spring.receivers.SpringAppContextAwareObjectSupplier
        </parameter>
        <parameter name= "SpringBeanName" >helloWorldService</parameter>
        <messageReceivers>
            <messageReceiver mep= "http://www.w3.org/2004/08/wsdl/in-only"
             class = "org.apache.axis2.rpc.receivers.RPCInOnlyMessageReceiver"/>
            <messageReceiver mep= "http://www.w3.org/2004/08/wsdl/in-out"
             class = "org.apache.axis2.rpc.receivers.RPCMessageReceiver"/>
        </messageReceivers>
</service>
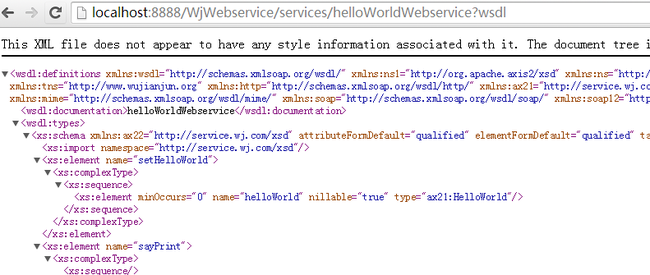
浏览器中输入:http://IP:端口/工程名/services/services.xml配置的服务名称?wsdl生成wsdl文件
到此webservice服务发布完成。

