<>2.3节(Adding Anchor, Image, Chapter, and Section objects)读书笔记
Adding Anchor, Image, Chapter, and Section objects
在上篇2.1节中,我向大家介绍了很多high-level类的使用。里面用到了ERD图中几乎所有的字段,但有个一没有用到:imdb。这个字段存储的是电影在网站imdb.com上的ID,缩写为IMDB(Internet Movie Database),因此这一节中我们会在文档中加入一些超链接。如果你下载了本书的源代码,里面会有一个resources文件夹,此文件夹中有一个poster文件夹:里面包含了每个imdb对应的图片(如Superman Return(超人归来)的ID是0348150,那么里面就会有一个0348150.jpg图片文件)。因此这一节我们首先会学会在文档中创建不同类型的链接,然后使用Chapter和Section对象来获取书签,最后学会如何往文档中添加图片。
The Anchor object: internal and external links
现在web网站上充满了超链接,我们无法想像一个web页面中没有a标签。但在PDF文档中呢?
在iText中有很多不同的方法往pdf文中添加链接,在这一节中我们会设置Anchor类的Reference和Name属性,对应与Chunk类的SetRemoteGoto方法和SetLocalDestination方法。
ADDING ANCHOR OBJECTS
在listing 2.22中,有三个Anchor对象被创建,第一个Anchor将country name作为其文本呈现,而且通过设置Name属性将其作为内部文档的一个书签,和HTML中的<a name="US">一样。第三个Anchor对象的文本是:"Go back to the first page",其会指向文档内部名称为US的书签,和HTML中的<a href="#US">一样。
listing 2.22 MovieLinks1.cs
Anchor imdb;

// loop over the countries

while (reader .Read ())

{

    Paragraph country = new Paragraph();

    // the name of the country will be a destination

    Anchor dest = new Anchor(reader.GetString(1), FilmFonts.BOLD);

    dest.Name = reader.GetString(0);

    country.Add(dest);

    country.Add(string.Format(": {0} movies", reader.GetInt32(2)));

    document.Add(country);


    string country_id = reader.GetString(0);

    // loop over the movies

    foreach (Movie movie in PojoFactory.GetMovies(conn, country_id))

    {

        imdb = new Anchor(movie.Title);

        // the movie title will be an external link

        imdb.Reference = string.Format("http://www.imdb.com/title/tt{0}", movie.IMDB);

        document.Add(imdb);

        document.Add(Chunk.NEWLINE);

    }

    document.NewPage();

}


// Create an internal link to the first page

Anchor toUS = new Anchor("Go back to the first page.");

toUS.Reference = "#US";

document.Add(toUS);
第二个Anchor对象引用的是一个外部的链接,在以上代码中指向IMDB 站点的指定页面,如 http://www.imdb.com/title/tt0348150/ 引用的就是电影[超人归来]的电影信息页面。
不过还有其它的方法来获取相同的效果。
REMOTE GOTO, LOCAL DESTINATION, AND LOCAL GOTO CHUNKS
listing 2.23 MovieLinks2.cs
// Create a local destination at the top of the page.

Paragraph p = new Paragraph();

Chunk top = new Chunk("Country List", FilmFonts.BOLD);

top.SetLocalDestination("top");

p.Add(top);

document.Add(p);


// create an external link

Chunk imdb = new Chunk("Internet Movie Database", FilmFonts.ITALIC);

imdb.SetAnchor(new Uri("http://www.imdb.com"));

p = new Paragraph("Click on a country, and you'll get a list of movies, containing likes to the ");

p.Add(imdb);

p.Add(".");

document.Add(p);


// Create a remote goto

p = new Paragraph("This list can be found in a ");

Chunk page1 = new Chunk("separate document");

page1.SetRemoteGoto("movie_links_1.pdf", 1);

p.Add(page1);

p.Add(".");

document.Add(p);

document.Add(Chunk.NEWLINE);


// Create a database connection and statement

string connStr = ConfigurationManager.AppSettings["SQLiteConnStr"];

SQLiteConnection conn = new SQLiteConnection(connStr);


using (conn)

{

    SQLiteCommand cmd = conn.CreateCommand();

    cmd.CommandText = "SELECT DISTINCT mc.country_id, c.country, count(*) AS c "

            + "FROM film_country c, film_movie_country mc "

            + "WHERE c.id = mc.country_id "

            + "GROUP BY mc.country_id, country ORDER BY c DESC";


    cmd.CommandType = System.Data.CommandType.Text;

    conn.Open();

    SQLiteDataReader reader = cmd.ExecuteReader();


    while (reader .Read ())

    {

        Paragraph country = new Paragraph(reader.GetString(1));

        country.Add(": ");

        Chunk link = new Chunk(string.Format("{0} moives", reader.GetInt32(2)));

        link.SetRemoteGoto("movie_links_1.pdf", reader.GetString(0));

        country.Add(link);

        document.Add(country);

    }


    document.Add(Chunk.NEWLINE);

    // Create local goto to top

    p = new Paragraph("Go to");

    top = new Chunk("top");

    top.SetLocalGoto("top");

    p.Add(top);

    p.Add(".");

    document.Add(p);


}
以上代码使用的是Chunk对象来向一些链接。我们可以设置以下的一些属性:
- Chunk.SetLocalDestination(),和Anchor.Name一样效果,可以设置为文档内部的一个书签
- Chunk.SetLocalGoto()和Anchor.Reference一样效果,不过引用的是文档内部的书签。
- Chunk.SetRemoteGoto()可以引用以下几种情况:
- 一个外部链接,这个和Anchor.Reference一样的效果
- 其它pdf文档中某一页,如代码page1.SetRemoteGoto("movie_links_1.pdf", 1);应该就是movie_links_1.pdf文档的第一页面。
- 其它pdf文档中的内部书签,如代码link.SetRemoteGoto("movie_links_1.pdf", reader.GetString(0));第二个参数就是movie_links_1.pdf文档的内部书签。
我们可以使用列出了32个countries的movie_links_2.pdf文档作为movie_links_1.pdf文档一个可以点击的目录(Table Of contents坚持为TOC)。接下来的例子我们会创建一个不同类型的TOC:Adobe Reader的书签。要注意的是书签(bookmarks)在pdf的文档中被引用为outlines。
Chapter and Section: get bookmarks for free

listing 2.24 MovieHistory.cs
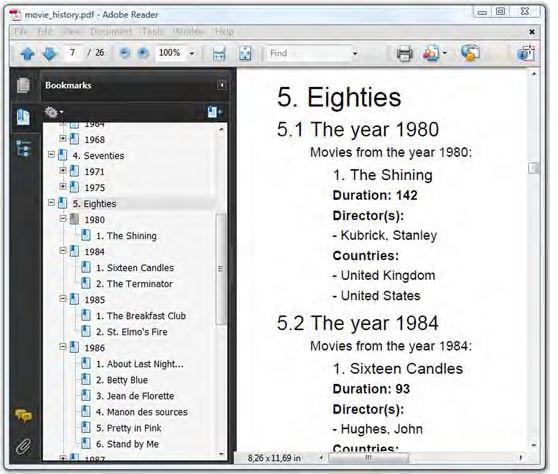
title = new Paragraph(EPOCH[epoch], FONT[0]);

chapter = new Chapter(title, epoch + 1);

………

title = new Paragraph(string.Format("The year {0}", movie.Year), FONT[1]);

section = chapter.AddSection(title);

section.BookmarkTitle = movie.Year.ToString();

section.Indentation = 30;

section.BookmarkOpen = false;

section.NumberStyle = Section.NUMBERSTYLE_DOTTED_WITHOUT_FINAL_DOT;

section.Add(new Paragraph(string.Format("Movies from the year {0}:", movie.Year)));

……

title = new Paragraph(movie.Title, FONT[2]);

subsection = section.AddSection(title);

subsection.Indentation = 20;

subsection.NumberDepth = 1;
以上为代码和生成的pdf文档截图。如果滚动pdf的书签面板,你会发现最上层的书签一共有7个带数字的实体:Forties, Fifties, Sixties, Seventies, Eighties, Nineties, and Twenty-first century。这些都是通过Chapter对象实现的,在pdf中每一个Chapter对象都包含了一个或多个Section对象。在以上代码中就是年份(years)属于时代(forties, fifties等)。
在代码中,Chapter相关联的数字是通过构造器中传入进去的,默认情况下在数字后面有一个点,不过可以通过NumberStyle来修改。Seciton对象都是通过AddSection来并传入Section的标题传入进去。此标题会呈现在Pdf文档和对应的书签上,如果希望使用不同的书签标题可以使用BookmarkTitle属性来修改。代码中Section还通过Indentation属性要修改缩进,不过这个只会影响Pdf文档中的缩进,不会对书签有影响。最后我们看下subsection书签的数字,它不是这样标记 5.4.1,5.4.2而是1.,2.。因为在代码中设置了属性NumberDepth=1。
这里要注意的是Section类实现的不是IElement接口,是ILargeElement接口。iText一般会尽快的将Pdf的语句写入到输出流中,这样就可以方便释放内存。但对于类似Section对象,只有在其被加入到Document类是iText才会作Pdf语法的转换工作,这也意味Section会一直保存在内存中直到iText完成转换工作。不过有以下几种方法解决Section的问题:
- 将Chapter定义为未完成(incomplete),然后将其以不同的片段加入到Document中。这个方法会在第四节中学到,在哪里会讨论另一个实现了ILargeElement的类:PdfPTable。
- 使用PdfOutLint对象来创建书签,具体的讨论会在第7节中。
目前为止我们已经讨论了类图中几乎所有的对象,除了以下两个对象:Rectangle和Image。
The Image object: adding raster format illustrations
在第一节的时候我们使用了Rectangle对象来定义页面大小,不过大部分情况下我们不会通过Document.Add方法将Rectangle添加进去。在第三节时会有更好的方法画图。不过为了完整性,以下是添加Rectangle的代码:
listing 2.25 MoviePosters1.cs
Rectangle rect = new Rectangle(0, 806, 36, 842);

rect.BackgroundColor = BaseColor.RED;

document.Add(rect);
添加图片
listing 2.26 MoviePosters1.cs (continued)
document.Add(new Paragraph(item.Title));

// Add an image

document.Add(Image.GetInstance(string.Format(RESOURCE, item.IMDB)));
以上的代码就会将Image对象添加到文档中,iText使用不同的图片类处理不同的图片类型:Jpeg,PngImage,GifImage,TiffImage等。所有的这些类会在第十节有详细的讨论。我们可以创建这些不同的类处理Image,不过更方便的方法就是让Image类检测图片的类型并自动选择合适的类来处理。
图片次序

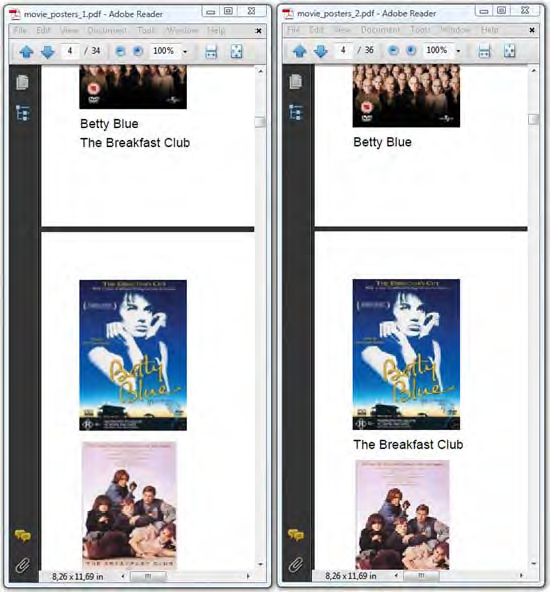
上图的左边就是listing 2.26生成的pdf文档,仔细观察的话你会发现文本"The Breakfast club"从第四页上移到了上一页。这是默认的行为:iText会尽可能多的为每一页添加内容。不过目前看起来就不太正确,但通过以下代码就可以修正:
listing 2.27 MoviePosters2.cs
PdfWriter.GetInstance(document, new FileStream(fileName, FileMode.Create)).StrictImageSequence = true;
以上代码生成的Pdf文档在图的右侧,属性StrictImageSequence会让iText严格按照添加的顺序来添加内容。
修改图片在文档中的位置

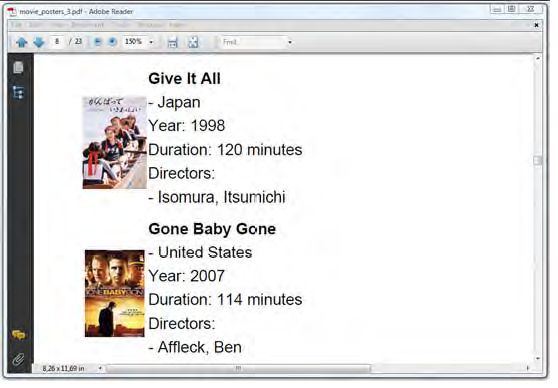
上图中图片打印在页面左边,电影信息的文本打印在图片的边上。这是通过设置Alignment属性完成的,其属性包含以下几个:
- Image.LEFT_ALIGN ,Image.ALIGN_CENTER 或者Image.ALIGN_LEFT:这些值设置的图片在页面的位置。
- Image.TEXTWRAP或者Image.UNDERLYING:默认情况下iText不会包裹图片,所以当先将图片添加到文档再添加文本时,文本会添加在图片的下面。但设置了Image.TEXTWRAP,我们就可以将文本添加在图片的旁边(设置了Image.ALIGN_CENTER就没有这种效果)。设置为UNDERLYING,文本就会直接添加在图片的上面,文本和图片就会重叠。
但如果使用了SetAbsolutePosition()方法,上面所有的设置都不会起作用。SetAbsolutePosition方法接受一个坐标(x,y),这个坐标是用来定位图片的左下角,图片也不会跟随其它的对象被打印。
图片边框
如果你仔细留意了类图的话你会发现Image类是继承Rectangle类,因此可以设置边框,长度和颜色等等:
listing 2.28 MoviePosters3.cs
// Create an image

Image img = Image.GetInstance(string.Format(RESOURCE, item.IMDB));

img.Alignment = Image.LEFT_ALIGN | Image.TEXTWRAP;

img.Border = Image.BOX;

img.BorderWidth = 10;

img.BorderColor = BaseColor.WHITE;

img.ScaleToFit(1000, 72);
Image.BOX值实际上就是Rectangle.RIGHT_BORDER|Rectangle.LEFT_BORDER|Rectangle.TOP_BORDER|Rectangle.BOTTOM_BORDER,也就是说图片在每一边都需要一个border。
图片缩放
在listing 2.28中,我们使用了ScaleToFit()方法,并传入一个美特斯邦威不走寻常路的宽度1000pt,和一个正常的高度72pt。这就可以保证所有的图都有1英寸高,但长度就依赖与图片的高宽比(aspect ratio of the image)。以下是可以改变图片尺寸的一些方法:
- ScaleToFit()方法的长度参数和宽度参数定义了图片的最大尺寸,如果传入长度和高度的比和图片的高宽比不一致,要么高度要么长度就会比传入的参数小。
- ScaleAbsoulte()方法中长度和高度参数就是图片的最终尺寸,不过如果参数太大的话图片有可能被拉伸或拉宽,具体使用时用的是ScaleAbsolteWidth()和ScaleAbsoulteHeight()方法。
- ScalePercent()有两个重载的方法:一个参数的方法百分比设置会同时影响长度和宽度,二个参数就对应长度和宽度。
缩放图片功能大家可能为认为iText改变了图片一些质量,但实际上iText不会修改图片的像素。当我们从文件中创建一个Image的实例时,我们有时候不太清楚图片的尺寸,但我们从以下几种属性中获取图片的长和宽。
- Width和Height是从Rectangle类中继承过来的,这些属性会发返回图片的原始长度和高度。
- PlainWidth和PlainHeight返回的是缩放之后的长宽,是图片在文档中打印的大小。
- ScaledWidth和ScaledHeight返回的值在图片没有旋转的情况下和PlainWidth和PlainHeight一样。
scaled width/height和plain width/height具体的不同会在下一个列子中说明。
图片旋转
图片的旋转方向为逆时针。以下为具体的代码:
listing 2.29 RiverPhoenix.cs
Paragraph p = new Paragraph();

Image imdb = Image.GetInstance(string.Format(rescourec, imdbId));

imdb.ScaleToFit(1000, 72);

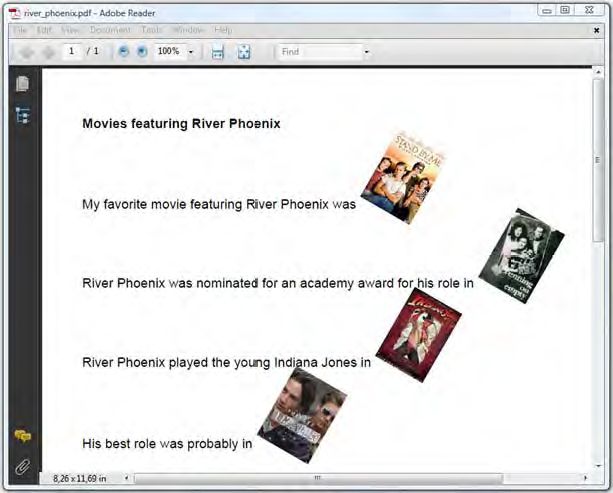
imdb.RotationDegrees = -30;

p.Add(new Chunk(imdb, 0, -15, true));

如果我们查看电影stand by me的图片,你会发现其实100 像素*140像素,也就是通过Width和Height获取的值。然后我们调用方法ScaleToFit(1000, 72),也就是说图片以高宽比不变的形式固定在1000像素*72像素的矩形中,这样图片的大小就会变成51.42857(72/140*100)*72,也就是通过PlainWidth和PlainWidth获取的值。但在下图中你会发现由于图片的旋转其要占据更多的空间,右下角到左上角之间的水平距离就变成了80.53845,右上角到左下角的垂直距离就变成了88.068115,也就是通过ScaledWidth和ScaledHeight获取的值。
WRAPPING IMAGES IN CHUNKS
在代码listing 2.29中,Image并不是直接添加到Document中,而是先被Chunk包裹,然后此Chunk又被添加到Paragraph中,最终添加到Document的是Paragraph对象。通过将Image包裹在Chunk类中,我们将Image当作普通Chunk文本。在Chunk的构造器中,定义了x和y方向的偏移量。listing 2.29中的负数会导致图片在基准线下添加15pt。最后一个参数设置的是chunk的行高是否适应图片。如果最后一个参数不为true的话,图片就有可能和其他的文本重叠。
总结
通过Achor对象的使用,我们创建了文档的内部书签和外部链接。Chapter和Section对象可以用来创建文档的书签,但接下来我们还会学到文档书签的其他创建方法和一些也实现了ILargeElement接口的对象,最后我们学习了Image的大量常用方法和属性。目前为止大家处理的都是high-level的对象,在下一节中会讨论一些PDF底层创建的东东,最后代码在这里下载。
同步
此文章已同步到目录索引:iText in Action 2nd 读书笔记。