Sliverlight实例之 绘制扇形和环形图
原文:
Sliverlight实例之 绘制扇形和环形图
未解决:
1,任意偏角,是个重点问题:
(1), 另一边在弧上坐标
(2), 这个弧的弧度(ArcSegment中的Size或Angle属性)
(3), 如何把这个弧度做成依赖属性配置的
2,做成一个自定义控件
有时间,再完成
准备知识:
1, 平面几何思维(三角形,圆,弧,曲线,斜率,方程式)
2, 三次贝塞尔曲线的数学公式
3, 定时器与动画的区别是时间序列
4, 缓动动画
一,1道几何题

已知两点坐标确定一条直线,直线上存在一个未知点,起始点与未知点的距离已知
求:未知点坐标
思路,如下:
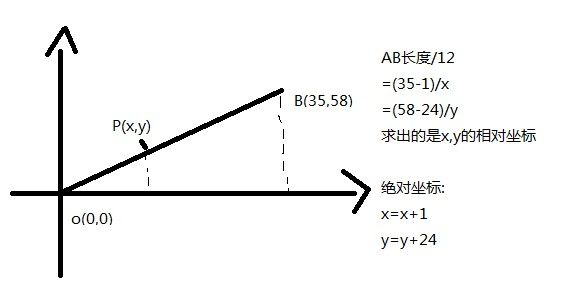
求AB长度,可以根据两点距离公式

二,写个C#类
定义一个Point类,代表坐标,它有两个成员x和y
定义一个方法GetLength,获取两点距离
       /*

            有两点坐标a(1,24) b(35,58) 连成一条直线,现在ab连线有一点p,pa长度为12

            求:p点的坐标

        */

        class Point

        {

            public double x;

            public double y;

            public Point(int x,int y)

            {

                this.x=x;

                this.y=y;

            }

            public static double GetLength(Point a,Point b)

            {

                return Math.Sqrt(Math.Pow(a.x - b.x, 2) + Math.Pow(a.y - b.y, 2));

            }

        }


       private Point GetPoint(Point a, Point b, double otherLength)

        {

            Point p = new Point(0, 0);


            p.x = otherLength * (b.x - a.x) / Point.GetLength(a, b) + a.x;

            p.y = otherLength * (b.y - a.y) / Point.GetLength(a, b) + a.y;


            return p;

        }


        //测试方法

        static void main()

        {

            double otherLength = 12;

            double radius = 58;


            //a:起点      b:终点    p:a,b之间任意一点

            Point a1 = new Point(1, 24);

            Point b1 = new Point(35, 58);

      }
三,绘制一个扇形
思路:使用PathGeometry中的LinearSegment和ArcSegment来绘制

(1) 确定两点坐标,绘制一条直线
(2) 已知半径长度,得到圆心坐标
(3) 按任意偏角绘制一条弧形
这个任意偏角,是个重点问题:
(1), 另一边在弧上坐标
(2), 如何把这个弧度做成依赖属性配置的
xaml代码:
       <Path x:Name="PathFillColor" Fill="Green" Canvas.Top="100" Canvas.Left="100" Stroke="Black" StrokeThickness="2">

                <Path.Data>

                    <PathGeometry>

                        <PathFigure StartPoint="1,24" IsClosed="True">

                        <LineSegment Point="9.48528137423857,32.4852813742386"/>

                        <ArcSegment Size="80,80" Point="59,13" SweepDirection="Clockwise"/>

                        <LineSegment Point="59,1"/>

                        <ArcSegment Size="80,80" Point="1,24" SweepDirection="Counterclockwise"/>

                    </PathFigure>

                    </PathGeometry>

                </Path.Data>

            </Path>
效果图

四,绘制环形

思路:
上图由8个扇形组成,即每个扇形偏角45度
可以用8个按钮代替
那么:
将按钮做成控件模板,内容就是一个扇形
则8个按钮使用这个控件模板
再对每个按钮进行45度旋转(使用RotateTransform实现)
定义控件模板
<UserControl.Resources>

        <Style x:Key="CircleStyle1" TargetType="Button">

            <Setter Property="Template">

                <Setter.Value>

                    <ControlTemplate>

                        <Canvas>

                            <Canvas>

                                <Canvas.RenderTransform>

                                    <TransformGroup>

                                        <ScaleTransform x:Name="RenderScaleX" />

                                        <RotateTransform/>

                                    </TransformGroup>

                                </Canvas.RenderTransform>

                                <Path x:Name="PathFillColor" Fill="{TemplateBinding Button.Background}">

                                    <Path.Data>

                                        <PathGeometry>

                                            <PathFigure StartPoint="1,24" IsClosed="True">

                                                <!--

                                                <LineSegment Point="35,58"/>

                                                <ArcSegment Size="30,30" Point="59,48" SweepDirection="Clockwise"/>

                                                <LineSegment Point="59,1"/>

                                                <ArcSegment Size="80,80" Point="1,24" SweepDirection="Counterclockwise"/>

                                                -->

                                                <LineSegment Point="9.48528137423857,32.4852813742386"/>

                                                <ArcSegment Size="80,80" Point="59,13" SweepDirection="Clockwise"/>

                                                <LineSegment Point="59,1"/>

                                                <ArcSegment Size="80,80" Point="1,24" SweepDirection="Counterclockwise"/>

                                            </PathFigure>

                                        </PathGeometry>

                                    </Path.Data>

                                </Path>

                                <TextBlock Foreground="Black" Text="{TemplateBinding Button.Content}"  Canvas.Left="20" Canvas.Top="20">

                                    <TextBlock.RenderTransform>

                                        <RotateTransform Angle="-25"/>

                                    </TextBlock.RenderTransform>

                                </TextBlock>

                            </Canvas>

                        </Canvas>

                    </ControlTemplate>

                </Setter.Value>

            </Setter>

        </Style>


    </UserControl.Resources>
使用样式
<Button x:Name="btn1" Background="#0024CE" Height="60" Width="60" Margin="42,18,0,0" Canvas.Top="0" Canvas.Left="0" RenderTransformOrigin="0.97,1.4" Content="1" Style="{StaticResource CircleStyle1}">

                <Button.RenderTransform>

                    <TransformGroup>

                        <RotateTransform/>

                    </TransformGroup>

                </Button.RenderTransform>

            </Button>


            <Button x:Name="btn2" Background="#00ace7" Height="60" Width="60" Margin="42,18,0,0" Canvas.Top="0" Canvas.Left="0" RenderTransformOrigin="0.97,1.4" Content="2" Style="{StaticResource CircleStyle1}">

                <Button.RenderTransform>

                    <TransformGroup>

                        <RotateTransform Angle="45"/>

                    </TransformGroup>

                </Button.RenderTransform>

            </Button>


            <Button x:Name="btn3" Background="#9dff00"  Height="60" Width="60" Margin="42,18,0,0" Canvas.Top="0" Canvas.Left="0" RenderTransformOrigin="0.97,1.4"  Content="3" Style="{StaticResource CircleStyle1}">

                <Button.RenderTransform>

                    <TransformGroup>

                        <RotateTransform Angle="90"/>

                    </TransformGroup>

                </Button.RenderTransform>

            </Button>