深度学习主流经典框架PyTorch(day1)
一、什么是Torch?
PyTorch是一个开源的深度学习框架,由Facebook的人工智能研究团队(FAIR)开发,它提供了一种灵活、高效、易于学习的方式来实现深度学习模型。PyTorch使用张量(tensor)来表示数据,可以轻松地处理大规模数据集,且可以在GPU上加速。PyTorch提供了许多高级功能,如自动微分(automatic differentiation)、自动求导(automatic gradients)等,这些功能可以帮助我们更好地理解模型的训练过程,并提高模型训练效率。
pytorch的安装
建议使用anaconda创建一个虚拟环境,用于安装pytorch
conda create -n universal python=3.9
cuda
cuDNN(CUDA Deep Neural Network library)和 CUDA(Compute Unified Device Architecture)密切相关,它们共同构成了高性能 GPU计算的基础,尤其在深度学习领域。
CUDA(Compute Unified Device Architecture),统一计算设备架构,是由 NVIDIA 提供的并行计算平台和编程模型。它允许开发者利用 NVIDIA GPU 的强大计算能力进行通用计算,包括科学计算、机器学习、图像处理和视频处理等。CUDA提供了GPU并行计算的底层基础,使GPU能够解决复杂的计算问题。
cuDNN
cuDNN是基于CUDA的深度神经网络加速库,提供了针对深度学习常见操作(如卷积、池化、归一化、激活函数等)的高度优化实现。
-
性能优化:cuDNN 为卷积神经网络等深度学习模型的训练和推理提供了极高的性能优化。它利用 CUDA 在 GPU 上进行加速计算,充分发挥了 GPU 的并行计算能力。
-
易用性:cuDNN 被集成在主流的深度学习框架(如 TensorFlow、PyTorch、MXNet 等)中,用户直接通过框架调用 cuDNN 的功能,无需关心底层实现细节。
GPU驱动
在安装PyTorch时一定要装CUDA,那如何选择CUDA版本
在cmd里面,输入nvidia-smi查看GPU驱动程序版本:
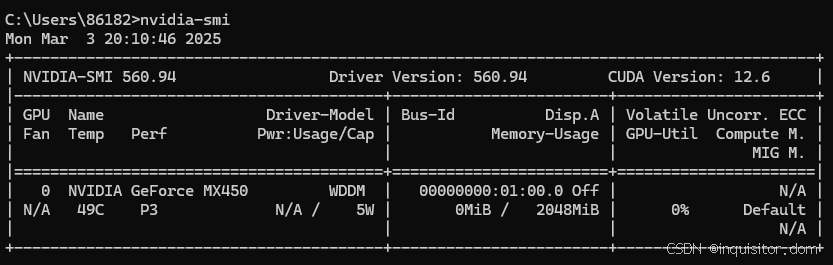
要保证你选择的CUDA版本号<=你的GPU驱动程序版本
正式安装
在安装PyTorch时无需单独安装CUDA,安装包会根据你选择的 CUDA 版本自动包含所需的CUDA库。在安装PyTorch时无需单独安装cuDNN,安装包会包含与指定 CUDA 版本兼容的 cuDNN,因此只需选择合适的 CUDA 版本。
在官方文档里面找到适合你设备的PyTorch版本及对应的安装指令执行即可:Previous PyTorch Versions | PyTorch
二、Tensor概述
2.1基本概念
在深度学习和科学计算中,张量(Tensor)是一个多维数组,类似于矩阵,但可以具有任意维度。张量是表示数据的基本单位。以下是张量的几个关键点:
-
标量:0维张量,例如一个单一的数字。
-
向量:1维张量,例如一个一维数组。
-
矩阵:2维张量,例如一个二维数组。
-
高维张量:3维及以上的张量,例如一组二维图像组成的三维数组。
在PyTorch中,张量是基本数据结构,用于存储和操作数据。通过张量可以进行各种数学运算,并支持GPU加速计算。
2.2数据类型
在PyTorch中,张量(Tensor)可以具有多种数据类型,主要包括以下几种:
-
torch.float32 或 torch.float:32位浮点数,这是默认的数据类型,用于存储实数。
-
torch.float64 或 torch.double:64位浮点数,精度更高,但占用更多内存。
-
torch.float16 或 torch.half:16位浮点数,主要用于提高计算速度和减少内存消耗,适用于某些硬件(如GPU)。
-
torch.int32 或 torch.int:32位整数,用于存储整数数据。
-
torch.int64 或 torch.long:64位整数,用于存储大范围整数数据。
-
torch.int16:16位整数,用于存储较小范围整数数据。
-
torch.int8:8位整数,用于存储更小范围整数数据。
-
torch.uint8:8位无符号整数,用于存储无符号的较小范围整数数据。
-
torch.bool:布尔型,用于存储True或False值。
2.3特点
-
动态计算图:PyTorch 支持动态计算图,这意味着在每一次前向传播时,计算图是即时创建的。
-
GPU 支持:PyTorch 张量可以通过
.to('cuda')移动到 GPU 上进行加速计算。 -
自动微分:通过
autograd模块,PyTorch 可以自动计算张量运算的梯度,这对深度学习中的反向传播算法非常重要。
三、Tensor创建
在Torch中张量以 "类" 的形式封装起来,对张量的一些运算、处理的方法被封装在类中,官方文档:
torch — PyTorch 2.6 documentation
1.基本创建方式
1.1torch.tensor
import torch
import numpy as np
def test001():
    # 1. 用标量创建张量
    x = torch.tensor(5)
    print(x, x.shape)

    # 2. 使用numpy随机一个数组创建张量
    data = np.random.randn(3, 4)
    data = torch.tensor(data)
    print(data, data.shape, data.device)

    # 3. 根据list创建tensor
    list1 = [[1.0, 2.0, 3.0], [4.0, 5.0, 6.0]]
    list1 = torch.tensor(list1)
    print(list1, list1.shape, list1.dtype)

if __name__ == "__main__":
    test001()
运行结果
tensor(5) torch.Size([])
tensor([[-1.1144, -2.4304,  1.5031, -0.4986],
        [ 1.5030, -1.2269, -0.4945,  1.0856],
        [ 0.2004, -0.8373,  2.1045, -0.0864]], dtype=torch.float64) torch.Size([3, 4]) cpu
tensor([[1., 2., 3.],
        [4., 5., 6.]]) torch.Size([2, 3]) torch.float32
1.2torch.Tensor
注意这里的Tensor是大写,该API根据形状创建张量,其也可用来创建指定数据的张量
    # 1. 根据形状创建张量
    tensor1 = torch.Tensor(2, 3)
    print(tensor1)

    # 2. 也可以是具体的值
    tensor2 = torch.Tensor([[1, 2, 3], [4, 5, 6]])
    print(tensor2, tensor2.shape, tensor2.dtype)

    tensor3 = torch.Tensor([10])
    print(tensor3, tensor3.shape, tensor3.dtype)
运行结果
tensor([[1.0743e+09, 1.3677e-42, 0.0000e+00],
        [0.0000e+00, 0.0000e+00, 0.0000e+00]])
tensor([[1., 2., 3.],
        [4., 5., 6.]]) torch.Size([2, 3]) torch.float32
tensor([10.]) torch.Size([1]) torch.float32
1.3torch.IntTensor
用于创建指定类型的张量,还有诸如Torch.FloatTensor、 torch.DoubleTensor、 torch.LongTensor......等。如果数据类型不匹配,那么在创建的过程中会进行类型转换,要尽可能避免,防止数据丢失。
    # 1. 创建指定类型的张量
    x1 = torch.IntTensor(2, 3)
    print(x1)

    x2 = torch.FloatTensor(3, 3)
    print(x2, x2.dtype)
    x3 = torch.DoubleTensor(3, 3)
    print(x3, x3.dtype)
    x4 = torch.LongTensor(3, 3)
    print(x4, x4.dtype)
    x5 = torch.ShortTensor(3, 3)
    print(x5, x5.dtype)
运行结果
tensor([[0, 0, 0],
        [0, 0, 0]], dtype=torch.int32)
tensor([[1.7147e+38, 1.8890e-42, 0.0000e+00],
        [0.0000e+00, 0.0000e+00, 0.0000e+00],
        [0.0000e+00, 0.0000e+00, 0.0000e+00]]) torch.float32
tensor([[0., 0., 0.],
        [0., 0., 0.],
        [0., 0., 0.]], dtype=torch.float64) torch.float64
tensor([[0, 0, 0],
        [0, 0, 0],
        [0, 0, 0]]) torch.int64
tensor([[ 4576, 32512,  1348],
        [    0,     0,     0],
        [    0,     0,     0]], dtype=torch.int16) torch.int16
2.创建线性和随机张量
2.1创建线性张量
    # 1. 创建线性张量
    r1 = torch.arange(0, 10, 2)
    print(r1)
    # 2. 在指定空间按照元素个数生成张量:等差
    r2 = torch.linspace(3, 10, 10)
    print(r2)
    # 3. 在指定空间按照元素个数生成张量:等比
    r3 = torch.logspace(3, 10, 5, base=2)#在2^3到2^10之间均匀生成5个数 base默认为10
    print(r3)
运行结果
tensor([0, 2, 4, 6, 8])
tensor([ 3.0000,  3.7778,  4.5556,  5.3333,  6.1111,  6.8889,  7.6667,  8.4444,
         9.2222, 10.0000])
tensor([   8.0000,   26.9087,   90.5097,  304.4370, 1024.0000])
2.2随机张量
使用torch.randn创建随机张量
随机数种子:是一个用于初始化随机数生成器的数值。随机数生成器是一种算法,用于生成一个看似随机的数列,但如果使用相同的种子进行初始化,生成器将产生相同的数列。
设置随机数种子torch.manual_seed(42)#保证每次随机的结果一样,是一种伪随机
获取随机数种子print(torch.initial_seed())
import torch
def test01():
    torch.manual_seed(42)
    x = torch.rand(2,3)*(30-(-5)) + (-5)#指定形状的随机张量
    print(x)

    #生成标准正态分布的随机张量
    x2 = torch.randn(3,3)
    print(x2)
    #服从正态分布的随机张量
    x3 = torch.normal(0,1,size=(2,3), dtype=torch.float32)
    print(x3)

    x4 = torch.randint(10,100,size=(3,2))
    print(x4, x4.dtype)

if __name__ == '__main__':
    test01()
运行结果
tensor([[25.8794, 27.0251,  8.4002],
        [28.5757,  8.6657, 16.0313]])
tensor([[ 1.1561,  0.3965, -2.4661],
        [ 0.3623,  0.3765, -0.1808],
        [ 0.3930,  0.4327, -1.3627]])
tensor([[ 1.3564,  0.6688, -0.7077],
        [-0.3267, -0.2788, -0.4220]])
tensor([[92, 40],
        [66, 22],
        [47, 49]]) torch.int64
3.创建0和1张量
在 PyTorch 中,你可以通过几种不同的方法创建一个只包含 0 和 1 的张量。(和numpy类似)
3.1创建全是0张量
    x = torch.zeros(3,5)
    print(x)
    x2 = torch.tensor([[1, 2, 1], [3, 4, 5]])
    print(x2)
    x3 = torch.zeros_like(x2)
    print(x3)
运行结果
tensor([[0., 0., 0., 0., 0.],
        [0., 0., 0., 0., 0.],
        [0., 0., 0., 0., 0.]])
tensor([[1, 2, 1],
        [3, 4, 5]])
tensor([[0, 0, 0],
        [0, 0, 0]])
3.2创建全是1张量
    x = torch.ones(3,5)
    print(x)
    x2 = torch.tensor([[1, 2, 1], [3, 4, 5]])
    print(x2)
    x3 = torch.ones_like(x2)
    print(x3)
运行结果
tensor([[1., 1., 1., 1., 1.],
        [1., 1., 1., 1., 1.],
        [1., 1., 1., 1., 1.]])
tensor([[1, 2, 1],
        [3, 4, 5]])
tensor([[1, 1, 1],
        [1, 1, 1]])
4.创建指定值张量
torch.full 和 torch.full_like 创建全为指定值张量。
    x = torch.full((5,3), 19)
    print(x)
    x2 = torch.tensor([[1, 2, 1], [3, 4, 5]])
    print(x2)
    x3 = torch.full_like(x2, 20)
    print(x3)

    x4 = torch.tensor([10, 20, 30])
    x5 = torch.fill(x4, 666)
    print(x4, x5)
运行结果
tensor([[19, 19, 19],
        [19, 19, 19],
        [19, 19, 19],
        [19, 19, 19],
        [19, 19, 19]])
tensor([[1, 2, 1],
        [3, 4, 5]])
tensor([[20, 20, 20],
        [20, 20, 20]])
tensor([10, 20, 30]) tensor([666, 666, 666])
5.创建单位矩张量
x = torch.eye(5)
    print(x)
运行结果
tensor([[1., 0., 0., 0., 0.],
        [0., 1., 0., 0., 0.],
        [0., 0., 1., 0., 0.],
        [0., 0., 0., 1., 0.],
        [0., 0., 0., 0., 1.]])
四、Tensor的常见属性
在PyTorch中,张量(Tensor)具有许多常见属性,这些属性可以帮助你更好地了解和操作张量。以下是一些常见的张量属性:
-
shape:张量的形状,它是一个包含张量每个维度大小的元组。例如,一个2x3的矩阵张量的形状是(2, 3)。
-
dtype:张量的数据类型,例如torch.float32、torch.int64等。
-
device:张量所在的设备,例如CPU或GPU(如cuda:0表示第一个GPU)。
-
requires_grad:指示张量是否需要计算梯度,用于自动微分。如果设为True,该张量在计算图中的操作会被记录,以便进行反向传播。
-
is_cuda:一个布尔值,表示张量是否存储在GPU上。
-
numel():返回张量中元素的总数。
-
size():返回张量的大小(形状),与shape属性类似。
-
ndimension():返回张量的维数。
4.1获取属性
    x = torch.ones([1, 2, 3])
    print(x, x.dtype, x.device, x.shape)

    x2 = x.type(torch.float32)
    print(x, x.dtype)
    print(x2, x2.dtype)
运行结果
tensor([[[1., 1., 1.],
         [1., 1., 1.]]]) torch.float32 cpu torch.Size([1, 2, 3])
tensor([[[1., 1., 1.],
         [1., 1., 1.]]]) torch.float32
tensor([[[1., 1., 1.],
         [1., 1., 1.]]]) torch.float32
4.2切换设备
默认在cpu上运行,可以显式的切换到GPU:不同设备上的数据是不能相互运算的。
    print(torch.cuda.device_count())
    x = torch.ones([1, 2, 3])#默认创建在CPU上
    print("x张量创建在那个设备上加速运算的:", x.device, type(x.device))
    #创建到显卡。
    x2 = torch.tensor([1, 2, 3], device="cuda")#cuda:0 表示第一块显卡
    print("x2张量创建在那个设备上加速运算的:", x2.device, type(x2.device))

    device = "cuda:0" if torch.cuda.is_available() else "cpu"
    x3 = torch.tensor([1, 2, 3], device=device)
    print(x3)

    #创建到显卡2;to方法可以改变张量所在的设备
    x4 = torch.tensor([1, 2, 3], device="cpu")
    x5 = x4.to("cuda")
    x6 = x5.to("cpu")
    print(x4.device, x5)
    print(x5.device, x6)

    x7 = x6.cuda()
    print(x6.device, x7)
运行结果
1
x张量创建在那个设备上加速运算的: cpu
x2张量创建在那个设备上加速运算的: cuda:0
tensor([1, 2, 3], device='cuda:0')
cpu tensor([1, 2, 3], device='cuda:0')
cuda:0 tensor([1, 2, 3])
cpu tensor([1, 2, 3], device='cuda:0')
4.3类型转换
    data = torch.tensor([1, 2, 3])
    print(data.dtype)  # torch.int64

    # 1. 使用type进行类型转换
    data = data.type(torch.float32)
    print(data.dtype)  # float32
    data = data.type(torch.float16)
    print(data.dtype)  # float16

    # 2. 使用类型方法
    data = data.float()
    print(data.dtype)  # float32
    data = data.half()
    print(data.dtype)  # float16
    data = data.double()
    print(data.dtype)  # float64
    data = data.long()
    print(data.dtype)  # int64
运行结果
torch.int64
torch.float32
torch.float16
torch.float32
torch.float16
torch.float64
torch.int64