超分论文CARN——Fast, Accurate, and Lightweight Super-Resolution with Cascading Residual Network
文章地址:[1803.08664] Fast, Accurate, and Lightweight Super-Resolution with Cascading Residual Network
代码:https://github.com/nmhkahn/CARN-pytorch
一、摘要
研究背景
近年来,深度学习方法在单幅图像超分辨任务中表现出色,但它们通常计算量大,难以应用于实际场景,特别是在资源受限的设备上(如手机、嵌入式系统等)。
解决方案:
为了应对这个问题,论文提出了一种准确且轻量化的深度网络结构,用于图像超分辨,提出了:
- 级联残差网络 (CARN) 及其变体 CARN-Mobile (CARNM)-(通过结合高效残差块和递归网络方案来实现高效 SR。)
实验结果:
通过大量实验验证,作者发现:
-
即使参数量和计算量大幅减少,该方法的性能依然可以媲美当前最先进的方法。
CARN 的目标就是:
在保证高超分性能的前提下,尽可能地减小模型参数量与计算量,实现轻量化部署。
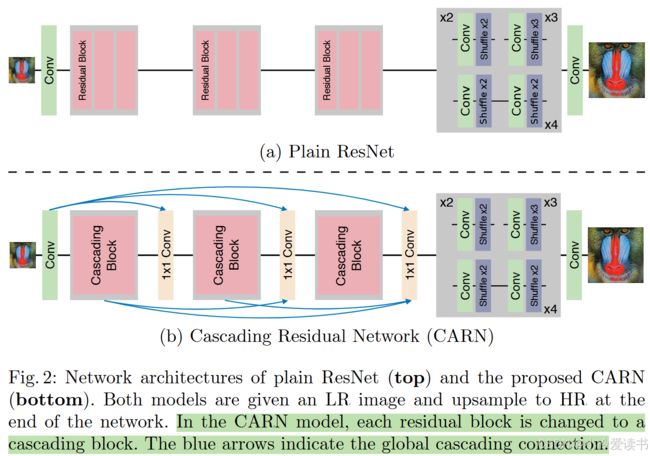
二、网络结构:CARN 的核心设计
1️⃣ 基础框架:残差网络(ResNet)
CARN 基于 ResNet 构建,通过引入残差块(Residual Block)增强信息流动能力,加快训练收敛,同时保持更深的网络深度。
残差通俗易懂的理解:
① 残差连接就是把输入 x 和输出 F(x) 做加法:y = x + F(x);
②举例说明:假设你有两个特征图输出:第一个 block 输出:F1(x),维度是 [H, W, 64];第二个 block 输出:F2(x),维度是 [H, W, 64],如果是残差连接,则F(x) = F1(x) + F2(x) → 输出维度还是 [H, W, 64]。
③目的:让网络学“增量”而不是全部;避免深层网络中的梯度消失问题。
级联(Cascading)通俗易懂的理解:
①级联是把多个特征图直接拼接在一起,而不是相加。使用的是 通道拼接(concatenation) 操作,而不是元素级加法(⊕)。
②举例说明: 如果是级联连接(cascading / concatenation),则:
F(x) = Concat(F1(x), F2(x)) → 输出维度变成 [H, W, 128]
③级联的意义:保留多个中间层的输出,不让信息丢失;类似于 DenseNet 中的“密集连接”思想;通过后面的 1×1 卷积 压缩维度,把信息“融合”起来。
2️⃣ 核心创新点:级联机制(Cascading Mechanism)
CARN 的创新点就在于:
-
局部级联(Local Cascade):在每个 block 内部,多个小的卷积层输出逐级连接(像 DenseNet 一样),融合更多特征信息。
-
全局级联(Global Cascade):不同 block 的输出不只是传给下一个 block,还会跳跃式连接到最终输出层。
这样做的好处:
-
充分利用不同层次的特征信息(低层细节 + 高层语义)
-
避免信息丢失
-
提升重建效果
3️⃣ 多分支结构:CARN vs CARN-M
他们还提出了一个变体叫 CARN-M(Mobile),进一步压缩模型:
-
将标准卷积替换为 Group Convolution 或 Depthwise Separable Convolution
-
极大减少参数量,适合边缘设备部署
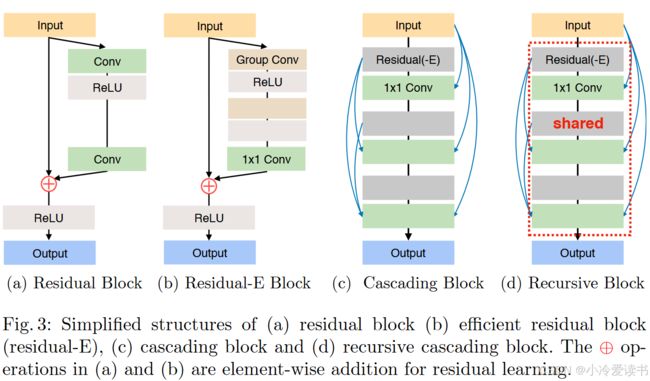
(1)基本残差块(Residual Block)
Input → Conv → ReLU → Conv → ReLU → Output
|_____________________⊕_↑这是标准的残差连接结构,包含两个卷积层和ReLU激活函数;输入通过两个卷积层处理后,与原始输入通过⊕(元素级加法)相加;实现了"恒等映射",帮助梯度流动,缓解深层网络训练难题。
(2)高效残差块(Residual-E Block)
Input → Group Conv → ReLU → 1x1 Conv → ReLU → Output
      |⊕____________________________↑
使用组卷积(Group Conv)替代普通卷积,大幅减少计算量,后接1x1卷积用于通道间的信息融合同样保留残差连接,相比标准残差块更轻量但保持相似性能。
(3)级联块(Cascading Block)
原理核心:将多个中间特征图进行级联(concatenate),不是相加,而是拼接起来!
构造过程:
-
每一层用 Residual-E + 1x1 Conv 得到一个特征图。
-
每一层的输出都保留下来,并传给后面的层。
-
所有这些中间特征图被「拼接在一起」做进一步处理(比如融合卷积)。
也就是说:y = concat(F1(x), F2(x), ..., Fn(x))。
(4)递归级联块(Recursive Block)
递归级联块 = 用同一个级联结构重复多次,并且每次的输出都拼接起来 + 参数共享。
原理核心:在级联结构的基础上,「共享参数的方式重复使用同一个模块」。用一个模块反复提炼特征、共享参数、不丢掉中间成果,最后全部拼接融合形成更强的表示。
构造过程:
-
拿一个 Cascading Block 模块(即图(c)里的结构),
-
重复使用它 N 次,每次的输出继续传给下一次。
-
所有中间输出再「拼接」或融合。
-
参数是共享的(图中用
shared标明)!
优点总结
| 特点 | 说明 |
|---|---|
| 高准确率 | 超分重建效果接近 SOTA |
| 模块设计巧妙 | 局部+全局级联机制,特征更丰富 |
| ⚡ 高效率 | 相比 RCAN、EDSR,FLOPs 更低 |
| 易部署 | 有轻量变体 CARN-M,可部署在移动端 |
三、代码讲解
1.carn.py
import torch
import torch.nn as nn
import model.ops as ops  # 引入自定义模块,包含 ResidualBlock、BasicBlock、UpsampleBlock、MeanShift 等

# 定义一个核心的特征提取模块 Block,包含3个残差块 + 多次级联特征融合
class Block(nn.Module):
    def __init__(self, in_channels, out_channels, group=1):
        super(Block, self).__init__()

        # 定义3个残差块(ResidualBlock),用于逐层提取高级特征
        self.b1 = ops.ResidualBlock(64, 64)
        self.b2 = ops.ResidualBlock(64, 64)
        self.b3 = ops.ResidualBlock(64, 64)

        # 定义3个融合块(BasicBlock),用于拼接后特征维度压缩和融合
        self.c1 = ops.BasicBlock(64*2, 64, 1, 1, 0)
        self.c2 = ops.BasicBlock(64*3, 64, 1, 1, 0)
        self.c3 = ops.BasicBlock(64*4, 64, 1, 1, 0)

    def forward(self, x):
        c0 = o0 = x  # 初始特征,作为拼接基准

        # 第一次残差块
        b1 = self.b1(o0)               # 输出 b1
        c1 = torch.cat([c0, b1], dim=1)  # 拼接初始输入和b1输出,维度变成64*2
        o1 = self.c1(c1)               # 用BasicBlock融合

        # 第二次残差块
        b2 = self.b2(o1)
        c2 = torch.cat([c1, b2], dim=1)  # 拼接之前的c1和b2,变成64*3
        o2 = self.c2(c2)

        # 第三次残差块
        b3 = self.b3(o2)
        c3 = torch.cat([c2, b3], dim=1)  # 拼接之前的c2和b3,变成64*4
        o3 = self.c3(c3)

        return o3  # 输出最终的融合特征

# 主网络结构
class Net(nn.Module):
    def __init__(self, **kwargs):
        super(Net, self).__init__()

        # 从参数字典中读取 scale 值(放大倍率)和是否启用 multi_scale
        scale = kwargs.get("scale")
        multi_scale = kwargs.get("multi_scale")
        group = kwargs.get("group", 1)

        # 均值归一化(图像减去平均值)提高训练稳定性
        self.sub_mean = ops.MeanShift((0.4488, 0.4371, 0.4040), sub=True)
        self.add_mean = ops.MeanShift((0.4488, 0.4371, 0.4040), sub=False)

        # 初始卷积:将输入的RGB图像(3通道)转换为64通道的特征图
        self.entry = nn.Conv2d(3, 64, 3, 1, 1)

        # 三个 Block 组成主干部分
        self.b1 = Block(64, 64)
        self.b2 = Block(64, 64)
        self.b3 = Block(64, 64)

        # 三级融合:每次融合后通道增加,再压缩回64
        self.c1 = ops.BasicBlock(64*2, 64, 1, 1, 0)
        self.c2 = ops.BasicBlock(64*3, 64, 1, 1, 0)
        self.c3 = ops.BasicBlock(64*4, 64, 1, 1, 0)

        # 上采样模块,用于将低分辨率特征图放大为高分辨率图像
        self.upsample = ops.UpsampleBlock(64, scale=scale,
                                          multi_scale=multi_scale,
                                          group=group)

        # 最后一层卷积,输出为3通道RGB图像
        self.exit = nn.Conv2d(64, 3, 3, 1, 1)

    def forward(self, x, scale):
        # 第一步:图像预处理(减均值)
        x = self.sub_mean(x)

        # 第二步:初始卷积
        x = self.entry(x)
        c0 = o0 = x  # 用于后面级联

        # 第1个 Block
        b1 = self.b1(o0)
        c1 = torch.cat([c0, b1], dim=1)
        #(Batch, Channel, Height, Width) = (N, C, H, W)
        o1 = self.c1(c1)

        # 第2个 Block
        b2 = self.b2(o1)
        c2 = torch.cat([c1, b2], dim=1)
        o2 = self.c2(c2)

        # 第3个 Block
        b3 = self.b3(o2)
        c3 = torch.cat([c2, b3], dim=1)
        o3 = self.c3(c3)

        # 上采样
        out = self.upsample(o3, scale=scale)

        # 输出卷积 + 加回均值(图像后处理)
        out = self.exit(out)
        out = self.add_mean(out)

        return out  # 最终输出的超分辨图像
总体结构图解(简化版):
输入图像 → entry卷积
       ↓
       Block1  → 输出1
           ↓
       Block2  → 输出2
           ↓
       Block3  → 输出3
           ↓
     c1→c2→c3 (融合每一层的特征)
           ↓
       Upsample
           ↓
         exit卷积
           ↓
        最终超分图像
“模块中嵌套模块”,每层都不断做残差提取 + 拼接融合,使得特征提取能力层层增强。
| 项目 | Block | Net |
|---|---|---|
| 作用 | 特征提取单元 | 整个超分模型结构 |
| 包含 | 3个ResidualBlock + 拼接融合 | 3个Block + 拼接融合 + 上采样 |
carn.py与carn_m.py不同的是之处:Block中直接用的EResidualBlock+3个BasicBlock
class Block(nn.Module):
    def __init__(self,
                 in_channels, out_channels,
                 group=1):
        super(Block, self).__init__()

        self.b1 = ops.EResidualBlock(64, 64, group=group)
        self.c1 = ops.BasicBlock(64*2, 64, 1, 1, 0)
        self.c2 = ops.BasicBlock(64*3, 64, 1, 1, 0)
        self.c3 = ops.BasicBlock(64*4, 64, 1, 1, 0)

    def forward(self, x):
        c0 = o0 = x

        b1 = self.b1(o0)
        c1 = torch.cat([c0, b1], dim=1)
        o1 = self.c1(c1)

        b2 = self.b1(o1)
        c2 = torch.cat([c1, b2], dim=1)
        o2 = self.c2(c2)

        b3 = self.b1(o2)
        c3 = torch.cat([c2, b3], dim=1)
        o3 = self.c3(c3)

        return o3
2.model/ops.py
import math
import torch
import torch.nn as nn
import torch.nn.init as init
import torch.nn.functional as F

# 权重初始化函数,主要用于卷积层的初始化
def init_weights(modules):
    for m in modules:
        if isinstance(m, nn.Conv2d):
            init.kaiming_normal_(m.weight)  # 使用Kaiming初始化方式
            if m.bias is not None:
                m.bias.data.zero_()

# MeanShift模块:用于图像的均值变换(预处理和后处理)
class MeanShift(nn.Module):
    def __init__(self, mean_rgb, sub):
        super(MeanShift, self).__init__()

        # sub=True表示减均值,False表示加回去(用于输入/输出阶段)
        sign = -1 if sub else 1
        r = mean_rgb[0] * sign
        g = mean_rgb[1] * sign
        b = mean_rgb[2] * sign

        # 1x1卷积实现每个通道的偏移
        self.shifter = nn.Conv2d(3, 3, 1, 1, 0)
        self.shifter.weight.data = torch.eye(3).view(3, 3, 1, 1)
        self.shifter.bias.data = torch.Tensor([r, g, b])

        # 冻结参数(不训练)
        for params in self.shifter.parameters():
            params.requires_grad = False

    def forward(self, x):
        return self.shifter(x)

# BasicBlock:基本卷积块 = Conv + ReLU
class BasicBlock(nn.Module):
    def __init__(self, in_channels, out_channels, ksize=3, stride=1, pad=1):
        super(BasicBlock, self).__init__()

        self.body = nn.Sequential(
            nn.Conv2d(in_channels, out_channels, ksize, stride, pad),
            nn.ReLU(inplace=True)
        )

        init_weights(self.modules)

    def forward(self, x):
        return self.body(x)

# ResidualBlock:常规残差块 = Conv + ReLU + Conv + 残差连接
class ResidualBlock(nn.Module):
    def __init__(self, in_channels, out_channels):
        super(ResidualBlock, self).__init__()

        self.body = nn.Sequential(
            nn.Conv2d(in_channels, out_channels, 3, 1, 1),
            nn.ReLU(inplace=True),
            nn.Conv2d(out_channels, out_channels, 3, 1, 1),
        )

        init_weights(self.modules)

    def forward(self, x):
        out = self.body(x)
        return F.relu(out + x)  # 残差连接

# EResidualBlock:扩展残差块,引入组卷积 + Conv(1x1)
class EResidualBlock(nn.Module):
    def __init__(self, in_channels, out_channels, group=1):
        super(EResidualBlock, self).__init__()

        self.body = nn.Sequential(
            nn.Conv2d(in_channels, out_channels, 3, 1, 1, groups=group),  # 分组卷积
            nn.ReLU(inplace=True),
            nn.Conv2d(out_channels, out_channels, 3, 1, 1, groups=group),
            nn.ReLU(inplace=True),
            nn.Conv2d(out_channels, out_channels, 1, 1, 0),  # 1x1卷积融合特征
        )

        init_weights(self.modules)

    def forward(self, x):
        out = self.body(x)
        return F.relu(out + x)  # 残差连接

# UpsampleBlock:用于多尺度或单尺度上采样
class UpsampleBlock(nn.Module):
    def __init__(self, n_channels, scale, multi_scale, group=1):
        super(UpsampleBlock, self).__init__()

        # 如果是多尺度模型,则为每个scale构建不同上采样模块
        if multi_scale:
            self.up2 = _UpsampleBlock(n_channels, scale=2, group=group)
            self.up3 = _UpsampleBlock(n_channels, scale=3, group=group)
            self.up4 = _UpsampleBlock(n_channels, scale=4, group=group)
        else:
            self.up = _UpsampleBlock(n_channels, scale=scale, group=group)

        self.multi_scale = multi_scale

    def forward(self, x, scale):
        if self.multi_scale:
            if scale == 2:
                return self.up2(x)
            elif scale == 3:
                return self.up3(x)
            elif scale == 4:
                return self.up4(x)
        else:
            return self.up(x)

# _UpsampleBlock:具体的上采样实现,结合 PixelShuffle
class _UpsampleBlock(nn.Module):
    def __init__(self, n_channels, scale, group=1):
        super(_UpsampleBlock, self).__init__()

        modules = []
        if scale == 2 or scale == 4 or scale == 8:
            for _ in range(int(math.log(scale, 2))):
                # 先用 Conv 提升通道数(用于 PixelShuffle)
                modules += [nn.Conv2d(n_channels, 4 * n_channels, 3, 1, 1, groups=group),
                            nn.ReLU(inplace=True)]
                # 使用 PixelShuffle 进行空间上采样
                modules += [nn.PixelShuffle(2)]
        elif scale == 3:
            modules += [nn.Conv2d(n_channels, 9 * n_channels, 3, 1, 1, groups=group),
                        nn.ReLU(inplace=True)]
            modules += [nn.PixelShuffle(3)]

        self.body = nn.Sequential(*modules)
        init_weights(self.modules)

    def forward(self, x):
        return self.body(x)
3.网络结构简图
Input Image
    │
    ▼
MeanShift(减均值)
    │
    ▼
Initial Conv(第一层特征提取)
    │
    ▼
┌───────────────────────────────┐
│          Block 1             │
│ ┌─────────────┐              │
│ │ ResidualBlk │──┐           │
│ └─────────────┘  │           │
│       ↓          │           ▼
│ ┌─────────────┐  │     Concat + Conv
│ │ ResidualBlk │──┼──────────────┐
│ └─────────────┘  │              │
│       ↓          │              ▼
│ ┌─────────────┐  │         融合输出
│ │ ResidualBlk │──┘              │
│ └─────────────┘                 ▼
└───────────────────────────────┘
        ↓
      Block 2
        ↓
      Block 3
        ↓
Final Conv + Upsample
        ↓
MeanShift(加均值)
        ↓
  Output Image
四、测试预训练模型
利用google colab,进行测试下载,具体步骤与命令如下:
1.挂载google drive
from google.colab import drive
drive.mount('/content/drive')
2.下载开源代码
%cd /content/drive/MyDrive/
!git clone https://github.com/nmhkahn/CARN-pytorch.git
3.切换到CARN-pytorch目录
# 切换到 CARN-pytorch 目录
%cd /content/drive/MyDrive/CARN-pytorch/
4。安装
!pip install torchvision numpy scipy pillow scikit-image h5py5.准备Set5数据集
dataset/
├── Set5/
│   ├── HR/
│   │   ├── baby_HR.png
│   │   ├── bird_HR.png
│   │   ├── butterfly_HR.png
│   │   ├── head_HR.png
│   │   └── woman_HR.png
│   ├── LR_bicubic/
│   │   ├── x2/
│   │   │   ├── baby_LR.png
│   │   │   ├── bird_LR.png
│   │   │   ├── butterfly_LR.png
│   │   │   ├── head_LR.png
│   │   │   └── woman_LR.png
│
6.检查一下权重以及数据集
# 检查数据集
!ls -l /content/drive/MyDrive/CARN-pytorch/dataset/Set5/LR_bicubic/x2/

# 检查权重
!ls -l /content/drive/MyDrive/CARN-pytorch/checkpoint/
7.修改CARN-pytorch/carn/dataset.py中的TestDataset类。
class TestDataset(data.Dataset):
    def __init__(self, dirname, scale):
        super(TestDataset, self).__init__()

        self.name  = dirname.split("/")[-1]
        self.scale = scale

        if "DIV" in self.name:
            self.hr = glob.glob(os.path.join("{}_HR".format(dirname), "*.png"))
            self.lr = glob.glob(os.path.join("{}_LR_bicubic".format(dirname),
                                             "X{}/*.png".format(scale)))
        else:
            # 修正后的 HR 和 LR 图像路径
            self.hr = glob.glob(os.path.join(dirname, "HR", "*.png"))  # HR 图像路径
            self.lr = glob.glob(os.path.join(dirname, "LR_bicubic", f"x{scale}", "*.png"))  # LR 图像路径

            # 调试:检查正在寻找的路径
            print(f"Looking for HR images in: {os.path.join(dirname, 'HR', '*.png')}")
            print(f"Looking for LR images in: {os.path.join(dirname, 'LR_bicubic', f'x{scale}', '*.png')}")

            # 打印找到的文件数量
            print(f"Found HR images: {len(self.hr)}")
            print(f"Found LR images: {len(self.lr)}")

        self.hr.sort()
        self.lr.sort()

        self.transform = transforms.Compose([
            transforms.ToTensor()
        ])

    def __getitem__(self, index):
        hr = Image.open(self.hr[index])
        lr = Image.open(self.lr[index])

        hr = hr.convert("RGB")
        lr = lr.convert("RGB")
        filename = self.hr[index].split("/")[-1]

        return self.transform(hr), self.transform(lr), filename

    def __len__(self):
        return len(self.lr)
8.在sample.py中加入调试数据
def main(cfg):
    print("Step 1: Importing model module")
    module = importlib.import_module("model.{}".format(cfg.model))
    print("Step 2: Creating model")
    net = module.Net(multi_scale=True, group=cfg.group)
    print("Step 3: Config printed")
    print(json.dumps(vars(cfg), indent=4, sort_keys=True))

    print("Step 4: Loading weights")
    state_dict = torch.load(cfg.ckpt_path, map_location='cuda' if torch.cuda.is_available() else 'cpu')
    print("Step 5: Weights loaded, processing state dict")
    new_state_dict = OrderedDict()
    for k, v in state_dict.items():
        name = k
        # name = k[7:] # remove "module." (uncomment if needed)
        new_state_dict[name] = v

    print("Step 6: Applying weights to model")
    net.load_state_dict(new_state_dict)
    print("Step 7: Weights applied")

    device = torch.device("cuda" if torch.cuda.is_available() else "cpu")
    print(f"Step 8: Moving model to device: {device}")
    net = net.to(device)

    print("Step 9: Loading test dataset")
    dataset = TestDataset(cfg.test_data_dir, cfg.scale)
    print(f"Step 10: Dataset loaded with {len(dataset)} images")

    print("Step 11: Creating output directory")
    os.makedirs(cfg.sample_dir, exist_ok=True)
    print("Step 12: Starting inference")
    sample(net, device, dataset, cfg)
    print("Step 13: Inference completed")
9.运行命令进行测试
目前是进行2倍的超分,如果x4/x8,则要准备数据集:dataset/Set5/LR_bicubic/x4,并且命名规则必须严格遵循。
!python carn/sample.py --model carn \
                      --test_data_dir dataset/Set5 \
                      --scale 2 \
                      --ckpt_path ./checkpoint/carn.pth \
                      --sample_dir output_samples \
                      --cuda
10.运行结果
Step 1: Importing model module
Step 2: Creating model
Step 3: Config printed
{
    "ckpt_path": "./checkpoint/carn.pth",
    "cuda": true,
    "group": 1,
    "model": "carn",
    "sample_dir": "output_samples",
    "scale": 2,
    "shave": 20,
    "test_data_dir": "dataset/Set5"
}
Step 4: Loading weights
Step 5: Weights loaded, processing state dict
Step 6: Applying weights to model
Step 7: Weights applied
Step 8: Moving model to device: cuda
Step 9: Loading test dataset
Looking for HR images in: dataset/Set5/HR/*.png
Looking for LR images in: dataset/Set5/LR_bicubic/x2/*.png
Found HR images: 5
Found LR images: 5
Step 10: Dataset loaded with 5 images
Step 11: Creating output directory
Step 12: Starting inference
Saved output_samples/Set5/x2/SR/baby_SR.png (256x256 -> 512x512, 0.668s)
Saved output_samples/Set5/x2/SR/bird_SR.png (144x144 -> 288x288, 0.012s)
Saved output_samples/Set5/x2/SR/butterfly_SR.png (128x128 -> 256x256, 0.011s)
Saved output_samples/Set5/x2/SR/head_SR.png (140x140 -> 280x280, 0.012s)
Saved output_samples/Set5/x2/SR/woman_SR.png (172x114 -> 344x228, 0.012s)
Step 13: Inference completed