【百度地图API】北京周边7日游——图标按路线轨迹行动
原文:
【百度地图API】北京周边7日游——图标按路线轨迹行动
任务描述:
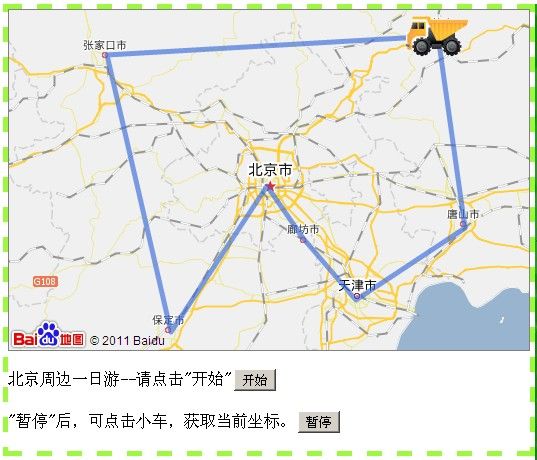
春节就要来啦~酸奶小妹的妈妈要从遥远的重庆,来到北京过春节呢!酸奶小妹忙着给妈妈计划,北京周边的旅游线路。计划好路线后,就开始驾车旅游啦~~
如何实现:
利用百度地图API先确定几个坐标点points,把他们连成一条折线BMap.Polyline(points)。
然后,更改标注图片为一辆小车,var myIcon = new BMap.Icon("car.png",...)。
最后利用二次开发的类K_pointmover让小车沿着折线运动。
图示:

运行代码,点击这里。
代码:
<!
DOCTYPE html PUBLIC "-//W3C//DTD XHTML 1.0 Transitional//EN" "http://www.w3.org/TR/xhtml1/DTD/xhtml1-transitional.dtd"
>
< html xmlns ="http://www.w3.org/1999/xhtml" >
< head >
< meta name ="keywords" content ="百度地图,百度地图API" />
< meta name ="description" content ="百度地图API自定义地图,按路线行驶的小车" />
< meta http-equiv ="Content-Type" content ="text/html; charset=gb2312" />
< title > 按指定路线前进的小车 </ title >
< script type ="text/javascript" src ="http://api.map.baidu.com/api?key=ea9710104e3349456b5e5d1191f2d376&v=1.1&services=true" ></ script >
< script type ="text/javascript" src ="K_PointMover.js" ></ script >
< script type ="text/javascript" src ="K_Function.js" ></ script >
</ head >
< body onload ="onLoad()" >
< div style ="float:left;border:5px dashed #9df83e;" >
< div style ="width:520px;height:340px;border:1px solid gray" id ="container" ></ div >
< div style ="display:none;" >
< input type ="checkBox" id ="MarkerMove" checked /> MarkerMove
< input type ="checkBox" id ="MapMove" /> MapMove
</ div >
< p > 北京周边一日游--请点击"开始" < input type ="button" value ="开始" onclick ="pointMover.Move();" /></ p >
< p > "暂停"后,可点击小车,获取当前坐标。 < input type ="button" value ="暂停" onclick ="pointMover.Pause();" /></ p >
</ div >
</ body >
< script type ="text/javascript" >
var map = new BMap.Map( " container " ); // 创建map
var point = new BMap.Point( 116.411053 , 39.950507 ); // 确定中心点
map.centerAndZoom(point, 8 ); // 初始化地图map,设置中心点和地图级别。
var moveMarker,pointMover;
function onLoad()
{
var point1 = new BMap.Point( 117.965625 , 40.962343 ); // 起点1
var point2 = new BMap.Point( 118.213988 , 39.609821 ); // 中间点2
var point3 = new BMap.Point( 117.211335 , 39.095608 ); // 中间点3
var point4 = new BMap.Point( 116.723807 , 39.53863 ); // 中间点4
var point5 = new BMap.Point( 116.392656 , 39.9080114 ); // 中间点5
var point6 = new BMap.Point( 115.509585 , 38.865845 ); // 中间点6
var point7 = new BMap.Point( 114.920872 , 40.829717 ); // 中间点7
var point8 = new BMap.Point( 117.965625 , 40.962343 ); // 终点8
var points = [point1,point2,point3,point4,point5,point6,point7,point8]; // 折线数组
var polyline = new BMap.Polyline(points); // 创建折线
map.addOverlay(polyline); // 绘制折线
var myIcon = new BMap.Icon( " car.png " , new BMap.Size( 63 , 42 ), { // 绘制小车
offset: new BMap.Size( 32 , 21 ), // 指定定位位置
imageOffset: new BMap.Size( 0 , 0 ) // 设置图片偏移
});
moveMarker = new BMap.Marker(points[ 0 ],{icon: myIcon});
map.addOverlay(moveMarker);
moveMarker.addEventListener( " click " , function (e){ // 鼠标点击获取经纬度
alert( " 小车的坐标为:经度 " + e.point.lng + " ,纬度 " + e.point.lat);
});
pointMover = new K_PointMover(points, 100 , 0.1 ,MapMove); // 移动函数
}
function MapMove(pointMover)
{
if (document.getElementById( " MarkerMove " ).checked)
moveMarker.setPoint(pointMover.point);
if (document.getElementById( " MapMove " ).checked)
map.panTo(pointMover.point);
}
</ script >
</ html >
备注:
你可以自己定义lng()和lat(),让小车移动更加平滑。
K_pointmover类是定义了小车移动的函数;K_function是基本的一些操作。
请到这里,右键查看源码,并下载这两个K_类。