使用HDP快速搭建Hadoop开发环境
使用两台虚拟机搭建真实集群环境,操作系统为Cent OS 6.5
1. 服务器基本设置
vim /etc/hosts
192.168.159.145 hdp01.domain
192.168.159.146 hdp02.domain
vim /etc/selinux/config
SELINUX=disabled
service iptables stop
chkconfig iptables off
vim /etc/sysconfig/network
HOSTNAME=hdp01 #主机名分别为hdp01, hdp02
关闭不必要的服务:
chkconfig NetworkManager off
chkconfig abrt-ccpp off
chkconfig abrtd off
chkconfig acpid off
chkconfig atd off
chkconfig bluetooth off
chkconfig cpuspeed off
chkconfig cpuspeed off
chkconfig ip6tables off
chkconfig iptables off
chkconfig netconsole off
chkconfig netfs off
chkconfig postfix off
chkconfig restorecond off
chkconfig httpd off
我是mini最小化安装,有些服务不存在。
完成后 reboot
2. 在hdp01上安装ambari
(1).下载HDP repo
下载HDP提供的yum repo文件并拷贝到/etc/yum.repos.d中
[root@hdp01 ~]# wget http://public-repo-1.hortonworks.com/ambari/centos6/1.x/updates/1.4.1.61/ambari.repo
--2014-03-10 04:57:58-- http://public-repo-1.hortonworks.com/ambari/centos6/1.x/updates/1.4.1.61/ambari.repoResolving public-repo-1.hortonworks.com... 54.230.127.224, 205.251.212.150, 54.230.124.207, ...
Connecting to public-repo-1.hortonworks.com|54.230.127.224|:80... connected.
HTTP request sent, awaiting response... 200 OK
Length: 770 [binary/octet-stream]
Saving to: “ambari.repo”
100%[======================================>] 770 --.-K/s in 0s
2014-03-10 04:58:01 (58.8 MB/s) - “ambari.repo” saved [770/770]
[root@hdp01 ~]# cp ambari.repo /etc/yum.repos.d/
(2).使用yum安装ambari-server
[root@hdp01 ~]# yum –y install ambari-server
...
Total download size: 49 M
Installed size: 113 M
Installed:
ambari-server.noarch 0:1.4.1.61-1
Dependency Installed:
postgresql.x86_64 0:8.4.20-1.el6_5 postgresql-libs.x86_64 0:8.4.20-1.el6_5 postgresql-server.x86_64 0:8.4.20-1.el6_5
Complete!
3. 配置root用户的ssh互信
分别在hdp01和hdp02生成key,再通过ssh-copy-id拷贝到hdp01和hdp02上去。
[root@hdp01 ~]# ssh-keygen -t rsa
[root@hdp02 ~]# ssh-keygen -t rsa
[root@hdp01 .ssh]# ssh-copy-id hdp01.domain
[root@hdp01 .ssh]# ssh-copy-id hdp02.domain
[root@hdp02 .ssh]# ssh-copy-id hdp01.domain
[root@hdp02 .ssh]# ssh-copy-id hdp02.domain
同步系统时间:
yum install -y ntpd
crontab –e
*/1 * * * * ntpdate time.windows.com && clock –w
ntpdate time.windows.com && clock –w
service ntpdate restart
service ntpd restart
service crond restart
4. 配置ambari server
Apache Ambari是基于Web的Apache Hadoop的自动部署、管理和监控工具。这里ambari server的metastore使用了自带了postgre数据库。
[root@hdp01 ~]# ambari-server setup
Using python /usr/bin/python2.6
Initializing...
Setup ambari-server
Checking SELinux...
SELinux status is 'disabled'
Customize user account for ambari-server daemon [y/n] (n)?
Adjusting ambari-server permissions and ownership...
Checking iptables...
Checking JDK...
To download the Oracle JDK you must accept the license terms found at http://www.oracle.com/technetwork/java/javase/terms/license/index.html and not accepting will cancel the Ambari Server setup.
Do you accept the Oracle Binary Code License Agreement [y/n] (y)?
Downloading JDK from http://public-repo-1.hortonworks.com/ARTIFACTS/jdk-6u31-linux-x64.bin to /var/lib/ambari-server/resources/jdk-6u31-linux-x64.bin
JDK distribution size is 85581913 bytes
dk-6u31-linux-x64.bin... 100% (81.6 MB of 81.6 MB)
Successfully downloaded JDK distribution to /var/lib/ambari-server/resources/jdk-6u31-linux-x64.bin
Installing JDK to /usr/jdk64
Successfully installed JDK to /usr/jdk64/jdk1.6.0_31
Downloading JCE Policy archive from http://public-repo-1.hortonworks.com/ARTIFACTS/jce_policy-6.zip to /var/lib/ambari-server/resources/jce_policy-6.zip
Successfully downloaded JCE Policy archive to /var/lib/ambari-server/resources/jce_policy-6.zip
Completing setup...
Configuring database...
Enter advanced database configuration [y/n] (n)? y
==============================================================================
Choose one of the following options:
[1] - PostgreSQL (Embedded)
[2] - Oracle
==============================================================================
Enter choice (1): 1
Database Name (ambari):
Username (ambari):
Enter Database Password (bigdata):
Default properties detected. Using built-in database.
Checking PostgreSQL...
Running initdb: This may take upto a minute.
About to start PostgreSQL
Configuring local database...
Connecting to the database. Attempt 1...
Configuring PostgreSQL...
Restarting PostgreSQL
Ambari Server 'setup' completed successfully.
使用root用户来启动ambari server
[root@hdp01 ~]$ ambari-server start
Using python /usr/bin/python2.6
Starting ambari-server
Unable to check iptables status when starting without root privileges.
Please do not forget to disable or adjust iptables if needed
Unable to check PostgreSQL server status when starting without root privileges.
Please do not forget to start PostgreSQL server.
Server PID at: /var/run/ambari-server/ambari-server.pid
Server out at: /var/log/ambari-server/ambari-server.out
Server log at: /var/log/ambari-server/ambari-server.log
Ambari Server 'start' completed successfully.
5.安装mysql
使用mysql-server来存hive metastore。
首先安装remi软件源(为了能通过yum安装Mysql 5.5):
[root@hdp01 ~]# yum install -y epel-release
Installed:
epel-release.noarch 0:6-8
Complete!
[root@hdp01 ~]# rpm -Uvh http://rpms.famillecollet.com/enterprise/remi-release-6.rpm
Retrieving http://rpms.famillecollet.com/enterprise/remi-release-6.rpm
warning: /var/tmp/rpm-tmp.JSZuMv: Header V3 DSA/SHA1 Signature, key ID 00f97f56: NOKEY
Preparing... ########################################### [100%]
1:remi-release ########################################### [100%]
[root@hdp01 ~]# yum install –y mysql-server
......
Total download size: 12 M
......
[root@hdp01 ~]# yum --enablerepo=remi,remi-test list mysql mysql-server
Loaded plugins: fastestmirror, refresh-packagekit, security
Loading mirror speeds from cached hostfile
......
Available Packages
mysql.x86_64 5.5.36-1.el6.remi
mysql-server.x86_64 5.5.36-1.el6.remi
[root@hdp01 ~]# yum --enablerepo=remi,remi-test install mysql mysql-server
Loaded plugins: fastestmirror, refresh-packagekit, security
Loading mirror speeds from cached hostfile
......
Total download size: 20 M
......
[root@hdp01 ~]# /usr/bin/mysql_secure_installation
[root@hdp01 ~]# /etc/init.d/mysqld start
[root@hdp01 ~]# /usr/bin/mysql_secure_installation
[root@hdp01 ~]# chkconfig --level 235 mysqld on
......
Enter current password for root (enter for none):
OK, successfully used password, moving on...
Change the root password? [Y/n] n
... skipping.
Remove anonymous users? [Y/n] Y
... Success!
Disallow root login remotely? [Y/n] Y
... Success!
Remove test database and access to it? [Y/n] Y
- Dropping test database...
... Success!
- Removing privileges on test database...
... Success!
Reload privilege tables now? [Y/n] Y
... Success!
All done! If you've completed all of the above steps, your MySQL installation should now be secure.
Thanks for using MySQL!
[root@hdp01 ~]# service mysqld start
Starting mysqld: [ OK ]
下面创建数据库和用户
[root@hdp01 ~]# mysql –u root –p
mysql> create database hive;
Query OK, 1 row affected (0.00 sec)
mysql> create user "hive" identified by "hive123";
Query OK, 0 rows affected (0.00 sec)
mysql> grant all privileges on hive.* to hive;
Query OK, 0 rows affected (0.00 sec)
mysql> flush privileges;
Query OK, 0 rows affected (0.00 sec)
6.使用浏览器打开, 输入admin/admin
http://hdp01.domain:8080/#/login
Name your cluster: debugo_test
Stack: HDP 2.0.6
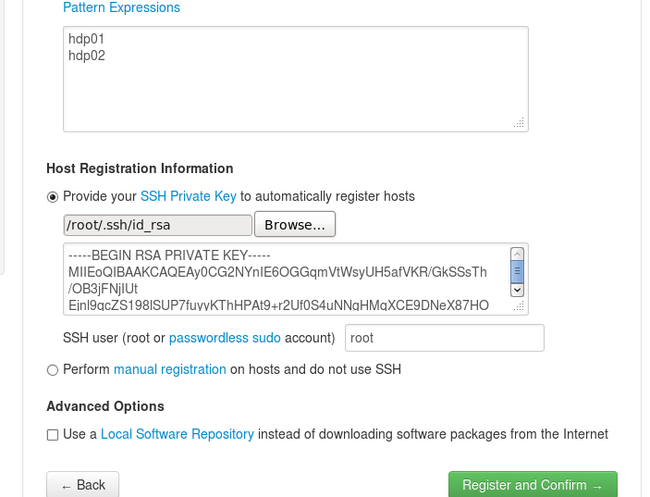
Target Hosts: hdp01,hdp02
Host Registration Information:
由于之前配置了root用户的ssh互信,这里需要选择hdp01.domain下的/root/.ssh下面id.rsa私钥文件,然后Register and confirm继续:
下面如果出现os_type_check.sh脚本执行失败导致的Local OS is not compatible with cluster primary OS报错,这是一个BUG,可以直接修改该os_type_check.sh使得输出里面直接在输出结果之前的RES=0。
这里我更新了系统:yum update 更新完成:reboot (否则会出现兼容性错误)
成功后,ambari-agent 安装完成,可以通过ambari-agent命令来控制:
[root@hdp02 Desktop]# ambari-agent status
ambari-agent currently not running
Usage: /usr/sbin/ambari-agent {start|stop|restart|status}
#在hdp01和hdp02上让ambari-agent在开机时启动
[root@hdp02 Desktop]# chkconfig ambari-agent --level 35 on
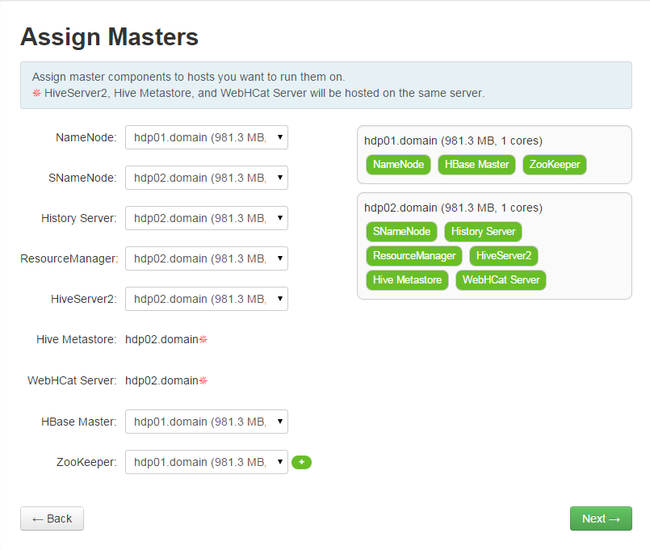
下一步选择要安装的组件,这里不选择Nagios, Ganglia和Oozie。对于Hive,后面选择使用前面安装的mysql-server:
我这里没有Hive的修改选项,使用默认的配置。
下一步:
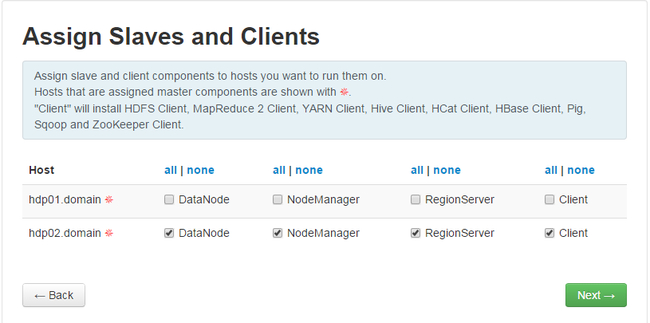
下一步:
下一步:
下一步:
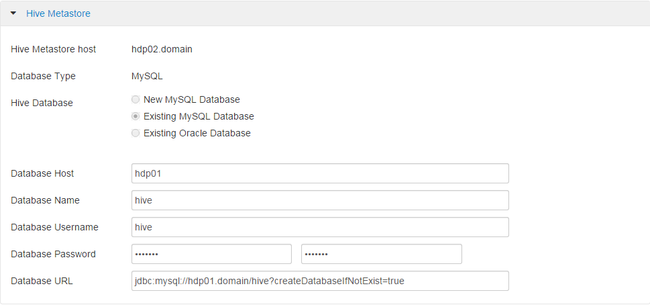
对于Hive,这里选择使用前面安装的mysql-server。
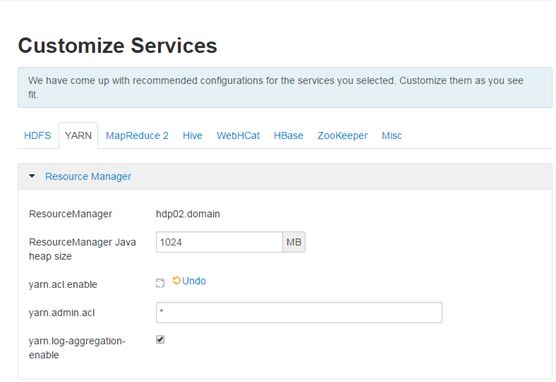
将YARN的yarn.acl.enable设置为false,去掉后面的勾选项。下一步:
检查是否存在错误,进行下一步的Deploy。
这是一个极为漫长的过程,中途遇到failure就retry一下。大约一小时(我花了很长时间),对于其中某些无法下载的rpm安装包,可以手动下载后,yum install *.rpm,再继续retry。
安装完成:
Next以后就进入了期待已久的Dashboard界面,此时安装的组件已经全部启动。
Hive可能无法启动,根据Hive连接数据库的相关选项,在hdp01.domain进行授权。
7.开发环境的配置
下载eclipse 4.3(kepler),maven-3.2.1到/opt下,设置环境变量
[root@hdp01 opt]# vim /etc/profile
export JAVA_HOME=/usr/jdk64/jdk1.6.0_31
export MAVEN_HOME=/opt/apache-maven-3.2.1
export PATH=$PATH:$JAVA_HOME/bin:$MAVEN_HOME/bin
export CLASSPATH=.:$JAVA_HOME/lib:$JAVA_HOME/lib/tools.jar
[root@hdp01 opt]# chgrp –R hadoop apache-maven-3.2.1/ eclipse/ workspace/
[root@hdp01 opt]# useradd hadoop
[root@hdp01 opt]# echo “hadoop” > passwd –stdin Hadoop
打开eclipse -> help -> Install new softwares,下载maven插件( http://download.eclipse.org/m2e-wtp/releases/kepler/ )。安装完成后重启eclipse,就可以正式开始hadoop之旅了。
8. WordCount的编译
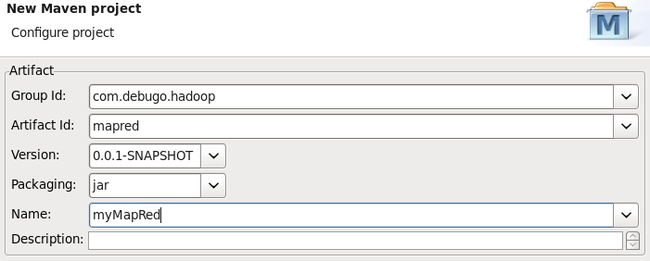
(1). 新建一个maven项目
(2). Create a simple project(skip archetype selection)
(3). 如果出现JRE安装相关的Warning
Build path specifies execution environment J2SE-1.5. There are no JREs installed in the workspace that are strictly compatible with this environment.
可以在项目properties页中删除JRE1.5SE这一项,然后Add Library -> JRE System Library -> workspace default JRE即可。
(4). WordCount.java
在com.debugo.com.mapred包下创建WordCount类:
package com.debugo.hadoop.mapred;
import java.io.IOException;
import java.util.StringTokenizer;
import org.apache.hadoop.conf.Configuration;
import org.apache.hadoop.fs.Path;
import org.apache.hadoop.io.IntWritable;
import org.apache.hadoop.io.Text;
import org.apache.hadoop.mapreduce.Job;
import org.apache.hadoop.mapreduce.Mapper;
import org.apache.hadoop.mapreduce.Reducer;
import org.apache.hadoop.mapreduce.lib.input.FileInputFormat;
import org.apache.hadoop.mapreduce.lib.output.FileOutputFormat;
import org.apache.hadoop.util.GenericOptionsParser;
public class WordCount {
public static class TokenizerMapper
extends Mapper<Object, Text, Text, IntWritable>{
private final static IntWritable one = new IntWritable(1);
private Text word = new Text();
public void map(Object key, Text value, Context context
) throws IOException, InterruptedException {
StringTokenizer itr = new StringTokenizer(value.toString());
while (itr.hasMoreTokens()) {
word.set(itr.nextToken());
context.write(word, one);
}
}
}
public static class IntSumReducer
extends Reducer<Text,IntWritable,Text,IntWritable> {
private IntWritable result = new IntWritable();
public void reduce(Text key, Iterable<IntWritable> values,
Context context
) throws IOException, InterruptedException {
int sum = 0;
for (IntWritable val : values) {
sum += val.get();
}
result.set(sum);
context.write(key, result);
}
}
public static void main(String[] args) throws Exception {
Configuration conf = new Configuration();
String[] otherArgs = new GenericOptionsParser(conf, args).getRemainingArgs();
if (otherArgs.length != 2) {
System.err.println("Usage: wordcount <in> <out>");
System.exit(2);
}
Job job = new Job(conf, "word count");
job.setJarByClass(WordCount.class);
job.setMapperClass(TokenizerMapper.class);
job.setCombinerClass(IntSumReducer.class);
job.setReducerClass(IntSumReducer.class);
job.setOutputKeyClass(Text.class);
job.setOutputValueClass(IntWritable.class);
FileInputFormat.addInputPath(job, new Path(otherArgs[0]));
FileOutputFormat.setOutputPath(job, new Path(otherArgs[1]));
System.exit(job.waitForCompletion(true) ? 0 : 1);
}
}
编辑pom.xml,添加依赖库。通过maven的repository里可以查得(http://mvnrepository.com/artifact/org.apache.hadoop)
<dependencies>
<dependency>
<groupId>junit</groupId>
<artifactId>junit</artifactId>
<version>3.8.1</version>
<scope>test</scope>
</dependency>
<dependency>
<groupId>org.apache.hadoop</groupId>
<artifactId>hadoop-common</artifactId>
<version>2.3.0</version>
</dependency>
<dependency>
<groupId>org.apache.hadoop</groupId>
<artifactId>hadoop-hdfs</artifactId>
<version>2.3.0</version>
</dependency>
<dependency>
<groupId>org.apache.hadoop</groupId>
<artifactId>hadoop-mapreduce-client-jobclient</artifactId>
<version>2.3.0</version>
</dependency>
<dependency>
<groupId>org.apache.hadoop</groupId>
<artifactId>hadoop-client</artifactId>
<version>2.3.0</version>
</dependency>
</dependencies>
这里需要注意的是,直接运行会包map任务找不到WordCount中的子类,所以要在mvn install之后将自己项目这个包再次引入到mvn项目中来。
mvn install:install-file -DgroupId=com.debugo.hadoopDartifactId=mr -Dpackaging=jar -Dversion=0.1 -Dfile=mr-0.0.1-SNAPSHOT.jar -DgeneratePOM=true
然后添加
<dependency>
<groupId>com.debugo.hadoop</groupId>
<artifactId>mr</artifactId>
<version>0.1</version>
</dependency>
另外,http://www.cnblogs.com/spork/archive/2010/04/21/1717592.html,也是一个很好的解决方案。
编辑Run Configuration,设置运行参数”/input /output”。
然后创建/input目录: hdfs dfs -mkdir /input
再使用hdfs dfs -put a.txt /input将一些文本传到该目录下。
最后执行这个项目,成功后结果就会输出到/output dfs目录中。
[2014-03-13 09:52:20,282] INFO 19952[main] - org.apache.hadoop.mapreduce.Job.monitorAndPrintJob(Job.java:1380) - Counters: 49
File System Counters
FILE: Number of bytes read=5263
FILE: Number of bytes written=183603
FILE: Number of read operations=0
FILE: Number of large read operations=0
FILE: Number of write operations=0
HDFS: Number of bytes read=6739
HDFS: Number of bytes written=3827
HDFS: Number of read operations=6
HDFS: Number of large read operations=0
HDFS: Number of write operations=2
Job Counters
Launched map tasks=1
Launched reduce tasks=1
Data-local map tasks=1
Total time spent by all maps in occupied slots (ms)=3075
Total time spent by all reduces in occupied slots (ms)=6294
Total time spent by all map tasks (ms)=3075
Total time spent by all reduce tasks (ms)=3147
Total vcore-seconds taken by all map tasks=3075
Total vcore-seconds taken by all reduce tasks=3147
Total megabyte-seconds taken by all map tasks=4723200
Total megabyte-seconds taken by all reduce tasks=9667584
Map-Reduce Framework
Map input records=144
Map output records=960
Map output bytes=10358
Map output materialized bytes=5263
Input split bytes=104
Combine input records=960
Combine output records=361
Reduce input groups=361
Reduce shuffle bytes=5263
Reduce input records=361
Reduce output records=361
Spilled Records=722
Shuffled Maps =1
Failed Shuffles=0
Merged Map outputs=1
GC time elapsed (ms)=26
CPU time spent (ms)=2290
Physical memory (bytes) snapshot=1309593600
Virtual memory (bytes) snapshot=8647901184
Total committed heap usage (bytes)=2021654528
Shuffle Errors
BAD_ID=0
CONNECTION=0
IO_ERROR=0
WRONG_LENGTH=0
WRONG_MAP=0
WRONG_REDUCE=0
File Input Format Counters
Bytes Read=6635
File Output Format Counters
Bytes Written=3827
参考文献:
HDP官方文档: http://docs.hortonworks.com/
Hortonworks HDP:
http://hortonworks.com/hdp/
http://zh.hortonworks.com/get-started/
http://hortonworks.com/hadoop/ambari/
使用YUM安装MySQL 5.5 http://www.linuxidc.com/Linux/2012-07/65098.htm
Canon的maven构建hadoop 1.x版本项目指南 http://blog.fens.me/hadoop-maven-eclipse/
