Ambari部署Hadoop环境&安装ZooKeeper
之前我们尝试了用CDH版本来安装Hadoop,现在来尝试用Ambari安装。
参考:
官方网站: http://ambari.apache.org/
2.1.2 安装 https://cwiki.apache.org/confluence/display/AMBARI/Install+Ambari+2.1.2+from+Public+Repositories
网友的安装过程 http://www.linuxidc.com/Linux/2014-05/101531.htm
==============================================先按照官方文档的操作一遍
Step1: Download the Ambari repository on the Ambari Server host
cd /etc/yum.repos.d/
wget http://public-repo-1.hortonworks.com/ambari/centos6/2.x/updates/2.1.2/ambari.repo 【这个要根据自己操作系统版本的具体型号】
Step 2: Install, Setup, and Start Ambari Server
yum install ambari-server -----------------原因:安装Ambari服务器from the public Ambari repository[下载这个服务器程序]
ambari-server setup -----------------原因:配置我的Ambari 服务器, Database, JDK, LDAP, and other options[一些初始化工作]
说明:这里的初始化最好自己人工干预一下,比如

然后提示把mysql驱动放到/usr/share/java里面来,接着需要指定一些数据库属性如下:
Hostname (x.x.x.x):
Port (3306):
Database name (ambari): ---前提是你得先创建了这个数据库
Username (ambari): ---前提是你得先创建了这个用户和密码
Enter Database Password (bigdata): ---前提是你得先创建了这个用户和密码
Configuring ambari database...
Copying JDBC drivers to server resources...
Configuring remote database connection properties...
WARNING: Before starting Ambari Server, you must run the following DDL against the database to create the schema: /var/lib/ambari-server/resources/Ambari-DDL-MySQL-CREATE.sql --- 你得用ambari用户通过navicat或者其它程序连接,在ambari数据库上下文里执行这个脚本。
ambari-server start -----------------原因:启动Ambari服务器 [正式启动这个程序]
这里可能会碰到问题,如果是mysql类包的问题,参考http://www.t086.com/article/5039 安装mysql-client即可。
Caused by: java.lang.RuntimeException: java.lang.ClassNotFoundException: com.mysql.jdbc.Driver
不过我在这一步没解决,只好用内嵌的posrgresql了,倒是启动成功了。
Step 3: Deploy Cluster using Ambari Web UI
打开 http://<ambari-server-host>:8080

Log in with username admin and password admin and follow on-screen instructions.
进去之后就是web管理界面了。
Step 3.1: 安装Cluster

!!!前期准备工作:
1)SSH免密码登陆
2)NTP时间同步
3) 防火墙,具体见CDH安装教程。
一些比较关键的步骤如下:
后面配置主机时配到一个FQDN,解决方法: http://blog.csdn.net/j2eelamp/article/details/10192759
继续执行,安装界面如下:【注意:执行这一步前,你必须让所有主机可以SSH互相无密码访问,本博客提供脚本!】

装了几分钟没报错,说明正在顺利安装,结果如下:
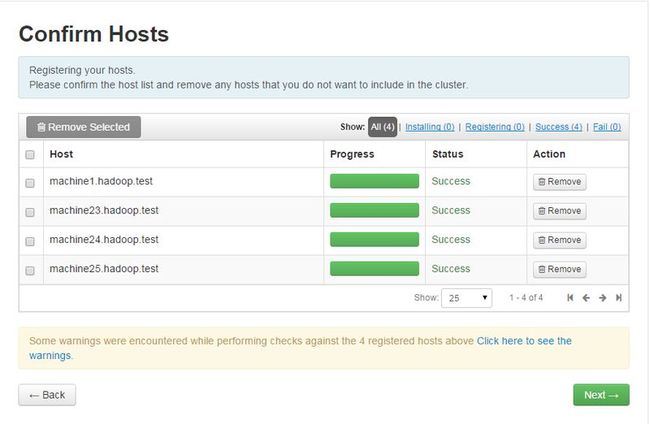
很好,全部安装完毕!
虽然安装完毕了,但是有一些警告,最好清除这些警告!
官方给了脚本 python /usr/lib/python2.6/site-packages/ambari_agent/HostCleanup.py --silent --skip=users
去除THP的步骤见: http://zhidao.baidu.com/link?url=JdL5uiSp5dw3da3x0rnvujOUxzgY4GuML4NLSj-CplH1gCOaUFk1h59m_QJRxkSaffYi4PBQ3X9i-hnhIkdzLPdmsnUKTKfTVi4-pq-ALEO
此步骤不再详细描述!
==================接下来是选择安装的服务,这里我先选择Metrics, ZK.
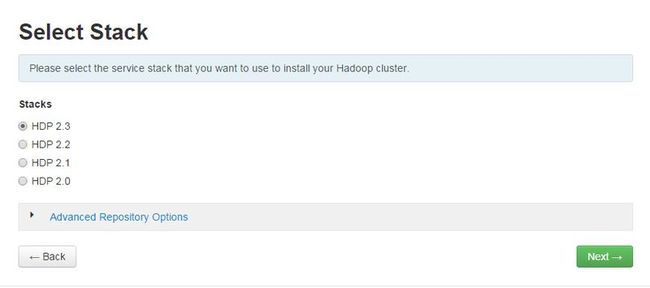
不过可以先看看各软件版本


=== 出来的界面可以调整

继续

不解释!
===接下来属性定制(这个不错,让人感觉可以控制它),略过。
最后的安装过程

---啰嗦几句
ambari安装的zookeeper,myid文件默认在
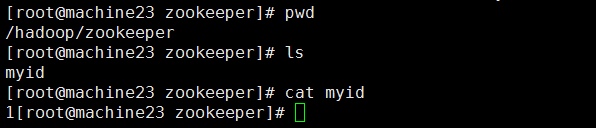
这个挺好,至少zookeeper的配置跟直接拿apache的来比,封装的不是很厉害,这个比CDH好些。

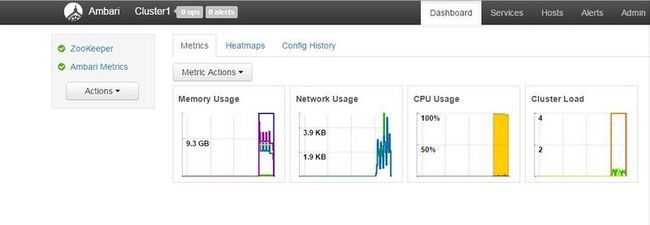
最后安装完的界面: