揭秘设计模式:适配器模式(Adapter)
链接地址:http://www.xx566.com/detail/136.html
这一篇,我们来学习适配器模式(Adapter),又叫变压器模式,在开始之前,先看一下网上针对此模式很流行的一个场景:在朋友聚会上碰到了一个美女 Sarah,从香港来的,可我不会说粤语,她不会说普通话,只好求助于我的朋友kent了,他作为我和Sarah之间的Adapter,让我和Sarah 可以相互交谈了。这就是典型的适配器模式,也很容易理解。
首先,我们先看一下适配器模式的定义:the adapter pattern is a software design pattern that allows the interface of an existing class to be used from another interface.It is often used to make existing classes work with others without modifying their source code.翻译过来就是:适配器模式是一种软件设计模式,允许从另一个接口使用现有类的接口。它常被用来使现有类与其他类合作而无需修改其源代码。
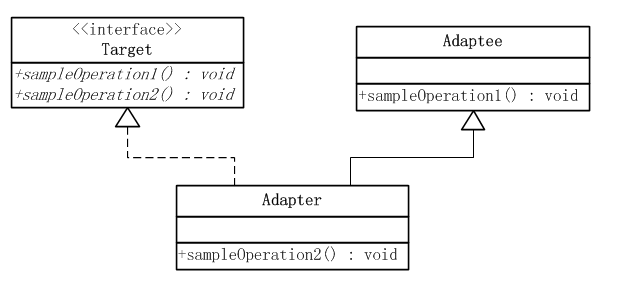
与之前学习到的装饰模式类似,适配器(Adapter)模式也像是一种包装,我们在日常工作中也经常做这样的包装,把已有的一些类包装起来,使之能有满足需要的接口。适配器模式有类的适配器模式和对象的适配器模式两个不同的形式,我们首先来看类的适配器模式,类的适配器模式就是把适配的类的API转换成目标类的API,其UML类图如下:
从上图中,我们看到类的适配器模式中包含一下三个角色,如下:
目标(Target)角色:客户端期望得到的接口,包含sampleOperation1和sampleOperation2两个方法。
源(Adaptee)角色:需要进行适配的接口,只包含sampleOperation1方法。
适配器(Adapter)角色:适配器类是模式的核心,提供sampleOperation2方法,把源接口转换为目标接口。
接下来,我们利用其源代码写一个简单的例子,来了解一下类的适配器模式,首先,我们定义源(Adaptee)角色,其中包含sampleOperation1()方法,代码如下:
/**
 * 源角色(Adaptee)
 * User: Realfighter
 * Date: 2014/8/28
 * Time: 21:41
 */
public class Adaptee {

    public void sampleOperation1() {
        System.out.println("this is sampleOperation1()");
    }

}
之后定义目标(Target)接口,其中包含sampleOperation1()和sampleOperation2()方法,代码如下:
/**
 * Target:目标接口
 * User: Realfighter
 * Date: 2014/8/28
 * Time: 21:44
 */
public interface Target {

    public void sampleOperation1();

    public void sampleOperation2();

}
之后,我们使用类的适配器模式定义适配器角色,继承源角色,实现目标接口,代码如下:
/**
 * 类的适配器
 * User: Realfighter
 * Date: 2014/8/28
 * Time: 21:46
 */
public class Adapter extends Adaptee implements Target {
    @Override
    public void sampleOperation2() {
        System.out.println("this is sampleOperation2()");
    }
}
至此,我们已将被适配类Adaptee的API转换成了目标类的API,我们简单的对类的适配器模式的测试,如下:
/**
 * 类的适配器模式测试
 */
@Test
public void testAdapterOfClass() {
    Target target = new Adapter();
    //this is sampleOperation1()
    target.sampleOperation1();
    //this is sampleOperation2()
    target.sampleOperation2();
}
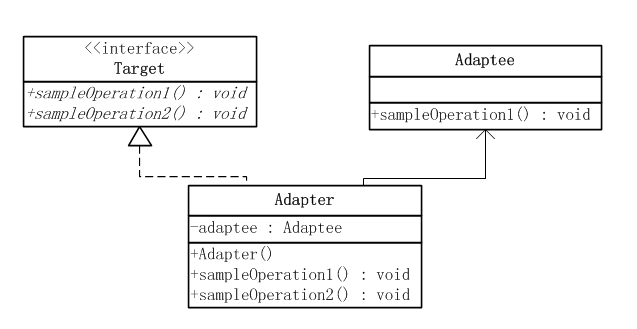
接下来,我们来看对象的适配器模式,与类的适配器模式一样,对象的适配器模式把适配的类的API转换称为目标类的API,与类的适配器模式不同的是,对象的适配器模式不是使用继承关系连接到Adaptee,而是使用委派关系连接到Adaptee类,其UML类图如下:
我们可以看到,与类的适配器模式相同,对象的适配器模式也包含目标(Target)、源(Adaptee)和适配器(Adapter)三种角色,不同的 是,适配器包装了一个Adaptee的实例,并实现了目标接口,从而可以把Adaptee的API与目标Target的API关联起来,接下来,我们使用 对象的适配器模式修改一下Adapter类,代码如下:
/**
 * 对象的适配器
 * User: Realfighter
 * Date: 2014/8/28
 * Time: 21:56
 */
public class Adapter implements Target {

    //内部包装被适配类的实例
    private Adaptee adaptee;

    //通过构造函数传入具体的需要适配的被适配类
    public Adapter(Adaptee adaptee) {
        this.adaptee = adaptee;
    }

    @Override
    public void sampleOperation1() {
        //使用委托方式
        this.adaptee.sampleOperation1();
    }

    @Override
    public void sampleOperation2() {
        System.out.println("this is sampleOperation2()");
    }
}
我们简单的对对象的适配器模式做一下简单的测试,如下:
/**
 * 对象的适配器模式
 */
@Test
public void testAdapterOfObject() {
    Target target = new javase.adapter.object.Adapter(new Adaptee());
    //this is sampleOperation1()
    target.sampleOperation1();
    //this is sampleOperation2()
    target.sampleOperation2();
}
总结:无论是类的适配器模式还是对象的适配器模式,都属于适配器模式的不同形式表现,其实也是一种包装模式,与之前的Decorator装饰模式具有同样 包装的功能,它非常适用与系统后期扩展、修改时候来使用,熟悉Java的可能知道,在JDK早期版本,集合使用的是Enumeration接口,之后修改 为Iterator接口,那么在一些古老的系统,进行扩展的时候可能就需要用到从Iterator到Enumeration的适配,或从 Enumeration到Iterator的适配,就可以通过适配器模式,这里不再赘述。
