非阻塞的Remote Debug(二)
生产服务器上一般不会有开发环境,按照(一)的方式来远程调试可以有几种方式:
每次手动复制一个编译好的Class文件到服务器上制定的目录
把你的开发机器上某一个目录共享出来,保证生产服务器能访问到,把编译好的Class文件放到该目录下,修改debug.jsp里读取Class文件的默认位置
使用http请求把开发环境下的Class文件读取为Byte[]再转换成String,然后post到服务器,服务器再把String解析回Byte[],再加载为Class对象
第一种复制几次之后就会烦了,第二种会好点,第三种是最好的。个人习惯用Eclipse做开发,为了更方便就写了个eclipse的插件,把执行的结果直接返回到Eclipse的console输出,第一次做Eclipse的插件开发,难免坑多,有错漏的地方请指正~
使用Eclipse Plugin的开发向导选择Hellow, World Command,生成一个最基本的plugin project,在此基础上一步步的修改,最终达到自己需要的效果。
第一步,找到要Post到服务器的Class文件的路径,这个路径是当前的Java文件编译后的路径,我没有找到能直接查到这个路径的API,用的是一个比较复杂的方式解析出来的,是用三个路径拼接起来的,
通过JDT的JavaUI获取当前的Java Project对象,得到Project的绝对路径
通过获取当前的Java源文件在工程里的相对路径
获取ClassPathEntry[ ],找到该Java文件所在的ClassPathEntry,得到其对应的sourcePath和outputLocation
至此可以得到当前的Java文件的完整路径,然后在该路径里用3中获取的outputLocation替换sourcePath,再把文件后缀从java换成class即得到了对应的Class文件的绝对路径,核心代码如下:
 IEditorInput currentEditor = HandlerUtil.getActiveEditorInput(event);
   // get current JavaElement
   IJavaElement javaElement = JavaUI.getEditorInputJavaElement(currentEditor);
   // get relative java src path
   String outputPath = javaElement.getPath().makeRelative().toFile().getPath();
   // get the project
   IJavaProject javaProject = javaElement.getJavaProject();
   String projectPath = javaProject.getProject().getLocation().makeAbsolute().toFile().getParent();
   String javaFilePath = projectPath + File.separator + outputPath;
   Activator.getStream().println("project relative src path is: "+javaFilePath);
   try {
    IPath projectOutput = javaProject.getOutputLocation();
    IClasspathEntry[] classpathEntries = javaProject.getRawClasspath();
    for (IClasspathEntry iClasspathEntry : classpathEntries) {
     if (IClasspathEntry.CPE_SOURCE == iClasspathEntry.getEntryKind()) {
      String source = iClasspathEntry.getPath().makeRelative().toFile().getPath();
      IPath iPath = iClasspathEntry.getOutputLocation();
      if (iPath == null) {
       iPath = projectOutput;
      }
      String output = iPath.makeRelative().toFile().getPath();
      Activator.getStream().println("source file is: " + source);
      if (javaFilePath.contains(source)) {
       classPath = javaFilePath.replace(source, output).replace(".java", ".class");
       break;
      }
     }
    }
   }
   catch (JavaModelException e) {
    // TODO Auto-generated catch block
    e.printStackTrace();
   }
第二步,把该文件转换为String类型,Post到服务器
try {
   Activator.getStream().println("debug class path is:"+classPath);
   InputStream is = new FileInputStream(classPath);
   byte[] b = new byte[is.available()];
   is.read(b);
   is.close();
   String classValue = new String(b, "iso-8859-1");
   String result = HttpUtils.postRequest(debugURL, classValue);
   Activator.getStream().println(result);
  }
  catch (Exception e) {
   // TODO Auto-generated catch block
   e.printStackTrace();
  }
String classValue = new String(b, "iso-8859-1");
这里指定编码非常重要,因为如果不指定编码而默认编码不是iso-8859-1的时候,远程服务器就不能把它再解析回去,字节数组里的魔数CAFEBABE变成了3F3F3F3F,这里我是用的httpclient,有点大材小用,而且还会对Eclipse的Http插件有依赖。
package com.gideon.remotedebug.handlers;
import java.io.BufferedReader;
import java.io.IOException;
import java.io.InputStreamReader;
import java.io.UnsupportedEncodingException;
import java.util.ArrayList;
import java.util.List;
import org.apache.http.HttpEntity;
import org.apache.http.HttpResponse;
import org.apache.http.client.entity.UrlEncodedFormEntity;
import org.apache.http.client.methods.HttpPost;
import org.apache.http.impl.client.DefaultHttpClient;
import org.apache.http.message.BasicNameValuePair;
import org.apache.http.protocol.HTTP;
public class HttpUtils {
 private static DefaultHttpClient httpclient = new DefaultHttpClient();
 public static String postRequest(String url, String classValue) throws UnsupportedEncodingException, IllegalStateException, IOException {
  HttpPost httppost = new HttpPost(url);
  // post 参数 传递
  List<BasicNameValuePair> nvps = new ArrayList<BasicNameValuePair>();
  nvps.add(new BasicNameValuePair("classValue", classValue)); // 参数
  httppost.setEntity(new UrlEncodedFormEntity(nvps, HTTP.UTF_8)); // 设置参数给Post
  // 执行
  HttpResponse response = httpclient.execute(httppost);
  HttpEntity entity = response.getEntity();
  if (entity != null) {
   // System.out.println("Response content length: " +
   // entity.getContentLength());
   // 显示结果
   BufferedReader reader = new BufferedReader(new InputStreamReader(entity.getContent(), "UTF-8"));
   String line = null;
   StringBuilder stringBuilder = new StringBuilder();
   while ((line = reader.readLine()) != null) {
    stringBuilder.append(line);
   }
   reader.close();
   return stringBuilder.toString();
  }
  else {
   return "return entity is null";
  }
 }
}
服务器对应的JSP文件:
 <%@ page language="java" contentType="text/html; charset=UTF-8"
 pageEncoding="UTF-8"%>
<%@ page import="com.gideon.remotedebug.*"%>
<%
 String classString = request.getParameter("classValue");
 byte[] classByte = classString.getBytes("iso-8859-1");
 String result = JavaClassExecuter.execute(classByte);
 out.print(result);
 out.flush();
%>
第三步,把服务器返回的结果输出到Eclipse的Console里,在插件的Activator中定义一个static的MessageConsoleStream,添加到ConsoleManager中,并在start()中初始化。
 private static MessageConsoleStream stream;

 public void start(BundleContext context) throws Exception {
  super.start(context);
  plugin = this;
  MessageConsole remoteDebugConsole=new MessageConsole("RemoteDebug Console", null);
  ConsolePlugin.getDefault().getConsoleManager().addConsoles(new IConsole[]{remoteDebugConsole});
  stream=remoteDebugConsole.newMessageStream();
 }

 public static MessageConsoleStream getStream() {
  return stream;
 }
在输出Message的时候用Activator.getStream().println()
第四步,如果第一步的自动解析出了问题,需要能够手动指定一个路径能够加载正确的Class路径,远程服务器的URL肯定需要从配置文件里读取的,这里用的是Eclipse的Preference。过程不复杂,直接贴代码。
package remotedebug.preferences;
/**
 * Constant definitions for plug-in preferences
 */
public class PreferenceConstants {
 public static final String P_PATH = "pathPreference";
 public static final String P_DEBUG_PATH = "pathDebugPreference";
 public static final String P_BOOLEAN = "booleanPreference";
}
package remotedebug.preferences;
import org.eclipse.core.runtime.preferences.AbstractPreferenceInitializer;
import org.eclipse.jface.preference.IPreferenceStore;
import remotedebug.Activator;
/**
 * Class used to initialize default preference values.
 */
public class PreferenceInitializer extends AbstractPreferenceInitializer {
 /*
  * (non-Javadoc)
  *
  * @see org.eclipse.core.runtime.preferences.AbstractPreferenceInitializer#initializeDefaultPreferences()
  */
 public void initializeDefaultPreferences() {
  IPreferenceStore store = Activator.getDefault().getPreferenceStore();
  store.setDefault(PreferenceConstants.P_BOOLEAN, false);
  store.setDefault(PreferenceConstants.P_DEBUG_PATH, "http://localhost:8082/WebDemo/debug.jsp");
 }
}
 package remotedebug.preferences;
import org.eclipse.jface.preference.*;
import org.eclipse.ui.IWorkbenchPreferencePage;
import org.eclipse.ui.IWorkbench;
import remotedebug.Activator;
/**
 * This class represents a preference page that is contributed to the
 * Preferences dialog. By subclassing <samp>FieldEditorPreferencePage</samp>, we
 * can use the field support built into JFace that allows us to create a page
 * that is small and knows how to save, restore and apply itself.
 * <p>
 * This page is used to modify preferences only. They are stored in the
 * preference store that belongs to the main plug-in class. That way,
 * preferences can be accessed directly via the preference store.
 */
public class SamplePreferencePage extends FieldEditorPreferencePage implements IWorkbenchPreferencePage {
 public SamplePreferencePage() {
  super(GRID);
  setPreferenceStore(Activator.getDefault().getPreferenceStore());
  setDescription("A demonstration of a preference page implementation");
 }
 /**
  * Creates the field editors. Field editors are abstractions of the common
  * GUI blocks needed to manipulate various types of preferences. Each field
  * editor knows how to save and restore itself.
  */
 public void createFieldEditors() {
  addField(new BooleanFieldEditor(PreferenceConstants.P_BOOLEAN, "&Use the customize path of the class", getFieldEditorParent()));
  addField(new FileFieldEditor(PreferenceConstants.P_PATH, "Choose the class to remote debug", getFieldEditorParent()));
  addField(new StringFieldEditor(PreferenceConstants.P_DEBUG_PATH, "Set the remote debug URL", getFieldEditorParent()));
 }
 /*
  * (non-Javadoc)
  * @see
  * org.eclipse.ui.IWorkbenchPreferencePage#init(org.eclipse.ui.IWorkbench)
  */
 public void init(IWorkbench workbench) {
 }
}
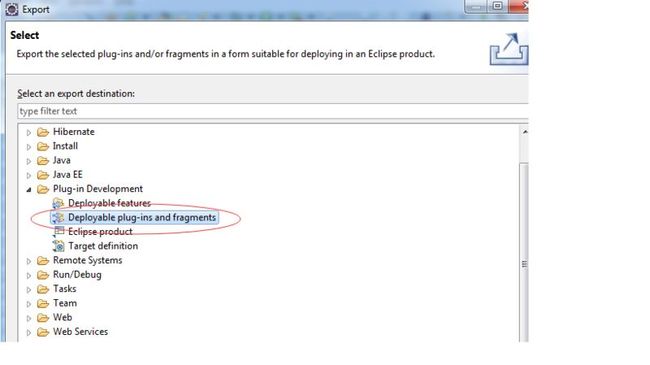
第五步,导出成Eclipse插件
把导出的jar包丢到eclipse目录下的dropins目录下,再重启即可
完整的源代码打包下载
