xblock-sdk学习笔记之制作studio界面
本文首发与我的博客莲花乡—十里屯。
由于公司采用TEAM@OSC管理项目,为了方便交流转载至此。
使用studio自带的文本编辑器
如果我们使用过studio的话不难看出它使用的是tinyMCE。如此问题就好解决了,我们只要定义一个textarea控件,在JS中将其初始化成在线编辑器就可以了,大致代码如下:
先给出模板代码:
<!-- editor -->
<div class="wrapper-comp-editor is-active is-set" id="editor-tab" data-editor="visual">
<section class="html-editor editor">
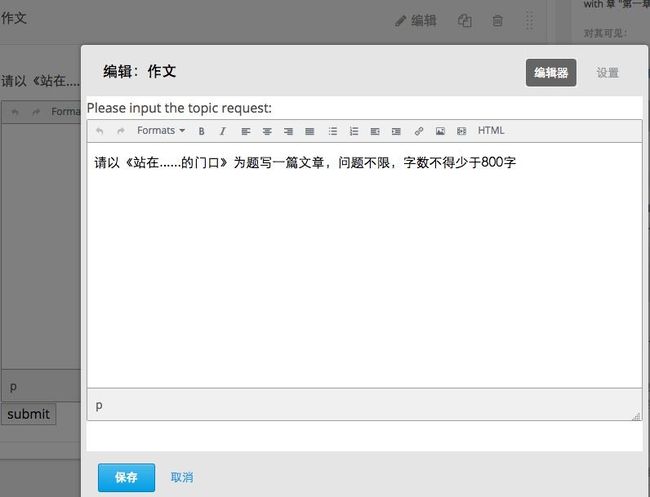
<div><span>Please input the topic request:</span></div>
<div class="row"><textarea class="tiny-mce" name="editor_question" id="editor_question">{question}</textarea></div>
</section>
</div>
相应的JS代码:
<!-- lang: js -->
tinymce.init({
            selector: "#editor-tab .tiny-mce",
            skin: 'studio-tmce4',
            height:"300",
            formats: {code: {inline: 'code'}
        },
        codemirror: {path: "/static/js/vendor"},
        plugins: "image link codemirror media",
        menubar: false,
        toolbar_items_size: 'small',
        extended_valid_elements : "iframe[src|frameborder|style|scrolling|class|width|height|name|align|id]",
        toolbar: "insertfile undo redo | styleselect | bold italic | alignleft aligncenter alignright alignjustify | bullist numlist outdent indent | link image media | code ",
        resize: "both"
    });
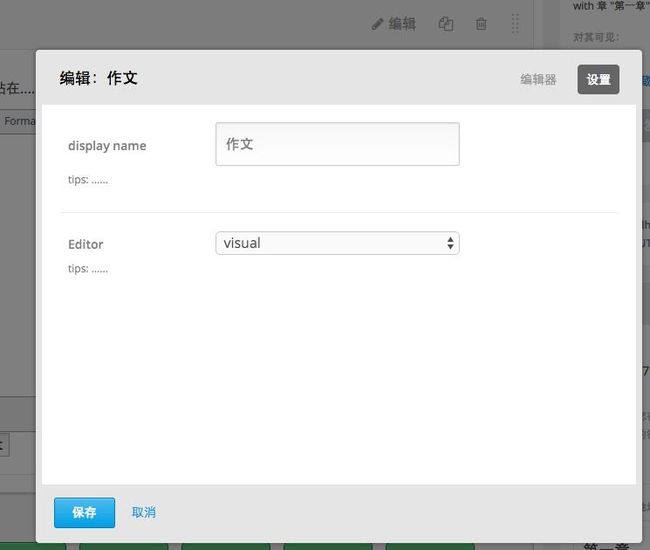
创建tab选项卡
这个功能我想了很久,本来以为很简单,直接在templates中编写一个tabs就可以了。后来发现不行,因为写的两个div都是在
中而正常情况下,标签代码应该在 中,内容在 中。如此才能正好利用上studio中原有的css和js代码。最初想的解决方法是在js中动态为相应的div填充内容。后来感觉上这样做不够合理,应该有其它的解决方案,最后分析了 html组件中的文本输入组件才发现只要将设置页面的div增加 metadata_edit 这个class即可实现tab选项卡的功能。
<!-- settings  -->
<div class="wrapper-comp-settings metadata_edit" id="settings-tab">
  <ul class="list-input settings-list metadata_entry">
        <li class="field comp-setting-entry metadata_entry">
            <div class="wrapper-comp-setting">
                <label class="label setting-label" for="module_title">display name</label>
                <input class="input setting-input" type="text" name="module_title" value="{module_title}">
            </div>
            <span class="tip setting-help">tips: ......</span>
        </li>

        <li class="field comp-setting-entry metadata_entry">
            <div class="wrapper-comp-setting">
                <label class="label setting-label" for="editor_type">Editor</label>
                <select class="input setting-input" name="editor_type">
                            <option value="visual">visual</option>
                            <option value="org">org</option>
                </select>
            </div>
            <span class="tip setting-help">tips: ......</span>
        </li>
  </ul>
</div>
如此,在测试时发现,我们填写的设置选项没有任何效果。在浏览器中调试,js报错为:Failed to load metadata-editor template。再进一步跟踪就会发现是在/cms/templates/widgets/metadata-edit.html 模板中加载:/cms/templates/js/metadata-editor.underscore 文件时加载失败了。其文件代码如下:
## js templates
<script id="metadata-editor-tpl" type="text/template">
    <%static:include path="js/metadata-editor.underscore" />
</script>

...

<div class="wrapper-comp-settings metadata_edit" id="settings-tab" data-metadata='${json.dumps(metadata_field_copy, cls=EdxJSONEncoder) | h}'/>
对应的 underscore 文件内容:
<ul class="list-input settings-list">
    <% _.each(_.range(numEntries), function() { %>
    <li class="field comp-setting-entry metadata_entry">
    </li>
    <% }) %>
</ul>
如此,我们再将我们的template内容改写一下:
<!-- element -->
<script id="metadata-editor-tpl" type="text/template">
  <ul class="list-input settings-list metadata_entry">
        <li class="field comp-setting-entry metadata_entry">
            <div class="wrapper-comp-setting">
                <label class="label setting-label" for="module_title">display name</label>
                <input class="input setting-input" type="text" name="module_title" value="{module_title}">
            </div>
            <span class="tip setting-help">tips: ......</span>
        </li>

        <li class="field comp-setting-entry metadata_entry">
            <div class="wrapper-comp-setting">
                <label class="label setting-label" for="editor_type">Editor</label>
                <select class="input setting-input" name="editor_type">
                            <option value="visual">visual</option>
                            <option value="org">org</option>
                </select>
            </div>
            <span class="tip setting-help">tips: ......</span>
        </li>
  </ul>

</script>

<!-- editor -->
<div class="wrapper-comp-editor is-active is-set" id="editor-tab" data-editor="visual">
    <section class="html-editor editor">
        <div><span>Please input the topic request:</span></div>
        <div class="row"><textarea class="tiny-mce" name="editor_question" id="editor_question">{question}</textarea></div>
    </section>
</div>

<!-- settings  -->
<div class="wrapper-comp-settings metadata_edit" id="settings-tab"></div>
使用studio自带的保存和取消按钮
这个问题在github和googlegroup上有好些人都在问,网上现有的比较通用的处理方法是在
中自定义一个保存和取消按钮,在JS中处理(可以参考:https://groups.google.com/forum/#!searchin/edx-code/xblock$20save/edx-code/l246xiaiGAc/TYTrQX0MvPUJ 和 本文最后的参考资料中的处理方式)。直到后来制作tab页面时才发现自定义的保存、取消按钮会受到选项卡切换的影响。用firebug查看了整个页面的html才知道,页面中原本是有保存和取消按钮的只是被隐藏,不显示而已。我最初的解决方法是在js中强行控制 中的元素,强行令其显示,后来在做选项卡之后发现了新的bug。有js将保存按钮隐藏,将取消按钮的title改成OK了。经过一番折腾调试,发现罪魁祸首是:/static/js/views/modals/edit_xblock.js,相关代码如下:
<!-- lang: js -->
onDisplayXBlock: function() {
    var editorView = this.editorView,
        title = this.getTitle();

    // Notify the runtime that the modal has been shown
    editorView.notifyRuntime('modal-shown', this);

    // 是否启用自定义的tab控件
    if (editorView.hasCustomTabs()) {
        // Hide the modal's header as the custom editor provides its own
        this.$('.modal-header').hide();

        // Update the custom editor's title
        editorView.$('.component-name').text(title);
    } else {
        this.$('.modal-window-title').text(title);
        if (editorView.getDataEditor() && editorView.getMetadataEditor()) {
            this.addDefaultModes();
            this.selectMode(editorView.mode);
        }
    }

    // 是否使用自定义的动作按钮
    if (!editorView.hasCustomButtons()) {
        // 如果当前的xblock插件不支持保存功能,就禁用保存按钮。
        if (!editorView.xblock.save) {
            this.disableSave();
        }
        this.getActionBar().show();
    }

    // Resize the modal to fit the window
    this.resize();
},

// 禁用保存按钮
disableSave: function() {
    var saveButton = this.getActionButton('save'),
        cancelButton = this.getActionButton('cancel');
    saveButton.hide();
    cancelButton.text(gettext('OK'));
    cancelButton.addClass('action-primary');
},
这代码的意思很明显是说,该xblock插件不支持save方法。根据栈回朔,定位到相关代码如下:
<!-- lang: js -->
handleXBlockFragment: function(fragment, options) {
    var self = this,
        wrapper = this.$el,
        xblockElement,
        successCallback = options ? options.success || options.done : null,
        errorCallback = options ? options.error || options.done : null,
        xblock,
        fragmentsRendered;

    fragmentsRendered = this.renderXBlockFragment(fragment, wrapper);
    fragmentsRendered.always(function() {
        // 这里得到我们自定义xblock插件的dom对象
        xblockElement = self.$('.xblock').first();
        try {
            // 初始化操作,其实就是进去调用我们xblock的js方法,我们可以跟进看一下
            xblock = XBlock.initializeBlock(xblockElement);
            self.xblock = xblock;
            self.xblockReady(xblock);
            if (successCallback) {
                successCallback(xblock);
            }
        } catch (e) {
            console.error(e.stack);
            // Add 'xblock-initialization-failed' class to every xblock
            self.$('.xblock').addClass('xblock-initialization-failed');

            // If the xblock was rendered but failed then still call xblockReady to allow
            // drag-and-drop to be initialized.
            if (xblockElement) {
                self.xblockReady(null);
            }
            if (errorCallback) {
                errorCallback();
            }
        }
    });
查看 XBlock.initializeBlock 的定义:/common/static/coffee/src/xblock/core.coffee:10
<!-- lang: js -->
initializeBlock: (element, requestToken) ->
  $element = $(element)
  requestToken = requestToken or $element.data('request-token')
  children = @initializeBlocks($element, requestToken)
  runtime = $element.data("runtime-class")
  version = $element.data("runtime-version")
  initFnName = $element.data("init")
  $element.prop('xblock_children', children)
  if runtime? and version? and initFnName?
    # 根据相应版本获取我们方法的名称
    runtime = new window[runtime]["v#{version}"]
    initFn = window[initFnName]
    # 调用我们自定义的方法,例如我指定的方法名是: frag.initialize_js('SubjectiveEditBlock')
    # 此方法是有返回值的,返回一个 类似capa中名后缀为 Descriptor 的xblock对象, 如果没有返回值就是一个空对象。
    block = initFn(runtime, element) ? {}
    block.runtime = runtime
  else
    elementTag = $('<div>').append($element.clone()).html();
    console.log("Block #{elementTag} is missing data-runtime, data-runtime-version or data-init, and can't be initialized")
    block = {}

  block.element = element
  block.name = $element.data("name")

  $element.trigger("xblock-initialized")
  $element.data("initialized", true)
  $element.addClass("xblock-initialized")
  block
到这里一切就都很明了了,我们只要让我们自定义的xblock方法返回一个对象,该对象中包含save方法即可,代码大致如下:
<!-- lang: js -->
// 返回一个自定义对象,其需要有save方法
function SubjectiveEditDescriptor(){
}

function SubjectiveEditBlock(runtime, element) {
    // 为返回的对象命名,具体请参考 /common/static/coffee/src/xblock/core.coffee:10
    $(element).data('name', 'SubjectiveEditDescriptor');

    var subjectiveEditDescriptor = new SubjectiveEditDescriptor();

    // 定义save方法
    subjectiveEditDescriptor.save = function(){
        var handlerUrl = runtime.handlerUrl(element, 'studio_submit');
        var data = {
            module_title: $(element).find('input[name=module_title]').val(),
            editor_type: $(element).find('input[name=editor_type]').val(),
            editor_question: tinyMCE.activeEditor.getContent()
        };

        $.post(handlerUrl, JSON.stringify(data)).done(function(response) {
            window.location.reload(false);
        });
    };

    tinymce.init({
                selector: "#editor-tab .tiny-mce",
                skin: 'studio-tmce4',
                height:"300",
                formats: {code: {inline: 'code'}
            },
            codemirror: {path: "/static/js/vendor"},
            plugins: "image link codemirror media",
            menubar: false,
            toolbar_items_size: 'small',
            extended_valid_elements : "iframe[src|frameborder|style|scrolling|class|width|height|name|align|id]",
            toolbar: "insertfile undo redo | styleselect | bold italic | alignleft aligncenter alignright alignjustify | bullist numlist outdent indent | link image media | code ",
            resize: "both"
        });

    //  将对象返回
    return subjectiveEditDescriptor;
};
至此,Studio界面相关的分析结束。如果哪里有遗漏还望各位看官批评指正。最后上传几张效果图: 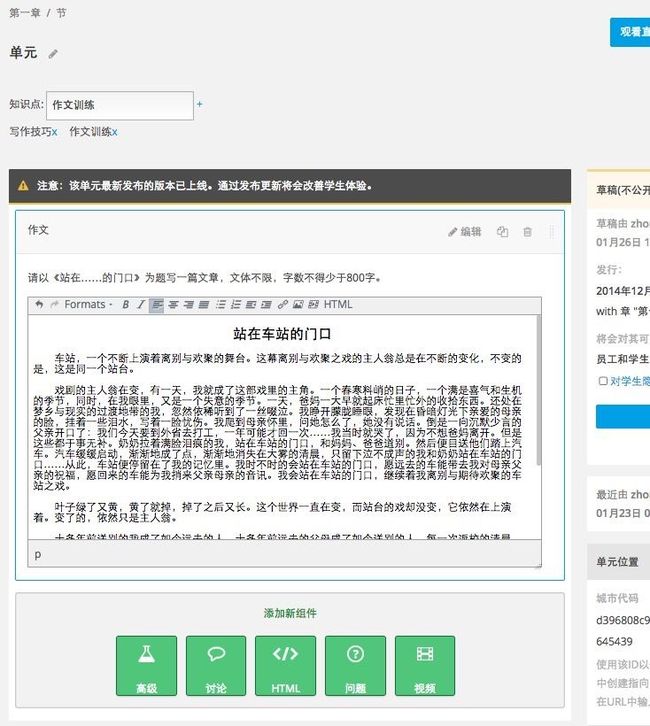
参考资料
1.XBlock 0.1 documentation - Tutorial
2.XBlock: Open edX courseware components
3.[开发] Open edX 56 网 XBlock 视频插件开发(基础)