Flex、Spring整合:blazeds
准备:
1、下载blazeds 4.x,下载地址:http://download.macromedia.com/pub/livecycle/blazeds/4_0/blazeds-bin-4.0.0.14931.zip
2、部署blazeds至tomcat,访问http://localhost:8080/blazeds/messagebroker/amf,显示空白页,则部署成功
整合:
====================服务端开发========================================
1、建立一测试Service:
2、配置bean:在blazeds/WEB-INF/下新建applicationContext.xml文件,添加
3、修改web.xml文件,添加spring支持
4、打开blazeds/WEB-INF/flex/services-config.xml,添加
使得flex的bean对象创建交由spring负责
SpringFactory类的代码如下:
5、将service公开,提供flex客户端调用:打开blazeds/WEB-INF/flex/remoting-config.xml,增加如下配置
至此,服务端整合、开发完毕
====================客户端开发========================================
1、新建flex应用程序,添加remoteObject调用:
注意这边的guestListService整合就是与remoting-config.xml中配置的destination的id保持一致
至此客户端就得到了服务器端的数据了,下面就是根据业务自由处理了。
效果图:

1、下载blazeds 4.x,下载地址:http://download.macromedia.com/pub/livecycle/blazeds/4_0/blazeds-bin-4.0.0.14931.zip
2、部署blazeds至tomcat,访问http://localhost:8080/blazeds/messagebroker/amf,显示空白页,则部署成功
整合:
====================服务端开发========================================
1、建立一测试Service:
public class GuestListService implements Serializable, IGuestListService {

	private static final long serialVersionUID = 3552207441192189726L;

	public List<Guest> getGuestList() {
		List<Guest> guestList = new ArrayList<Guest>();
		guestList.add(new Guest("Guest One"));
		guestList.add(new Guest("Guest Two"));
		guestList.add(new Guest("Guest Three"));
		guestList.add(new Guest("Guest Four"));
		return guestList;
	}
}
2、配置bean:在blazeds/WEB-INF/下新建applicationContext.xml文件,添加
<beans>
	<bean id="guestListService" class="com.sky.flexonspring.services.GuestListService" />
</beans>
3、修改web.xml文件,添加spring支持
<context-param>
		<param-name>contextConfigLocation</param-name>
		<param-value>/WEB-INF/applicationContext.xml</param-value>
	</context-param>
	<listener>
		<listener-class>
			org.springframework.web.context.ContextLoaderListener
		</listener-class>
	</listener>
4、打开blazeds/WEB-INF/flex/services-config.xml,添加
<factories>
		<factory id="spring" class="com.sky.flexonspring.factories.SpringFactory" />
	</factories>
使得flex的bean对象创建交由spring负责
SpringFactory类的代码如下:
package com.sky.flexonspring.factories;

import org.springframework.context.ApplicationContext;
import org.springframework.web.context.support.WebApplicationContextUtils;
import org.springframework.beans.BeansException;
import org.springframework.beans.factory.NoSuchBeanDefinitionException;
import flex.messaging.FactoryInstance;
import flex.messaging.FlexFactory;
import flex.messaging.config.ConfigMap;
import flex.messaging.services.ServiceException;

/**
 * This interface is implemented by factory components which provide instances
 * to the flex messaging framework.
 *
 * @author Jeff Vroom
 */
public class SpringFactory implements FlexFactory {
	private static final String SOURCE = "source";

	/**
	 * This method can be used to initialize the factory itself. It is called
	 * with configuration parameters from the factory tag which defines the id
	 * of the factory.
	 */
	public void initialize(String id, ConfigMap configMap) {
	}

	/**
	 * This method is called when we initialize the definition of an instance
	 * which will be looked up by this factory. It should validate that the
	 * properties supplied are valid to define an instance. Any valid properties
	 * used for this configuration must be accessed to avoid warnings about
	 * unused configuration elements. If your factory is only used for
	 * application scoped components, this method can simply return a factory
	 * instance which delegates the creation of the component to the
	 * FactoryInstance's lookup method.
	 */
	public FactoryInstance createFactoryInstance(String id, ConfigMap properties) {
		SpringFactoryInstance instance = new SpringFactoryInstance(this, id,
				properties);
		instance.setSource(properties.getPropertyAsString(SOURCE,
				instance.getId()));
		return instance;
	} // end method createFactoryInstance()

	/**
	 * Returns the instance specified by the source and properties arguments.
	 * For the factory, this may mean constructing a new instance, optionally
	 * registering it in some other name space such as the session or JNDI, and
	 * then returning it or it may mean creating a new instance and returning
	 * it. This method is called for each request to operate on the given item
	 * by the system so it should be relatively efficient.
	 * <p>
	 * If your factory does not support the scope property, it report an error
	 * if scope is supplied in the properties for this instance.
	 */
	public Object lookup(FactoryInstance inst) {
		SpringFactoryInstance factoryInstance = (SpringFactoryInstance) inst;
		return factoryInstance.lookup();
	}

	static class SpringFactoryInstance extends FactoryInstance {
		SpringFactoryInstance(SpringFactory factory, String id,
				ConfigMap properties) {
			super(factory, id, properties);
		}

		public String toString() {
			return "SpringFactory instance for id =" + getId() + " source="
					+ getSource() + " scope=" + getScope();
		}

		public Object lookup() {
			ApplicationContext appContext = WebApplicationContextUtils
					.getWebApplicationContext(flex.messaging.FlexContext
							.getServletConfig().getServletContext());
			String beanName = getSource();
			try {
				return appContext.getBean(beanName);
			} catch (NoSuchBeanDefinitionException nexc) {
				ServiceException e = new ServiceException();
				String msg = "Spring service named '" + beanName
						+ "' does not exist.";
				e.setMessage(msg);
				e.setRootCause(nexc);
				e.setDetails(msg);
				e.setCode("Server.Processing");
				throw e;
			} catch (BeansException bexc) {
				ServiceException e = new ServiceException();
				String msg = "Unable to create Spring service named '"
						+ beanName + "' ";
				e.setMessage(msg);
				e.setRootCause(bexc);
				e.setDetails(msg);
				e.setCode("Server.Processing");
				throw e;
			}
		}
	}
}
5、将service公开,提供flex客户端调用:打开blazeds/WEB-INF/flex/remoting-config.xml,增加如下配置
<destination id="guestListService">
		<properties>
			<factory>spring</factory>
			<source>guestListService</source>
		</properties>
	</destination>
至此,服务端整合、开发完毕
====================客户端开发========================================
1、新建flex应用程序,添加remoteObject调用:
<mx:RemoteObject id="ro"
					 destination="guestListService"
					 endpoint="http://localhost:8080/blazeds/messagebroker/amf"
					 result="resultHandler(event)"
					 fault="faultHandler(event)"/>
注意这边的guestListService整合就是与remoting-config.xml中配置的destination的id保持一致
ro.getGuestList()这段代码调用就得到调用
GuestListService.getGuestList()后的List<Guest> 列表
private function resultHandler(event:ResultEvent):void
			{
				guestListDP = ArrayCollection(event.result);
			}
至此客户端就得到了服务器端的数据了,下面就是根据业务自由处理了。
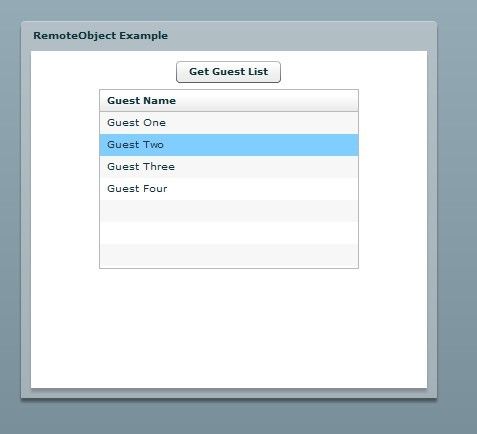
效果图:
