Tab Bars和Pickers
不好意思各位,本人休息了一个礼拜,所以这次的进度延后了,而且这次的学习的内容比较多,时间用的也比较长,文章发布的时间间隔有些长了,望各位谅解,下面继续我们的ios之旅。
这次我们主要学习的内容有2个,一个是Tab Bar,如下图
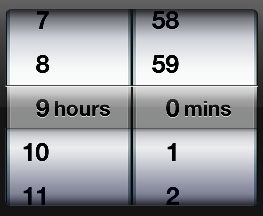
很熟悉的界面(iphone中的phone),另一个Picker,如下图
在正是开始学习项目之前,先首先简单介绍一下这次的例子的一个结构,当然一个root controller肯定是有的,用来控制其他subController的切换,在root controller中会放置一个tab bar,这个tab bar中有5个item,分别对应5个不同的view,每个view中有一个picker,所以在这个例子中,会有5个功能不同的picker,基本上涵盖了日常可能会用到的常规情况。OK,下面开始这次的学习。
1)创建一个工程,选择Empty Application,并命名为Pickers
这个过程和前一篇是一样的,在这里就不再叙述了。
2)添加需要的文件
之前我们说过,这个项目会有5个subcontrollers,因此我们需要添加5个view,选中Project navigator中的Pickers文件夹,单击鼠标右键,选择“New File...”,或者使用快捷键command+N,或者使用菜单栏File>New>New File...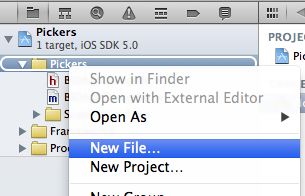

在弹出的窗口中,左边选择Cocoa Touch,右边选择UIViewController subclass,点击Next按钮。
在下一个窗口中,填写类名BIDDatePickerViewController,并确认“With XIB for user interface” checkbox被选中(在前一篇的学习中,我们没有选中这个checkbox,而是在之后手动的连接controller和xib文件,在这里系统将帮我们连接这2个文件),点击Next
选择保持的位置,保存在“Pickers”目录下,完成创建。创建完成后的Project navigator如下
一共有3个文件被创建,分别是.h、.m和.xib。
使用相同的方法再创建其他4个subcontroller,分别命名为BIDSingleComponentPickerViewController、BIDDoubleComponentPickerViewController、BIDDependentComponentPickerViewController、BIDCustomPickerViewController。创建完成后的Project navigator如下:
其中:
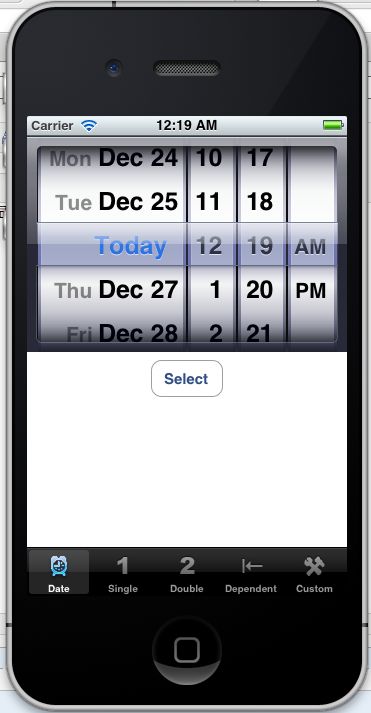
BIDDatePickerViewController:包含一个Date Picker
BIDSingleComponentPickerViewController:包含一个Picker View,并有一个滚轴1一个component)
BIDDoubleComponentPickerViewController:包含一个Picker View,并有两个滚轴(2个component),且这2个滚轴是独立的
BIDDependentComponentPickerViewController:包含一个Picker View,并有两个滚轴(2个component),且这2个滚轴是联动的
BIDCustomPickerViewController:包含一个Picker View,并有五个滚轴(5个component),这5个滚轴中的内容是图片
(温馨提示:每一步做完后,你可以先build一下你的code,看看有没有错误,有的话可以及时修改,有一些警告应该是正常的,我们并没有完全完成项目的创建,但是不应该报错。)
3)添加Root View Controller(就是前面的提到的root controller)
添加root controller选择的模板和前面的有些不同,选中Project navigator中的Pickers文件夹,使用快捷键command+N创建一个新文件,在弹出的选中模板对话框中,左边选择User Interface,右边选择Empty模板,单击Next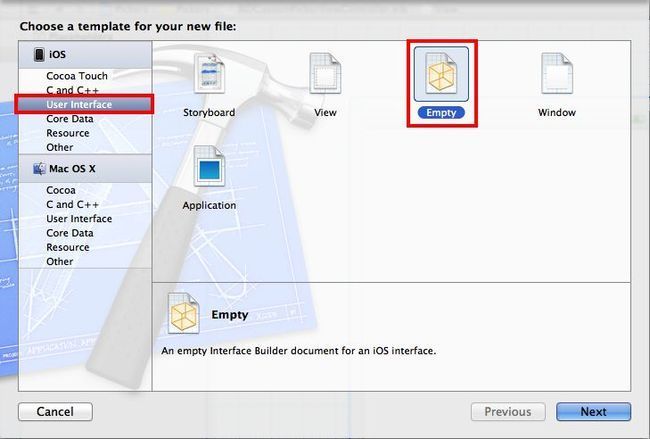
Device Family保持默认的iPhone,点击Next,将新建的模板命名为TabBarController.xib,点击Create,创建完成。然后一个单独的TabBarController.xib文件会出现在Project navigator中。(Empty模板不会帮我们创建任何.h.m文件,我们会将TabBarController.xib关联到BIDAppDelegate,因此我们不需要和前面的文件一样创建.h.m文件,其次Empty模板不会帮我们创建一个默认的View,点击TabBarController.xib,你会发现xib的窗口中什么东西也没有,我们需要在之后自己添加)
打开BIDAppDelegate.h文件,添加以下内容
#import <UIKit/UIKit.h>

@interface BIDAppDelegate : UIResponder <UIApplicationDelegate>

@property (strong, nonatomic) UIWindow *window;
@property (strong, nonatomic) IBOutlet UITabBarController *rootController;

@end
打开BIDAppDelegate.m文件,添加以下内容
#import "BIDAppDelegate.h"

@implementation BIDAppDelegate

@synthesize window = _window;
@synthesize rootController;

- (BOOL)application:(UIApplication *)application didFinishLaunchingWithOptions:(NSDictionary *)launchOptions
{
    self.window = [[UIWindow alloc] initWithFrame:[[UIScreen mainScreen] bounds]];
    // Override point for customization after application launch.

    [[NSBundle mainBundle] loadNibNamed:@"TabBarController" owner:self options:nil];
    [self.window addSubview:rootController.view];

    self.window.backgroundColor = [UIColor whiteColor];
    [self.window makeKeyAndVisible];
    return YES;
}

...
这些方法应该比较熟悉了,和之前几篇的例子很相似。
在此打开TabBarControll.xib,在Object library中找到Tab Bar Controller
并拖动到xib窗口
下面的一步是将TabBarControll.xib关联到BIDAppDelegate,选中TabBarControll.xib,然后选择File's Owner,打开identity inspector,Class中选择BIDAppDelegate
接着打开connections inspector,在Outlets中会出现我们刚在定义在BIDAppDelegate.h中的rootController,鼠标放到rootController右边的圆圈上,圆圈中会出现加号,然后点击鼠标拖动到xib窗口中的Tab Bar Controller上,将2者关联起来,之后在rootController边上就会显示Tab Bar Controller了。
4)添加Tab Bar Item
首先可以看一下Tab Bar Controller的结构
一个Tab Bar Controller下面有一个Tab Bar,然后这个Tab Bar下有很多Item(每个Tab Bar Controller默认会有2个tab bar item),每个Item有一个View Controller,每个View Controller下又有一个Tab Bar Item,好了这个就是一个Tab Bar Controller的基本结构,因为我们需要5个tab bar item,下面就添加其他的3个。
在Object Library中找到Tab Bar Item
然后拖动到Tab Bar上,一共拖3个,位置无所谓,添加完tab bar item的结构如下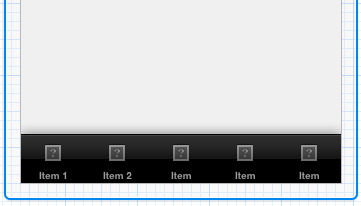

这2者是一一对应的。
5个tab bar item分别对应5个view,因此我们需要制定2者的对应关系,选中最左边的一个tab bar item,打开attribute inspector,在NIB Name的下拉列表中选择BIDDatePickerViewController,然后打开identity inspcetor,在Class中选择BIDDatePickerViewController(在NIB Name中选择BIDDatePickerViewController是指定tab bar item对应的view是哪个,在Class中选中BIDDatePickerViewController是指定view的delegate是哪个类),对其他的4个tab bar item都执行上面的操作,分别对应各自的controller。从左到右的顺序为:
BIDDatePickerViewController
BIDSingleComponentPickerViewController
BIDDoubleComponentPickerViewController
BIDDependentComponentPickerViewController
BIDCustomPickerViewController
5)为Tab Bar Item添加icon
下载TabBarIcons,并其解压后连同文件夹一同拖入到Project navigator中,在弹出的“Choose options for adding these files”框中保持默认选项即可,添加完后的Project navigator如下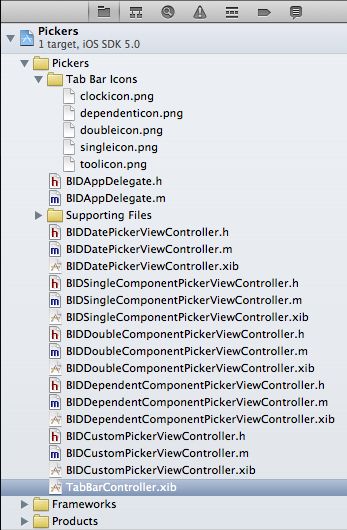
一般来说,app中图片基本上都是使用png格式,然后Tab Bar Item的图片大小为24px * 24px。(感觉xcode还是很只能的,它能够自己搜索所有的在项目中的图片文件,然后供用户进行选择,无论你图片放在那个文件夹下,xcode都可以找到)
图片拖动到项目中后,接下来就是为tab bar item添加图片了,首先选中最左边的一个Tab Bar Item,选中的方法是在视图中点击2次最左边的item图标,第一次我们选中的是view controller,第二次才是真正的tab bar item

第二次选中后,打开Attributes inspector,在Bar Item的Image中找到clockicon.png,这样icon就设好了,然后将Title命名为Date即可。
其他的四个item都是相同的操作,对应关系如下
BIDDatePickerViewController(clockicon.png,Title:Date)
BIDSingleComponentPickerViewController(singleicon.png,Title:Single)
BIDDoubleComponentPickerViewController(doubleicon.png,Title:Double)
BIDDependentComponentPickerViewController(dependenticon.png,Title:Dependent)
BIDCustomPickerViewController(toolicon.png,Title:Custom)
完成后的样子
至此,我们对于root controller的所有设置都完成了,编译运行一下程序,看看效果,之后在进行每个subcontroller的实现。
6)Date Picker
第一个实现的是Date Picker,首先打开BIDDatePickerViewController.h,添加如下代码
#import <UIKit/UIKit.h>

@interface BIDDatePickerViewController : UIViewController

@property (strong, nonatomic) IBOutlet UIDatePicker *datePicker;
- (IBAction)buttonPressed;

@end
声明一个UIDatePicker的Outlet,用于等会和DatePicker控件连接,然后声明一个Action事件,我们会添加一个button,会触发该事件。
接着打开BIDDatePickerViewController.xib,然后在Graphical Layout Area(简称GLA)中选中View,再打开Attributes inspector,在Simulated Metrics中找到Bottom Bar,并选择“Tab Bar”,如下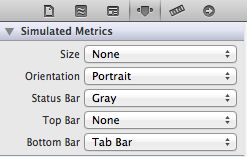
设置完成后,在GLA中会出现一条黑色区域,表示Tab Bar area,这样这个View的实际大小会把Tab Bar area给去掉,实际的高度变成411px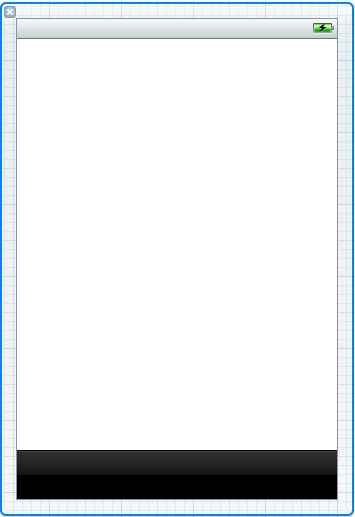
在Object library中找到Date Picker
并拖动到View的顶部,接着拖一个button放在DatePicker的下方,并命名为Select,完成后的效果如下
我们还需要一个设置,设置DatePicker的最大日期和最小日期,选中View上的DatePicker,然后打开Attributs inspector,在Date Picker栏找到Constraints,将2个checkbox勾上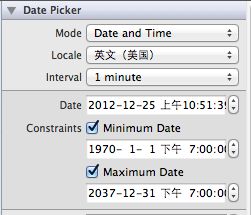
(其他的设置选项你自己也可以随便玩玩,看看DatePicker有什么变化)
7)连接Outlet和Action,写code
选中View上的button,打开connections inspector,在Sent Events中找到Touch Up Inside,将其连接到File's Owner下的buttonPressed action
选中File's Owner,control-drag到View中的DatePicker上,选择Outlet:datePicker
好了,所有的连接都完成了,下面就可以写code了
打开BIDDatePickerViewController.m,添加如下code
@implementation BIDDatePickerViewController
@synthesize datePicker;

......

- (void)viewDidLoad
{
    [super viewDidLoad];
    // Do any additional setup after loading the view from its nib.
    NSDate *now = [NSDate date];
    [datePicker setDate:now animated:NO];
}

- (void)viewDidUnload
{
    [super viewDidUnload];
    // Release any retained subviews of the main view.
    // e.g. self.myOutlet = nil;
    self.datePicker = nil;
}

......

- (IBAction)buttonPressed
{
    NSDate *selected = [datePicker date];
    NSString *message = [[NSString alloc] initWithFormat:@"The date and time you selectd is: %@", selected];
    UIAlertView *alert = [[UIAlertView alloc] initWithTitle:@"Date and Time Selected"
                                                    message:message
                                                   delegate:self
                                          cancelButtonTitle:@"Yes, I do"
                                          otherButtonTitles:nil];
    [alert show];
}
这些code应该比较容易理解,在viewDidLoad中初始化datePicker显示的日期,在viewDidUnload中释放datePicker,在buttonPressed方法中,首先获取datePicker当前选中的时间对象NSDate,然后赋给一个string,最后alert显示出来,非常简单。
点击Select按钮,一个alert框弹出
一切正常唯有时间不对,iphone上方显示的是11:13 AM,但是alert中显示的时间是03:11:13 +0000,这是它显示的是格林尼治时间,和中国的时差有8个小时,要解决这个问题,改写buttonPressed如下
- (IBAction)buttonPressed
{
    NSDate *selected = [datePicker date];

    NSTimeZone *zone = [NSTimeZone systemTimeZone];
    NSInteger interval = [zone secondsFromGMTForDate: selected];
    NSDate *localeDate = [selected  dateByAddingTimeInterval: interval];
    NSString *message = [[NSString alloc] initWithFormat:@"The date and time you selectd is: %@", loaclDate];
    UIAlertView *alert = [[UIAlertView alloc] initWithTitle:@"Date and Time Selected"
                                                    message:message
                                                   delegate:self
                                          cancelButtonTitle:@"Yes, I do"
                                          otherButtonTitles:nil];
    [alert show];
}
NSTimeZone *zone = [NSTimeZonesystemTimeZone]; // 获得当前设备的时区,即iphone的时区
NSInteger interval = [zone secondsFromGMTForDate: selected]; // 算出当前时区和GMT的时差是多少
NSDate *localeDate = [selected dateByAddingTimeInterval: interval]; // 在GMT的基础上加上加上相应的时差
好了,在此编译运行,点击button后,显示的时间和iphone上的一致了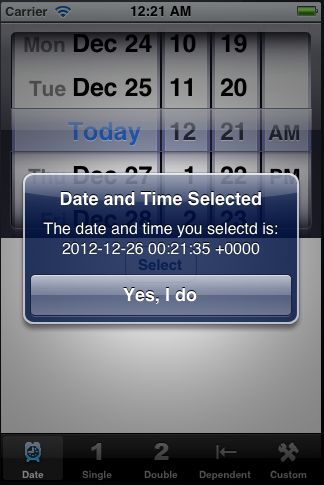
8)Single-Component Picker
DatePicker是一个特殊的picker,专门用于对日期进行选择,但是在很多时候,我们需要选择的内容都是需要我们自己制定的,在这个例子中,我们就将制定自己内容。
在这里例子中,我们会添加一个Picker View
在Picker中,每一个滚轴就是一个component,我们将使用delegate来定义Picker View中component的数量和数据的来源。
9)创建Outlet和Action
打开BIDSingleComponentPickerViewController.h,添加如下code
#import <UIKit/UIKit.h>

@interface BIDSingleComponentPickerViewController : UIViewController <UIPickerViewDelegate, UIPickerViewDataSource>

@property (strong, nonatomic) IBOutlet UIPickerView *singlePicker;
@property (strong, nonatomic) NSArray *pickerData;

- (IBAction)buttonPressed;

@end
首先添加了2个protocols,这2个protocols是必须的,PickerView的delegate和datasource都是源于它,然后声明了一个指向PickerView的对象,再声明一个保存PickerView数据的数列,最后声明了一个action,代码很简单。
10)添加Picker View,绑定Outlet和Action
选中BIDSingleComponentPickerViewController.xib,空出底部的Tab bar位置(Attributes inspector>Simulated Metrics>Bottom Bar>Tab Bar。在Object library中,找到Picker View,拖动到View的顶部,在拖一个button放在Picker View的下面,命名为Select,所有控件添加完毕
选中File's Owner,control-drag到Picker View上,选中singlePicker。
选中Picker View,打开connections inspector,拖动dataSource和delegate边上的圆圈到File's Owner上进行绑定,这样就告诉这个Picker View,它的dataSource和delegate都是BIDSingleComponentPickerViewController类
绑定Select按钮的Touch Up Inside的action为buttonPressed(方法和之前的一个例子一样)
ok,至此所有的控件和连接操作都已经完成,下面开始code部分。
11)写code
打开BIDSingleComponentPickerViewController.m,添加如下代码
#import "BIDSingleComponentPickerViewController.h"

@implementation BIDSingleComponentPickerViewController
@synthesize singlePicker;
@synthesize pickerData;

......

- (void)viewDidLoad
{
    [super viewDidLoad];
    // Do any additional setup after loading the view from its nib.
    NSArray *array = [[NSArray alloc] initWithObjects:@"Luke", @"Leia",
                      @"Han", @"Chewbacca", @"Artoo", @"Threepio", @"Lando", nil];
    self.pickerData = array;
}

- (void)viewDidUnload
{
    [self setSinglePicker:nil];
    [super viewDidUnload];
    // Release any retained subviews of the main view.
    // e.g. self.myOutlet = nil;
    self.singlePicker = nil;
    self.pickerData = nil;
}

......

- (IBAction)buttonPressed
{
    NSInteger row = [singlePicker selectedRowInComponent:0];
    NSString *selected = [pickerData objectAtIndex:row];
    NSString *title = [[NSString alloc] initWithFormat:@"You selected %@!", selected];
    UIAlertView *alert = [[UIAlertView alloc] initWithTitle:title
                                                    message:@"Thank you for choosing."
                                                   delegate:nil
                                          cancelButtonTitle:@"You're Welcome"
                                          otherButtonTitles:nil];
    [alert show];
}
一些必要的解释,在viewDidLoad中,声明一个数组,存放在PickerView的componnent中显示的数据。
buttonPressed方法中:
NSInteger row = [singlePicker selectedRowInComponent:0]; // selectedRowInComponent方法返回当前component滚到哪一行,后面的0表示最左边的一个component
NSString *selected = [pickerData objectAtIndex:row]; // objectAtIndex:row返回component中当前行的对象,这个例子中是NSString
其他的代码都比较简单,下面继续添加code,这次添加dataSource和delegate需要使用到的方法,这也是每个Picker View(不包括Date Picker)都需要实现的方法
#pragma mark -
#pragma mark Picker Data Source Methods

- (NSInteger)numberOfComponentsInPickerView:(UIPickerView *)pickerView {
    return 1;
}

- (NSInteger)pickerView:(UIPickerView *)pickerView numberOfRowsInComponent:(NSInteger)component {
    return [pickerData count];
}

#pragma mark Picker Delegate Methods
- (NSString *)pickerView:(UIPickerView *)pickerView titleForRow:(NSInteger)row forComponent:(NSInteger)component {
    return [pickerData objectAtIndex:row];
}
numberOfComponentsInPickerView告诉picker一共有几个component(滚轴),我们这个例子是SingleComponent,只有一个滚轴,因此返回1。这个方法有一个参数是传一个pickerview进来,如果一个view中有2个或2个以上的Picker View,就需要使用这个参数,告诉系统到底是在设置哪个Picker View的component的数量,如果只有1个Picker View就可以忽略该参数,我们这个例子就忽略了这个参数。
pickerView方法是返回dataSource的数量,告诉pick你有多少个数据需要显示。参数pickerView指明是哪个picker在调用,只有一个的话可以忽略该参数,参数component是picker中的第几个滚轴,如果只有一个滚轴,也可以忽略该参数。
以上是的2个方法都是属于dataSource,最后的一个方法是属于delegate的,Picker View的dataSource方法是必须实现的,而delegate方法是可选的,但必须要实现其中的一个,在这个例子中我们实现的是pickerView方法
pickerView方法在指定的picker和component中返回第row行数据,这个例子中的数据都来自NSArray,就返回array中的第row个数据即可。在这个方法中,只用到了参数row,其他2个参数不需要,因为我们只有1个pickerview和1个component。
至此,所有的Single component的所有code都写完了,编译运行,选择Tab Bar上的第二个item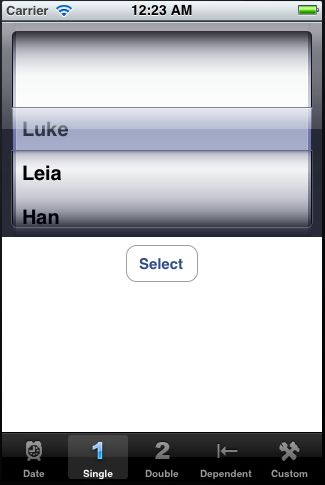
单击Select按钮,警告框弹出,显示哪一行的内容被选中了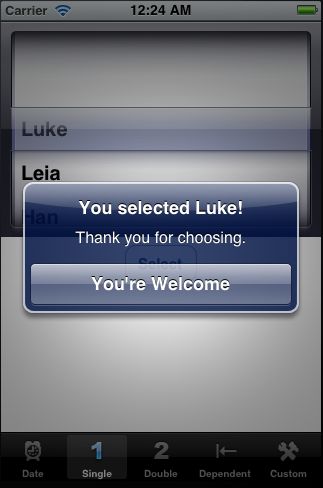
13)Multicomponent Picker
在这个例子中,将会有2个component,它们各自独立(没有关联),实现起来也很简单,只要准备2个NSArray,在返回component的数量的方法中返回2就可以了,下面进行具体的实现。
14)创建Outlet和Action
打开BIDDoubleComponentPickerViewController.h,添加如下code
#import <UIKit/UIKit.h>

#define kfillingComponent 0
#define kBreadComponent 1

@interface BIDDoubleComponentPickerViewController : UIViewController <UIPickerViewDelegate, UIPickerViewDataSource>

@property (strong, nonatomic) IBOutlet UIPickerView *doublePicker;
@property (strong, nonatomic) NSArray *fillingTypes;
@property (strong, nonatomic) NSArray *breadTypes;

- (IBAction)buttonPressed;

@end
上面的code应该很容易理解,定义了2个宏变量来区分左右2个component,这是一个很好的习惯,而且使代码更易读,然后添加了2个protocols,声明了一个指向PickerView的outlet,声明2个数组,分别保存左右2个component的数据,最后定义一个action,很简单。
15)添加Picker View,绑定Outlet和Action
打开BIDDoubleComponentPickerViewController.xib,设置view的Bottom Bar为Tab Bar,拖一个Picker View放到view的顶部,拖一个按钮放到Picker View的下面,并命名为Select,完成后的界面
选中File's Owner,control-drag到Picker View上,选中doublePicker。
选中Picker View,打开connections inspector,拖动dataSource和delegate边上的圆圈到File's Owner上进行绑定,这样就告诉这个Picker View,它的dataSource和delegate都是BIDDoubleComponentPickerViewController类
绑定Select按钮的Touch Up Inside的action为buttonPressed
16)写code
打开BIDDoubleComponentPickerViewController.m文件,添加如下代码
@implementation BIDDoubleComponentPickerViewController
@synthesize doublePicker;
@synthesize fillingTypes;
@synthesize breadTypes;

- (IBAction)buttonPressed
{
    NSInteger fillingRow = [doublePicker selectedRowInComponent:kfillingComponent];
    NSInteger breadRow = [doublePicker selectedRowInComponent:kBreadComponent];

    NSString *filling = [fillingTypes objectAtIndex:fillingRow];
    NSString *bread = [breadTypes objectAtIndex:breadRow];

    NSString *message = [[NSString alloc] initWithFormat:@"Your %@ on %@ bread will be right up.", filling,bread];

    UIAlertView *alert = [[UIAlertView alloc] initWithTitle:@"Thank you for your order"
                                                    message:message
                                                   delegate:nil
                                          cancelButtonTitle:@"Great!"
                                          otherButtonTitles:nil];
    [alert show];
}

......

- (void)viewDidLoad
{
    [super viewDidLoad];
    // Do any additional setup after loading the view from its nib.
    NSArray *fillingArray = [[NSArray alloc] initWithObjects:@"Ham",
                             @"Turkey", @"Peanut Butter", @"Tuna Salad",
                             @"Nutella", @"Roast Beef", @"Vegemite", nil];
    self.fillingTypes = fillingArray;

    NSArray *breadArray = [[NSArray alloc] initWithObjects:@"White",
                           @"Whole Wheat", @"Rye", @"Sourdough", @"Seven Grain",nil];
    self.breadTypes = breadArray;

}

- (void)viewDidUnload
{
    [super viewDidUnload];
    // Release any retained subviews of the main view.
    // e.g. self.myOutlet = nil;
    self.doublePicker = nil;
    self.fillingTypes = nil;
    self.breadTypes = nil;
}

......

#pragma mark -
#pragma mark Picker Data Source Methods

- (NSInteger)numberOfComponentsInPickerView:(UIPickerView *)pickerView {
    return 2;
}

- (NSInteger)pickerView:(UIPickerView *)pickerView numberOfRowsInComponent:(NSInteger)component {
    if(component == kBreadComponent)
        return [self.breadTypes count];

    return [self.fillingTypes count];
}

#pragma mark Picker Delegate Methods
- (NSString *)pickerView:(UIPickerView *)pickerView titleForRow:(NSInteger)row forComponent:(NSInteger)component {
    if(component == kBreadComponent)
        return [self.breadTypes objectAtIndex:row];

    return [self.fillingTypes objectAtIndex:row];
}
上面的code和在singlepicker中的基本一样,由于有2个component,因此在viewDidLoad中创建了2个数组,在numberOfComponentsInPickerView中返回2,这样PickerView就会创建2个component(滚轴),在DataSource的pickerView方法中,根据component来返回数组,在delegate的pickerView中根据component返回数据。很简单,然后编译运行程序,载入app后,选择Tab Bar上的第三个tab item,出现如下界面
17)Dependnet Components
前面的2个例子分别实现了1个componet和2个component,在这个例子中,也将实现2个component,但是这2个componet是联动的,当左边的component存放美国的各个洲(state),右边的component存放每个洲的邮政编码(zip),当左边的洲发生时,右边的邮政编码也会随之变化。另外在之前的例子中,显示在component中的数据都是写在code中的,这个不利于数据的更新,且如果数据量巨大,我们也不可能都写在code里面,在这个例子中,数据将存入一个property list(plist)文件,component的数据将从该文件中获取。
打开BIDDependentComponentPickerViewController.h文件,添加如下code
#import <UIKit/UIKit.h>
#define kStateComponent 0
#define kZipComponent 1

@interface BIDDependentComponentPickerViewController : UIViewController <UIPickerViewDelegate, UIPickerViewDataSource>

@property (strong, nonatomic) IBOutlet UIPickerView *picker;
@property (strong, nonatomic) NSDictionary *stateZips;
@property (strong, nonatomic) NSArray *states;
@property (strong, nonatomic) NSArray *zips;

- (IBAction)buttonPressed;

@end
唯一不同的是,多了一个NSDictionary对象,这个对象是用来存放关联数据的,存放之前提到的plist。
和前面2个例子一样,拖动一个Picker View和button到View上,并连接Outlet和Action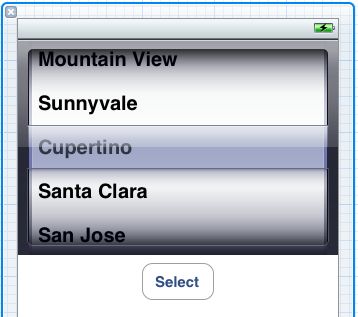
18)NSDictionary:statedictionary.plist
下载statedictionary.plist压缩包,并解压出里面的文件statedictionary.plist,将statedictionary.plist拖入到Project navigator中,放到Pickers目录下,点击statedictionary.plist文件,你会发现有茫茫多的数据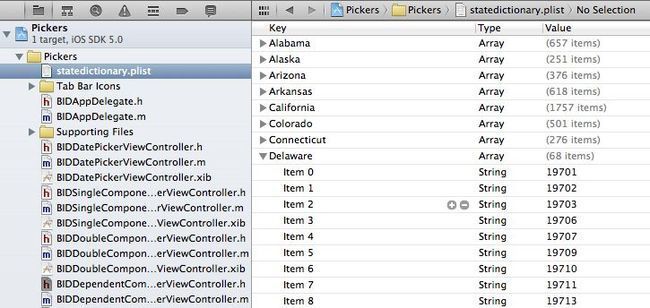
其实statedictionary.plist是一个xml文件,理解有序的将这些数据组织起来,供程序使用
19)写code
由于这次的code稍微有些不同,主要是在读取plist上面,因此我们分开写,打开BIDDependentComponentPickerViewController.m文件,首先添加如下code
#import "BIDDependentComponentPickerViewController.h"

@implementation BIDDependentComponentPickerViewController
@synthesize picker;
@synthesize stateZips;
@synthesize states;
@synthesize zips;

- (IBAction)buttonPressed
{
    NSInteger stateRow = [picker selectedRowInComponent:kStateComponent];
    NSInteger zipRow = [picker selectedRowInComponent:kZipComponent];

    NSString *state = [states objectAtIndex:stateRow];
    NSString *zip = [zips objectAtIndex:zipRow];

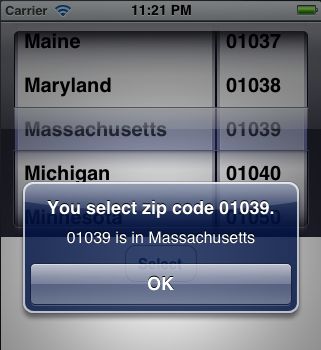
    NSString *title = [[NSString alloc] initWithFormat:@"You select zip code %@.", zip];

    NSString *message = [[NSString alloc] initWithFormat:@"%@ is in %@", zip, state];

    UIAlertView *alert = [[UIAlertView alloc] initWithTitle:title
                                                    message:message
                                                   delegate:nil
                                          cancelButtonTitle:@"OK"
                                          otherButtonTitles:nil];
    [alert show];
}
上面的code应该不需要过多的解释了吧,很简单,应该都可以看懂,接着添加viewDidLoad
- (void)viewDidLoad
{
    [super viewDidLoad];
    // Do any additional setup after loading the view from its nib.
    NSBundle *boundle = [NSBundle mainBundle];
    NSURL *plistURL = [boundle URLForResource:@"statedictionary" withExtension:@"plist"];

    NSDictionary *dictionary = [NSDictionary dictionaryWithContentsOfURL:plistURL];

    self.stateZips = dictionary;

    NSArray *components = [self.stateZips allKeys];
    NSArray *sorted = [components sortedArrayUsingSelector:@selector(compare:)];
    self.states = sorted;
    NSString *selectedState = [self.states objectAtIndex:0];
    NSArray *array = [stateZips objectForKey:selectedState];
    self.zips = array;
}
这里面的变化比较大,首先声明了一个NSBundle对象,这个对象在前几篇的例子中已经出现过(load一个xib),这里做一个比较详细的解释:bundle是一个特殊的文件夹,其中包含了程序会使用到的资源,这些资源包含了如图像、声音、编译好的代码、xib文件。对应bundle,cocoa提供了类NSBundle。
下面逐个对语句进行解释
NSBundle *bundle = [NSBundle mainBundle]; //这里的作用就是获取应用程序的主目录,然后在主目录中寻找需要的资源
NSURL *plistURL = [boundle URLForResource:@"statedictionary" withExtension:@"plist"]; //通过主目录来获取资源的路径(URL),这里寻找的资源是statedictionary.plist,有了资源的路径,就可以找到该资源
NSDictionary *dictionary = [NSDictionary dictionaryWithContentsOfURL:plistURL]; //NSDictionary就是通过资源的路径来获取资源,并读取里面的数据
self.stateZips = dictionary; //将dictionary赋stateZips
NSArray *components = [self.stateZips allKeys]; //获取statedictionary.plist中所有的<key>
NSArray *sorted = [components sortedArrayUsingSelector:@selector(compare:)]; //将获取的所有<key>按字母序进行排列(这里我只知道是排序的意思,后面的方法我还没有深究,先这样子用着)
self.states = sorted; //将排完序的数组赋给states(左边的component)
NSString *selectedState = [self.states objectAtIndex:0]; // 当启动程序的时候,左边的component默认是选择第一个值的,这里获得第一个值,然后根据这个值找到对应的zips,然后显示在右边的component中
NSArray *array = [stateZips objectForKey:selectedState]; // 根据<key>来获得对应的zips
self.zips = array; //然后将数组赋给zips
继续写code
- (void)viewDidUnload
{
    [super viewDidUnload];
    // Release any retained subviews of the main view.
    // e.g. self.myOutlet = nil;
    self.picker = nil;
    self.stateZips = nil;
    self.states = nil;
    self.zips = nil;
}
不多解释了
#pragma mark -
#pragma mark Picker Data Source Methods
- (NSInteger)numberOfComponentsInPickerView:(UIPickerView *)pickerView {
    return 2;
}

- (NSInteger)pickerView:(UIPickerView *)pickerView numberOfRowsInComponent:(NSInteger)component {
    if(component == kStateComponent)
        return [self.states count];

    return [self.zips count];
}
Picker的DataSource方法,第一个方法返回2,说明有2个component,第二个方法返回component中数据的个数,这里以component做为区分,如果是kStateComponent,返回左边component数据的格式,否则返回右边component数据的个数。
#pragma mark Picker Delegate Methods
- (NSString *)pickerView:(UIPickerView *)pickerView titleForRow:(NSInteger)row forComponent:(NSInteger)component {
    if(component == kStateComponent)
        return [self.states objectAtIndex:row];
    return [self.zips objectAtIndex:row];
}

- (void)pickerView:(UIPickerView *)pickerView didSelectRow:(NSInteger)row inComponent:(NSInteger)component {
    if(component == kStateComponent)
    {
        NSString *selectedState = [self.states objectAtIndex:row];
        NSArray *array = [stateZips objectForKey:selectedState];
        self.zips = array;
        [picker selectRow:0 inComponent:kZipComponent animated:YES];
        [picker reloadComponent:kZipComponent];
    }
}
Picker的delegate方法,第一个方法还是和以前一样的,第二个方法是重点,用来更新右边component的数据,更新的方法和viewDidLoad中的方法是一样的,首先判断是不是左边的component发生了变化,如果是,得到左边component的当前值,根据这个值获取相应的zips,然后将zips赋值给右边的component,接着选中右边component的第一个值,并以动画的形式选中,滚动到第一个值,最后重新载入右边的component。
好了,以编译运行程序了,程序运行后,选择第四个tabitem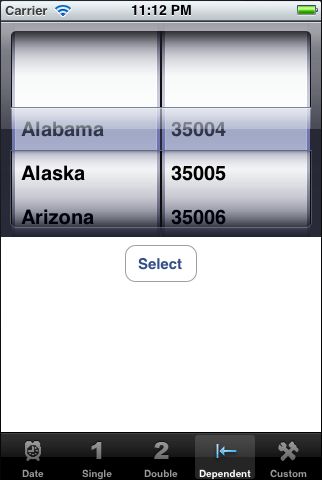
试着改变左边component的选项,右边的zips会跟着改变
程序似乎是做完了,但是并不完美,稍微往下滚动左边的component,会发现一些state的名字太长,没有完全显示出来,但是又发现右边的component有很多空白的地方被浪费了,因此最后能够拉长左边的component,缩短右边的component,方法很简单,在BIDDependentComponentPickerViewController.m中添加下面的方法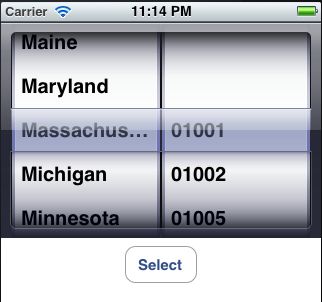
- (CGFloat)pickerView:(UIPickerView *)pickerView widthForComponent:(NSInteger)component {
    if(component == kZipComponent)
        return 90;
    return 200;
}
该方法也是一个delegate,它用来设置pickerview中各个component的宽度,再次编译运行程序,这次程序界面完美了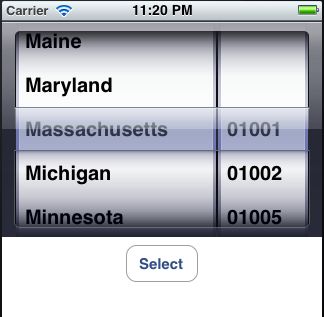
20)Custom Picker
这个内容在近几天会进行补充,请大家留意,谢谢!
