flask tutorial => make a blog :) flask 搭建博客系统从零开始!
please follow the tutorial from the official site :)
http://flask.pocoo.org/docs/
You could download the zipped file from this site : 下载离线版doc ,将更加方便查看。
You can download the documentation in other formats as well:
要搭建博客,就需要至少有几个工具。
1、搭建博客的工具——————python,建议搭配virtualenv(这点是从pyramid 框架中学来的 :) ),这样将非常有利于后来的发展,好搭配各种环境库,这样也容易打包
2、需要知道的程序语言——————python, html, javascript, 一些计算机方面的常识
3、零活一点,多查阅docs,不会的要去用google,irc等等
Please follow this tutorial : http://flask.pocoo.org/docs/tutorial/#tutorial
这里我使用的是linuxmint 13 操作系统。总体来说非常好用。
下面是具体实现步骤
一、安装virtualenv
sudo apt-get install python-virtualenv -y
二、创建环境
virtualenv env_27_flask --no-site-packages
在当钱目录下创建一个文件夹 env_27_flask , 是没有网站原包的虚拟环境,这样的很干净。(pyramid学来的 )
三、在虚拟环境中安装flask
cd env_27_flask
./bin/pip install flask # to install flask in the virtualenv folder
等待一段时间后,会自动下载一些依赖包。环境里面就安装了flask。 (pip 和 easy_install 区别,前者官方,后者比较随意,详情google之 ,plz)
四、创建一个flask项目
mkdir -p ./flaskr/{static, templates}
说明 目录
./flaskr 项目总目录
./flask/static 用于存放静态页面的目录
./flask/templates 用于存放网页模板的目录
五、构建数据表(这是为未来保存博客内容考虑的)
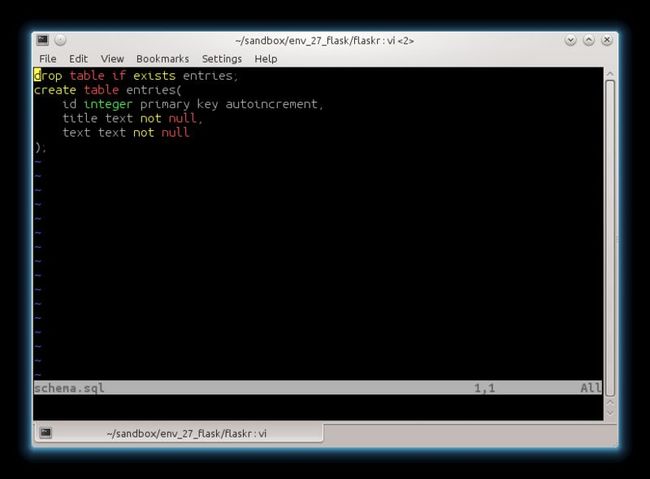
如下图:
代码在:
drop table if exists entries;
create table entries(
    id integer primary key autoincrement,
    title text not null,
    text text not null
);
准备使用的数据库产品是sqlite3, 当然类似的数据库产品MySQL, PostGRESQL也都是可行的。
保存在 ./flaskr 目录下
六、新建app
详情:http://flask.pocoo.org/docs/tutorial/setup/#step-2-application-setup-code
1)新建一个 flask.py 的文件,其引用的模块内容应该有
from flask import Flask, request, session, g, redirect, url_for, \
     abort, render_template, flash
解释
Flask 用于做新建app的一个类。能生成一个新得app对象。 请看下面的代码例子
request 是网页上表单传来的GET 或者 POST 的请求。 可以用 request.method (这个变量有两个选项,一个是POST,一个是GET,在请求发送的时候都已经在原HTML表单中定义了), request.form['title'], request.form['text'] (意思是来自表单中 html 标签 name='title' 所提交的内容)
session 用来和cookie配合,判断用户是否登录的。这个东西是个好东西阿。
g 是在用来html页面访问URL, 发送一些GET、POST请求的时候, 用来从数据库里面提取数据,每次都在before request (建立数据库会话), 和 after request(关闭数据库会话) 自动发生的。 具体结合 装饰器 @app.before_request @app.after_request 来使用的。请看下面的实例代码
redirect 将会返回一个自动跳转页面命令,在装饰器 @app.route('/path/to', methods=['POST或者GET']) 的作用下,将返回一个html自动跳转页面命令,也就是说,当用户点击了含有装饰器为 @app.route('/path/to', methods=['POST或者GET']) 其 最后有 return redict(“一个URL-B”)的链接, 将会自动转到 www.xxxx.com/URL-B 的链接页面上。
url_for 一般配合 redirect 使用。url_for 的更多内容请参考: http://flask.pocoo.org/docs/quickstart/#url-building
>>> from flask import Flask, url_for
>>> app = Flask(__name__)
>>> @app.route('/')
... def index(): pass
...
>>> @app.route('/login')
... def login(): pass
...
>>> @app.route('/user/<username>')
... def profile(username): pass
...
>>> with app.test_request_context():
...  print url_for('index')
...  print url_for('login')
...  print url_for('login', next='/')
...  print url_for('profile', username='John Doe')
...
/
/login
/login?next=/
/user/John%20Doe
url_for 和 redirect 配合使用后,就会重新定向到一个route。 而被这个route装饰的程序,就会返回其应有的东西。具体请看下面的详尽代码案例。
abort 故名思意,请参考http://flask.pocoo.org/docs/api/?highlight=abort#flask.abort
render_template, 会将参数导入到一个template中,template有模板引擎标记语言。这里flask默认的是jinja2. 详情看下面的代码
2) 新建配置环境内容,需要大写!
请看下面的内容解释
其中app.config.from_object(__name__)
和 app.config.from_envvar('FLASKER_SETTINGS', silent=True)
相互补充,各有各的好处。上图也说了,当有大量的不同的配置的时候,第二者就比较科学方便了。
更多关于app 环境配置的内容,请访问:http://flask.pocoo.org/docs/tutorial/setup/#step-2-application-setup-code
3)、定义建立到数据库的方法
这样还不完整,因为,还没有建立数据库表格内容。所以,还需要create database. 上面仅仅是为了未来方便。
4)新建数据表内容
http://flask.pocoo.org/docs/tutorial/dbinit/#step-3-creating-the-database
这个链接内的内容很详细,这里不做赘述了。简单的说就是数据库初始化。
简单的使用方法如下,这样的方法是新做一个表,按照schema结构:
sqlite3 /tmp/flaskr.db < schema.sql
5)处理请求与数据库之间的链接
Request Database Connections
http://flask.pocoo.org/docs/tutorial/dbcon/#step-4-request-database-connections
在这里将体现前面引入模块 from flask import g 的妙处
flask将请求分为两种,于是用两种装饰器,
一种@app.before_request 这种是为了在获得请求访问数据库内容前,事先做好与数据库的连接准备
另外一种@app.after_request 这种是在和数据库完成数据访问后,自动关闭与数据库的连接,这样将节省资源,必须的
6)添加http URL访问路径 view functions
http://flask.pocoo.org/docs/tutorial/views/#step-5-the-view-functions
[1] 关于路径和模板直接的关系
在这个例子中,将会有
比如说路径 “/” 会去访问数据库内容。由于前面的from flask import g 的杰出贡献,我们只管连接获取就好了,不用去考虑新建数据库连接或者关闭数据库连接了。省了很多代码和脑细胞。
对代码
@app.route('/')
def show_entries():
    cur = g.db.execute('select title, text from entries order by id desc')
    entries = [dict(title=row[0], text=row[1]) for row in cur.fetchall()]
    return render_template('show_entries.html', entries=entries)
中的
render_template('show_entries.html', entries = entries) # 这里把上面定义的方法的entries 变量导入到 模板 show_entries.html 中的entries 变量中了。 注意,这里左边的entries是show_entries.html 中的,右边的entries 是该方法中的变量。
[2] 增加新的分录
http://flask.pocoo.org/docs/tutorial/views/#add-new-entry
这里会有体现session的用法,只有当session.get('logged_in') 存在(即用户登录了)的时候才能程序往下进行。不然这里就要体现 abort(401) (来自 from flask import abort)的功力了。
[3] 处理登录和登出 login and logout
[3.1] login
这个是要和网页模板之间紧密相连的,jinja2 模板引擎里面有个很好的选项是 extend, 在下面我将会细讲。
上面代码就是说明,两个问题
1.当以这种方式,上图是POST和GET 访问URL /login 的时候,会指向 login.html 页面
2.会将一个变量传递给html模板 error = error , 而error的内容具体有里面POST或者GET的内容是否跟应用匹配而决定的
就这么两个事儿。
上面的图中代码有 flash 真的,这个和jinja2配合的很不错。jinja2模板引擎里面有一个命令叫
get_flashed_messages()
比较人性化。具体请结合事成的blog自我感觉。
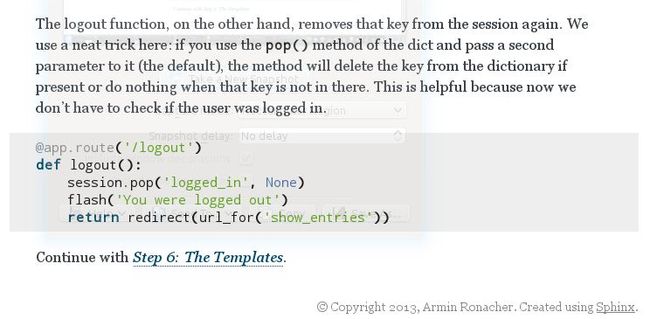
[3.2] logout
将 session.pop('logged_in', None) 干掉了'logged_in' 这个元素,然后又flash了一下。重新指向方法为'show_entries'的URL页面。
也就是说没登录上,可以看博客。登录上了不仅可以看博客,还有一个博客添加内容。
观察代码后,综合分析一下
logout 的状态是 没有登录, 重新定向到 url_for('show_entries')
login 的状态是 已经登录 分两个 1、登录成功 也是重新定向到 url_for('show_entries') 2、没有登录成功,还是一直返回 render_template('login.html', error=error)
那么,既然login, logout 两者状态不同,但是都能返回到URL url_for('show_entries') ,所以,一定在模板 'show_entries' 中,有对login 与否的 session有判断。不然login后为什么会有添加博客的form表,而logout的没有?!
查看一下模板show_entries源码,如下几行就是造成是否有权利写博客的原因。
不出所料呀!
不出所料吧。
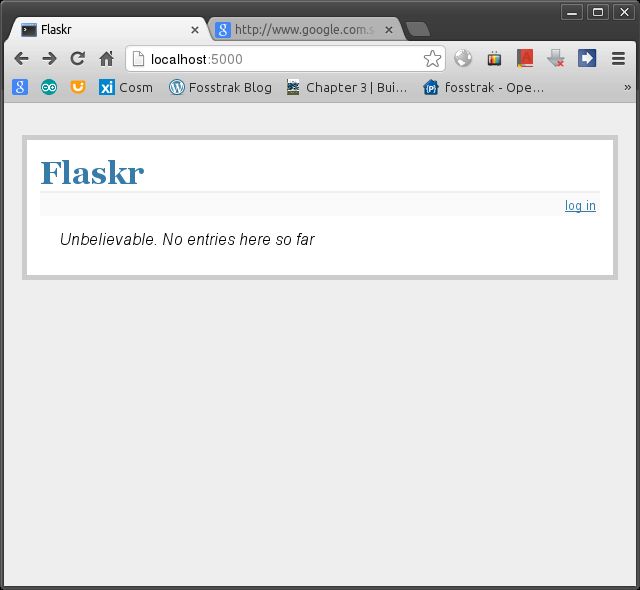
看看如实效果图
下面是 没有登录的 或者是 logout状态后的
上图不能自由填写博客内容,只能浏览博客。
下面的图片是登录后的
不同点就在于 login 之后的,就可以填写博客内容啦。
[4]、网页模板
http://flask.pocoo.org/docs/tutorial/templates/#step-6-the-templates
上面是为了演示所以先展示了做好的图片。这里将介绍为什么是这样的模板。
不同于 Markup 或者 |saft 过滤器 一般我会这样用
from cgi import escape
return escape(a) # 这里是将本来是HTML格式的a, 以反义符号(就是不转换HTML代码, 详情请看 http://www.w3school.com.cn/html/html_entities.asp )
用法都是一样的
<!doctype html>
<title>Flaskr</title>
<link rel=stylesheet type=text/css href="{{ url_for('static', filename='style.css') }}">
<div class=page>
  <h1>Flaskr</h1>
  <div class=metanav>
  {% if not session.logged_in %}
    <a href="{{ url_for('login') }}">log in</a>
  {% else %}
    <a href="{{ url_for('logout') }}">log out</a>
  {% endif %}
  </div>
  {% for message in get_flashed_messages() %}
    <div class=flash>{{ message }}</div>
  {% endfor %}
  {% block body %}{% endblock %}
</div>
上面我们有提过关于session.logged_in 的判断机制问题。这里在模板 show_entries.html 中又会体现。
{% extends "layout.html" %}
{% block body %}
  <h2>Login</h2>
  {% if error %}<p class=error><strong>Error:</strong> {{ error }}{% endif %}
  <form action="{{ url_for('login') }}" method=post>
    <dl>
      <dt>Username:
      <dd><input type=text name=username>
      <dt>Password:
      <dd><input type=password name=password>
      <dd><input type=submit value=Login>
    </dl>
  </form>
{% endblock %}
上面也说过,jinja2的模板引擎有个好处就是 能继承 {% extends 'layout.html' %}
上面的 show_entries.html 继承了 layout.html
login.html 也继承了 layout.html
其直面表管就是都有了网页的上半部分,无论是否登录还是别的登录页面。很科学的呀!
[5]、添加样式表
http://flask.pocoo.org/docs/tutorial/css/#step-7-adding-style
保存到./flaskr/static/style.css 中就okay了
[6]、开始测试网站
以上代码全部为手工,请在复写的时候注意不要范低级错误。把debug选项打开,将有利于知道哪里出现问题。
使用
#在flaskr目录下使用
$../bin/python flaskr.py
http://flask.pocoo.org/docs/tutorial/testing/#bonus-testing-the-application
更多关于flask的网站调试内容,将在这里展示:http://flask.pocoo.org/docs/testing/#testing-flask-applications
附上自己写的代码及英文注释(重点):
flaskr.py
# all the imports
import sqlite3
from flask import Flask, request, session, g, redirect,url_for, abort, render_template, flash

# this module is used to auto-closing context session when \
# sql database operation is finished
# it has the same function of " xxx.close() "
#######################################
# con = sqlite3.connect('census.db')
# cur = con.cursor()
# cur.execute('CREATE TABLE Density(Region TEXT, Population INTEGER, Area REAL)')
# [and lots of SQL operation]
# cur.close()
# con.close()
#######################################
# Please visit http://www.cnblogs.com/spaceship9/archive/2013/04/25/3042870.html
#######################################
from contextlib import closing


# configuration
DATABASE = '/tmp/flaskr.db'
DEBUG = True
SECRET_KEY = 'development key'
USERNAME = 'admin'
PASSWORD = 'default'

# create our little application :)
app= Flask(__name__)

# [ Flask basic settings ]
# from_object() will look at the given object ( if it's a string it will \
# import it) and then look for all uppercase variables defined there. In our \
# case, the configuration we just wrote a few lines of code above. You can \
# also move that into a separate file
# [Note:] Flask has two ways to import configuration files
#               1. app.config.from_object(__name__)
#               2. app.config.from_envvar('FLASKR_SETTINGS', silent=True)
# [In this case] we choose way 1.
# Here we see

app.config.from_object(__name__)


# This will create a environmental variable called FLASKR_SETTINGS to specify \
# a config file to be loaded wich will then override the default values. \
# The silent switch just tells Flask to not complain if no such environment key\
# is set.
app.config.from_envvar('FLASKR_SETTINGS', silent=True)


# The secret_key is needed to keep the client-side sessions secure.
# Choose the key wisely and as hard to guess and complex as possible


# [ prepare for database]
# *connect db*
def connect_db():
    return sqlite3.connect(app.config['DATABASE'])
# [in this case] app.config['DATABASE'] ==> DATABASE = '/tmp/flaskr.db'


# *initialize db*
def init_db():
    with closing(connect_db()) as db:
        with app.open_resource('schema.sql', mode='r') as f:
            db.cursor().executescript(f.read())
        db.commit()

# [organical solution: request with database for opening and closing ]
# organically open database session before request
@app.before_request
def before_request():
    g.db = connect_db()

# organically close database session after request
@app.teardown_request
def teardown_request(exception):
    db = getattr(g,'db',None)
    if db is not None:
        db.close()


# [the view functions]
# *show entries*
@app.route('/')
def show_entries():
    cur = g.db.execute('select title, text from entries order by id desc')
    # you gonna love dict to the utmost :)
    entries = [ dict(title = row[0], text = row[1]) for row in cur.fetchall()]
    return render_template('show_entries.html', entries = entries)


# *add new entry*
@app.route('/add', methods=['POST'])
def add_entry():
    if not session.get('logged_in'):
        abort(401)
    g.db.execute('insert into entries (title, text) values (?,?)',[request.form['title'], request.form['text']])
    g.db.commit()
    flash('New entry was sucessfully posted')
    return redirect(url_for('show_entries'))    # redirect the URL where is hooked up with
                                                # function 'show_entries'

# [security note]
# Login and logout
# *login*
@app.route('/login', methods = ['GET', 'POST'])
def login():
    error = None
    if request.method == 'POST':
        if request.form['username'] != app.config['USERNAME']:
            error = 'Invalid username'
        elif request.form['password'] != app.config['PASSWORD']:
            error = 'Invalid password'
        else:
            session['logged_in'] = True
            flash('You were logged in')
            return redirect(url_for('show_entries'))
    return render_template('login.html', error = error)


# *logout*
@app.route('/logout')
def logout():
    session.pop('logged_in',None)
    flash('You were logged out')
    return redirect(url_for('show_entries'))


if __name__=="__main__":
    app.run(host='0.0.0.0',debug=True)
项目目录文件结构:
其中flashr.pyc 是临时文件
layout.html~ 是临时文件,layout.html 才是使用的模板。
好了,步骤就基本上是这样的。从0开始,一步一步的就能用flask开发博客了。
以后我会介绍一些关于sqlalchmy 还有 一些别的比如JSON, Ajax, RESTful 等技术使用。这里也mark一下。
Happy Coding :)


